
SB2C Helldiver
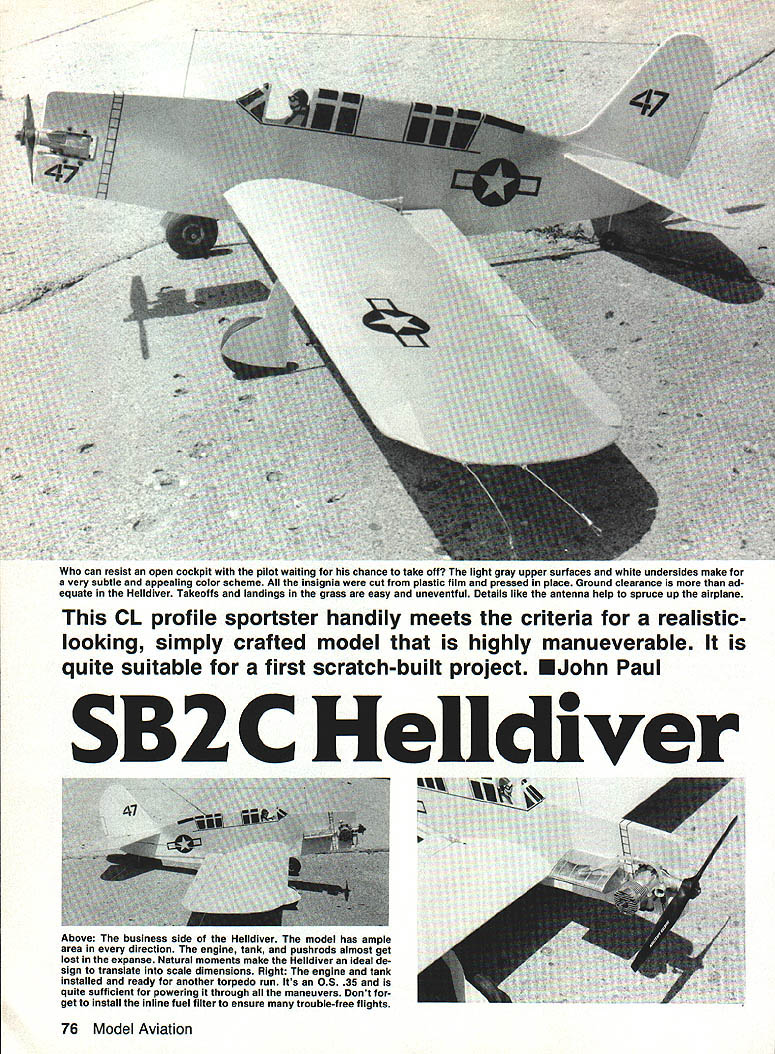
My goal for the project was a good-looking scale profile model that would fly aerobatics, be rugged enough for weekend practice, and have distinctive looks with lots of character. I looked at Navy carrier-based airplanes for potential subjects and chose the SB2C Helldiver. Probably the least-modeled Navy carrier aircraft, it has a long nose, ample wing area, a decent tail moment, generous side area and striking color profiles. Squadron/Action Publications' Helldiver (In Action series) helped clinch the decision.
Construction
The model uses standard construction techniques and keeping it light is important. The wing-tip structure is simply made by extending the spars to meet the wing-tip sheeting. The documentation drawings inspired the project and the construction techniques make the SB2C an ideal first-time scratch-built project.
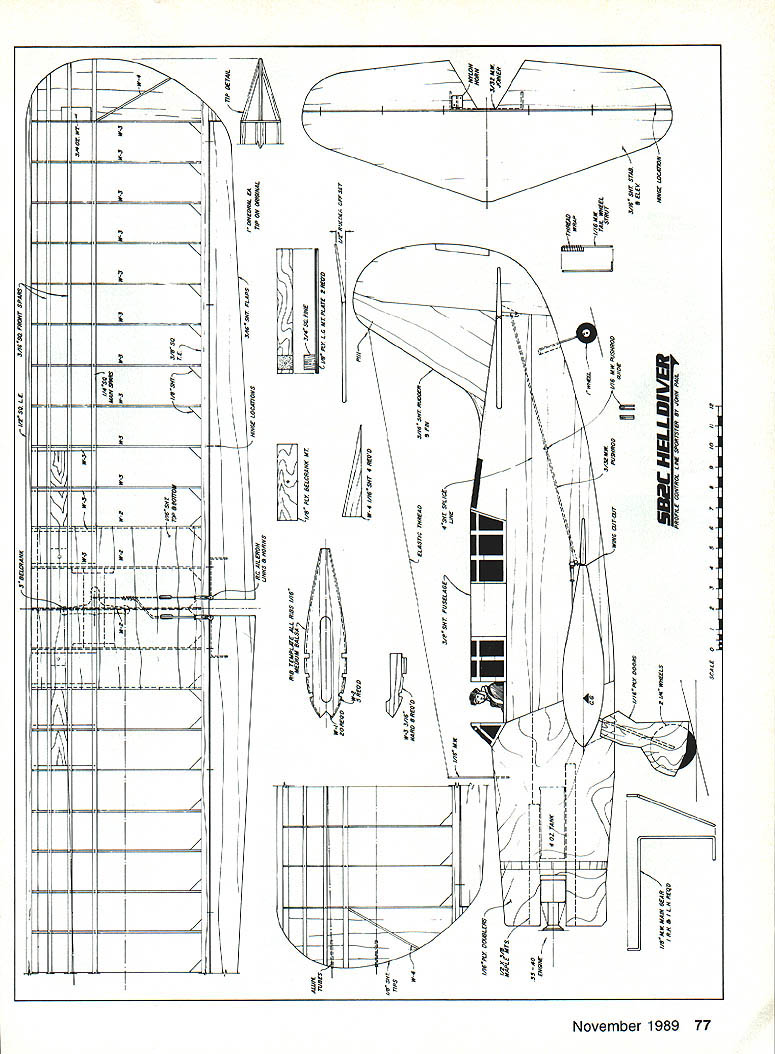
Some modelers may recognize a Dick Mathis–style multispar wing design. I've used this multispar approach for years — it is very light, fast-building and strong. The plan shows a small amount of dihedral; dihedral may be omitted to simplify construction, but a little dihedral improves the wing's appearance. If you build dihedral, use the flap linkages indicated on the plan.
Fuselage
Fuselage building techniques are conventional. The tricky part is edge-joining the fuselage sheeting. Use two sheets of 3/32-inch balsa joined edge-to-edge and trim them to fit without gaps. The two sheets usually fit well together with minimal sanding.
I used cyanoacrylate (CyA) glue to join the sheets because it is fast-acting and strong. Use white glue around the nose area for a good bond. If you do not want a pilot in the cockpit, omit the figure from the canopy area.
Cut out the fuselage bottom for the wing mounting as shown on the plan. Fit the wing and then reinstall and epoxy the bottom fuselage section in place. Trim and fit gaps, and use CyA where appropriate for final joins.
Tail surfaces
Choose medium-light sheeting that is flat for the tail surfaces. You will likely need to splice two sheets together for adequate width.
Wing
Since all but the center-section ribs are identical, stack-saw the rib blanks on a bandsaw, then drill the lead-out holes and cut the spar notches. Follow the same procedure for the landing gear false ribs.
Assembly steps:
- Position the main spars and the leading and trailing edges over the plan to mark rib locations.
- Slide the lower main spar ribs in place.
- Fit the top spar and the top and bottom turbulator spars into the rib notches.
- Pin the leading and trailing edges as needed.
- When alignment looks correct, slip large rubber bands chordwise over the wings to hold the assembly.
- Brush white glue on all sides of every joint. Pin the wing to the bench and prop up the trailing edge with blocks to check for warps while drying.
After the glue sets, add tips, tip weight, lead-out guide tubes, bellcrank and mount, landing-gear plates and false ribs, gussets, pushrods and planking. If adding dihedral, include dihedral braces at all spars and cover a 2-inch-wide band of lightweight glass cloth over the center joint of the wing after planking.
Install the flaps using nylon or pin-style hinges. If you have no experience with flapped models, you may choose to glue the flaps in place instead of making them functional.
Make the wing mounting cutout in the fuselage bottom as shown on the plan and take time to ensure good alignment when mounting.
Elevator, control horns, pushrods, and clevis
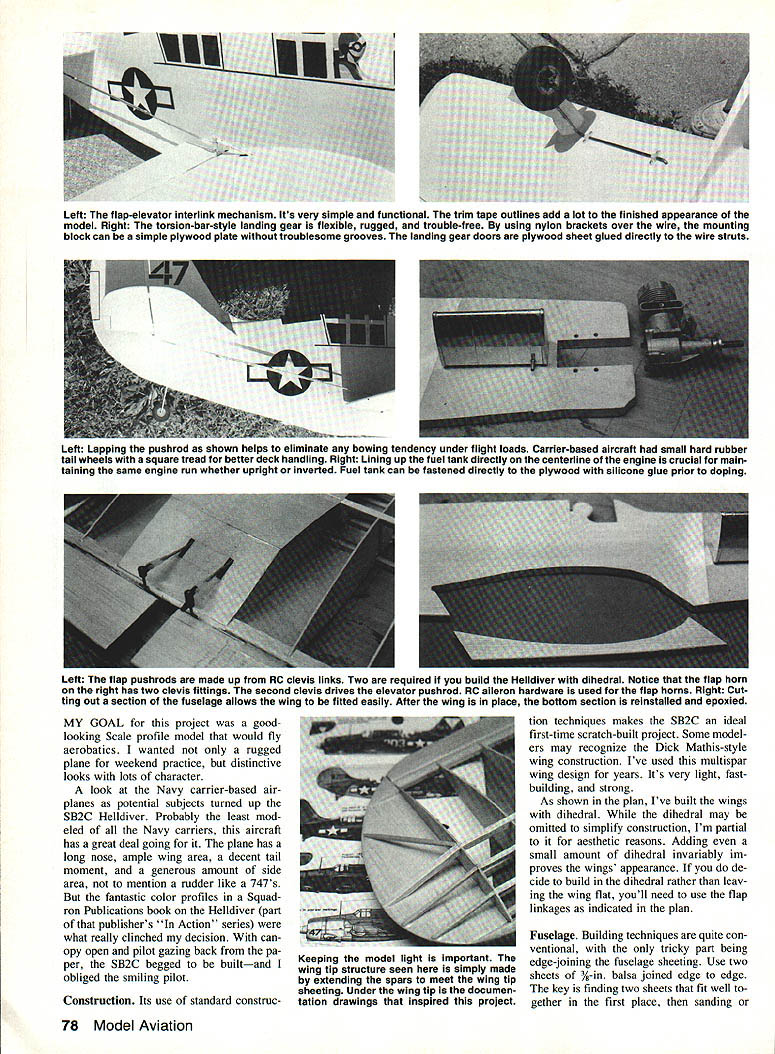
The control system uses pushrod linkage. I prefer two long RC-style clevis rods — one from the elevator horn and one from the flap horn. Allow them to overlap about 4 inches, then wrap and solder them together to produce a pushrod that resists bending under compression. Alternatively, use the pushrod guide shown on the plan.
The flap horns require two clevis fittings — the second clevis drives the elevator pushrod. Standard R/C aileron hardware can be used on the flap horns.
Install the tailwheel and strut. For a carrier-style aircraft, a small hard-rubber tailwheel with a square tread gives better deck handling.
Final assembly and finishing
I’ve become partial to silicone glue for attaching fuel tanks. It anchors the tank securely, dampens engine vibration, and can be applied before doping the fuselage. Line up the fuel tank on the engine centerline for consistent running upright or inverted and install an inline fuel filter for trouble-free operation.
Silicone glue also works well for landing-gear doors. Coat the inside of the door liberally and hold them with masking tape until set. Use nylon landing-gear clips to hold gear to the wings; clips with a premolded hump save weight because they can be mounted to a plywood plate instead of cutting grooves into a heavy mounting block. A torsion-bar–style landing gear is flexible, rugged and trouble-free. Use plywood plates to distribute landing loads where necessary and be careful when fitting landing-gear-door grooves — plywood glued directly to the wire struts works well.
Cover wood surfaces with tissue to seal the grain and add strength; wings can be covered with plastic or tissue. I used silkspan. After shrinking the covering, apply about five coats of clear dope, then the color. The prototype features light-gray upper surfaces and white undersides. Mask and paint the canopy. Black trim tape or black contact film works for insignia and markings; adhere with a coat of clear dope around the edges to resist fuel seepage.
Flying
Bolt on the engine (the prototype used an O.S. .35), fit the wheels, and check the balance point. The prototype balanced correctly without additional lead.
At the flying field the Helldiver proved dependable. Performance was outstanding in round maneuvers and quite respectable in square figures. The ample side area helps the model stay out on the lines with no trouble. Ground clearance is adequate and takeoffs and landings on grass are easy and uneventful.
Expect some quizzical glances if you fly the model inverted with the canopy open — it looks odd but charming with an open-cockpit pilot waiting to take off.
Tips and notes
- If you prefer a simpler build, omit dihedral and glue the flaps in place instead of making them functional.
- Use CyA for quick strong joins and white glue or epoxy for slow, strong joints at major assemblies.
- When gluing planking and other large sheets, check carefully for warps as the glue dries.
- Use a 2-inch-wide band of lightweight glass cloth over the wing center joint for extra strength when dihedral is included.
- Lapping and soldering overlapping pushrods helps eliminate bowing under flight loads.
- The model’s business area in front of the engine provides ample space for the tank and pushrods; plan placements to keep the center of gravity favorable.
- Install the fuel tank before doping and secure it with silicone glue to reduce vibration and movement.
- Don’t forget an inline fuel filter to ensure consistent engine performance.
The SB2C Helldiver meets the goals of being simple, realistic-looking, and highly maneuverable — a suitable choice for a first scratch-built profile sportster.
Transcribed from original scans by AI. Minor OCR errors may remain.

