
SCALE SCRATCH-BUILDING FROM PAPER
Ken Long
Years ago, when my brother was 14 and I was 12, he hit on the idea of building airplanes using Tinker Toy™ frames, then cutting and pasting various thicknesses of paper from magazine covers and cereal boxes. Of course, these models were too flimsy to fly, but we thought they looked great—and it was a lot of fun creating something together.
After 40-plus years of building stick-and-tissue balsa, plastic, and foam airplanes (mostly Control Line Scale), I decided to try paper once again.
I had built several practice models from corrugated paper box material. They flew well, but when covering the outside this material had to be scored on the inside to go around the curve. This produced more of an octagonal look rather than a smoothly contoured surface. That led to the idea of using paper of various calipers (thicknesses) and weights to produce a scale model that would more closely resemble the prototype.
The basic construction is much the same as built-up balsa, but substituting the fuselage formers and wing ribs with corrugated paper box material, then covering with various thicknesses of paper.
Advantages of this type of construction:
- It is relatively inexpensive.
- You can put surface detail on your model as you build it (panel lines, rivets, and access panels).
- It makes a durable model that in many ways is stronger than other forms of construction.
Choose a subject that has a high percentage of straight, fine curves, with a low percentage of compound curves. A P-47, with its barrel-shaped fuselage, would not make a good subject; a Hellcat would be excellent. Many aluminum-skinned aircraft, both civil and military, lend themselves well to paper modeling.
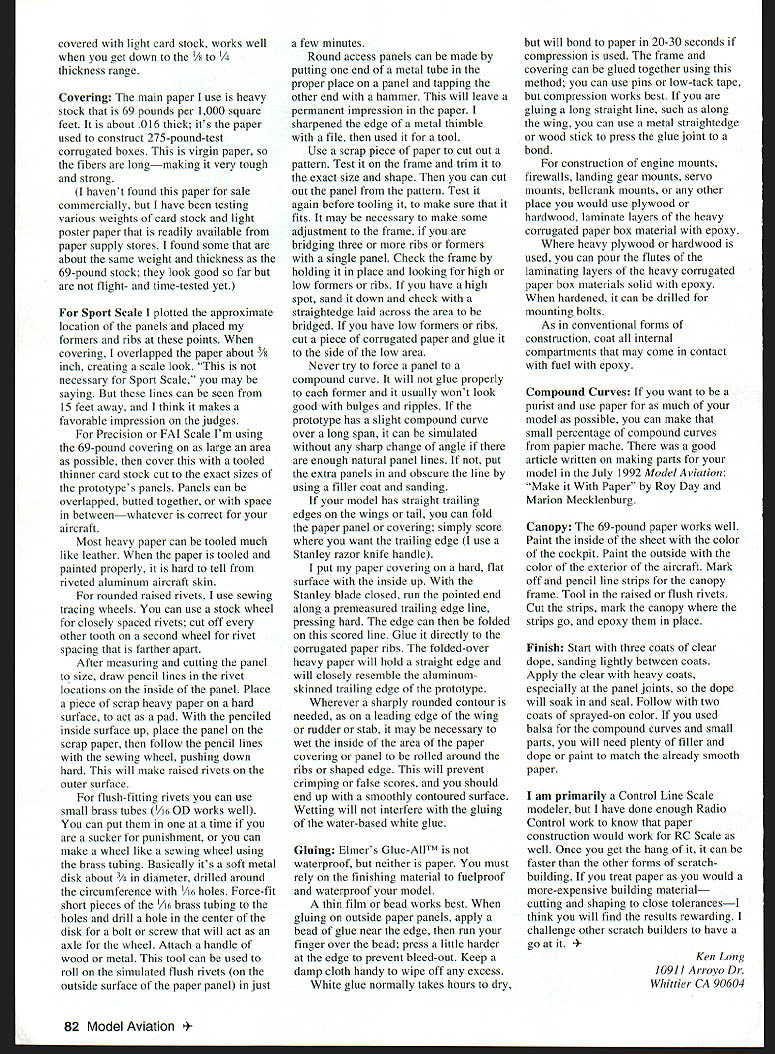
I chose the Ju-87D Stuka for my first paper Sport Scale project. It has a 60-inch wingspan. Flying weight is just more than six pounds, and it is agile enough to do a wingover. It has been flown more than 50 times and has won five major contests, including Nationals and Regionals.
Materials
For the frame, sheets cut from corrugated paper boxes are used. Work with the idea that everything from the balance point forward is heavy and strong, and everything to the rear is as light as possible and only as strong as needed.
Most corrugated paper boxes are made from what is known as C-flute (groove). It averages about 1/16" thick, depending on the caliper of paper used in its construction, and is the most desirable for frame construction. To measure the thickness, make a fresh cut, as the edges of a box tend to get mashed down in manufacturing.
A box used to hold a heavy appliance such as a TV or a washing machine is made from heavy corrugated. It can be used for cutting out fuselage formers forward of the balance point. Firewalls, engine mounts, bellcrank mounts, wing spars, and some wing ribs (where strength is needed) can be cut from heavy corrugated.
Lightweight corrugated paper (for framework to the rear of the balance point) can be obtained from large master cartons used for light products, such as potato chips or paper towels.
Most corrugated paper boxes have a box maker's certificate stamp on the bottom that will tell you the test. For our purposes, 250- to 350-pound test would be considered heavy; 150- to 200-pound test would be considered light.
You will need:
- White paper glue such as Elmer's Glue-All™.
- Five-minute epoxy.
- 30-minute epoxy.
Tools
- A good sharp pair of scissors.
- A Stanley box knife (razor).
- A metal straightedge.
Construction methods
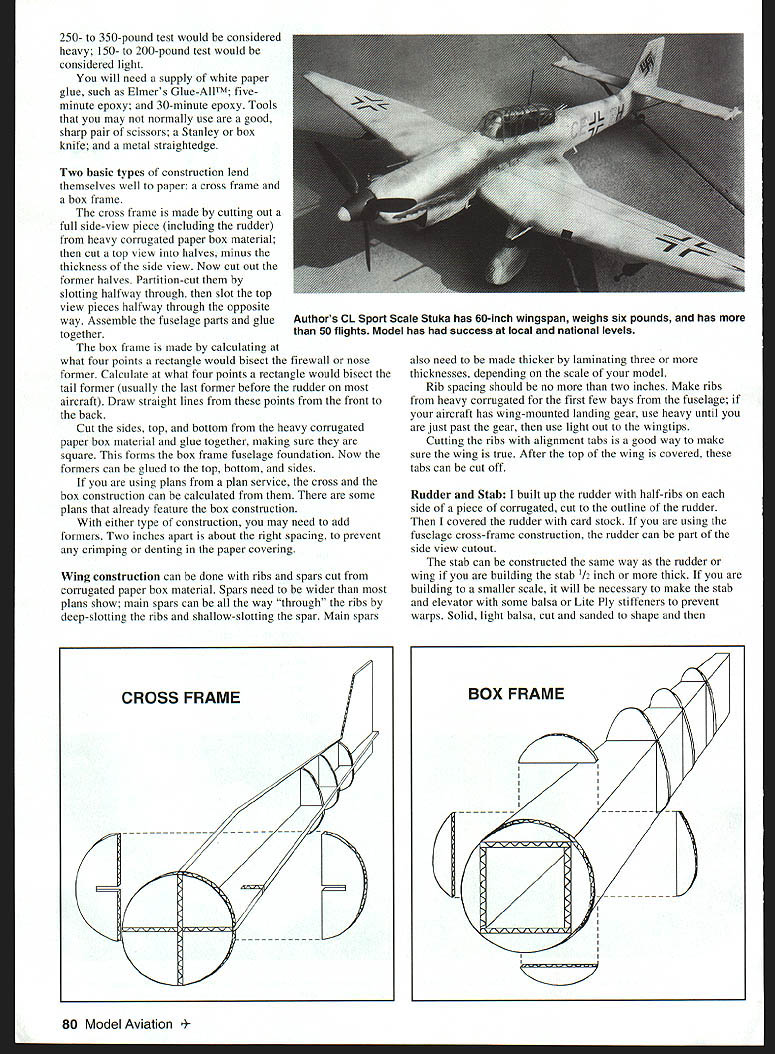
Two basic types of construction lend themselves well to paper—cross-frame and box-frame.
#### Cross-frame Cut out the full side-view piece (including rudder) from heavy corrugated paper box material. Cut top-view halves minus the thickness of the side view. Cut out former halves. Partially cut slots (partition-cut) halfway through the top-view pieces, cutting the opposite slot halfway through the other way. Assemble fuselage parts and glue together.
#### Box-frame Calculate what four points of a rectangle would bisect the firewall (nose former). Calculate what four points of a rectangle would bisect the tail former (usually the last former before the rudder on an aircraft). Draw straight lines between points front and back. Cut sides, top, and bottom from heavy corrugated paper box material and glue together, making sure the assembly is square. This forms the box-frame fuselage foundation. Formers can then be glued to the top, bottom, and sides using the plans. Some plans already feature box construction. Either type of construction may need added formers. Two inches apart is about right spacing to prevent crimping or denting the paper covering.
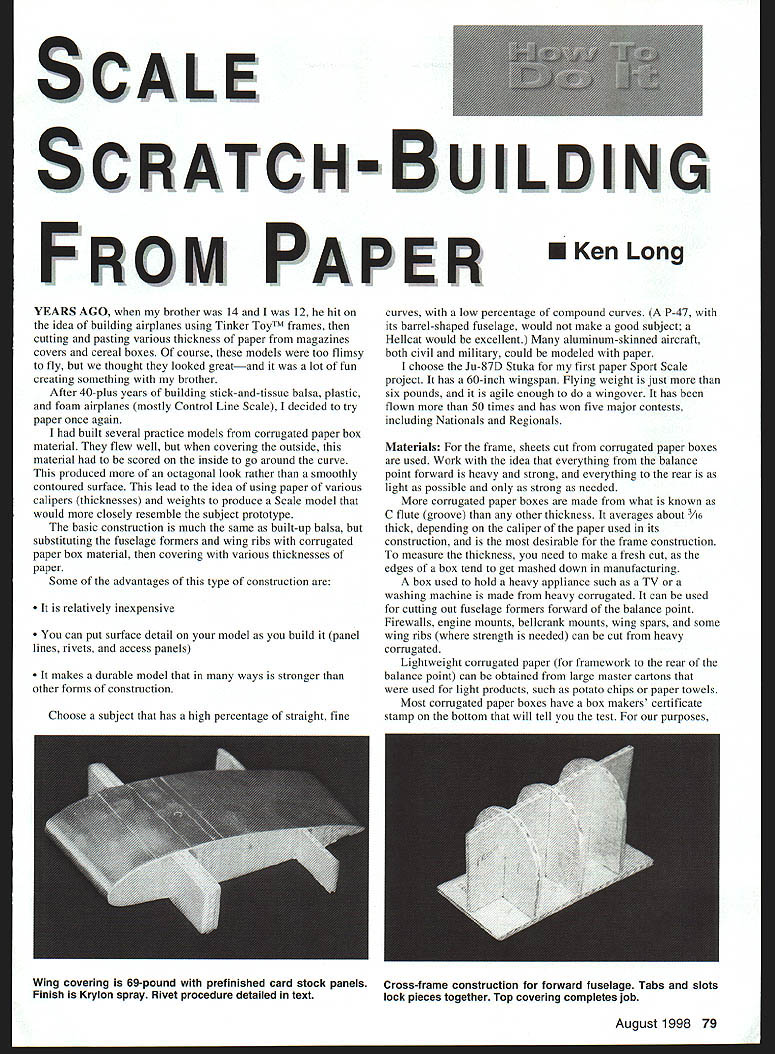
Wing construction
Wing construction can be done with ribs and spars cut from corrugated paper box material. Spars need to be wider; plans show main spars cut all the way through ribs for deep-section wings. Main spars also need to be made thicker by laminating three or more thicknesses, depending on the scale of your model.
Rib spacing should be no more than two inches. Make ribs from heavy corrugated for the first few bays from the fuselage; if your aircraft has wing-mounted landing gear, use heavy material near the fuselage, then use light material out to the wingtips.
Cut ribs with alignment tabs to make sure the wing is true. After the top of the wing is covered, these tabs can be cut off.
Rudder and stabilizer
I built up the rudder with half-ribs on each side of a piece of corrugated paper cut to the outline of the rudder, then covered the rudder with card stock. If you are using the fuselage cross-frame construction, the rudder can be part of the side-view cutout.
The stabilizer (stab) can be constructed the same way as the rudder or wing if you are building the stab 1/2 inch or more thick. If you are building to a smaller scale, it will be necessary to make the stab and elevator with some balsa or Lite Ply stiffeners to prevent warps. Solid, light balsa, cut and sanded to shape and then glued in place will give the needed strength.
Covering
The main paper I use is heavy stock that is 69-pound per 1,000 square feet. It is about .016" thick; it's the paper used to construct 275-pound-test corrugated boxes. This is virgin paper, so the fibers are long—making it very tough and strong.
(I haven't found this paper for sale commercially, but I have been testing various weights of card stock and light poster paper that is readily available from paper supply stores. I found some that are about the same weight and thickness as the 69-pound stock; they look good so far but are not flight- and time-tested yet.)
For Sport Scale I plotted the approximate location of the panels and placed my formers and ribs at these points. When covering, I overlapped the paper about 3/8", creating a scale look. This is not necessary for Sport Scale, you may say, but these lines can be seen from 15 feet away, and I think it makes a favorable impression on the judges.
For Precision or FAI Scale I'm using the 69-pound covering on as large an area as possible, then covering this with a tooled thinner card stock cut to the exact sizes of the prototype's panels. Panels can be overlapped, butted together, or spaced apart—whatever is correct for your aircraft.
Most heavy paper can be tooled much like leather. When the paper is tooled and painted properly, it is hard to tell from a riveted aluminum aircraft skin.
For rounded raised rivets, I use a sewing tracing wheel. You can use a standard tracing wheel for closely spaced rivets; cut off every other tooth on a second wheel for rivet spacing that is farther apart.
Process for raised rivets:
- Measure and cut the panel to size.
- Draw pencil lines in the rivet locations on the inside of the panel.
- Place a piece of scrap heavy paper on a hard surface to act as a pad.
- With the penciled inside surface up, place the panel on the scrap paper, then follow the pencil lines with the tracing wheel, pushing down hard. This will make raised rivets on the outer surface.
For flush-fitting rivets you can use small brass tubes (1/16" OD works well). You can put them in one at a time, or make a wheel similar to a tracing wheel: a soft metal disk about 3/4" in diameter drilled around the circumference with 1/16" holes. Force-fit short pieces of the 1/16" brass tubing into the holes and drill a hole in the center of the disk for a bolt or screw that will act as an axle. Attach a handle of wood or metal. This tool can be used to roll on simulated flush rivets on the outside surface of the paper panel in just a few minutes.
Round access panels can be made by placing one end of a metal tube in the proper place on a panel and tapping the other end with a hammer to leave a permanent impression in the paper. I sharpened the edge of a metal thimble with a file and used it as a tool.
Use a scrap piece of paper to cut out a pattern. Test it on the frame and trim it to the exact size and shape. Then cut out the panel from the pattern and test it again before tooling, to make sure it fits. It may be necessary to make some adjustment to the frame if you are bridging three or more ribs or formers with a single panel. Check the frame by holding the panel in place and looking for high or low formers or ribs. If you have a high spot, sand it down and check with a straightedge laid across the area to be bridged. If you have low formers or ribs, glue a piece of corrugated paper to the side of the low area.
Never try to force a panel to a compound curve. It will not glue properly to each former and it usually won't look good, with bulges and ripples. If the prototype has a slight compound curve over a long span, it can be simulated without any sharp change of angle if there are enough natural panel lines. If not, add extra panels and obscure the line by using a filler coat and sanding.
If your model has straight trailing edges on the wings or tail, you can fold the paper panel or covering; simply score where you want the trailing edge (I use a Stanley razor knife handle). Put the paper covering on a hard, flat surface with the inside up. With the Stanley blade closed, run the pointed end along a premeasured trailing edge line, pressing hard. The edge can then be folded on this scored line. Glue it directly to the corrugated paper ribs. The folded-over heavy paper will hold a straight edge and will closely resemble the aluminum-skinned trailing edge of the prototype.
Wherever a sharply rounded contour is needed, as on a leading edge, rudder, or stab, it may be necessary to wet the outside of the paper covering or panel to be rolled around the ribs or shaped edge. This will prevent crimping or false scores and should result in a smoothly contoured surface. Wetting will not interfere with the gluing of water-based white glue.
Gluing and reinforcement
Elmer's Glue-All is not waterproof, but neither is paper. You must rely on the finishing material to fuelproof and waterproof your model.
A thin film or bead of glue works best. When gluing on outside paper panels, apply a bead of glue near the edge, then run your finger over the bead; press a little harder at the edge to prevent bleed-out. Keep a damp cloth handy to wipe off any excess.
White glue normally takes hours to dry, but will bond to paper in 20–30 seconds if compression is used. The frame and covering can be glued together using this method; you can use pins or low-tack tape, but compression works best. If you are gluing a long straight line, such as along the wing, you can use a metal straightedge or wood stick to press the glue joint to a bond.
For construction of engine mounts, firewalls, landing gear mounts, servo mounts, bellcrank mounts, or any other place you would use plywood or hardwood, laminate layers of heavy corrugated paper box material with epoxy. When hardened, it can be drilled for mounting bolts.
As in conventional forms of construction, coat all internal compartments that may come in contact with fuel with epoxy.
Compound curves
If you want to be a purist and use paper for as much of your model as possible, you can make that small percentage of compound curves from paper mache. See "Make It With Paper" by Roy Day and Marion Mecklenburg (Model Aviation, July 1992) for a good article on making parts from paper.
Canopy
The 69-pound paper works well for canopies. Paint the inside of the sheet with the cockpit color and the outside with the exterior color of the aircraft. Mark off and pencil-line strips for the canopy frame. Tool in the raised or flush rivets, cut the strips, mark the canopy where the strips go, and epoxy them in place.
Finish
Start with three coats of clear dope, sanding lightly between coats. Apply the clear with heavy coats, especially at the panel joints, so the dope will soak in and seal. Follow with two coats of sprayed-on color. If you used balsa for the compound curves and small parts, you will need plenty of filler and sandpaper to get the parts to match the already smooth paper.
I am primarily a Control Line Scale modeler, but I have done enough Radio Control work to know that paper construction would work for RC Scale as well. Once you get the hang of it, it can be faster than other forms of scratchbuilding. If you treat paper as you would a more expensive building material—cutting and shaping to close tolerances—I think you will find the results rewarding. I challenge other scratch builders to have a go at it.
Ken Long 10911 Arroyo Dr. Whittier, CA 90604
Transcribed from original scans by AI. Minor OCR errors may remain.

