
SCALE TIPS FOR THE COMMON MODELER
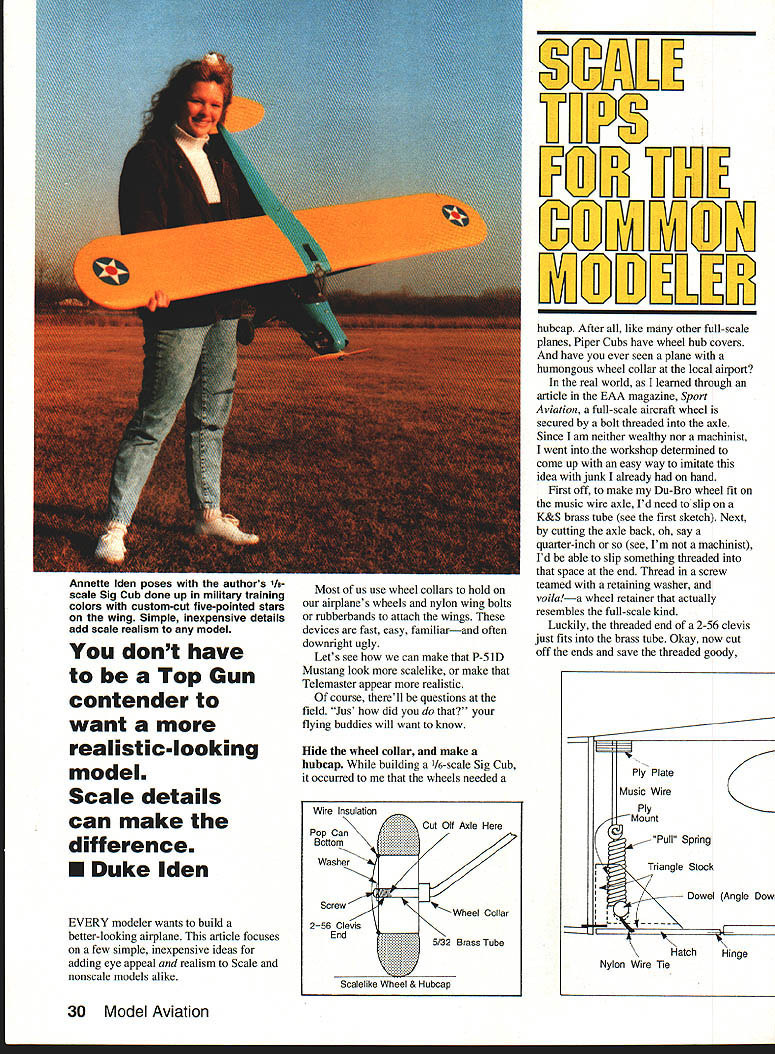
You don't have to be a Top Gun contender to want a more realistic-looking model. Scale details can make the difference. Every modeler wants to build a better-looking airplane. This article collects a few simple, inexpensive ideas for adding eye appeal and realism to scale and nonscale models alike.
Most of us use wheel collars to hold wheels and nylon wing bolts or rubber bands to attach wings. These devices are fast, easy, familiar — and often downright ugly. The tips below show easy ways to hide or replace them and add other small scale touches that look right at the flying field.
Hide the wheel collar; make a hubcap
While building a 1/6-scale Sig Cub I decided the wheels needed hubcaps. On full-size aircraft the wheel is often secured by a bolt threaded into the axle. I adapted that idea using common workshop junk.
- Slip a short length of K&S brass tube over the music-wire axle so the Du-Bro wheel will fit.
- Cut the axle back about 1/4 inch to leave room for a threaded fastener.
- The threaded end of a 2-56 clevis fits the brass tube; cut off the clevis and save the threaded piece.
- Thread a screw into the tube with a retaining washer to form a wheel retainer that resembles the full-size arrangement.
You can make the system removable:
- Put the wheel collar back on the wheel hub,
- Grind a flat spot on the music-wire axle,
- Cut a small notch in the brass tube so the wheel-collar nut will bite onto the flat spot.
To change the wheel, loosen the wheel collar and slide the assembly off. The wheel collar is now hidden inside and looks almost like a brake drum.
For a hubcap:
- Use the slightly concave bottom of an aluminum can — cut out the center for a very light, free hubcap.
- If the cap doesn't clear the retaining screw (common on ~3-inch wheels), scavenge a short length of insulated wire, remove the copper core to make a hollow black tube, and glue that tube to the outside rim of the hubcap.
- Secure the cap to the wheel with silicone cement (RC-56) or CyA (cyanoacrylate).
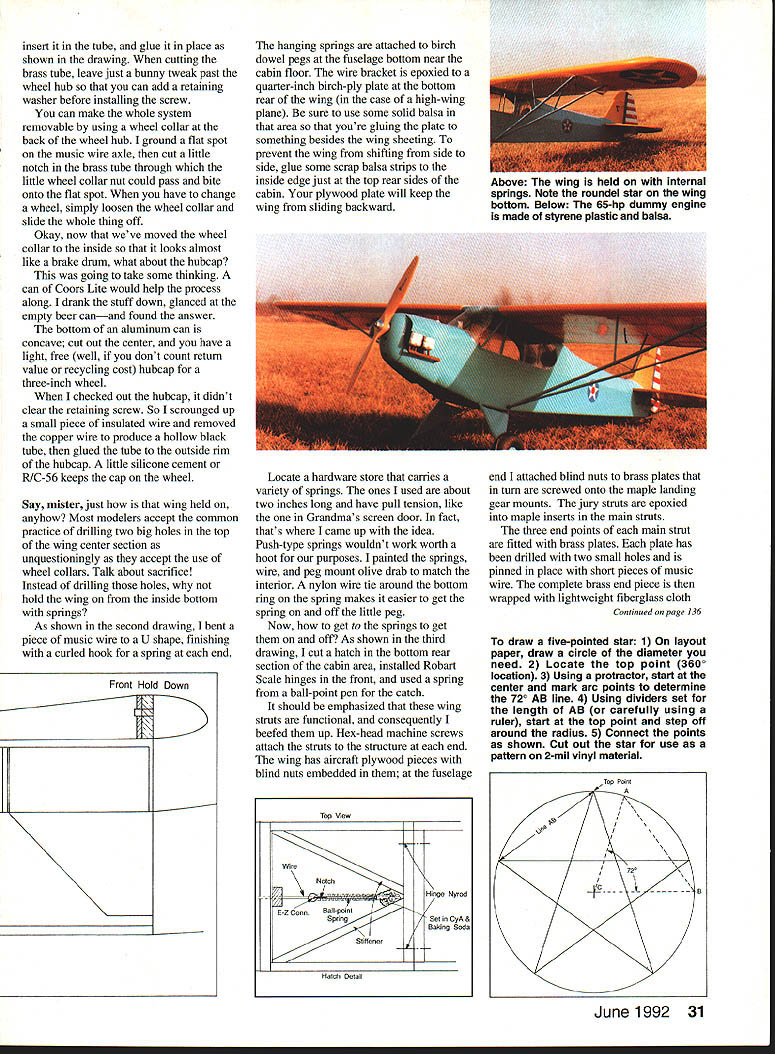
Wing hold-down springs instead of drilled bolt holes
Instead of drilling two large holes through the top wing center section and using visible wing bolts or collars, use bottom-mounted pull springs and a small hatch for access. This keeps the top of the wing clean and much more scale.
- Bend a length of music wire into a U shape and finish the ends with curled hooks for the springs to hang on.
- Epoxy birch-dowel pegs to a 1/4-inch birch-ply plate and glue that plate to the bottom rear wing saddle inside the fuselage.
- On high-wing models, glue the plate to some solid balsa area (not just wing sheeting) to prevent side-to-side shifting. Glue scrap balsa strips inside the top rear sides of the cabin so the plywood plate will keep the wing from sliding backward.
- Use pull-type springs about 2 inches long (screen-door springs have appropriate tension). Push-type springs won't work well.
- Paint springs and wire peg mounts olive drab to match the interior. A nylon wire tie around the bottom ring of the spring makes it easier to remove the spring from its peg.
Cut a hatch in the bottom rear cabin area to access the springs. Install Robart scale hinges on the front of the hatch and use the spring from a ball-point pen as a catch.
Struts, mounts and reinforcement
- Wing struts are functional; beef up their structure and use hex-head machine screws for attachment.
- Use aircraft plywood pieces with blind nuts embedded in them for the wing end of the struts. At the fuselage end, attach blind nuts to brass plates that are screwed onto the maple landing-gear mounts.
- Jury struts can be epoxied into maple inserts in the main struts.
- Fit each main strut end with a brass plate drilled with two small holes; pin the plate in place with short pieces of music wire. Wrap the complete brass end piece with lightweight fiberglass cloth for strength and a finished look.
Use CyA to cement fittings where appropriate. Properly done, the wing will be secure — the wing came off mine once in the past; never again!
Inexpensive custom decals and graphics
If commercial decals aren't available in the size or color you want, local print shops that do transfer letters can cut two-mil vinyl graphics to order. Two-mil vinyl is thin enough that you can still see the weave of doped cloth covering once the graphic is applied.
- Have your shop cut graphics in the colors you need; metal-flake colors are sometimes available.
- For an Army Air Corps roundel (blue circle, white star, red center):
- Cut a blue circle from two-mil vinyl using a fresh #11 X-Acto blade. Cut only the vinyl, not the backing; keep backing on until you are ready to apply.
- Make a thin cardboard pattern for a five-pointed star using basic geometry:
- Draw a circle of the needed diameter.
- Mark the top point (360° location).
- From the center, use a protractor to mark a 72° arc (this gives the AB line).
- Using dividers set for the length AB, step off around the circle from the top point to locate the five star points.
- Connect the points to form the star; cut out the pattern.
- Use the cardboard pattern to cut the white star from two-mil vinyl.
- Cut the red center circle to fit the interior size of the star.
- Apply the large blue circle first, pulling off the backing and rolling it on slowly to avoid air bubbles.
- Apply the white star and finally the red circle in the same careful way.
- You can also have the shop produce stripes or letters (they typically supply a positioning adhesive sheet on the front).
Two-mil vinyl is so thin that layered graphics (three layers) look good and still read as scale detail.
Dummy engines and other scale bits
If you want the look of additional engine detail to balance an offset powerplant or just add realism, dummy engines are easy and cheap to make.
- Use thin materials: 1/16-inch balsa sheet for cylinder banks, 1/32-inch plastic styrene for details, 1/4-inch balsa for valve covers, and thin K&S tinplate for a shroud.
- A small three-view or proportion guide is often enough to make a convincing unit in an hour.
Dummy engines are a great addition to many models.
Closing
Small, inexpensive changes — hiding wheel collars with brass-tube retainers and aluminum-can hubcaps, using bottom-mounted pull springs and a hatch for wing hold-downs, reinforcing strut attachments, making custom vinyl graphics, and adding dummy engines — can dramatically increase a model's realism. Try one or two of these ideas on your next build and be prepared for questions at the field: "Just how did you do that?"
Transcribed from original scans by AI. Minor OCR errors may remain.

