
Schoolyard Scale Cessna C-37
Don Srull
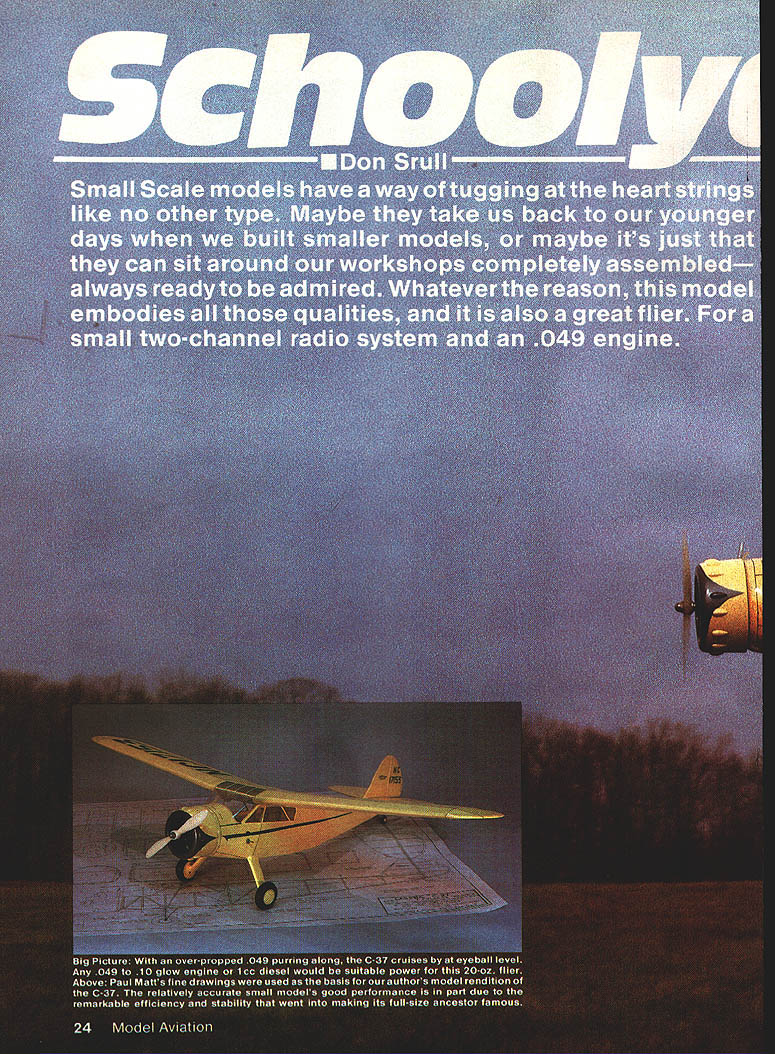
IN 1934 the Cessna Aircraft Company reopened for business after a three-year interruption caused by the Great Depression. A dramatic and permanent change was about to take place in civil aviation. The first aircraft of the new Cessna line was designed by Dwane Wallace, President Clyde Cessna's nephew, who was a recent aeronautical engineering graduate of Wichita University. Sticking with the old Cessna tradition of a high-wing cabin monoplane, but bringing all the latest technology to bear, Wallace designed a slick four-place aircraft — the C-34. Its graceful lines and clean, efficient aerodynamics would survive in the form of the uniquely Cessna Airmaster series.
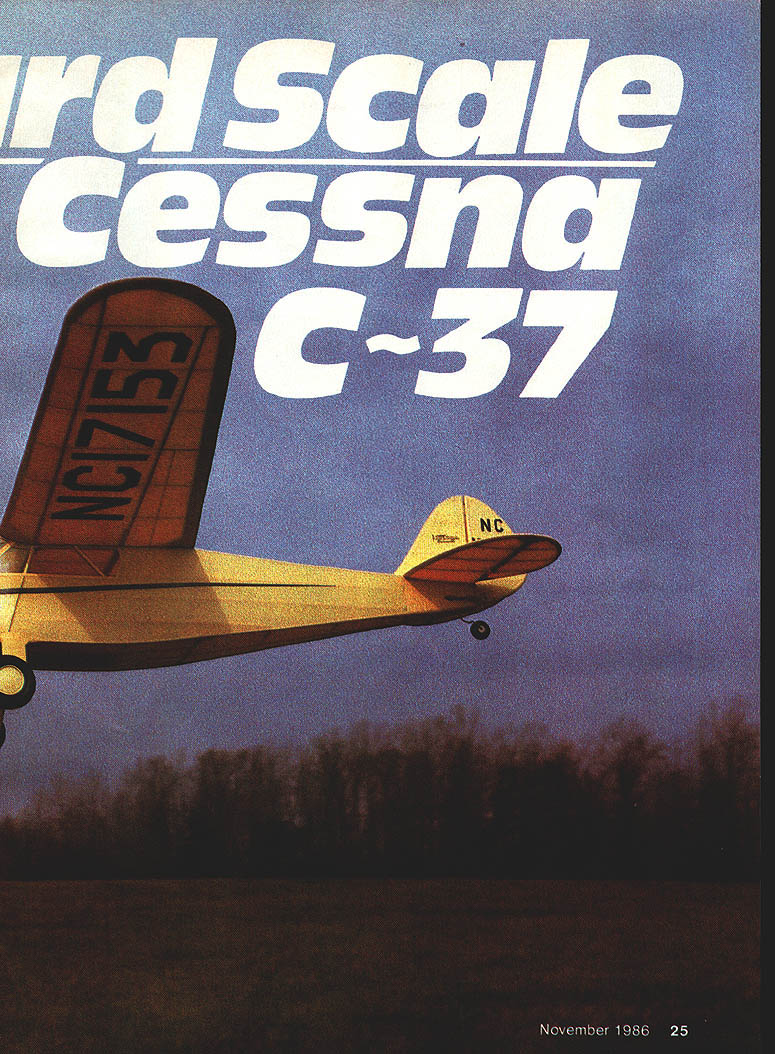
The C-34 quickly won attention and respect in the aviation world — competitions, races and awards including the World's Most Efficient Airplane title. The C-34 attention didn't hurt business either; a total of 42 aircraft were sold. In the midst of the lingering Depression, that wasn't bad. The 1937 design was upgraded slightly, including a widened cabin, electrically operated wing flaps, improved shock absorbers and a cleaner cowl shape. External appearance, however, was virtually unchanged and the 145-hp seven-cylinder Warner Scarab engine was retained. Ultimately 47 Model C-37s were sold. As the series progressed through the C-38, C-145 and C-165 models up to World War II, the C-37 version remained an important part of the design lineage.
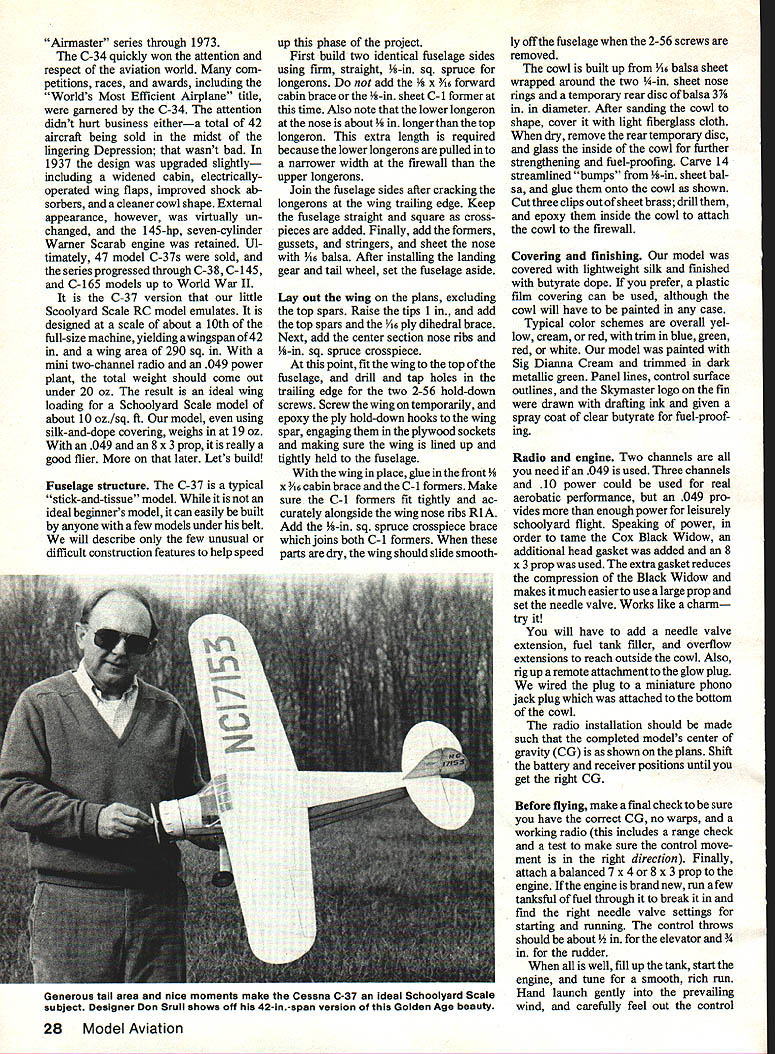
The little Schoolyard Scale RC model emulates the C-37, designed at about 1/10th full size, yielding a wingspan of 42 in. and a wing area of 290 sq. in. With a mini two-channel radio and an .049 power plant the total weight should come out under 20 oz., the result being an ideal wing loading for a Schoolyard Scale model — about 10 oz./sq. ft. A model using silk-and-dope covering weighs about 19 oz. A .049 with an 8 x 3 prop is a really good flier.
Let's build
Fuselage structure
The C-37 model is a typical stick-and-tissue model, ideal for beginners. The model can be easily built by anyone with a few models under his belt. Below are a few special construction notes to speed up the project.
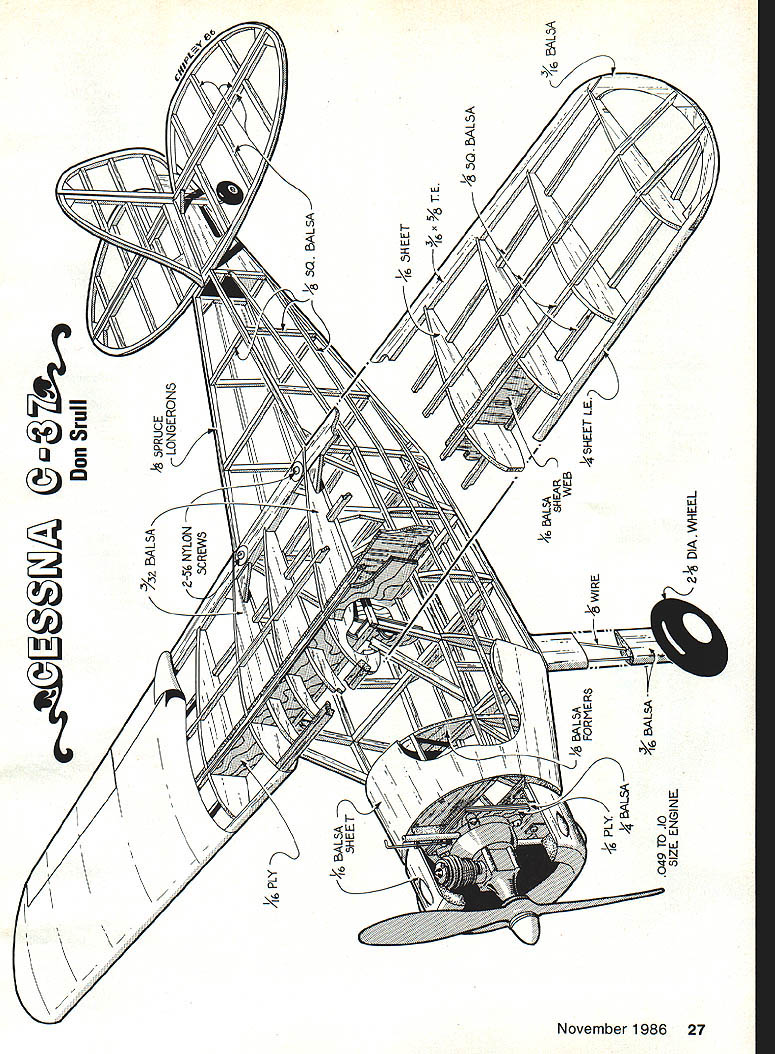
- First build two identical fuselage sides using firm, straight 1/8-in. sq. spruce longerons. Add the 1/16-in. sheet C-1 former at this time.
- Note the lower longeron at the nose is about 1/8 in. lower than the top longeron; extra length is required because the lower longerons pull to a narrower width at the firewall than the upper longerons.
- Join the fuselage sides after racking the longerons to the wing trailing edge. Keep the fuselage straight; add square crosspieces.
- Finally add formers, gussets, stringers and sheet the nose with 1/16-in. balsa. After installing the landing gear and tail wheel, set the fuselage aside.
Wing
- Lay out the wing plans excluding the top spars. Raise the tips 1/2 in.; add top spars and the dihedral brace.
- Add the center section nose ribs and a 1/8-in. sq. spruce crosspiece.
- Dry-fit the wing to the fuselage; drill and tap holes in the trailing edge for two 2-56 hold-down screws. Screw the wing temporarily in place.
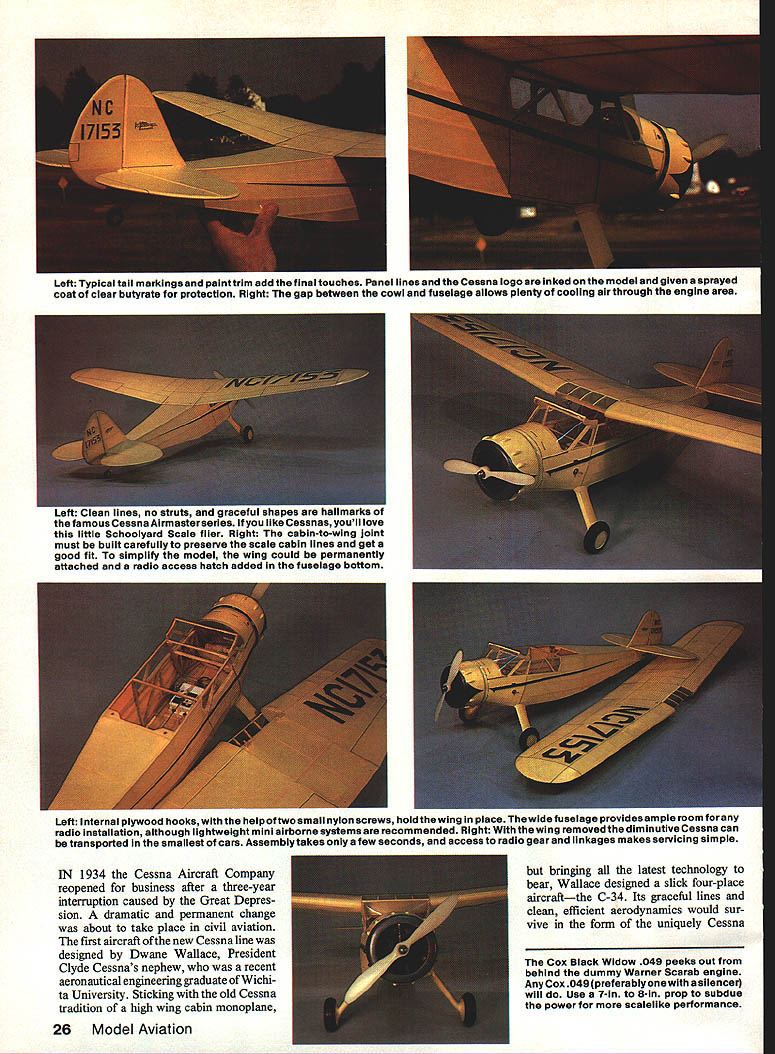
- Epoxy the plywood hold-down hooks to the wing spar, engaging plywood sockets in the fuselage, making sure the wing is lined up tightly and held against the fuselage.
- Glue the front X-brace and C-1 formers. Make sure the C-1 formers fit tightly and accurately alongside the wing nose ribs (R1A). Add the 1/8-in. sq. spruce crosspiece which joins both C-1 formers.
- When these parts are dry, the wing should slide smoothly off the fuselage when the 2-56 screws are removed.
Cowl
The cowl is built up from 1/16-in. balsa sheet wrapped around two 1/4-in. sheet nose rings and a temporary rear disc of 3/16-in. balsa. After sanding the cowl to shape, cover it with light fiberglass cloth. When dry, remove the rear temporary disc, and glass the inside of the cowl for further strengthening and fuel-proofing.
Carve 1/4-in. streamlined "bumps" from 1/8-in. sheet balsa and glue them onto the cowl as shown. Cut three clips out of sheet brass, drill them, and epoxy them inside the cowl to attach the cowl to the firewall.
Covering and finishing
Our model was covered with lightweight silk and finished with butyrate dope. If you prefer, a plastic film covering can be used, although the cowl will have to be painted in any case.
Typical color schemes are overall yellow, cream, or red, with trim in blue, green, red or white. Our model was painted with Sig Diana Cream and trimmed in dark metallic green. Panel lines, control surface outlines, and the Skymaster logo on the fin were drawn with drafting ink and given a spray coat of clear butyrate for fuel-proofing.
Radio and engine
Two channels are all you need if an .049 is used. Three channels and .10 power could be used for real aerobatic performance, but an .049 provides more than enough power for leisurely Schoolyard flight.
To tame the Cox Black Widow, an additional head gasket was added and an 8 x 3 prop was used. The extra gasket reduces the compression of the Black Widow and makes it much easier to use a larger prop and to set the needle valve. It works very well.
You will have to add a needle valve extension, fuel tank filler and overflow extensions to reach outside the cowl. Also rig up a remote attachment to the glow plug — we wired the plug to a miniature phono jack which was attached to the bottom of the cowl.
The radio installation should be made such that the completed model's center of gravity (CG) is as shown on the plans. Shift the battery and receiver positions until you get the right CG.
Before flying
Before flying, make a final check to be sure you have the correct CG, no warps, and a working radio. This includes a range check and a test to make sure the control movement is in the right direction.
- Control throws: about 1/4 in. for the elevator and 3/8 in. for the rudder.
- Attach a balanced 7 x 4 or 8 x 3 prop to the engine.
- If the engine is brand new, run a few tanksful of fuel through it to break it in and find the correct needle valve settings for starting and running.
When all is well, fill the tank, start the engine, and tune for a smooth, rich run. Hand-launch gently into the prevailing wind, and carefully feel out the control response of this little beauty.
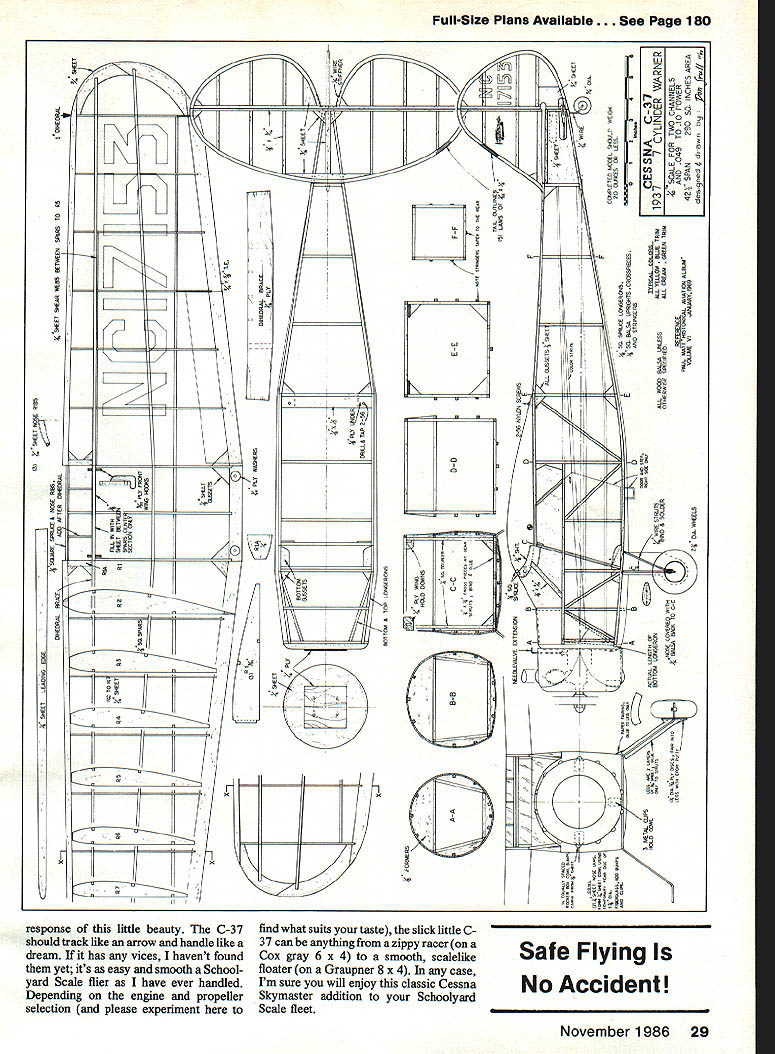
The C-37 should track like an arrow and handle like a dream. If it has any vices, they are not apparent — it's as easy and smooth a Schoolyard Scale flier as one can handle. Depending on engine and propeller selection (and please experiment here to find what suits your taste), the slick little C-37 can be anything from a zippy racer (on a Cox gray 6 x 4) to a smooth, scale-like floater (on a Graupner 8 x 4). In any case, you should enjoy this classic Cessna Airmaster addition to your Schoolyard Scale fleet.
Transcribed from original scans by AI. Minor OCR errors may remain.

