
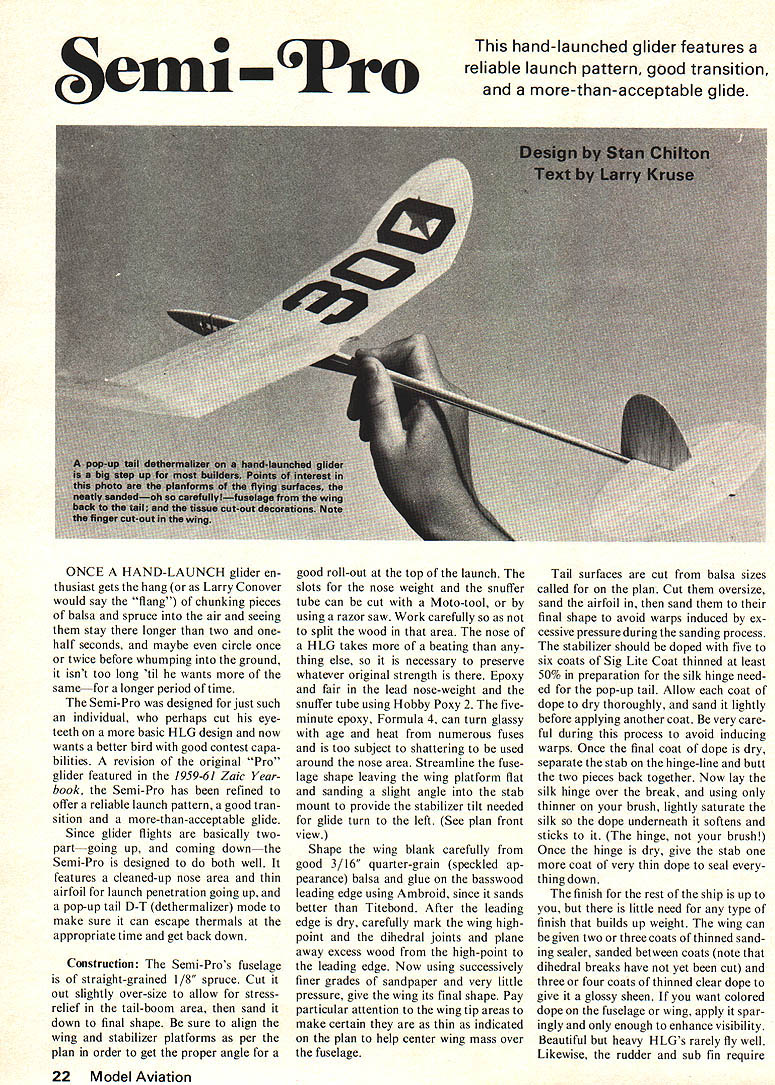
Semi-Pro
This hand-launched glider features a reliable launch pattern, good transition, and a more-than-acceptable glide.
Design by Stan Chilton Text by Larry Kruse
ONCE A HAND-LAUNCH glider enthusiast gets the hang (or as Larry Conover would say the "flang") of chunking pieces of balsa and spruce into the air and seeing them stay there longer than two and one-half seconds, and maybe even circle once or twice before whumping into the ground, it isn't too long 'til he wants more of the same—for a longer period of time.
The Semi-Pro was designed for just such an individual, who perhaps cut his eye-teeth on a more basic HLG design and now wants a better bird with good contest capabilities. A revision of the original "Pro" glider featured in the 1959-61 Zaic Yearbook, the Semi-Pro has been refined to offer a reliable launch pattern, a good transition and a more-than-acceptable glide.
Since glider flights are basically two-part—going up, and coming down—the Semi-Pro is designed to do both well. It features a cleaned-up nose area and thin airfoil for launch penetration going up, and a pop-up tail D-T (dethermalizer) mode to make sure it can escape thermals at the appropriate time and get back down.
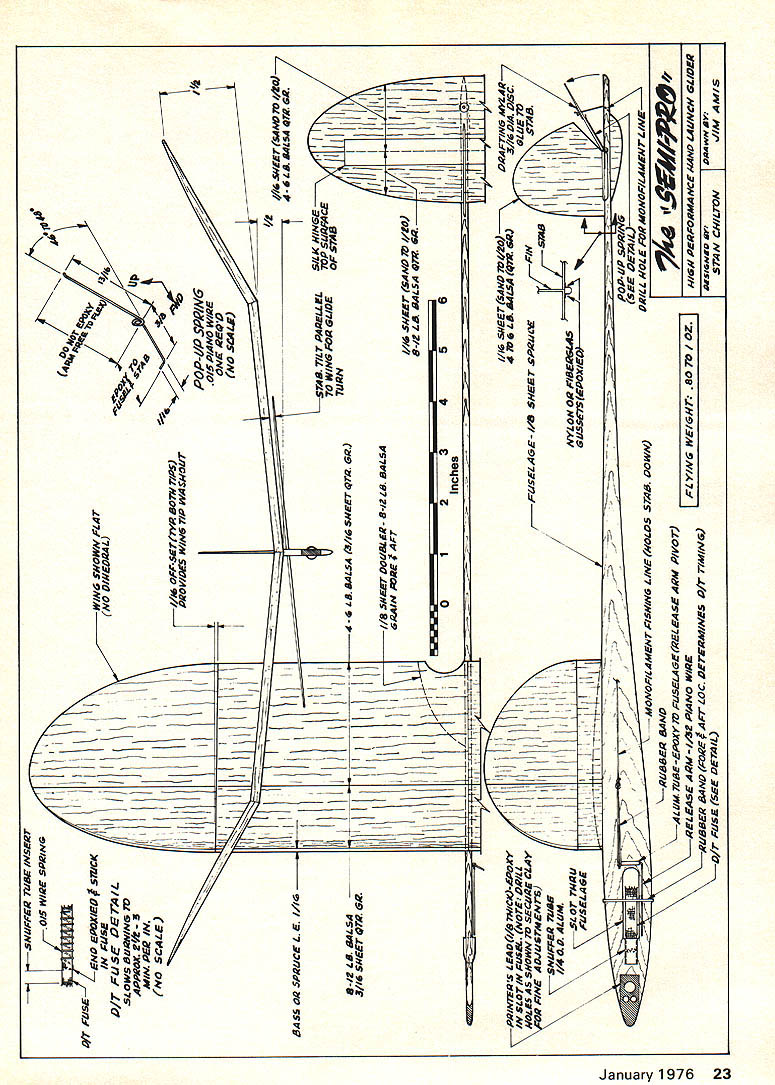
Construction: The Semi-Pro's fuselage is of straight-grained 1/8" spruce. Cut it out slightly over-size to allow for stress-relief in the tail-boom area, then sand down to final shape. Be sure to align the wing and stabilizer platforms as per the plan in order to get the proper angle for a good roll-out at the top of the launch. The slots for the nose weight and the snuffer tube can be cut with a Moto-tool, or by using a razor saw. Work carefully so as not to split the wood in that area. The nose of a HLG takes more of a beating than anything else, so it is necessary to preserve whatever original strength is there. Epoxy and fair in the lead nose-weight and the snuffer tube using Hobby Poxy 2. The five-minute epoxy, Formula 4, can turn glassy with age and heat from numerous fuses and is too subject to shattering to be used around the nose area. Streamline the fuselage shape leaving the wing platform flat and sanding a slight angle into the stab mount to provide the stabilizer tilt needed for glide turn to the left. (See plan front view.)
Shape the wing blank carefully from good 3/16" quarter-grain (speckled appearance) balsa and glue on the basswood leading edge using Ambroid, since it sands better than Titebond. After the leading edge is dry, carefully mark the wing high-point and the dihedral joints and plane away excess wood from the high-point to the leading edge. Now using successively finer grades of sandpaper and very little pressure, give the wing its final shape. Pay particular attention to the wing tip areas to make certain they are as thin as indicated on the plan to help center wing mass over the fuselage.
Tail surfaces: cut balsa sizes called for on the plan. Cut them oversize, sand the airfoil in, then sand them to their final shape to avoid warps induced by excessive pressure during the sanding process. The stabilizer should be doped with five to six coats of Sig Lite Coat thinned at least 50% in preparation for the silk hinge needed for the pop-up tail. Allow each coat of dope to dry thoroughly, and sand it lightly before applying another coat. Be very careful during this process to avoid inducing warps. Once the final coat of dope is dry, separate the stab on the hinge-line and butt the two pieces back together. Now lay the silk hinge over the break, and using only thinner on your brush, lightly saturate the silk so the dope underneath it softens and sticks to it. (The hinge, not your brush!) Once the hinge is dry, give the stab a very thin coat of dope to seal things down and finish the rest.
The wing need have little or no top-type finish that builds up weight. The wing can be given two or three coats of thinned sanding sealer, sanded between coats (note that dihedral breaks have not yet been cut) and three or four coats of thinned clear dope to give it a glossy sheen. If you want colored dope on the fuselage or wing, apply it sparingly and only enough to enhance visibility. Beautiful but heavy HLGs rarely fly well.
Likewise, the rudder and sub fin require little or no finish.
Semi-Pro
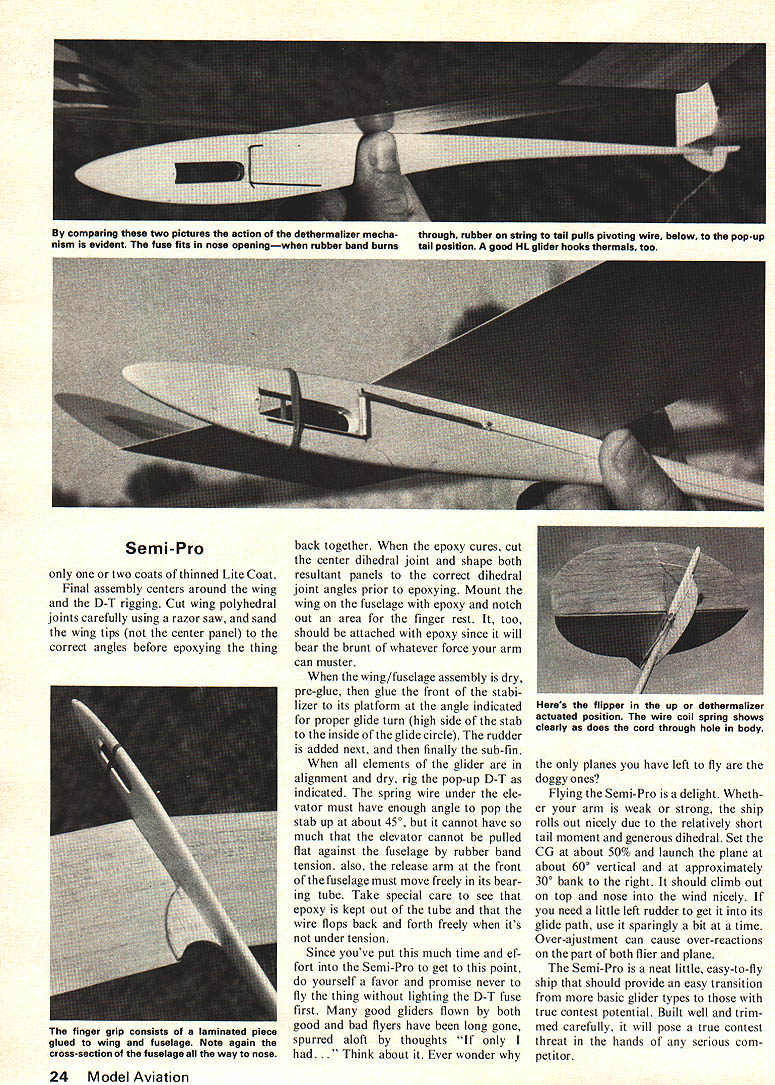
Final assembly centers around the wing and the D-T rigging. Cut wing polyhedral joints carefully using a razor saw, and sand the wing tips (not the center panel) to the correct angles before epoxying the thing back together. When the epoxy cures, cut the center dihedral joint and shape both resultant panels to the correct dihedral joint angles prior to epoxying. Mount the wing on the fuselage with epoxy and notch out an area for the finger rest. It, too, should be attached with epoxy since it will bear the brunt of whatever force your arm can muster.
When the wing/fuselage assembly is dry, pre-glue, then glue the front of the stabilizer to its platform at the angle indicated for proper glide turn (high side of the stab to the inside of the glide circle). The rudder is added next, and then finally the sub-fin.
When all elements of the glider are in alignment and dry, rig the pop-up D-T as indicated. The spring wire under the elevator must have enough angle to pop the stab up at about 45°, but it cannot have so much that the elevator cannot be pulled flat against the fuselage by rubber band tension. Also, the release arm at the front of the fuselage must move freely in its bearing tube. Take special care to see that epoxy is kept out of the tube and that the wire flops back and forth freely when it's not under tension.
Since you've put this much time and effort into the Semi-Pro to get to this point, do yourself a favor and promise never to fly the thing without lightening the D-T fuse first. Many good gliders flown by both good and bad flyers have been lost, spurred aloft by thoughts "If only I had..." Think about it. Ever wonder why the only planes you have left to fly are the doggy ones?
Flying the Semi-Pro is a delight. Whether your arm is weak or strong, the ship rolls out nicely due to the relatively short tail moment and generous dihedral. Set the CG at about 50% and launch the plane at about 60° vertical and at approximately 30° bank to the right. It should climb out on top and nose into the wind nicely. If you need a little left rudder to get it into its glide path, use it sparingly a bit at a time. Over-adjustment can cause over-reactions on the part of both flier and plane.
The Semi-Pro is a neat little, easy-to-fly ship that should provide an easy transition from more basic glider types to those with true contest potential. Built well and trimmed carefully, it will pose a true contest threat in the hands of any serious competitor.
Transcribed from original scans by AI. Minor OCR errors may remain.

