
Setting Up a New RC Sailplane
This article is intended to help a newcomer trim out his first RC sailplane. It can also be a refresher for those of us who do things and don't remember why. Material has been borrowed from many good writers.
We will assume your ship is built and covered and that all surfaces are square to the fuselage:
- Rudder exactly vertical with respect to the stabilizer.
- Stabilizer at right angles to the fuselage from top and front.
- Wing and stabilizer aligned perfectly.
If these are not true, fix them. The airplane will fly with small misalignments, but not as well or efficiently.
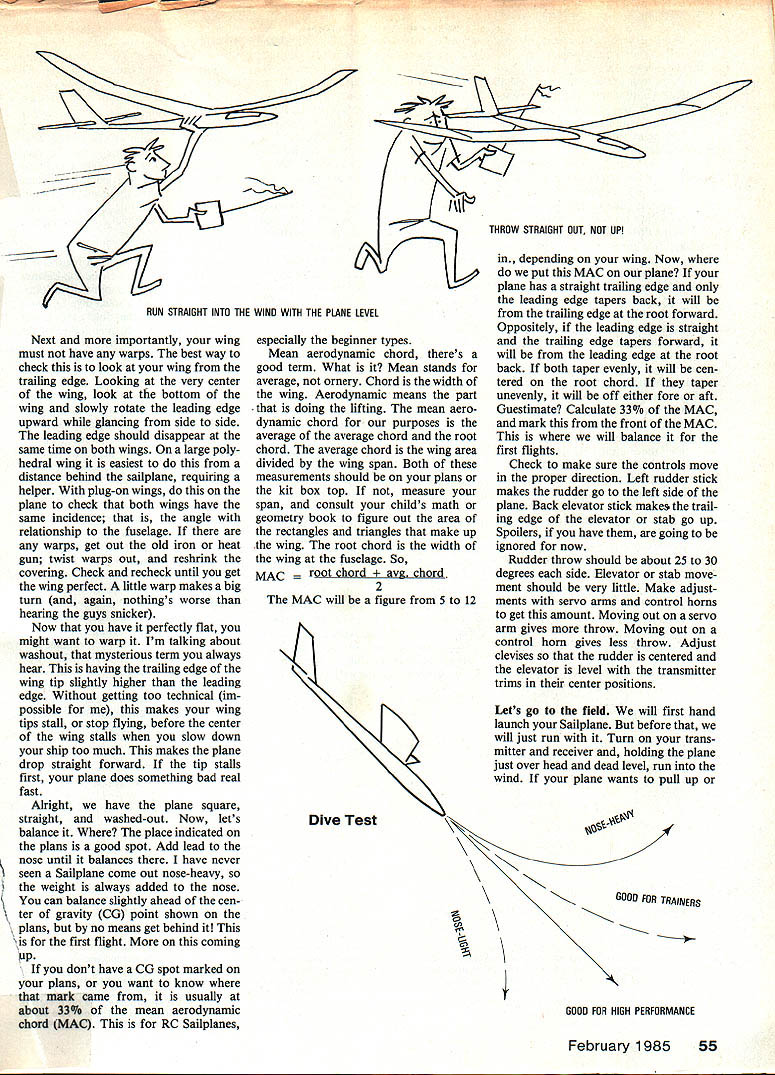
Wing warps and washout
- The wing must have no warps. Best way to check: look along the wing trailing edge from the center and slowly rotate the leading edge upward while glancing from side to side. The leading edge should disappear at the same time on both wings. Large polyhedral wings are easiest to check. For plug-on wings, have a helper hold the fuselage while you check both wings' incidence angles relative to the fuselage.
- If warps are present, use an iron or heat gun to twist the warps out and re-shrink the covering. Check and recheck until the wing is perfect. A little warp makes a big turn.
- Once the wing is flat, consider adding washout: the trailing edge at the wing tip slightly higher than the leading edge. This helps the wing tips stall after the center wing, preventing sudden tip-stall behavior at low speed.
Balance and center of gravity (CG)
- Balance at the spot indicated on the plans. Add lead in the nose until it balances. Most sailplanes require added nose weight; rarely are they nose-heavy out of the box.
- You can balance slightly ahead of the CG, but do not get behind it for the first flight.
- If the plans do not show a CG, mark it at about 33% of the mean aerodynamic chord (MAC).
How to find MAC:
- MAC is the average chord: (root chord + tip chord) / 2, or more accurately, wing area divided by wing span.
- Use plan or box measurements, or calculate wing area from the span and shapes (rectangles/triangles).
- Mark 33% of the MAC from the leading edge; that is a good starting CG for first flights.
Controls and throws
- Verify control directions:
- Left rudder stick → rudder moves left.
- Back elevator stick → elevator trailing edge moves up.
- Recommended throws:
- Rudder: about 25°–30° each side.
- Elevator/stab: very little movement for initial flights.
- To change throws:
- Moving the servo arm out increases throw.
- Moving the control horn out decreases throw.
- Center rudder and level elevator, and set transmitter trims to neutral.
Pre-flight checks and run test
Before the first hand launch:
- Turn on transmitter and receiver.
- Hold the plane overhead, dead level, and run into the wind while the holder releases.
- Observe initial flight path:
- If the plane dives, adjust transmitter trim (or clevis if trims are insufficient).
- If the plane pulls up sharply on release, it's nose-light — add nose weight.
- If the plane dives on release, it's nose-heavy — add weight toward the nose.
- For hand launching, always run directly into the wind. Throw straight out, not up.
Note: A slightly nose-heavy ship is easier as a trainer (tends to fly straight and recover). Nose-light ships are livelier but can be twitchy and prone to tip-stall.
Hand-launch technique
- Run straight into the wind with the plane level and throw it straight out toward the horizon or a distant spot — not upward.
- If the plane wants to pull up and stall, add down trim. If it dives, add up trim. If it turns, add rudder trim.
- Once it glides straight and level, you can proceed to a high-start launch.
Ground wing test
- Rest the plane on the ground, pick up one wing tip while the other rests on the ground, and gently bounce the plane. There should be no pops, creaks, or uneven bending along the wing. If the wing fails here, it would likely break on tow.
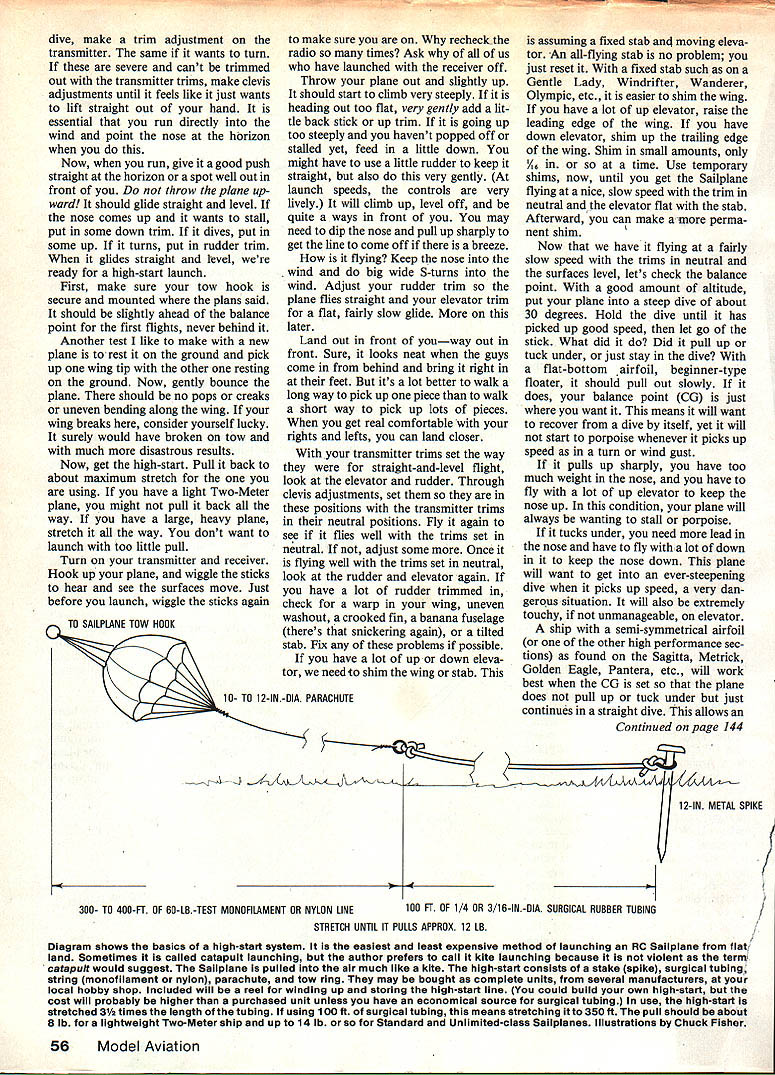
High-start launch
- Pull the high-start to an appropriate stretch for your plane (lighter Two-Meter planes may not need full stretch; larger planes usually need full stretch).
- Turn on radio, hook up, and wiggle the sticks to confirm surfaces move and the receiver is on.
- Throw the plane out and slightly up on the high-start: it should climb steeply. If it climbs too flat, add a little back stick or up trim; if it climbs too steeply, add a little down.
- Use gentle rudder if needed to keep it straight — controls are lively at launch speeds.
- After release it will climb, level off, and be well out in front of you; if the line doesn't release, you may need to dip the nose and pull up sharply.
Initial flight trimming
- Keep the nose into the wind and fly big, wide S-turns into the wind.
- Adjust rudder trim so the plane tracks straight and elevator trim for a flat, fairly slow glide.
- Land out in front of you — far out. It's better to walk a long way to retrieve one intact plane than to walk a short way to pick up many pieces.
Setting trims as neutral
- With the transmitter trims set for straight-and-level flight, inspect the control linkages so that rudder and elevator are centered with trims neutral.
- Fly again. If the plane needs significant trim to fly straight with trims neutral:
- Check for warps, uneven washout, crooked fin, bent or “banana” fuselage, or a tilted stabilizer.
- Fix structural/alignment issues if present.
- If large elevator correction is needed and you have a fixed stabilizer:
- Shim the wing or stabilizer in small amounts (about 1/16 in. at a time). Use temporary shims until final flying trim is achieved, then make permanent shims if necessary.
- For a low tail, shim the leading edge of the wing up; for down elevator, shim the trailing edge of the wing up.
Dive test and CG fine-tuning
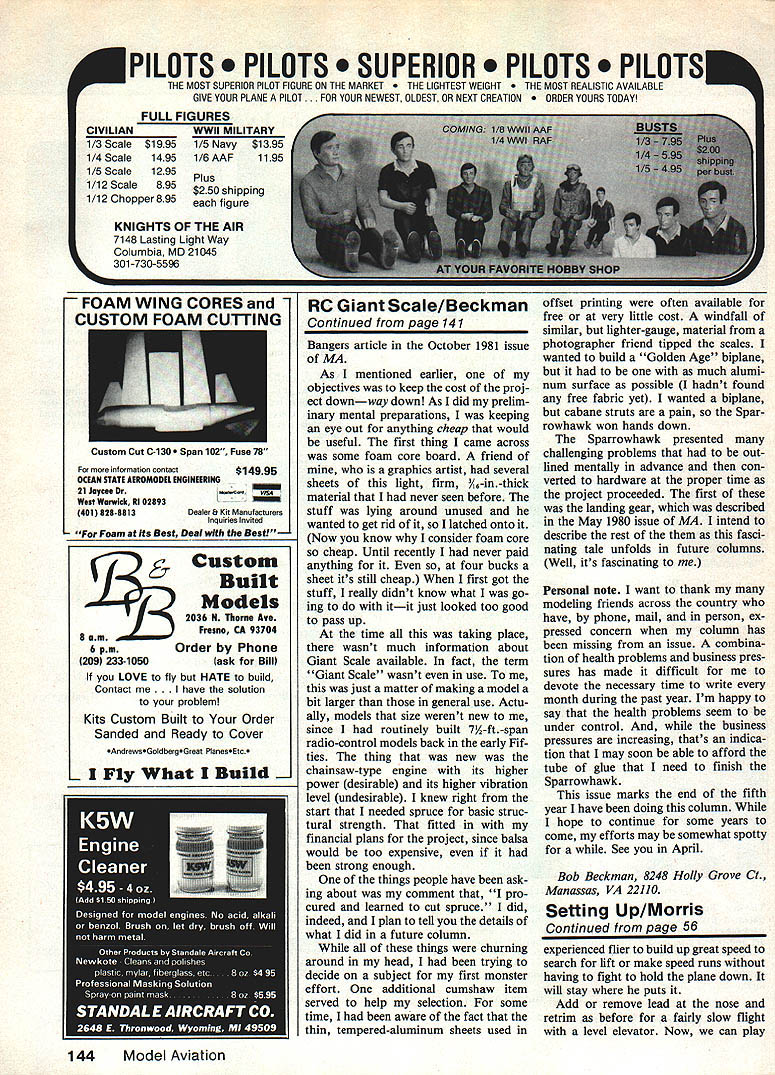
With a good altitude:
- Push into a steep dive (~30°) and hold until the plane picks up speed.
- Release the stick and observe:
- Flat-bottom, beginner floater: should pull out slowly — desired for trainers.
- If it pulls up sharply: too much nose weight (plane will stall/porpoise easily).
- If it tucks under: too little nose weight (plane will dive and be touchy on elevator).
- For semi-symmetrical or high-performance airfoils, the plane should continue in a straight dive (no pull up or tuck) so the pilot can build speed without holding the nose down.
Adjust CG accordingly by adding or removing nose weight or shifting equipment fore/aft.
Wing loading and tow-hook position
- Wing loading = weight (oz) / wing area (ft²). Wing area in ft² = area in in² / 144.
- Typical wing loading ranges:
- Beginner floaters (Olympic, Windrider, Wanderer, Gentle Lady): ~6–8 oz/ft².
- Higher-performance (Sagitta, Metrik, Golden Eagle, Pantera): ~8–10 oz/ft².
- Very high-performance (Bounty Hunter, Camaro, Fiesta, Antares): ~10–14 oz/ft².
- You can increase wing loading (faster flight) by adding lead/ballast at the CG — useful on windy days.
Tow-hook position:
- Moving the tow hook rearward steepens climb on tow.
- Move it back in small increments; too far back makes the plane wild or prone to stalling on tow.
- Adding up trim or back stick on launch also steepens climb, but too much causes violent behavior. Increase cautiously.
Final notes
- Recheck radio power and control movement before every launch.
- Practice is the best way to learn flying and trimming. If possible, fly with an experienced pilot who can coach you on spotting and working lift.
- Regardless of setup, practice!
Transcribed from original scans by AI. Minor OCR errors may remain.

