

Shillelagh 500
By Duane Gall
Shillelagh (pronounced "shi·lay·lee") is an Irish word meaning cudgel. What better way to get into "club" racing?
In the years since this article was first written, the boom-and-bust world of racing has gone through an entire cycle. The former entry-level event, Quickie 500, now features $300 engines and 160‑mph airplanes. The low end of the cost/speed continuum is now occupied by a new event, Q500 Sport (event 424 in the AMA rule book). The aircraft shown here may be out-of-date for the older Quickie formula, but they're current and competitive in Q500 Sport.
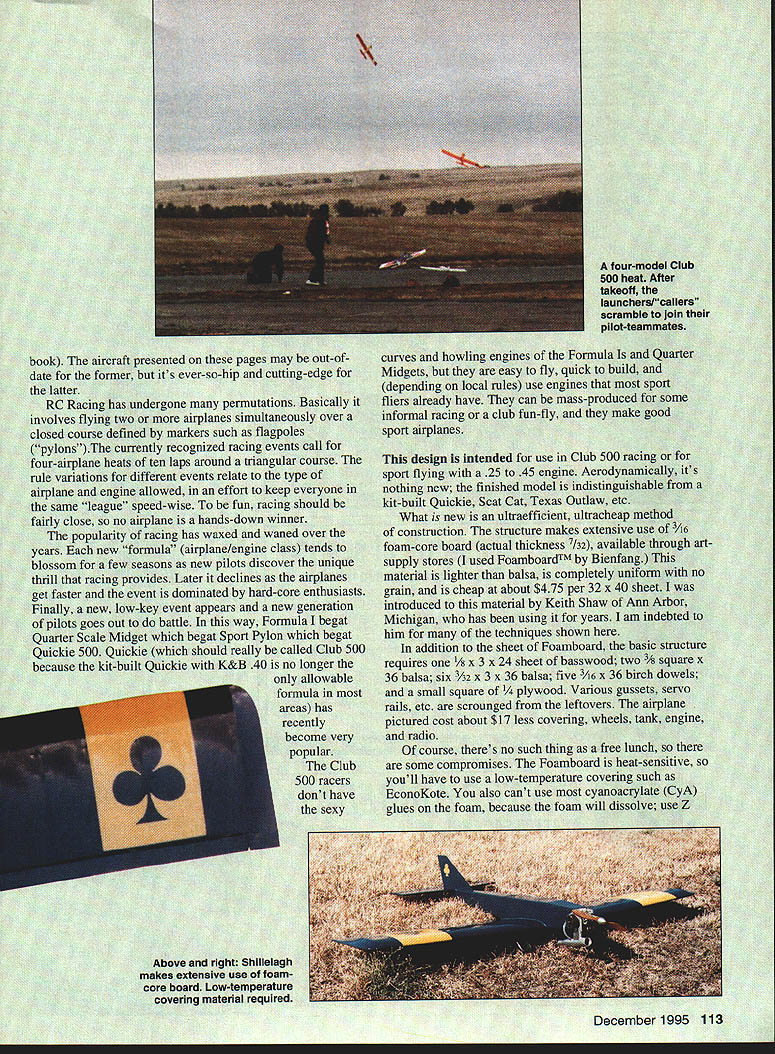
RC racing involves flying two or more airplanes simultaneously over a closed course defined by pylons. Current racing events call for four-airplane heats of ten laps around a triangular course. Rule variations for different events limit airplane and engine types to keep competitors in the same speed "league" so racing stays close and fun.
Racing popularity waxes and wanes. Each new formula (airplane/engine class) tends to blossom for a few seasons, then decline as airplanes get faster and competition becomes dominated by hard-core enthusiasts. Eventually a new, low-key event appears and a new generation of pilots takes part. In this way, Formula I begat Quarter Scale Midget, which begat Sport Pylon, which begat Quickie 500. Quickie 500 (really Club 500, since kit-built Quickies with K&B .40s are no longer the only allowable formula in many areas) has become very popular.
Club 500 racers don't have the curves and howling engines of Formula Is and Quarter Midgets, but they are easy to fly, quick to build, and (depending on local rules) use engines most sport fliers already have. They can be mass-produced for informal racing or a club fun-fly and make good sport airplanes.
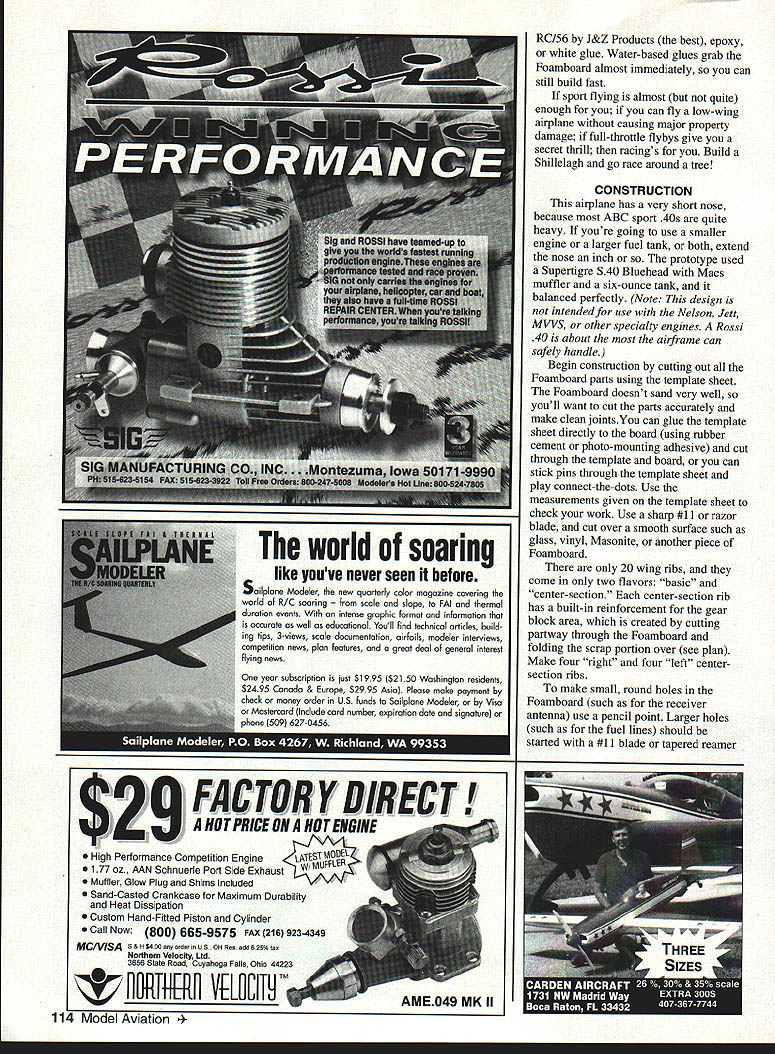
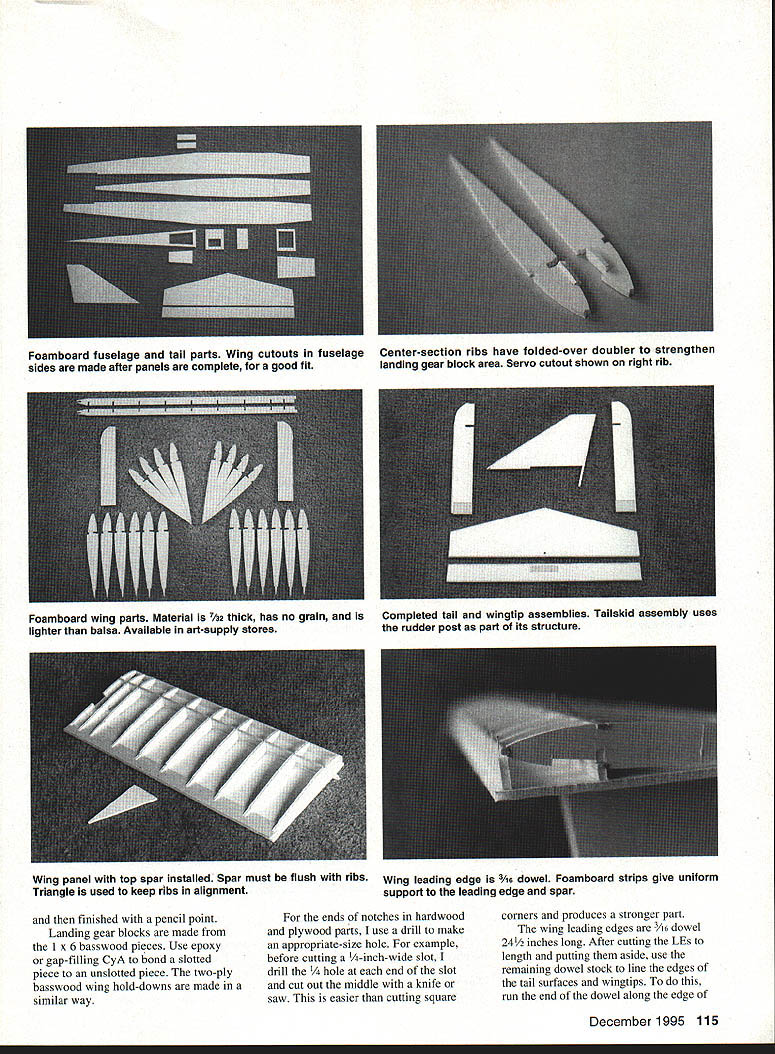
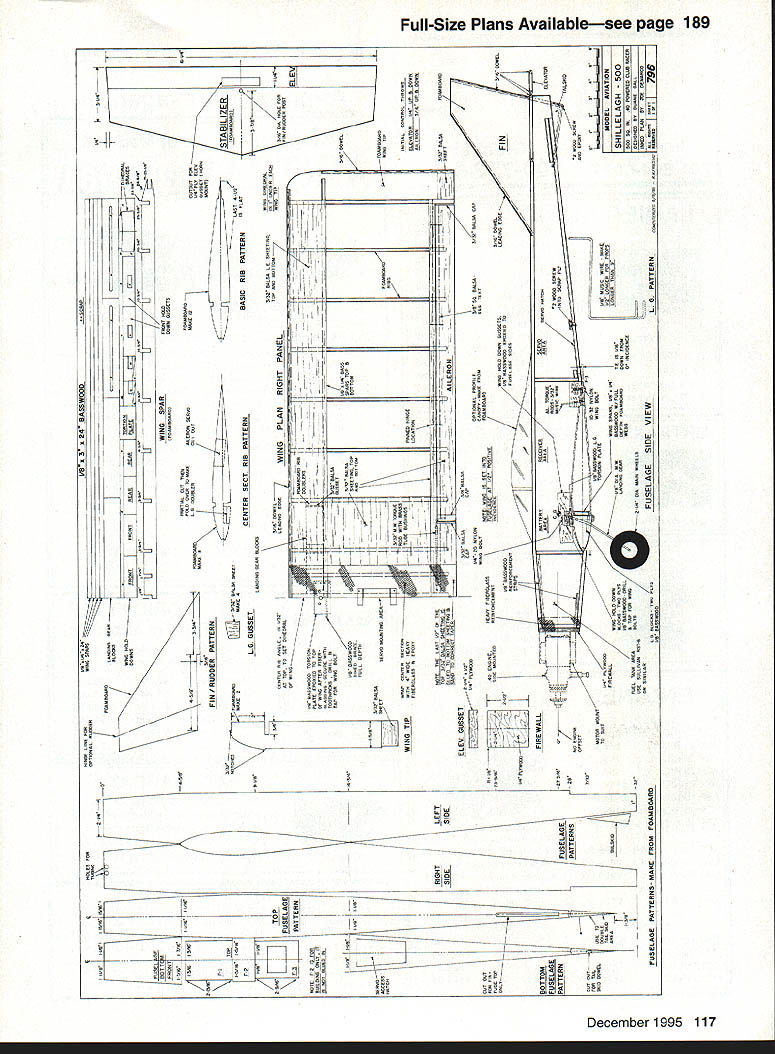
This design is intended for Club 500 racing or sport flying with a .25 to .45 engine. Aerodynamically it’s conventional—the finished model is indistinguishable from a kit-built Quickie, Scat Cat, Texas Outlaw, etc. What is new here is an ultra-efficient, ultra-cheap method of construction using 3/16" foam-core board (actual thickness 7/32"), available through art-supply stores (I used Foamboard™ by Bienfang). This material is lighter than balsa, uniform with no grain, and inexpensive (about $4.75 per 32 x 40 sheet). I learned many of these techniques from Keith Shaw of Ann Arbor, Michigan.
In addition to one sheet of Foamboard, the basic structure requires:
- 1/8 x 3 x 24" sheet of basswood
- two 3/8 x 3 x 36" balsa sheets
- six 3/32 x 3 x 36" balsa strips
- five 1/16 x 36" birch dowels
- a small square of 1/4" plywood
- various leftover scraps for gussets, servo rails, etc.
The pictured airplane cost about $17 in materials (not including covering, wheels, tank, engine, and radio).
There are trade-offs. Foamboard is heat-sensitive, so use a low-temperature covering such as EconoKote. Most cyanoacrylate (CyA) glues will dissolve the foam; use R/C-56 by J&Z Products (recommended), epoxy, or white glue. Water-based glues bond Foamboard almost immediately, so you can still build quickly.
If sport flying almost satisfies you and you enjoy low-wing handling, full-throttle flybys, and go-fast behavior, build a Shillelagh and go race around a pylon!
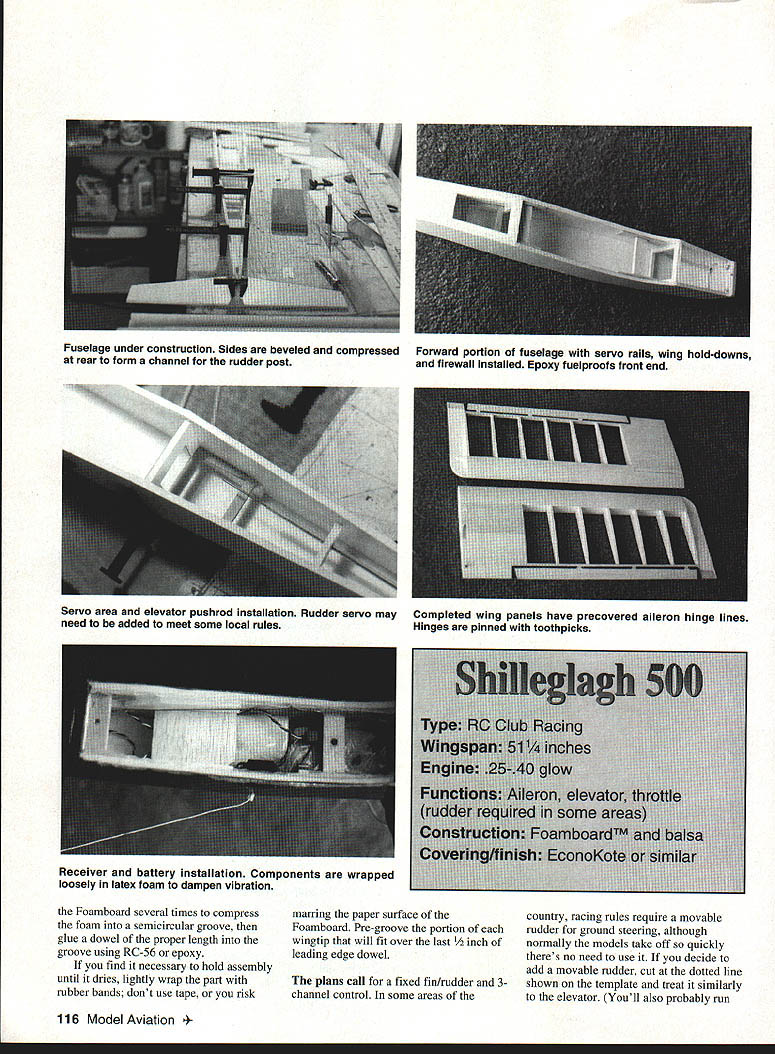
Specifications
- Type: RC Club Racing
- Wingspan: 51-1/4 inches
- Engine: .25–.40 glow (Rossi .40 is about the most the airframe can safely handle)
- Functions: aileron, elevator, throttle (rudder required in some areas)
- Construction: Foamboard™ and balsa
- Covering/finish: EconoKote or similar
Construction
This airplane has a short nose because most ABC sport .40 engines are fairly heavy. If you plan to use a smaller engine or a larger fuel tank, extend the nose about 1 inch. The prototype used a Supertigre SA-40 Bluehead with a Macs muffler and a 6 oz tank and balanced perfectly. (This design is not intended for use with Nelson, Jett, MVVS, or other specialty engines.)
Begin by cutting out all Foamboard parts using the template sheet. Foamboard doesn't sand well, so cut accurately and make clean joints. You can glue the template to the board (rubber cement or photo-mounting adhesive) and cut through both, or pin the template and cut by connecting the points. Use a sharp #11 or razor blade and cut over a smooth surface such as glass, vinyl, Masonite, or another piece of Foamboard. Check measurements against the template.
There are only 20 wing ribs in two types: basic and center-section. Each center-section rib has a built-in reinforcement for the gear-block area created by cutting partway through the Foamboard and folding the scrap over. Make four "right" and four "left" center-section ribs.
To make small round holes (e.g., receiver antenna), use a pencil point. Larger holes (e.g., fuel lines) should be started with a #11 blade or tapered reamer.
Use rubber bands to hold assemblies while drying—do not use tape, which can mar the paper surface. Pre-groove wingtip fittings for the last 1/2" of the leading-edge dowel.
The plans call for a fixed fin/rudder and 3‑channel control. In some areas racing rules require a movable rudder for ground steering. If you add a movable rudder, cut at the dotted line on the template and treat it like the elevator. Note: adding a movable rudder may use up space in the shown servo compartment; consider placing the throttle servo ahead of former #3 and using the aft compartment for elevator and rudder servos.
Bend the landing-gear struts from 1/8" music wire. Leave the portion that protrudes through the top of the wing a bit long so you can trim it later.
Wing
- Build the two wing panels separately. Use the lighter balsa pieces on the right panel to compensate for the engine weight.
- Glue the bottom spar to each spar web. While drying, make a wing jig on your building board: at the main spar location (7-3/4" ahead of the trailing edge) place a 1/4 x 24" strip of Foamboard or balsa; at the leading-edge location (9-1/16" ahead of the trailing edge) place a similar strip 3/4" high.
- Cut a 1-1/2 x 24" piece of 3/32" trailing-edge sheeting and lay it on the board. Also place a 3 x 6" portion of center-section sheeting and glue it to the trailing-edge sheeting.
- Set the spar/web assembly on the 1/4" high strip and add ribs. Install end ribs first, then work from the center outward, using a small Foamboard triangle to keep ribs aligned. The fourth center-section rib should have its reinforcing doubler facing inboard.
- Ensure ribs seat far enough into their notches so the top spar will sit on a perfectly flush surface. The joint between spar, ribs, and upper web edge is critical—any gaps weaken the wing.
- Install the top spar, press it down firmly, and use pins next to (not through) it until dry. Add the 3/16" dowel leading edge, the trailing-edge sheet, and the center-section sheeting in that order. Score the rearmost 1/2" of the trailing-edge top sheeting if needed to bend cleanly.
- When dry, add the leading-edge sheeting and weight the structure down on the jig until dry. You may use CyA to tack the sheeting to spar and leading edge—avoid introducing warps. The leading-edge sheeting locks in the wing shape.
- Remove the panel from the jig and apply a light fillet of R/C-56 on the underside of each seam. Add bottom sheeting, landing-gear blocks, balsa gear block, gussets, and wingtips. Sand leading and trailing edges to final shape. The top trailing-edge sheeting will taper to zero at the airfoil "tail."
- Lay the panel upside down. Cut through bottom sheeting and ribs and install the 3/8" square aileron spar, gluing it to the underside of the top sheeting. Sand the spar flush, then measure and cut the aileron.
- Use a 1/8" Dremel grinding wheel to rout a channel for the aileron torque rod. Cap the aileron ends with balsa, round the leading edges, and cut hinge slots. Before attaching the aileron, apply 1/4" strips of covering along the hinge line. Attach the aileron and torque rod, securing hinges with toothpicks and CyA.
- Join the panels by inserting the dihedral brace into the Foamboard web. Dig out the foam filler to open space between the cardboard facings, insert the brace, and join panels with epoxy. Ensure the dihedral brace contacts upper and lower spars on both sides to create a continuous I-beam through the center section.
- Wrap the center section with heavy (3–8 oz) fiberglass cloth and slow-curing epoxy. Avoid wrinkles or bubbles; the structure must be uniform for strength.
- Add the torsion plate and servo-mounting reinforcements. Drill the center section for landing-gear struts and wing-mounting bolts. Cover the wing and install the landing gear and aileron servo.
Notes on some shop techniques:
- For the ends of notches in hardwood and plywood, drill an appropriately sized hole at each end before cutting the middle out. This produces stronger parts and easier cuts.
- Wing leading edges are 3/16" dowel, 2-1/2" long. Use remaining dowel stock to cap the tail surfaces and wingtips by compressing the foam into a semicircular groove and gluing the dowel in place with R/C-56 or epoxy.
Fuselage and Tail
- Build the fuselage upside down on a flat surface. Mark the centerline and former positions on the top plank. If room allows, lay down the stabilizer and make sure it’s square with the centerline.
- Crease the fuselage top plank at former #1 and bend it, blocking it up 5/16" at the forward end. Using a right-angle triangle for alignment, glue formers #1 and #3 to the plank. Set former #2 in position but don’t glue it yet.
- Bend aft ends of the fuselage sides so the rear of the fuselage will be about 1/4" wide when joined. Place a scrap dowel in the stabilizer hole where the rudder post will go, squeeze the fuselage sides together with the dowel between to compress the foam into a channel for the rudder post. Remove the dowel, glue all seams, and clamp the fuselage/stabilizer assembly until dry.
- Before adding the bottom rear plank, plan servo installation. Install servo rails and cut holes for pushrods. Add the bottom rear plank and wing hold-down.
- Drill the firewall for the engine mount and throttle pushrod; install blind nuts on the backside. Glue the firewall to the nose, ensuring correct thrust angles—if you must err, use a slight down and right thrust. Reinforce joints with scrap basswood strips as shown on the plans.
- After drying, paint the inside of the tank compartment and firewall with slow-curing epoxy and install the fuel tank. Paint and glue the bottom front plank on. Use any leftover epoxy to fuelproof wing hold-downs. Add epoxy and fiberglass tape around the firewall and paint the firewall with epoxy.
- Clean up the fuselage by rounding edges: use a knife handle or dowel to progressively squash the Foamboard into a radius with light fore-and-aft strokes. Covering will shrink around the corners to create smooth contours.
- Hinge the elevator to the stabilizer as you did the ailerons. Apply covering to the fin, stabilizer, and aft fuselage. Install the fin with epoxy and add the tailskid assembly (which uses the rudder post as part of its structure). Finish covering the fuselage, drill and tap for wing hold-down bolts, and install engine and radio.
- Check balance: with the fuel tank empty the center-of-gravity fore-and-aft balance point should be right on the wing spar. Also check side-to-side balance.
Full-size plans are available (see original publication).
Flying
- Range-check the radio with the engine running.
- Initial control throws: elevator 1/4" each way; ailerons 3/16" each way.
- Set the engine rich enough to run strongly with the nose pointed straight up; re-check radio operation.
- For takeoff, point the model down the runway, hold a little up, and apply full power.
- Try full-elevator loops at safe altitude to ensure the model doesn’t buffet or tip-stall. If it does, reduce elevator throw, add nose weight, or both. The goal is smooth, tight turns on full elevator without losing airspeed or control.
- Do not set the racer up excessively sensitive and fly by barely touching the sticks. A racing airplane should be fast but not hard to fly.
- If flying off pavement, you may need to bend the landing gear struts back slightly to prevent porpoising on landing. Deadstick landings are recommended with this kind of airplane.
Whether or not you enter a race, Club 500 airplanes offer lots of excitement for minimal cost. Shillelagh is one "club" racer that will deliver in spades!
Transcribed from original scans by AI. Minor OCR errors may remain.

