
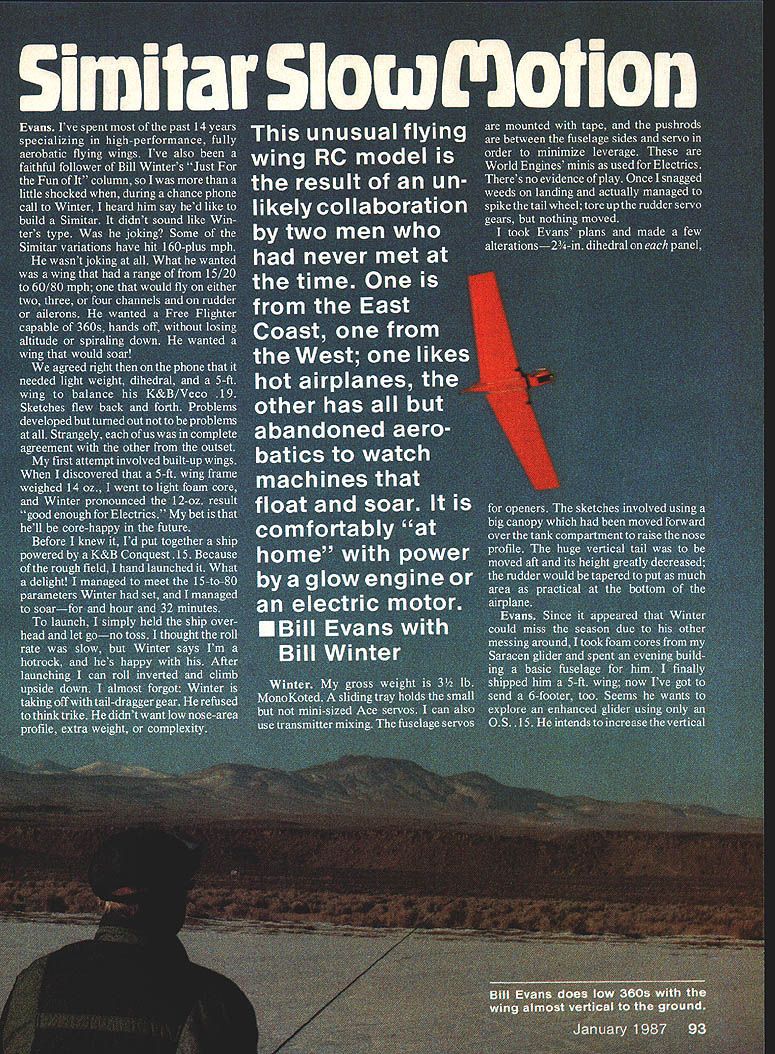
Simitar Slow Motion
Evans
Evans: I've spent most of the past 14 years specializing in high-performance, fully aerobatic flying wings. I've also been a faithful follower of Bill Winter's "Just For the Fun of It" column, so I was more than a little shocked when, during a chance phone call to Winter, I heard him say he'd like to build a Simitar. It didn't sound like Winter's type. Was he joking? Some of the Simitar variations have hit 160-plus mph. He wasn't joking at all. What he wanted was a wing that had a range of from 15–20 to 60–80 mph; one that would fly on either two, three, or four channels and on rudder or ailerons. He wanted a Free Flighter capable of 360s, hands off, without losing altitude or spiraling down. He wanted a wing that would soar.
We agreed right then on the phone that it needed light weight, dihedral, and a 5-ft. wing to balance his K&B/Veco .19. Sketches flew back and forth. Problems developed but turned out not to be problems at all. Strangely, each of us was in complete agreement with the other from the outset.
My first attempt involved built-up wings. When I discovered that a 5-ft. wing frame weighed 14 oz., I went to light foam core, and Winter pronounced the .12-oz. result "good enough for Electrics." My bet is that he'll be core-happy in the future.
Before I knew it, I'd put together a ship powered by a K&B Conquest .15. Because of the rough field, I hand-launched it. What a delight! I managed to meet the 15–80 mph parameters Winter had set, and I managed to soar—for an hour and 32 minutes.
To launch, I simply held the ship over my head and let go—no toss. I thought the roll rate was slow, but Winter says I'm a hotrock, and he's happy with his. After launching I can roll inverted and climb upside down. I almost forgot: Winter is taking off with tail-dragger gear. He refused to think trike. He didn't want low nose-area profile, extra weight, or complexity.
This unusual flying wing RC model is the result of an unlikely collaboration by two men who had never met at the time. One is from the East Coast, one from the West; one likes hot airplanes, the other has all but abandoned aerobatics to watch machines that float and soar. It is comfortably at home with power by a glow engine or an electric motor.
— Bill Evans (with Bill Winter)
Winter
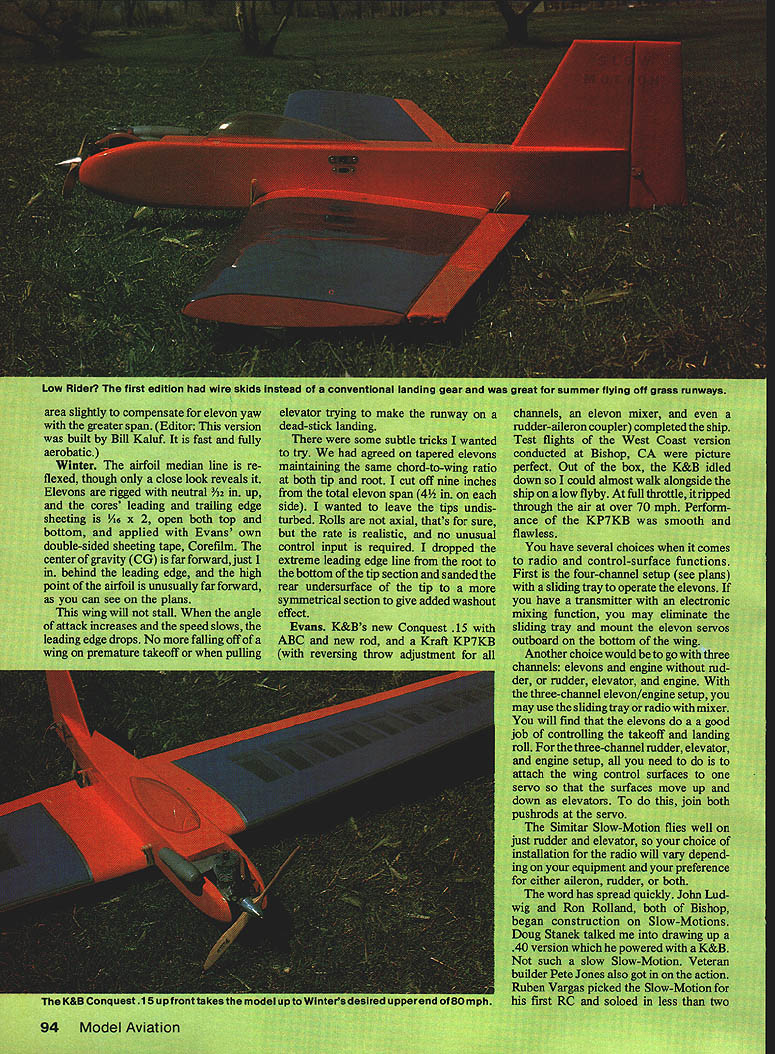
Winter: My gross weight is 3½ lb., Monokoted. A sliding tray holds the small but not mini-sized Ace servos. I can also use transmitter mixing. The fuselage servos are mounted with tape, and the pushrods are between the fuselage sides and servo in order to minimize leverage. These are World Engines' minis as used for Electrics. There's no evidence of play. Once I snagged weeds on landing and actually managed to spike the tail wheel; to up the rudder servo gears, but nothing moved.
I took Evans' plans and made a few alterations—2-3/4 in. dihedral on each panel, for openers. The sketches involved using a big canopy which had been moved forward over the tank compartment to raise the nose profile. The huge vertical tail was to be moved aft and its height greatly decreased; the rudder would be tapered to put as much area as practical at the bottom of the airplane.
Evans, since it appeared that Winter could miss the season due to his other messing around, took foam cores from his Saracen glider and spent an evening building a basic fuselage for him. He finally shipped him a 5-ft. wing; now I've got to send a 6-footer, too. Seems he wants to explore an enhanced glider using only an O.S. .15. He intends to increase the verticals slightly to compensate for elevon yaw with the greater span. (Editor: This version was built by Bill Kaluf. It is fast and fully aerobatic.)
The airfoil median line is re-flexed, though only a close look reveals it. Elevons are rigged with neutral 3/32 in. up, and the cores' leading- and trailing-edge sheeting is 1/16 x 2 in., on both top and bottom, and applied with Evans' own double-sided sheeting tape, Corefilm. The center of gravity (CG) is far forward, just 1 in. behind the leading edge, and the high point of the airfoil is unusually far forward, as you can see on the plans.
This wing will not stall. When the angle of attack increases and the speed slows, the leading edge drops. No more falling off a wing on premature takeoff or when pulling elevator trying to make the runway on a dead-stick landing.
There were some subtle tricks I wanted to try. We had agreed on tapered elevons maintaining the same chord-to-wing ratio at both tip and root. I cut off nine inches from the total elevon span (4½ in. on each side). I wanted to leave the tips undisturbed. Rolls are not axial, that's for sure, but the rate is realistic, and no unusual control input is required. I dropped the extreme leading-edge line from the root to the bottom of the tip section and sanded the rear undersurface off the tip to a more symmetrical section to give added washout effect.
Engines
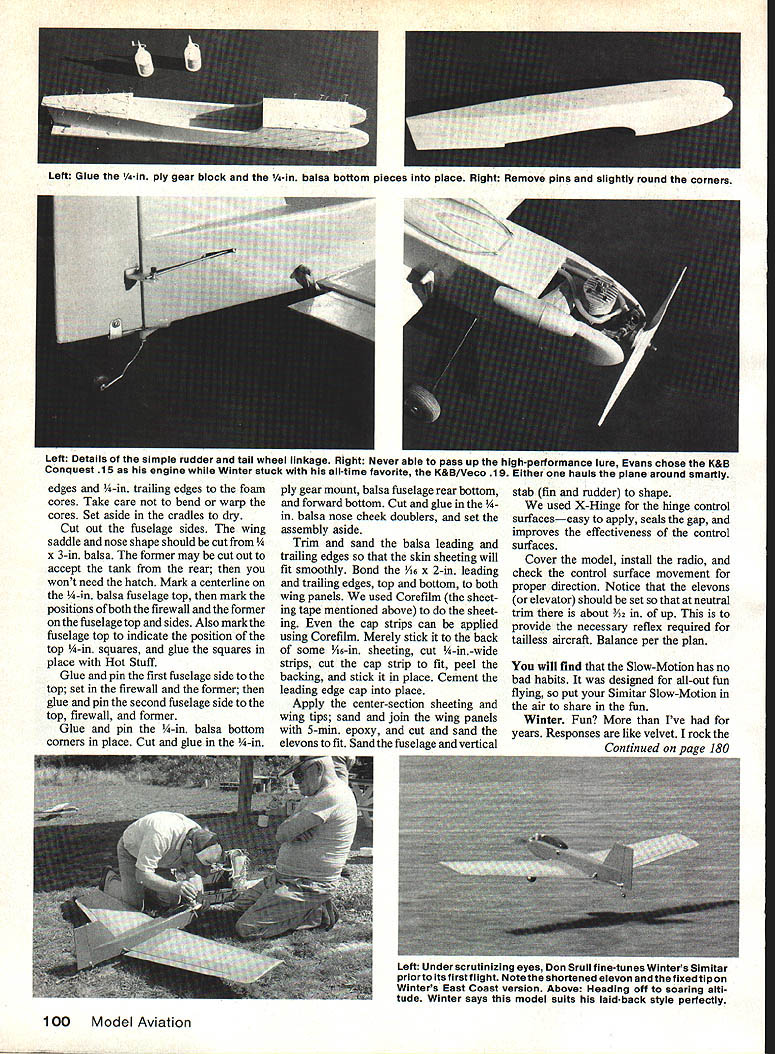
K&B's new Conquest .15 with ABC and new rod, and a Kraft KP7KB (with reversing throw adjustment for all channels, an elevon mixer, and even a rudder–aileon coupler) completed the ship. Test flights of the West Coast version conducted at Bishop, CA were picture perfect. Out of the box, the K&B idled down so I could almost walk alongside the ship on a low flyby. At full throttle, it ripped through the air at over 70 mph. Performance of the KP7KB was smooth and flawless.
Evans chose a K&B Conquest .15; I used my all-time favorite K&B/Veco .19. Either hauls the plane around smartly.
Radio and control options
You have several choices when it comes to radio and control-surface functions:
- Four-channel setup (see plans) with a sliding tray to operate the elevons.
- Transmitter with electronic mixing: eliminate the sliding tray and mount the elevon servos outboard on the bottom of the wing.
- Three-channel options:
- Elevons and engine (no rudder). With this setup you may use the sliding tray or a radio with a mixer. The elevons do a good job of controlling the takeoff and landing roll.
- Rudder, elevator, and engine. Attach the wing control surfaces to one servo so that the surfaces move up and down as elevators — join both pushrods at the servo.
The Simitar Slow-Motion flies well on just rudder and elevator, so your choice of installation for the radio will vary depending on your equipment and your preference for either aileron (elevon), rudder, or both.
The word has spread quickly. John Ludwig and Ron Rolland, both of Bishop, began construction on Slow-Motions. Doug Stanek talked me into drawing up a .40 version which he powered with a K&B — not such a slow Slow-Motion. Veteran builder Pete Jones also got in on the action. Ruben Vargas picked the Slow-Motion for his first RC and soloed in less than two weeks.
As I write, Evans is altering the "finished" plan. Originally the fuselage begins its sharp curve to the rudder rearward from the trailing edge. There was fear that some builders might encounter mechanical clash of elevon control rods with the fuselage sides. The fit was mighty close. If the pushrods are kept close to the centerline, and the upright drive arms of the linkage are bent (slanted) slightly toward inboard, then the fuselage curve can begin at mid-chord—definitely a lower-drag configuration.
Even though I used a Hallco gear with oversize Goldberg wheels for my grassy runway, I was forced to locate the airborne system quite differently than I had expected in order to achieve Evans' "mandatory" CG position. I had to position the 450 mAh battery pack vertically between the tank and the forward cabin bulkhead. This forced me to use a long top hatch, and since my flat-sided balsa canopy is extremely far forward, the canopy had to be attached to the hatch as a unit.
Since I didn't know how the plane would taxi, take off, or land, I raised the thrust line a half inch to increase the prop clearance. My 4-oz. Kraft tank top projects up inside the canopy through a hole in the hatch, and my Ace Silver 7 receiver lies against the cabin bulkhead. Evans' ship balances with the receiver and pack together well back in the cabin.
Skilled fliers like Evans are always self-conscious when talking about how a ship flies and what techniques to apply. A hacker like me runs no risk of seeming to brag. With the help of Don Srull (my test pilot) I have thoroughly evaluated this strange bird. For ease of handling in every respect, my Slow-Motion is a delight.
With 3/8 in. of up (elevons in neutral), the ship will climb high at a great rate under power, slow-fly, and land like a Goldberg Eaglet. It remains stable at high speed with down trim cranked in, and the airfoil (including elevons) becomes quite speed-efficient.
Although I feared tip-overs on the ground, the ground-handling characteristics are superb. Taxi control is excellent. The takeoff run is as good as any trike airplane; it usually requires no correction, but on occasion a light tap of right rudder is necessary as the tail comes up. There is one extremely strange characteristic. On takeoff, from most tail-draggers, the pilot holds up-elevator during the beginning of the run. With my Slow-Motion you could hold full-up all the way until the ship makes a perfectly ordinary takeoff and, once safely off, relax the stick to neutral. Climb-out is automatic. I think the tail wheel prevented over-rotation.
This machine tracks like an arrow. With takeoff elevon trim (elevator mode), it has hands-off stability. A jab of the stick (don't hold it) produces a slightly delayed turn (a second or two) which develops into a 360, hands off, without loss of altitude. Tap the stick the other way, and an automatic eight will be perfectly executed. You do nothing!
Hitting the stick a bit harder (again, don't hold) results in a 720.
If there are winds, there is a slight loss of altitude on the downwind side. At one-third throttle in level flight, a tight loop can be pulled with one-third back stick. On an engine failure over the runway midpoint at 30 feet (I emptied the tank), I made a tight curving descent to a perfect landing at a point directly beneath! In a pinch, the Slow-Motion will turn with my Vagabond Oldtimer.
In normal neutral trim, approaches can be racked around close-in—a boon for old guys with trifocals (or for beginners). With down-trim, approaches can be from far out as with any typical sport job. Slow flight maneuvering in traffic—trying to get into a busy approach stream—is a dream. One needs very little skill; it's safe as a baby; but it takes a couple of flights to become accustomed to the look of the odd configuration.
To soar, I climb to, say, 500 feet, then go idle but don't cut it off. With an economical engine like the old baffle K&B/Veco .19, you can do that for 15 to 18 minutes. It is possible to search all areas for lift. Dead-sticks are a laugh. Really. I have soared repeatedly (with either elevon trim set for circle diameter) staying on station waiting for lift or gradually edging toward promising areas using only the trims for control. Any lift gives you automatic soaring like the big boys.
Tight gliding circles may eventually cause spiraling (gentle) with much down-aileron. However, the rudder trim for soaring proves superior, the turns being flatter. If you combine aileron and rudder trims by degrees in cross-trim, you get very tight, flat soaring circles. The most efficient power-off soaring occurs with some down trim for higher speeds with less sink. Because of the long span, if you're forced to an extreme of crossed controls, the down aileron eventually overpowers the rudder to break the circle. But that is a never-used control situation anyway.
The ship will invert either from a half roll or from off the top of a half loop, but in slow trim it requires full elevator to hold — in down trim and at higher speed, inverted flight is easy. My roll rate is satisfactory. Evans' is faster, and his inverted flight is better. I have more weight and drag and a different center of drag because of my bulky landing gear.
I find Evans' design superior in every way to any so-called trainer with reasonable across-the-board performance. Approaches are positive, don't float, and there is a make-it-easy positive angle to the spot. To tell you the truth, his airplane has excited me. It is a conversation piece at any field and has given me more pleasure than anything since my 1/4-scale Aristocrat. Remember that a .15 is wimpy, a .19 is derated (for me), and if you are into advanced aerobatics, some other Simitar variation (such as his .40 Tracer) could be your cup of tea. I should add that there are no crosswind takeoff or landing problems. I take off at two-thirds throttle.
Construction
Following the sequence described should produce a framed-up craft in four to six hours. I spend most of my time covering and installing the radio system. We've fixed it up so you can have a Slow-Motion even if you can't cut foam cores. They can be ordered from Soaring Research, 454 Wildrose Lane, Bishop, CA 93514. The cost is $12 plus $3 shipping, and California residents must add 6.5% sales tax.
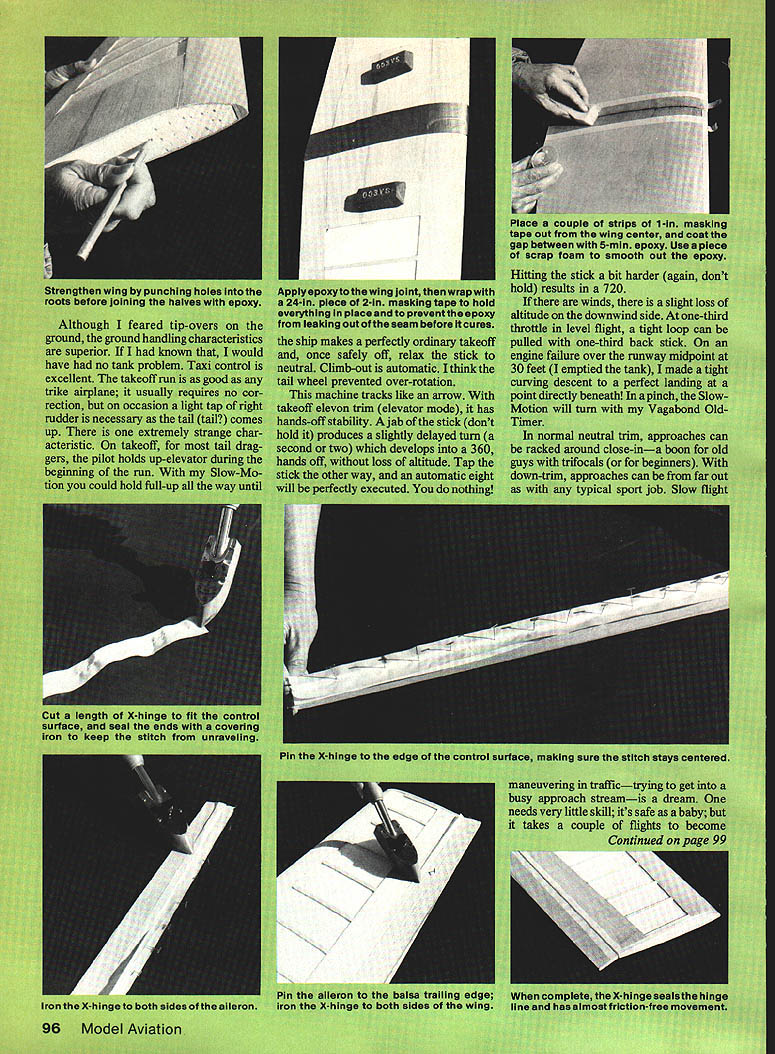
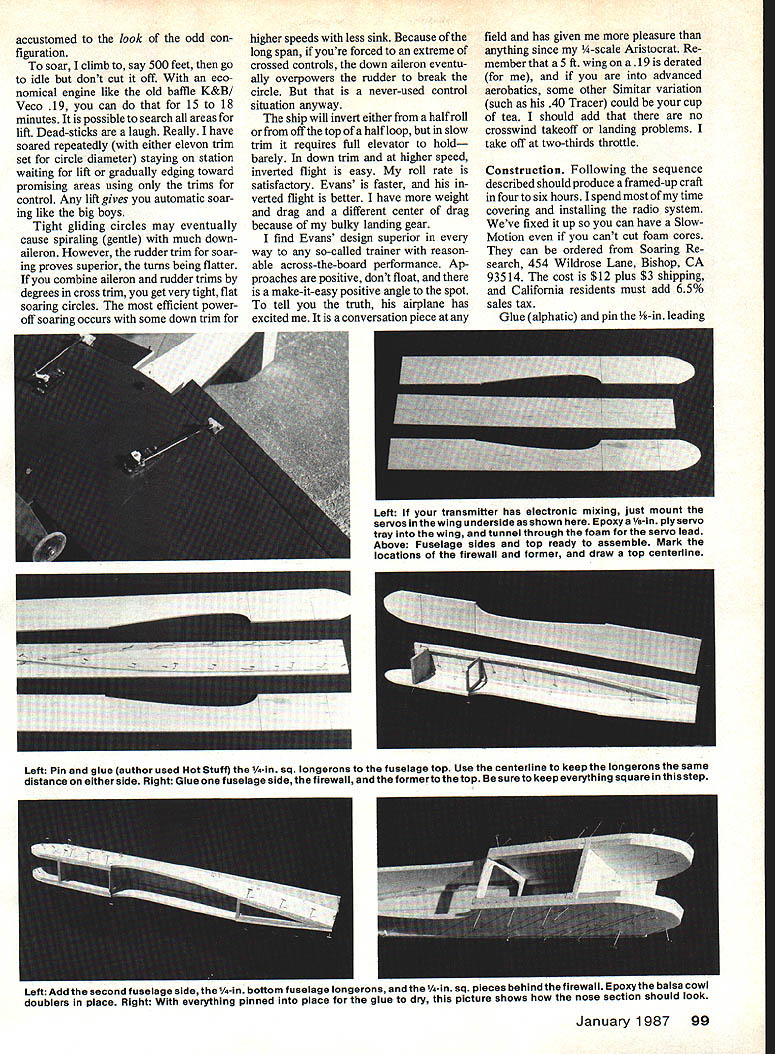
- Glue (aliphatic) and pin the 1/4-in. sq. longerons to the fuselage top. Use the centerline to keep the longerons the same distance on either side. Glue one fuselage side, the firewall, and the former to the top. Be sure to keep everything square in this step.
- Add the second fuselage side, the 1/4-in. bottom fuselage longerons, and the 1/4-in. sq. pieces behind the firewall. Epoxy the balsa cowl doublers in place. With everything pinned in place, let the glue dry.
- If your transmitter has electronic mixing, mount the servos in the wing underside. Epoxy a 1/8-in. ply servo tray into the wing and tunnel through the foam for the servo lead. Mark the locations of the firewall and former on the fuselage top and draw a top centerline.
- Glue a 1/4-in. ply gear block and 1/4-in. balsa bottom pieces in place. Remove pins and slightly round corners. Fit a simple rudder–tailwheel linkage.
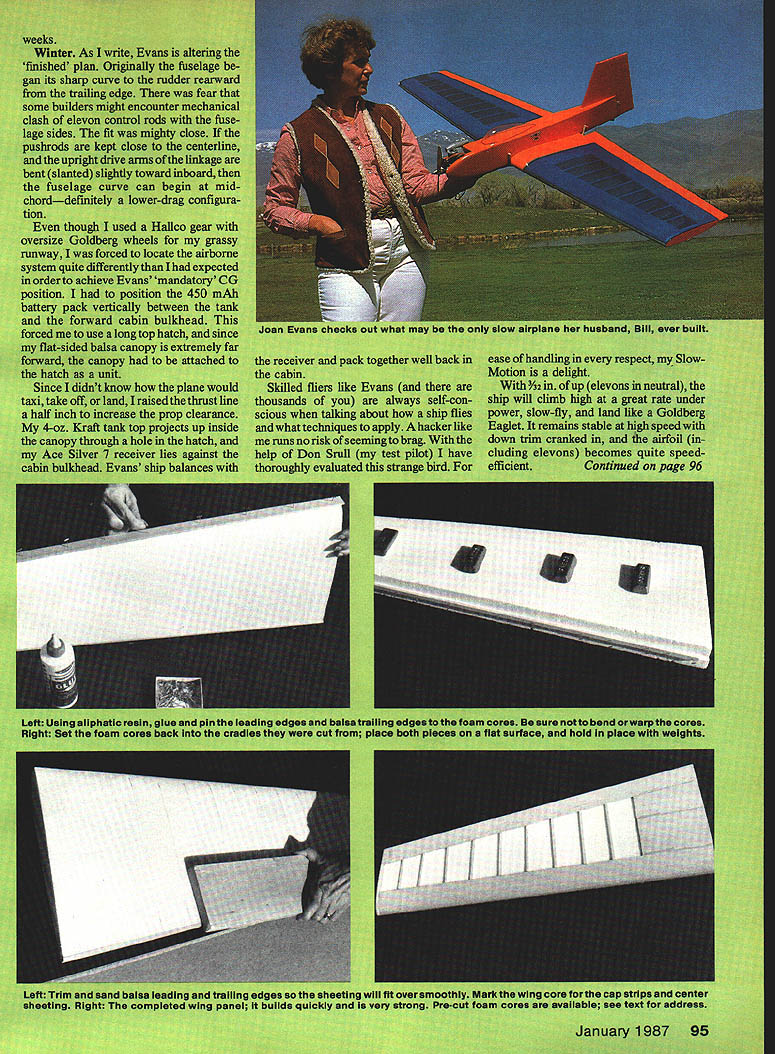
- Trim and sand the balsa leading and trailing edges so the skin sheeting will fit smoothly. Bond 1/16 x 2-in. leading- and trailing-edge stock top and bottom on both wing panels. Take care not to bend or warp the foam cores; set aside cradles to dry.
- Cut out the fuselage sides, wing saddle, and nose shape. Cut a 3-in. balsa former to accept the tank; the rear won't need a hatch. Mark centerline on the 1/8-in. balsa fuselage top and mark positions of both the firewall and former on the fuselage top sides. Also mark the fuselage top to indicate the position of the top 1/4-in. squares and glue the squares in place.
- Glue and pin the first fuselage side to the top and set the firewall and former. Glue and pin the second fuselage side to the top and firewall and former. Glue and pin the 1/4-in. balsa bottom corner pieces in place. Cut and glue the 1/8-in. ply gear mount and the balsa fuselage rear bottom and forward bottom pieces. Cut and glue the balsa nose cheek doublers and set the assembly aside.
- Corefilm sheeting (Evans' double-sided tape) and sheeting cap strips can be applied using Corefilm. Stick back some 1/16-in. sheeting, cut 3/8-in.-wide strips, cut the cap strip to fit, peel the backing and stick in place. Cement the leading-edge cap in place. Apply the center-section sheeting and wing tips, and sand joints smooth.
- We used X-Hinge for the hinge control surfaces—easy to apply, seals the gap, and improves the effectiveness of the control surfaces.
- Cover the model, install the radio, and check the control surface movement for proper direction. Notice that the elevons (or elevator) should be set so that at neutral there is about 3/32 in. of up. This is to provide the necessary reflex required for tailless aircraft. Balance per the plan.
You will find that the Slow-Motion has no bad habits. It was designed for all-out fun flying, so put your Simitar Slow-Motion in the air to share in the fun.
Winter: Fun? More than I've had for years. Responses are like velvet. I rock the stick in fascination. It's as if the servos were geared to the sticks. I even tried coupled ailerons and rudder, but the Slow-Motion flies itself better without. Its smooth responses make my flying look expert. You'll never see a jerky response to any input. What can I tell you? All aircraft should have been designed like the Simitar.
Prologue
It was February and the wind was blowing and cold as I headed for the Eastern Sierra Flyers' field in Bishop, CA. My usual gear list called for the usual — airplane, transmitter, and battery charger — no fuel, plugs, starting battery, or paper towels — I was going to fly.
The new electric version of my Slow-Motion was fitted with an Astro Flight motor, the Cobalt 15, and a 12-cell 800 mAh pack. At 57 oz., the Cobalt is lighter than my .15 glow-powered Slow-Motion. Tests run on the Cobalt 15 with an 8x4 prop had produced 15,000 rpm for the first 2½ minutes, 13,000 for the next minute, and 9,000 for the rest of the four-minute run. My spirits were high.
The field was soft sand (decomposed granite), so I opted for a hand launch. It went off easy with plenty of power, and what a flight! Loops, rolls, and inverted maneuvers were terrific. After four minutes I could hear the motor wind down, so I shut it off and turned in a 7½-minute flight. I was hooked. I put in a call to Bob Boucher at Astro Flight and asked about a Cobalt 25. In a week I was back at the field with a ship that weighed a full 5 lb. and flew faster than with the .15 glow version. I was really hooked.
Specs
- Total wing area: 630 sq. in. (4.4 sq. ft.)
- Weight with geared Cobalt 05: 64 oz. — wing loading 14.5 oz./sq. ft.
- Weight with Cobalt 15 direct drive: 57 oz. — wing loading 13 oz./sq. ft.
- Weight with Cobalt 25 (14 cells, 1200 mAh): 80 oz. — wing loading 18 oz./sq. ft.
Whichever of these three Astro motors you may use in a Slow-Motion, mounting is a simple matter with the mounts available from Astro.
Transcribed from original scans by AI. Minor OCR errors may remain.

