
Simple Lathe Turning
By A. A. Lidberg
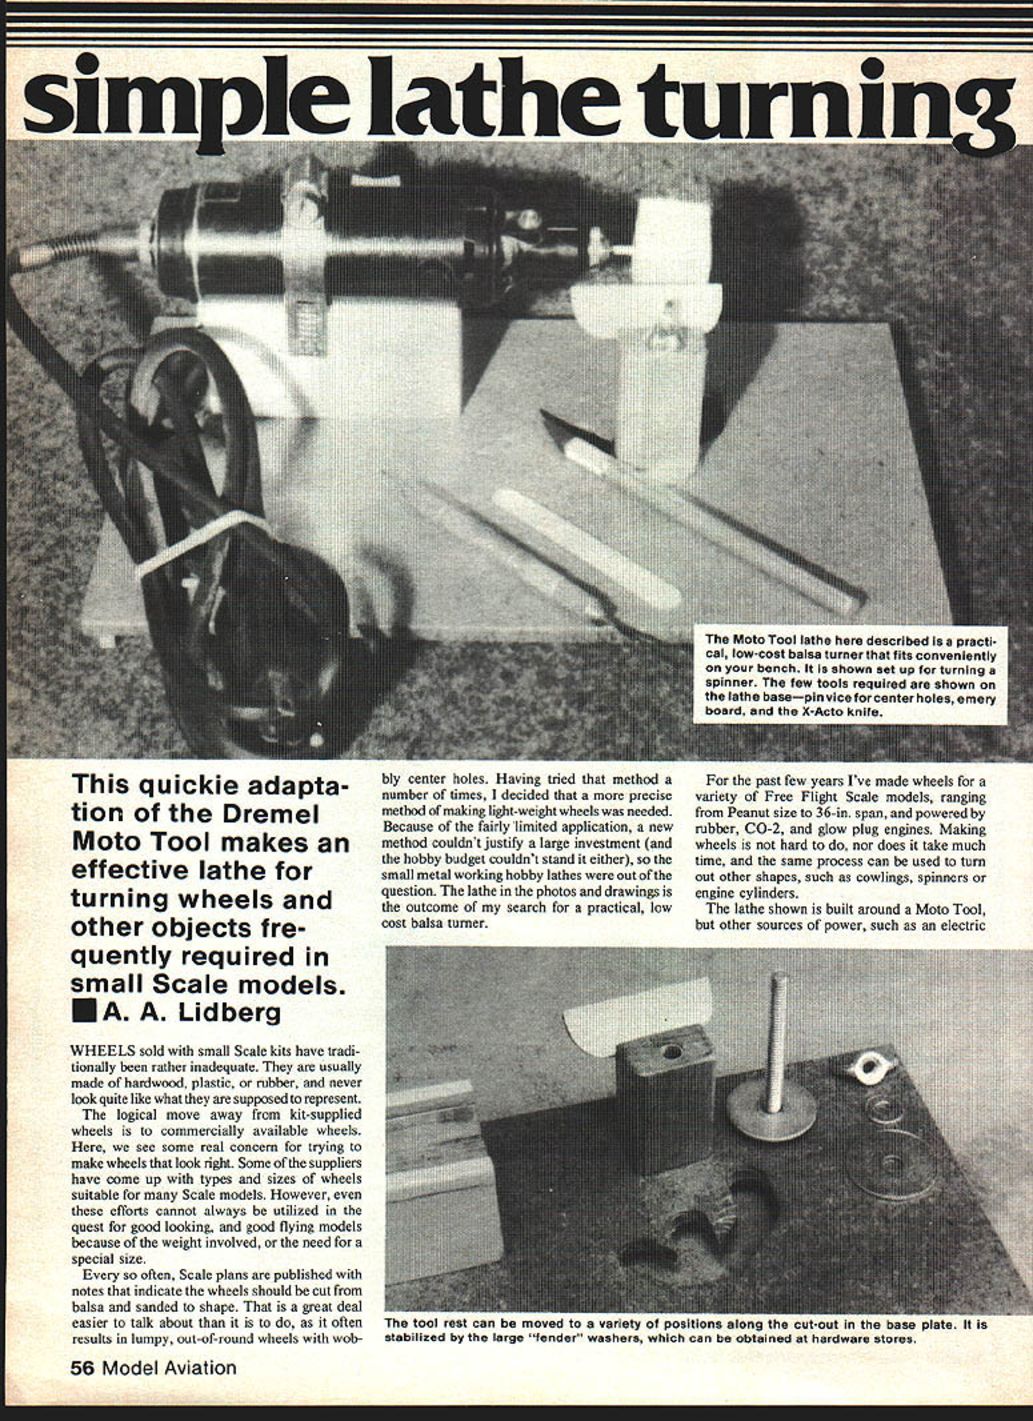
This quick adaptation of the Dremel Moto-Tool makes an effective lathe for turning wheels and other objects frequently required in small-scale models.
Wheels supplied with small-scale kits have traditionally been rather inadequate. They are usually made of hardwood, plastic, or rubber, and seldom look like what they are supposed to represent. A logical move away from kit-supplied wheels is to use commercially available wheels. Some suppliers have produced types and sizes suitable for many scale models, but these are not always usable because of weight or the need for a special size.
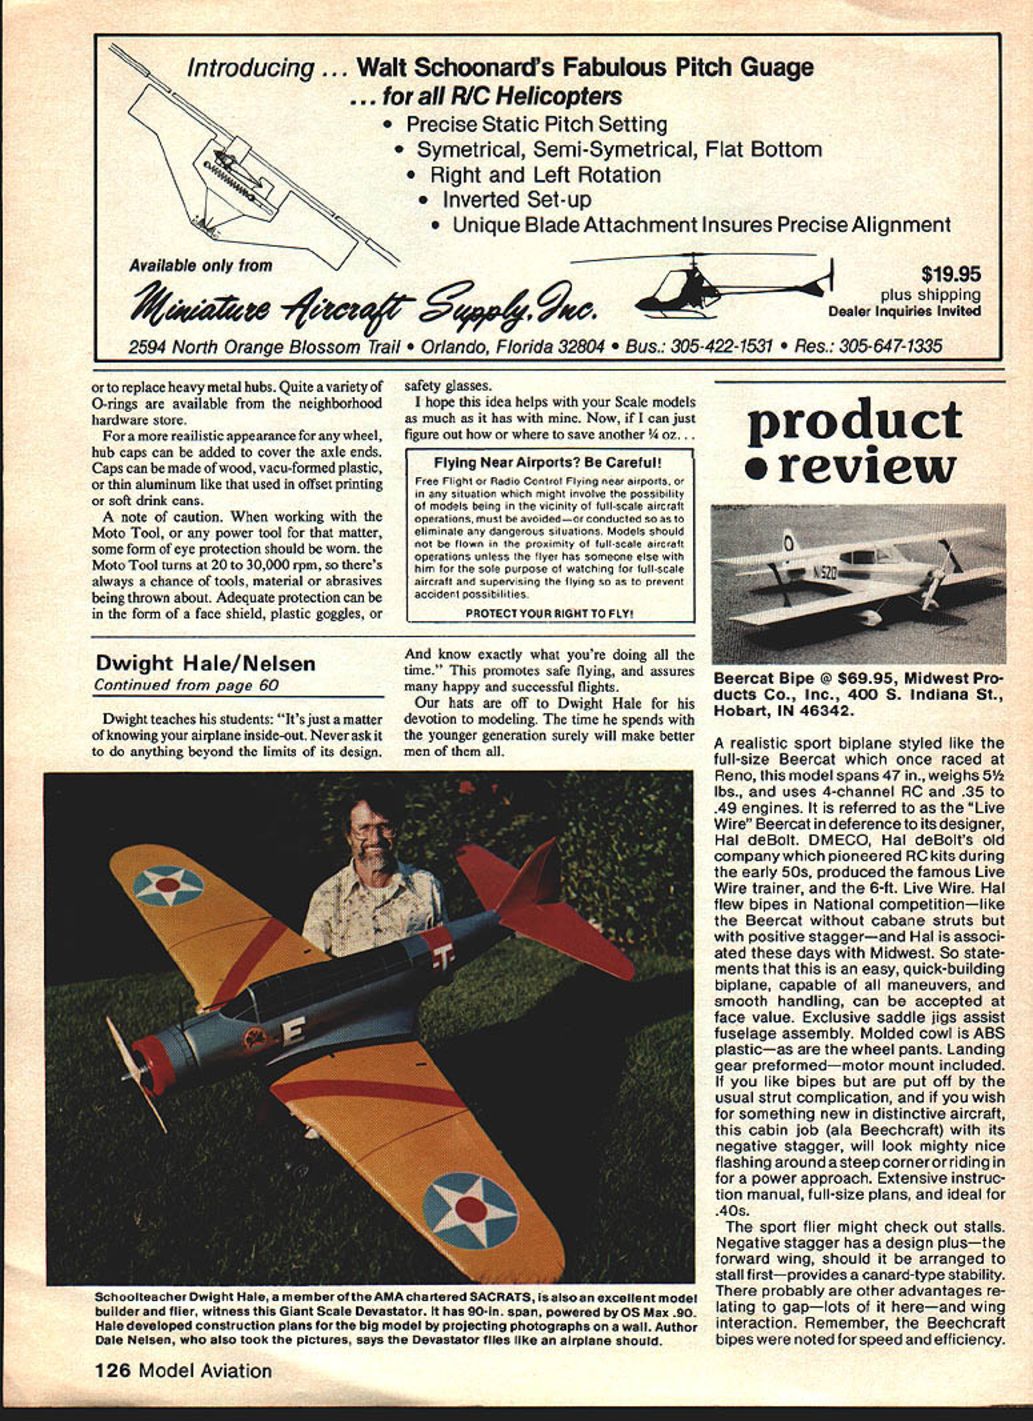
Every so often, scale plans recommend cutting wheels from balsa and sanding to shape. That sounds easy but often results in lumpy, out-of-round wheels with wobbly center holes. After trying that method several times, I decided a more precise, lightweight method was needed. Because the application is fairly limited, a large investment wasn't justified, so small metal-working hobby lathes were out of the question. The lathe described here is the outcome of a search for a practical, low-cost balsa turner.
Over the past few years I’ve made wheels for various free-flight scale models, ranging from Peanut size to 36 in. span, and powered by rubber, CO2, and glow engines. Making wheels is not hard and doesn’t take much time. The same process can be used to turn other shapes, such as cowlings, spinners, or engine cylinders.
Power and Principle
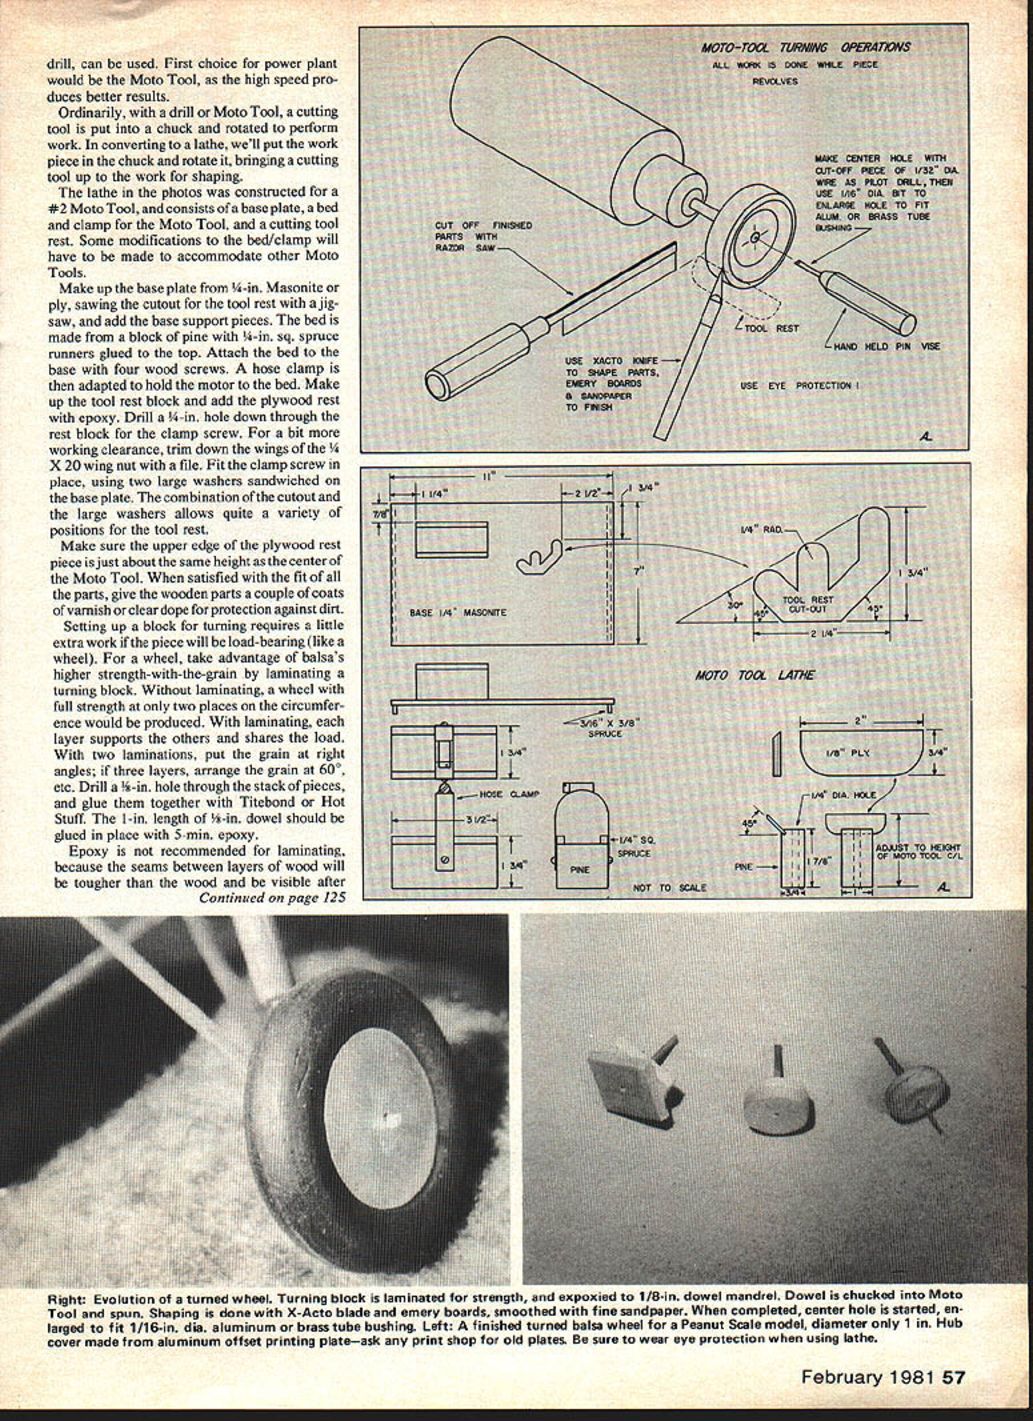
The lathe shown is built around a Moto-Tool, but other power sources, such as an electric drill, can be used. The Moto-Tool is preferable because its high speed produces better results.
Ordinarily, with a drill or Moto-Tool a cutting tool is held in a chuck and rotated to perform work. In this lathe, the workpiece is held in the chuck and rotated while a cutting tool is brought up to the work for shaping.
Materials and basic parts
- Moto-Tool (the example used a #2 Moto-Tool)
- 1/4-in. Masonite or plywood for base plate
- Pine block for bed
- 3/4-in. sq. spruce runners
- Hose clamp to hold motor to bed
- Plywood and block for tool rest
- 1/4 x 20 wing nut and clamp screw with washers
- Epoxy (for tool rest) and 5-min epoxy (for dowel)
- Titebond or Hot Stuff (for laminating)
- 5/16-in. dowel (1 in. length glued in place)
- X-Acto blade and pin vise
- Sandpaper (#100, #320/360), emery boards, sanding blocks
- Razor saw
Construction
- Make the base plate from 1/4-in. Masonite or plywood. Saw the cutout for the tool rest with a jig saw and add the base support pieces.
- Make the bed from a block of pine. Glue 3/4-in. square spruce runners to the top of the bed.
- Attach the bed to the base with four wood screws.
- Adapt a hose clamp to hold the Moto-Tool to the bed.
- Make the tool rest block and add the plywood rest with epoxy. Drill a 1/4-in. hole down through the rest block for the clamp screw.
- Fit the clamp screw using two large washers sandwiched on the base plate; the cutout and washers allow a variety of positions for the tool rest.
- Trim the wings of the 1/4 x 20 wing nut with a file if more clearance is needed.
- Make sure the upper edge of the plywood rest piece is about the same height as the center of the Moto-Tool.
- When satisfied with the fit, give the wooden parts a couple of coats of varnish or clear dope for protection against dirt.
Some modification of the bed/clamp will be necessary to accommodate different Moto-Tool models.
Preparing the turning block
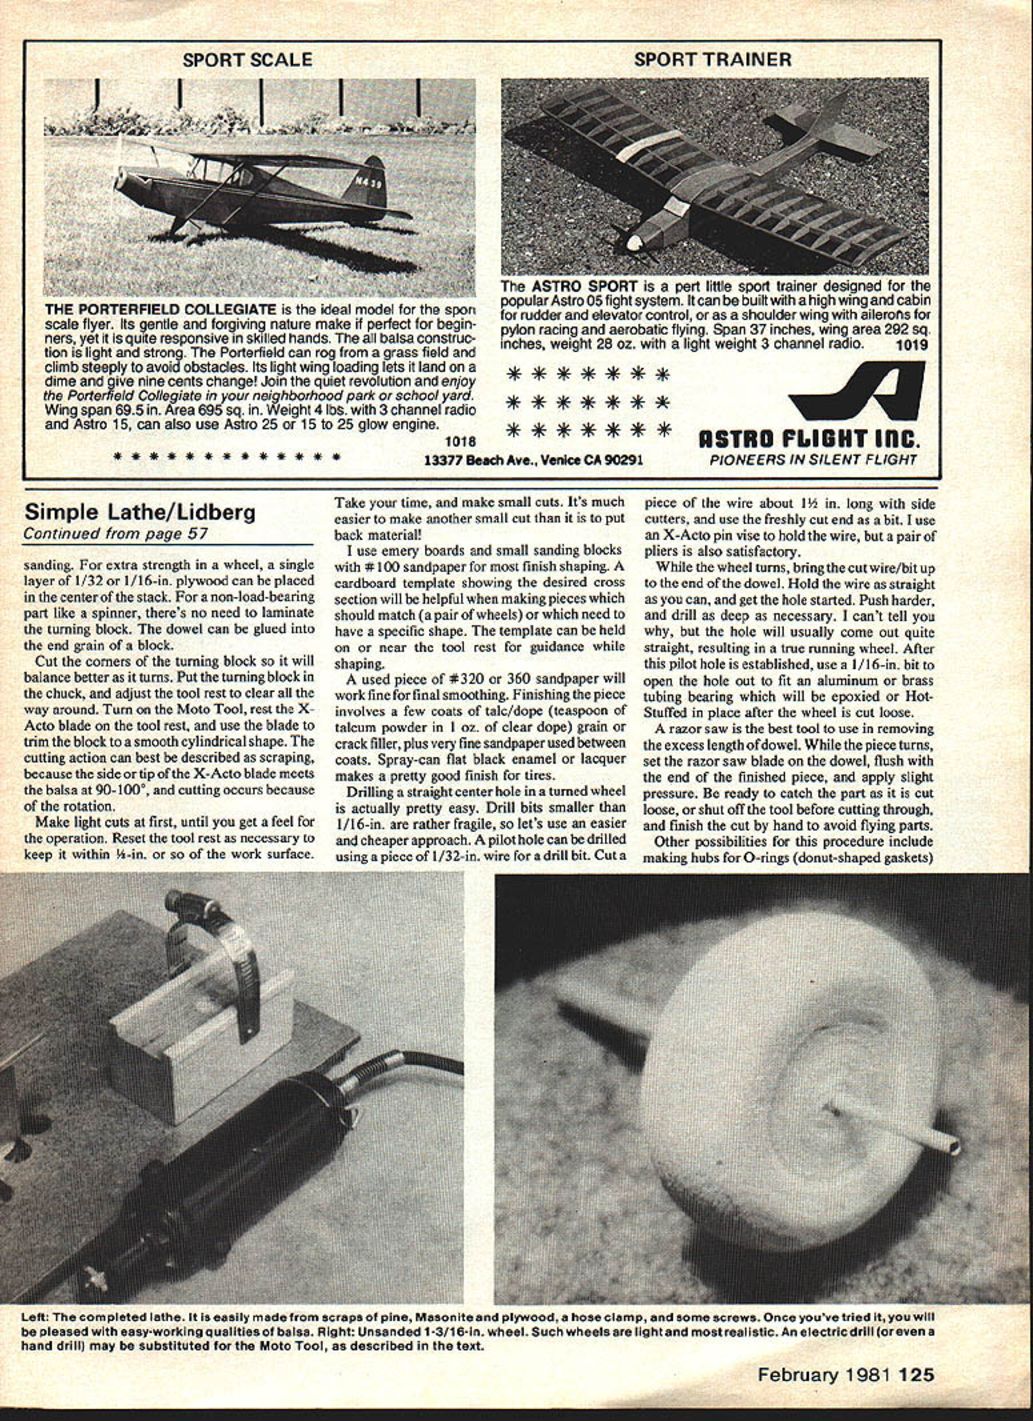
For load-bearing parts like wheels, laminate the turning block to take advantage of balsa’s higher strength with the grain. Without laminating, a wheel would have full strength only at two places on the circumference. Laminating lets each layer support the others and share the load.
- For two laminations: orient the grain at right angles (90°).
- For three laminations: arrange the grain at 60° to each other.
- Drill a 1/4-in. hole through the stacked pieces and glue them together with Titebond or Hot Stuff.
- Glue a 1-in. length of 5/16-in. dowel in place with 5-minute epoxy.
Epoxy is not recommended for laminating because the seams between layers will be tougher than the wood and may be visible after sanding. For extra strength in a wheel, a single layer of 1/32- or 1/16-in. plywood can be placed in the center of the stack. For non-load-bearing parts (for example, a spinner), laminating is unnecessary; the dowel can be glued directly into the end grain of a block.
Cut the corners off the turning block so it balances better as it turns.
Turning and shaping
- Put the turning block in the chuck and adjust the tool rest to clear all the way around.
- Turn on the Moto-Tool. Rest the X-Acto blade on the tool rest and use the blade to trim the block to a smooth cylindrical shape. The cutting action is basically scraping— the side or tip of the X-Acto blade meets the balsa at about 90–100°, and material is removed by the rotation.
- Make light cuts at first until you get a feel for the operation. Reset the tool rest as necessary to keep it within about 1/4 in. of the work surface.
- Take your time and make small cuts—it's much easier to remove more material than to restore it.
Use emery boards and small sanding blocks with #100 sandpaper for most finish shaping. A cardboard template showing the desired cross section is helpful when making matched pieces (a pair of wheels) or pieces with a specific shape; the template can be held on or near the tool rest for guidance.
A used piece of #320 or #360 sandpaper works well for final smoothing. Finish the piece with a few coats of talc/dope (1 teaspoon talcum powder in 1 oz. clear dope) or grain/crack filler, sanding very fine between coats. Spray-can flat black enamel or lacquer makes a good tire finish.
Drilling the center hole
Drilling a straight center hole in a turned wheel is easier than it sounds. Small drill bits under 1/16 in. are fragile, so use this inexpensive pilot method:
- Cut a piece of 1/32-in. wire about 1-1/2 in. long with side cutters and use the freshly cut end as a bit.
- Hold the wire in an X-Acto pin vise or with pliers.
- While the wheel turns, bring the wire up to the end of the dowel, hold it as straight as possible, and start the hole. Push harder to drill as deep as necessary. The hole will usually come out quite straight, producing a true-running wheel.
- After the pilot hole is established, use a 1/16-in. bit to open the hole to fit an aluminum or brass tubing bearing, which can be epoxied or Hot-Stuffed in place after the wheel is cut loose.
Use a razor saw to remove the excess dowel length. While the piece turns, set the razor saw blade on the dowel flush with the end of the finished piece and apply slight pressure. Be ready to catch the part as it is cut loose, or shut off the tool before cutting through and finish the cut by hand to avoid flying parts.
Extras and alternatives
- Hubs for O-rings (donut-shaped gaskets) can be turned; a variety of O-rings is available from hardware stores.
- For a more realistic appearance, add hub caps to cover axle ends. Caps can be made of wood, vacuum-formed plastic, or thin aluminum salvaged from offset printing or soft drink cans.
Safety
When working with the Moto-Tool or any power tool, wear eye protection. The Moto-Tool turns at 20,000–30,000 rpm, so tools, material, or abrasives can be thrown. Adequate protection includes a face shield, plastic goggles, or safety glasses.
I hope this idea helps with your scale models as much as it has with mine. Now, if I can just figure out how or where to save another 1/2 oz....
Transcribed from original scans by AI. Minor OCR errors may remain.

