

Skinny Minnie
Tony D'Alessandro
Overview / Background
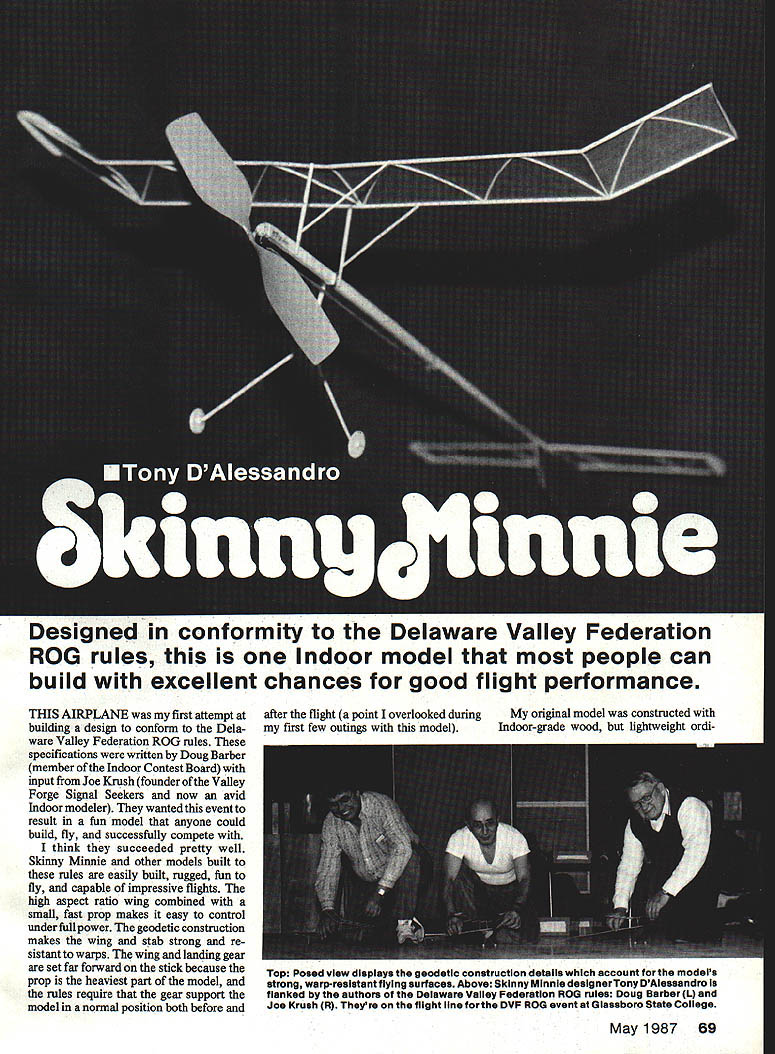
Designed to conform to the Delaware Valley Federation (DVF) ROG rules, Skinny Minnie is an indoor model that most builders can construct with excellent chances for good flight performance. These specifications were written by Doug Barber (Indoor Contest Board) with input from Joe Krush (founder of the Valley Forge Signal Seekers). The intent was a fun, rugged model that anyone could build, fly, and successfully compete with in mass-launch events.
Skinny Minnie features a high-aspect-ratio wing, a small fast prop, geodetic wing construction for strength and warp resistance, and a forward-mounted wing and landing gear to accommodate a heavy prop. My original was built with indoor-grade wood, but lightweight ordinary balsa may be substituted.
Note: the DVF rules call for a minimum overall model weight of 0.109 oz (3.1 g). Use the weights on the plan as a general guide for individual parts.
Materials & Suggested Dimensions
- Ribs: quarter-grain 1/32" balsa, sanded to 0.025"
- Wing and stab spars: stiff, straight-grained 1/16" sheet, sanded to thickness noted on plan
- Stick and tail boom: lightweight, straight, stiff balsa (tail boom may be softer)
- Wing and landing-gear poles: medium-weight balsa (cut oversize, sanded to circular taper)
- Landing-gear pieces: fairly hard quarter-grain balsa
- Wheels: foam cafeteria dishes with balsa hubs
- Covering: Japanese tissue (or other suitable covering)
- Adhesives: Ambroid cement thinned about 50/50; 3M #77 spray cement for tissue
- Bearing: front double bearing (aluminum) or homemade from wire
- Prop: commercially available plastic prop, max 6" diameter (per DVF rules); may be thinned and hub scraped but not hole-cut
- Typical motor rubbers tried: .058 x 16 in (initial) and .048 x 20 in (preferred)
- Recommended winding: ~2,300 turns or more for maximum flights
General Construction Tips
- Use clean, straight-grained balsa free of warps.
- Thin Ambroid cement about 50/50 and apply carefully (small glue pot, glue stick or small glue gun recommended).
- For cutting and trimming use a double-edge razor blade (the brittle, break-to-a-point type). Protect face and hands.
- Make rib templates from thin, flexible material (1/32" sheet aluminum is recommended).
- Assemble wing and stab over the plans; let all glue joints dry thoroughly before proceeding.
- Shim up the leading edge of the left wing tip by 1/8" to help the model maintain altitude while circling left.
- Cut dihedral joints, apply glue, and block up the wing panels to the correct dihedral dimensions.
Wing and Tail Construction
- Make rib templates and cut ribs from quarter-grain 1/32" balsa, sanded to 0.025". Slice ribs at the intervals shown on the plan.
- Cut wing and stab spars from stiff 1/16" sheet; sand to the thickness on the plan and cut to finished size.
- Trim ribs at the rear and glue into place on the spars while assembling over the plan.
- After glue dries, cut dihedral joints, apply glue, and block up to the correct dihedral.
- Cover flying surfaces with Japanese tissue (see Covering below). Inner wing panels: tissue cut to exact length; other parts: tissue cut somewhat larger for trimming.
Covering
- Use 3M #77 spray cement to adhere tissue. Lay out newspapers, aim the spray about 1 ft above the parts, and give two light spritzes. Work in subdued light so you can see the spray.
- Iron pre-cut tissue with a warm iron to smooth wrinkles and reduce moisture before applying.
- Apply tissue smoothly to frames, then trim overhang with a new razor blade.
- Spray some cement into a small container and use a fine brush for missed spots and dihedral overlaps.
- Alternatively, covering may be done using thinned dope or other standard adhesives.
Stick, Tail Boom, and Hook
- Select a lightweight, straight, stiff balsa stick. Tail boom may be slightly softer wood.
- Sand and shape parts to plan dimensions.
- Bend and fit the rear (rubber) hook, glue it centered on the stick.
- Glue the tail boom to the stick while the top edges are lying on a flat surface—make sure the boom is in line with the stick.
- Glue the stab in place at the end of the tail boom, tilted slightly as shown on the plan. When dry, glue the rudder aligned with the wing poles by eye.
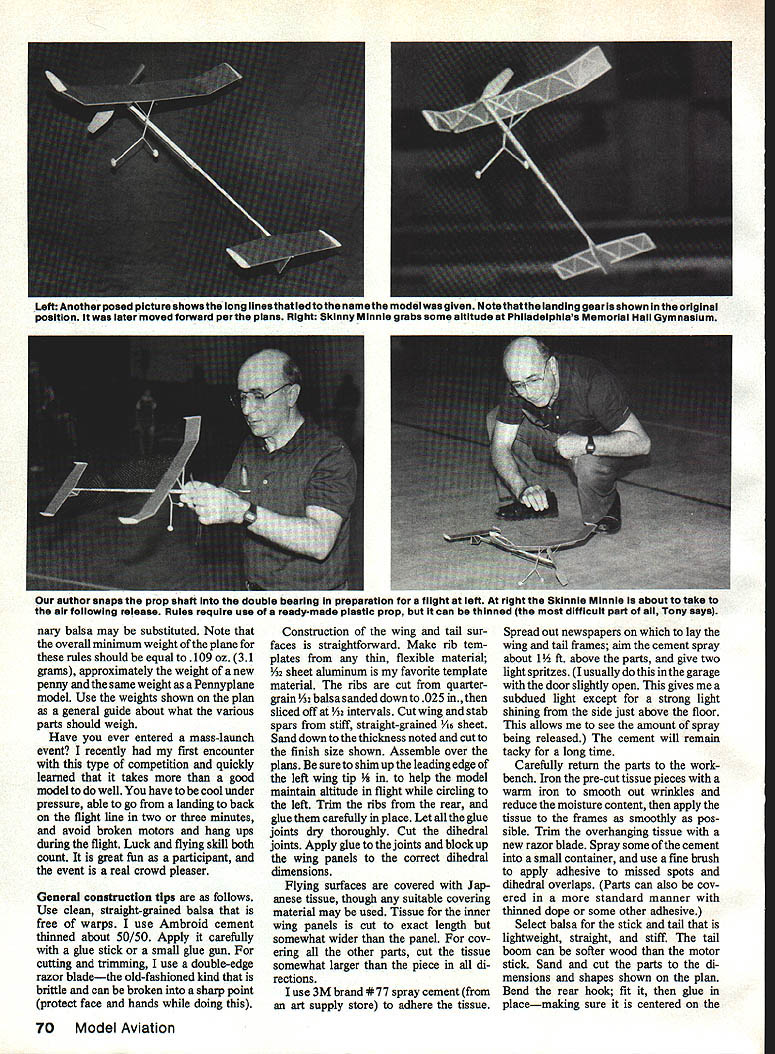
Front Bearing and Prop Shaft
- The front double bearing (aluminum) keeps the prop running smoothly, especially as the rubber motor slackens. Bearings can be bought (e.g., Ray Harlan) or formed from wire if skilled.
- Glue the bearing to the front of the motor stick with approximately 2° left offset to produce a left-hand circle.
- A purchased bearing may require shimming so the holes stand 1/16" away from the motor stick. Wrap a few turns of thread around the stick and bearing and glue for additional strength.
- Thread a 1/8" brass tube on the shaft about 1/4" and secure to the front of the stick with Ambroid, ensuring ~2° left thrust.
- Balance the prop by placing the center on a thin edge to see which blade is heavier; scrape the heavy blade a bit more, finish with fine sandpaper, wash in solvent, rub with fine steel wool, and wipe clean.
Making Paper Tubes and Poles
- Cut about a 1-1/2" square of tissue.
- Deburr and polish about 2" of 1/16" O.D. wire or tube.
- Apply dope to the tissue and wrap it around the wire, making 6–7 layers.
- After a few seconds, slide the rolled tube off the form and let dry at least an hour.
- Slide it back onto the form, mark needed lengths, and cut with a razor blade.
- Cut and sand balsa poles and landing-gear pieces slightly oversized to a snug, circular taper to fit the paper tubes.
Landing Gear and Wheels
- Cut wheels from foam cafeteria dishes. Glue balsa hubs to the discs with white glue.
- Bend wire axles per the plan and glue in place. Pierce the wheel hub center with a thin straight pin, place on the axle, and retain with a drop of glue.
- Assemble landing gear as shown on the plan.
Final Assembly
- Mark positions of the wing tubes on the left side of the stick and the landing-gear tube on the right side.
- Pin the stick assembly vertically on a flat surface. Glue the paper tubes (with poles inserted) to the side of the stick.
- Before glue sets, use a small square/triangle to ensure the poles are perfectly vertical in all directions.
- Glue the wing to the top of the poles. Sand or cut a small flat on the pole tops for a stronger joint. Note the wing is offset 1/16"; block up while glue dries.
- Insert the landing-gear assembly into its paper tube. Cut a 1/16" square balsa spacer and glue it to the tube. Glue the landing gear assembly to the right side of the stick, aligned vertically with the wing poles and tilted forward so the wheels sit about halfway between the front wing pole and the prop bearing.
- The landing gear is removable for storage. If the model is overweight, raise the landing-gear parts and paper tube up to 1/8" to achieve proper balance point.
Tip Plates
Knowledgeable builders say tip plates can increase lifting efficiency; I haven't proven or disproven this but used them for aesthetics. If used, glue them at 90° to the surface.
Propeller Details & DVF Rule Notes
- DVF rules require a ready-made plastic propeller, maximum 6" diameter. You may scrape blades and hub as thin as allowed, but you cannot cut holes in the prop.
- Scraping/thinning the prop is tedious: scrape, wash in solvent, rub with fine steel wool, and wipe clean.
- The prop I used had low pitch and was fairly heavy; you might experiment with different shapes, higher pitch, and lighter weight.
Motor and Performance
- The model originally flew well on a loop of rubber sized .058 x 16 in but often dead-sticked. Changing to .048 x 20 in improved endurance.
- For maximum flights, wind to approximately 2,300 turns or more.
- The Skinny Minnie prefers a left-hand circle, fairly fast: apply full power until established, then reduce power to avoid climbing into the ceiling. Landings indoors should be with power off, letting the model settle.
- If the model stalls, reduce incidence at the front wing root; if it dives, increase incidence. The center of gravity with rubber motor installed should be as shown on the plan (about the prop-shaft balance point). Plans call for about 1/8" nose weight (or equivalent) to achieve the proper CG.
Flying and Mass-Launch Events
- Mass-launch contests require more than a good model: stay calm under pressure, relaunch quickly (get back on the flight line in 2–3 minutes), and avoid broken motors and hang-ups during flights. Luck and flying skill both count. These events are great fun and crowd-pleasers.
Sources & References
- Indoor Model Supply (Box C, Greeley, CA 91234)
- Micro-X Products (P.O. Box 1063, Lorain, OH 44053)
- Recommended book: Ron Williams, Building and Flying Indoor Models — highly recommended for detailed coverage.
Summary
Skinny Minnie is an easy-to-build, rugged indoor model with good performance potential in competition. Follow the DVF rules (including the plastic prop and minimum weight), use careful construction and trimming, and practice quick, calm flying during mass launches for best results.
Transcribed from original scans by AI. Minor OCR errors may remain.

