
Skyhook
By Dom Apikos
Want something different to do that is fun for you and your kids? Try this easy project.
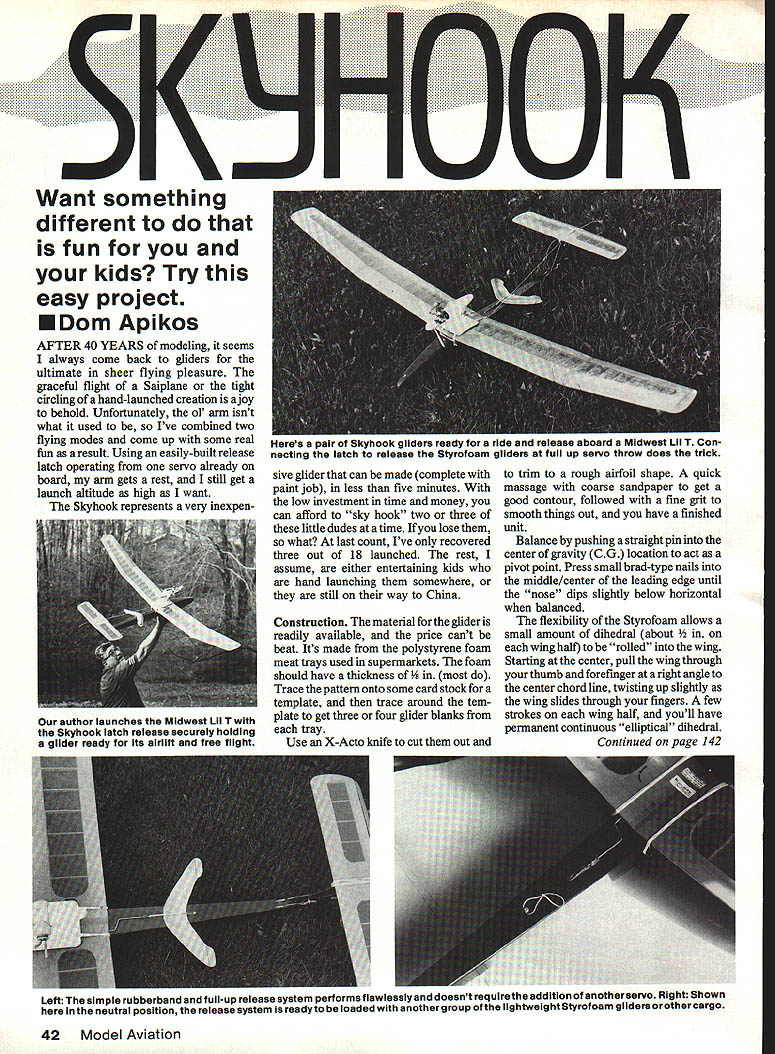
After 40 years of modeling, it seems I always come back to gliders for the ultimate in sheer flying pleasure. The graceful flight of a sailplane or the tight circling of a hand-launched creation is a joy to behold. Unfortunately, the old arm isn't what it used to be, so I've combined two flying modes and come up with some real fun as a result. Using an easily built release latch operating from one servo already on board, my arm gets a rest, and I still get a launch altitude as high as I want.
The Skyhook represents a very inexpensive glider that can be made (complete with paint job) in less than five minutes. With the low investment in time and money, you can afford to skyhook two or three of these little dudes at a time. If you lose them, so what? At last count, I've only recovered three out of 18 launched. The rest, I assume, are either entertaining kids who are hand-launching them somewhere, or they are still on their way to China.
Construction
Materials
- Polystyrene foam meat trays from supermarkets (about 1/4 in. thick)
- Card stock for a template
- X-Acto knife
- Coarse and fine grit sandpaper
- Straight pin
- Small brad-type nails
- Spray paint (test first to ensure it doesn't attack the foam)
- Small servo (already on board)
- Rubber band and hardware for the release latch (pushrod, anchor, etc.)
Steps
- Trace the glider pattern onto card stock to make a template. Use the template to trace three or four glider blanks from each foam tray.
- Cut the blanks out with an X-Acto knife and trim to a rough airfoil shape.
- Shape the airfoil by massaging with coarse sandpaper to get a good contour, then finish with fine grit to smooth things out.
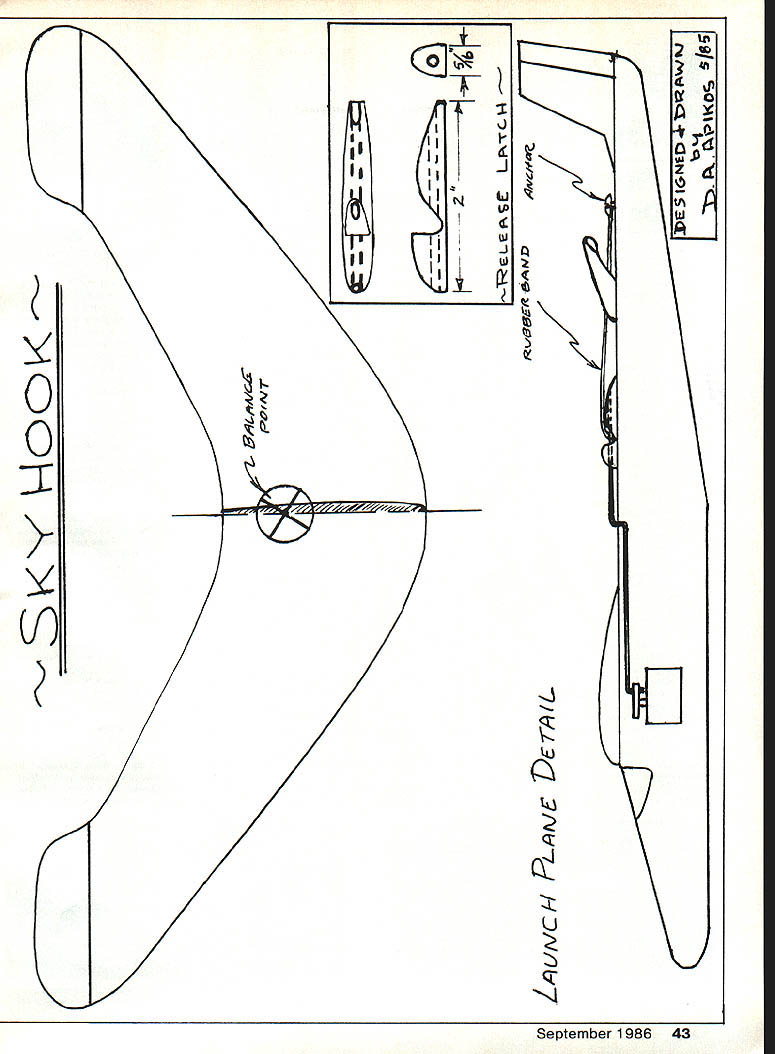
- Balance the model by pushing a straight pin into the center of gravity (C.G.) location to act as a pivot point. Adjust by pressing small brad-type nails into the middle/center of the leading edge until the nose dips slightly below horizontal when balanced.
- Add dihedral: the flexibility of the foam allows about 1/2 in. of dihedral on each wing half to be rolled into the wing. Starting at the center, pull the wing through your thumb and forefinger at a right angle to the center chord line, twisting up slightly as the wing slides through your fingers. A few strokes on each wing half will create a permanent continuous "elliptical" dihedral.
- Crease the hinge line at the wing tip with a ball-point pen. The crease will let you bend up trim tabs by cracking the hinge. About 1/16 in. of positive trim tab should be sufficient.
- Finish with a quick spritz of spray paint. Test the paint brand first to be sure it doesn't attack the foam along the leading edge.
Release Latch
The release latch is designed to be super-simple, quick and foolproof. Basically, the latch releases a rubber band held in place by a pushrod that is operated by the extreme throw of an already-installed control servo. The full-up servo throw lets you release the glider at relatively slow speed—ideally after you drop to low throttle and pull up to a gentle stall.
If you use your imagination, the release latch can be used to release, drop, or launch a host of cargo — truly a "sky hook."
Plan notes / diagram labels
- Balance point
- Release latch
- 2 in.
- 9/16 in.
- Anchor
- Rubber band
- Launch plane detail
Designed & drawn D.A. Apikos 5/85
Transcribed from original scans by AI. Minor OCR errors may remain.

