
Slow Poker
Stan Buddenbohm
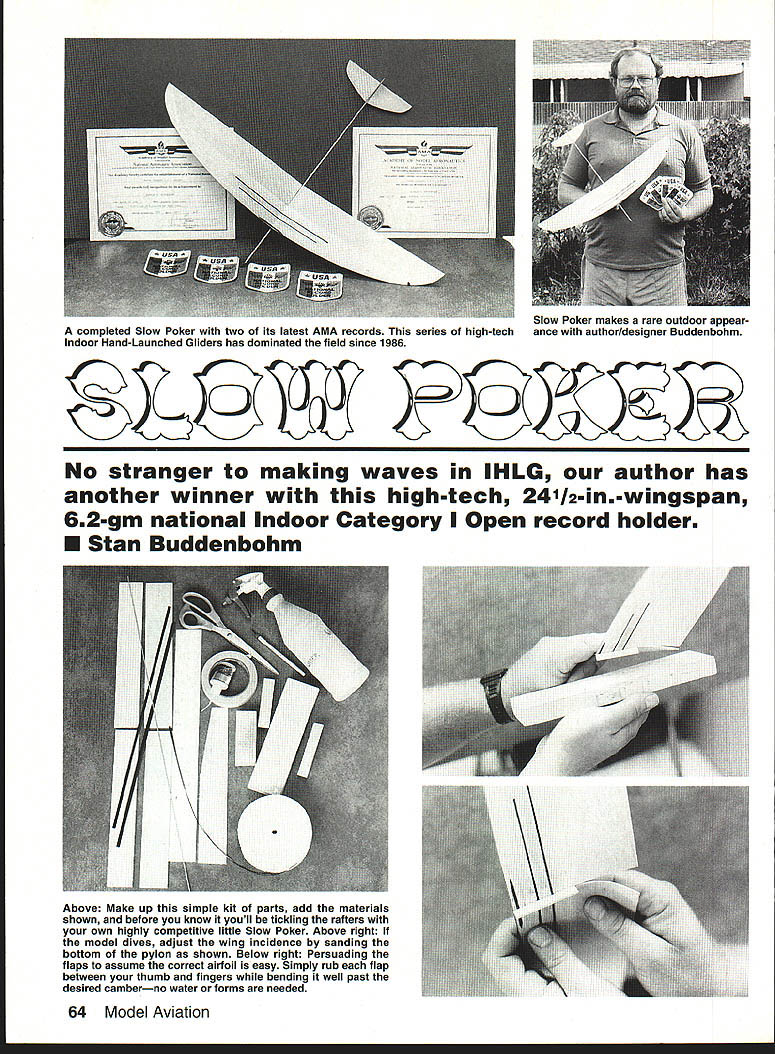
No stranger to making waves in IHLG, Slow Poker is a high‑tech Indoor Hand‑Launched Glider (IHLG) with a 24-1/2 in. wingspan and a 6.2 gm flying weight. Few sights in Free Flight are as beautiful as an IHLG gracefully, smoothly, and slowly descending from a 26‑ft ceiling for a long, lazy circle. Slow Poker regularly delivers 47‑second flights and holds the national Indoor Category I Open record (two flights totaling 9:48). Early versions bested Phedon Tsiknopoulos’s all‑wood record; a later high‑tech version overturned Mark Drela’s record with an 828.8‑second flight, which was improved to 851 seconds. The large jump to the current record came from rethinking design and trim philosophies.
Like successful low‑ceiling designs since the Stoy brothers’ Coot, Slow Poker uses a flapper‑type wing to achieve lower drag by allowing the airfoil to flatten on launch. To increase wing incidence and improve recovery and glide, the design uses more undercamber and weaker flaps than a conventional flapper. Stabilizer area is larger than many designs; very small stabilizers can cause small speed oscillations that reduce flight time.
Construction
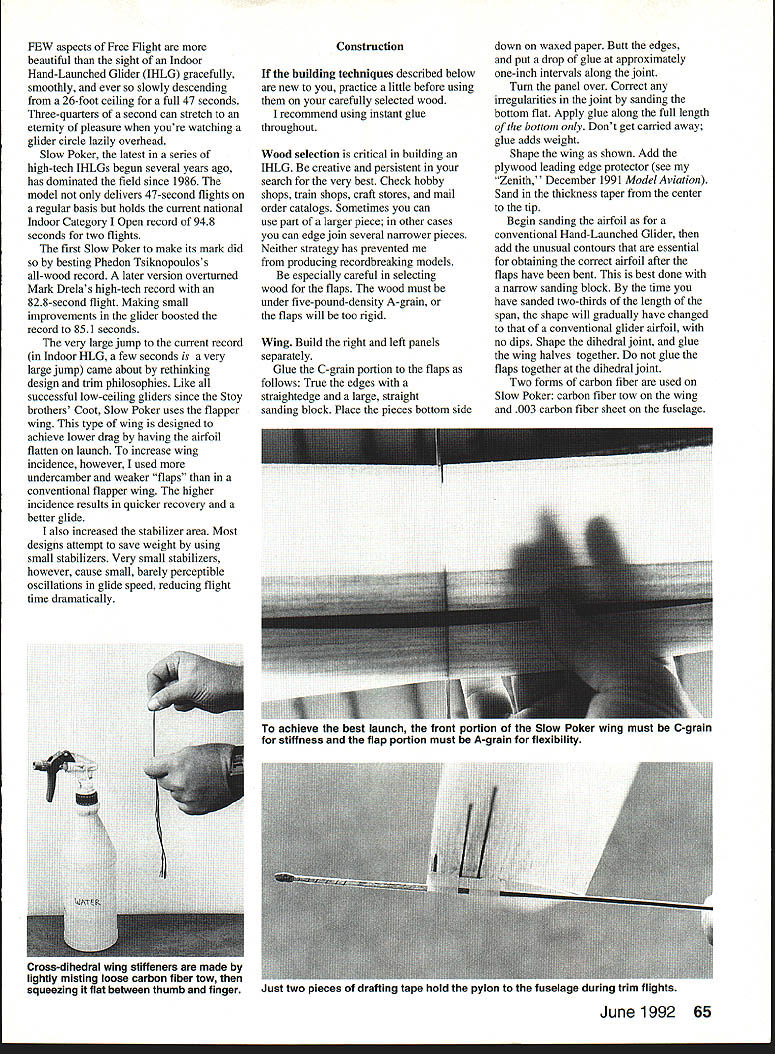
If these building techniques are new to you, practice on scrap wood before using your best stock. The author recommends instant glue throughout.
Wood selection
- Be creative and persistent: check hobby shops, train shops, craft stores, and mail‑order catalogs.
- Sometimes use part of a larger piece or edge‑join narrower pieces.
- Flap wood must be under five‑pound density A‑grain; C‑grain flaps will be too rigid.
General tips
- Use waxed paper on the board when gluing panels.
- Avoid excess glue — it adds weight.
- Two forms of carbon fiber are used: carbon fiber tow for the wing and .003 in. carbon fiber sheet for the fuselage.
- A small amount of glue along the top and bottom of the fuselage will help control splintering.
Wing
Build right and left panels separately.
- Prepare the flaps and C‑grain join:
- True the edges with a straightedge and a large, straight sanding block.
- Place pieces bottom side down on waxed paper. Butt edges and put a drop of glue about every 1 in. along the joint.
- Turn the panel over and correct irregularities by sanding the joint flat.
- Apply glue along the full length of the bottom; avoid overdoing it.
- Shape the wing:
- Add a plywood leading‑edge protector.
- Sand thickness taper from center to tip.
- Begin sanding the airfoil as for a conventional HLG, then add the unusual contours needed so the correct airfoil appears after the flaps have been bent. Use a narrow sanding block.
- By about two‑thirds of the span the shape should transition to a conventional glider airfoil (dips and undercamber should fade out).
- Flaps and camber:
- The extra camber in the flap is formed by grasping the structure between thumb and fingers and bending it past the desired shape while sliding your hand along the span. This can take minutes or hours depending on the wood.
- Persuade the flaps to assume the correct airfoil by rubbing and bending; no water forms are needed.
- Dihedral and joining:
- Shape the dihedral joint and glue the wing halves together.
- Do not glue the flaps together at the dihedral joint (flaps must remain independent where required).
- Carbon fiber tow stiffeners (across the dihedral):
- Cut a length of carbon fiber tow with scissors.
- Lightly spray with water and squeeze to a flat ribbon; peel off a 1/8‑in. strip if needed.
- The tow is easier to handle after a few minutes of drying.
- Apply the tow stiffeners top and bottom across the dihedral joint for best strength‑to‑weight ratio (they are somewhat difficult to work with).
Notes on wing construction
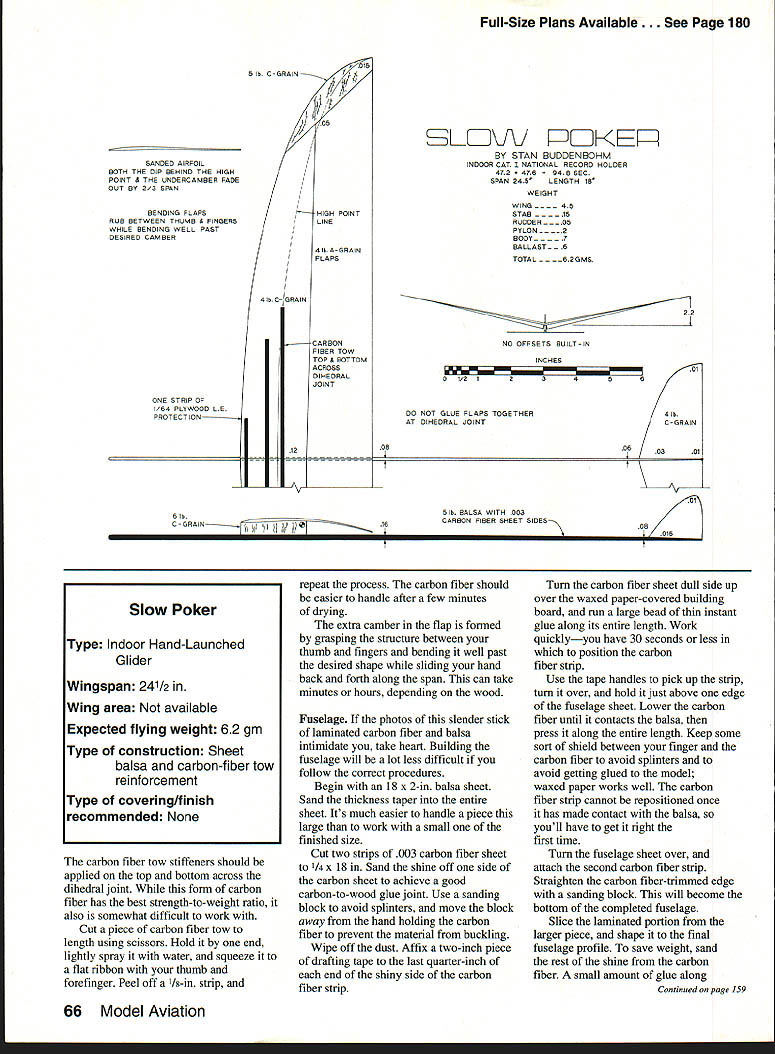
- The front portion of the lower wing should have C‑grain stiffness while the flap portion must have A‑grain flexibility to achieve the correct launch characteristics.
Fuselage
If the slender laminated carbon/balsa stick seems intimidating, follow these steps.
- Start with an 18 x 2 in. balsa sheet and sand the thickness taper into the entire sheet; it’s easier to handle a large piece.
- Cut two strips of .003 in. carbon fiber sheet to 1/4 x 18 in.
- Sand the shine off one side of each strip to improve glue adhesion. Use a sanding block to avoid splinters and to prevent buckling.
- Wipe dust off and affix a 2 in. piece of drafting tape to the last 1/4 in. of each end of the shiny side to act as handling tabs.
- Turn the carbon sheet dull side up over waxed paper on the building board, run a large bead of thin instant glue along its length, and work quickly.
- Use the tape handles to pick up the strip, turn it over, and lower it onto one edge of the fuselage sheet. Press along the entire length. Use a shield (waxed paper) between finger and carbon to avoid splinters and glue contamination. Once the strip contacts the balsa it cannot be repositioned.
- Turn the fuselage sheet over and attach the second carbon strip to the opposite side.
- Straighten the carbon‑trimmed edge with a sanding block; this will be the bottom of the finished fuselage.
- Slice the laminated portion from the larger sheet and shape to final profile. To save weight, sand more of the shine from the carbon fiber where structural strength is not required.
Pylon and other small items
- Just two pieces of drafting tape will hold the pylon to the fuselage during trim flights.
- Cross‑dihedral wing stiffeners are made by lightly misting loose carbon fiber tow and squeezing it flat between thumb and finger.
Full‑size plans are available.
Assembly and Flying
- Glue the pylon to the wing, not to the fuselage.
- Glue the stabilizer and rudder to the fuselage.
- Temporarily attach the pylon to the fuselage with two pieces of drafting tape while trimming.
- Add nose weight to achieve a level glide.
Turning methods
- There are only two effective ways to make the model turn: rudder offset or tip weight.
- The flight pattern for low‑ceiling gliders is either left‑left or right‑right. Right‑handed throwers are recommended to use left‑left.
Trim and incidence testing
- Do a test glide starting with a small amount of rudder trim.
- If the model doesn't circle tightly enough, add weight to the left wing (for left turns).
- The required wing incidence depends on flap flexibility. Test by throwing the model hard and straight ahead (neither pitched up nor down, nor banked).
- It should stay level, slow, and then turn into the glide circle.
- If it dives, remove the wing and sand more incidence into the bottom of the pylon.
- If it climbs as it slows, decrease the incidence in the wing.
- If it tends to barrel roll, reduce the rudder offset.
Launching technique
- Keep the fuselage in line with the launch angle throughout the throwing motion — do not swing the model through an arc.
- The motion should be like throwing a dart: throw as hard as possible while putting as little stress on the wings as possible to avoid damage.
- For endurance flights, the best launch is about 70° upward with no left or right bank. There should be enough rudder offset to initiate the glide circle just as the climb tops out.
- Make sure you are completely satisfied with incidence and trim before gluing the pylon permanently to the fuselage.
Contact
- If you have questions or want to share experiences with low‑ceiling gliders, send a SASE to: 5652 Meinhardt Rd., Westminster, CA 92683.
Transcribed from original scans by AI. Minor OCR errors may remain.

