
Small Tanks for Scale Models
Ned Kragness
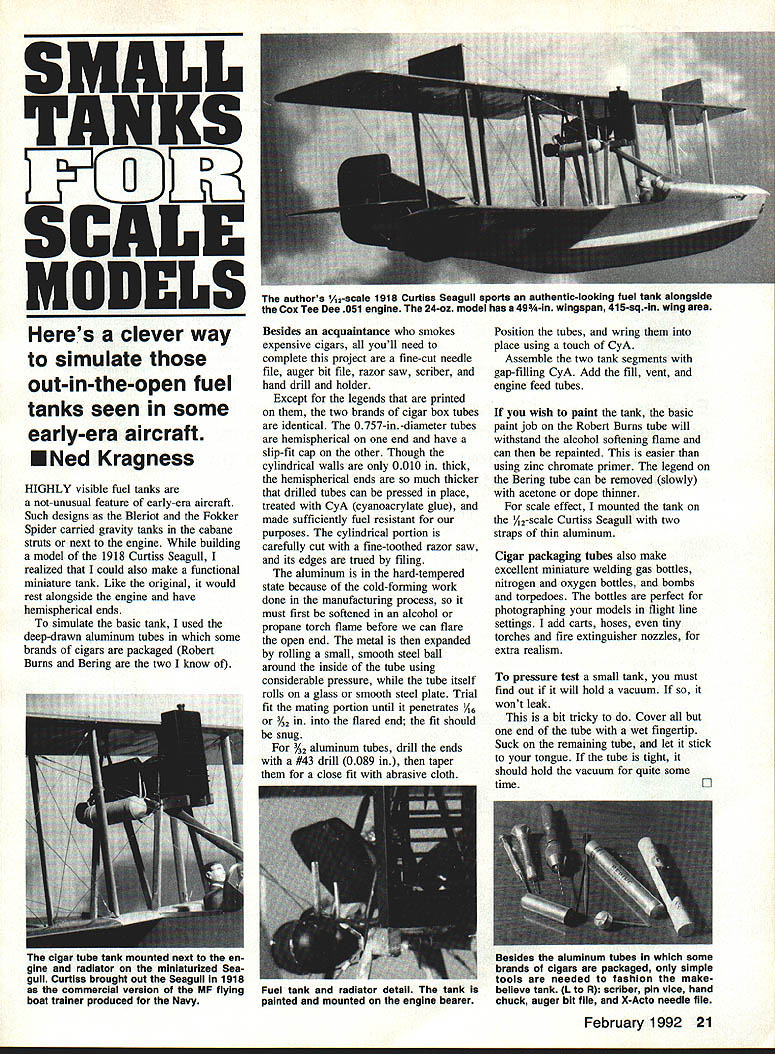
Highly visible fuel tanks are a not-unusual feature of early-era aircraft. Such designs as the Blériot and the Fokker Spider carried gravity tanks in the cabane struts or next to the engine. While building a model of the 1918 Curtiss Seagull, I realized I could also make a functional miniature tank. Like the original, it would rest alongside the engine and have hemispherical ends.
Materials and Tools
- Materials:
- Deep-drawn aluminum cigar tubes (brands: Robert Burns and Bering). The 0.757-in. diameter tubes are hemispherical on one end and have a slip-fit cap on the other.
- Small smooth steel ball
- Glass or smooth steel plate
- CyA (cyanoacrylate) glue
- Abrasive cloth
- Fill, vent, and engine feed tubing
- Thin aluminum for mounting straps
- Acetone or dope thinner (to remove printed legends, if desired)
- Tools:
- Fine-cut needle file
- Auger bit
- File
- Fine-toothed razor saw
- Scriber
- Hand drill and holder
- #43 drill (0.089 in.) for 3/32-in. tubes
- Alcohol or small propane torch (for annealing)
Notes on the cigar tubes
Except for the printed legends, the two brands are essentially identical. The cylindrical walls measure about 0.010 in. thick, but the hemispherical ends are much thicker. Drilled hemispheres can be pressed in place, treated with CyA, and made sufficiently fuel resistant for model use. The cylindrical portion should be cut with a fine-toothed razor saw and the edges trued with a file.
Procedure
- Prepare the tube:
- Cut the cylindrical portion to length with a fine-toothed razor saw.
- True the cut edges with a file.
- Soften the aluminum:
- The aluminum is hard-tempered from cold-forming and must be softened (annealed) before flaring. Heat gently in an alcohol or propane torch flame until softened.
- Flare and expand the open end:
- Roll a small, smooth steel ball around the inside of the softened tube while rolling the tube itself on a glass or smooth steel plate. Use considerable pressure to expand the metal and form the flare.
- Trial fit:
- Trial fit the mating portion until it penetrates about 1/16 in. or 3/32 in. into the flared end. The fit should be snug.
- Drill and taper (for 3/32-in. tubes):
- Drill the ends with a #43 drill (0.089 in.), then taper them for a close fit using abrasive cloth.
- Assemble:
- Position the tubes and wring them into place using a touch of CyA. Assemble the two tank segments with gap-filling CyA.
- Add the fill, vent, and engine feed tubes as required.
Finishing and painting
- If you wish to paint the tank, the basic paint on the Robert Burns tube will withstand the alcohol softening flame and can be repainted afterward. This is easier than applying zinc chromate primer.
- The legend on the Bering tube can be removed slowly with acetone or dope thinner.
- For scale effect, I mounted the tank on a 1/2-scale Curtiss Seagull with two straps of thin aluminum.
Other uses
Cigar packaging tubes also make excellent miniature welding gas bottles, nitrogen and oxygen bottles, bombs, and torpedoes. The bottles are perfect for photographing your models in flight-line settings. Add carts, hoses, tiny torches, and fire extinguisher nozzles for extra realism.
Pressure testing
To check for leaks, test whether the small tank will hold a vacuum. Cover all but one end of the tube with a wet fingertip, create a vacuum by drawing on the remaining open end and letting it adhere to your tongue. If the tube holds the vacuum for quite some time, it should be tight and not leak.
Transcribed from original scans by AI. Minor OCR errors may remain.

