
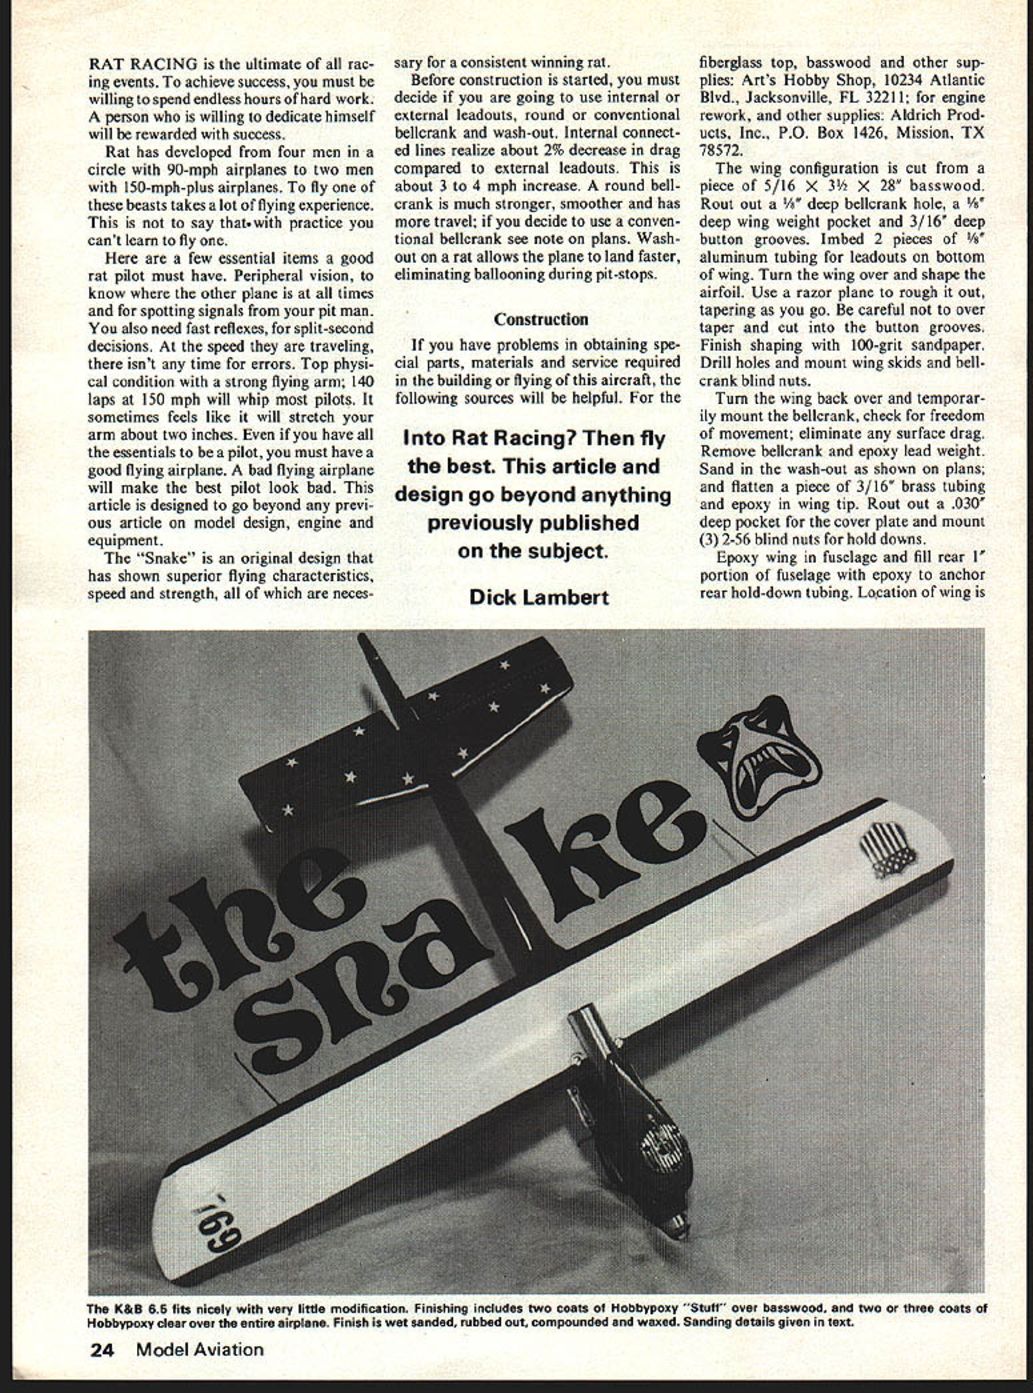
The Snake
RAT RACING is the ultimate of all racing events. To achieve success, you must be willing to spend endless hours of hard work. A person who is willing to dedicate himself will be rewarded with success.
Rat has developed from four men in a circle with 90-mph airplanes to two men with 150-mph-plus airplanes. To fly one of these beasts takes a lot of flying experience. This is not to say that with practice you can't learn to fly one.
Here are a few essential items a good rat pilot must have. Peripheral vision, to know where the other plane is at all times and for spotting signals from your pit man. You also need fast reflexes, for split-second decisions. At the speed they are traveling, there isn't any time for errors. Top physical condition with a strong flying arm; 140 laps at 150 mph will whip most pilots. It sometimes feels like it will stretch your arm about two inches. Even if you have all the essentials to be a pilot, you must have a good flying airplane. A bad flying airplane will make the best pilot look bad. This article is designed to go beyond any previous article on model design, engine and equipment.
The "Snake" is an original design that has shown superior flying characteristics, speed and strength, all of which are necessary for a consistent winning rat.
Before construction is started, you must decide if you are going to use internal or external leadouts, round or conventional bellcrank and wash-out. Internal connected lines realize about 2% decrease in drag compared to external leadouts. This is about a 3 to 4 mph increase. A round bellcrank is much stronger, smoother and has more travel; if you decide to use a conventional bellcrank see note on plans. Washout on a rat allows the plane to land faster, eliminating ballooning during pit-stops.
Into Rat Racing? Then fly the best. This article and design go beyond anything previously published on the subject.
Dick Lambert
Construction
If you have problems in obtaining special parts, materials and service required in the building or flying of this aircraft, the following sources will be helpful. For the fiberglass top, basswood and other supplies: Art's Hobby Shop, 10234 Atlantic Blvd., Jacksonville, FL 32211; for engine rework, and other supplies: Aldrich Products, Inc., P.O. Box 1426, Mission, TX 78572.
The wing configuration is cut from a piece of 5/16 x 3-1/2 x 28" basswood. Rout out a 1/8" deep bellcrank hole, a 1/8" deep wing weight pocket and 3/16" deep button grooves. Imbed 2 pieces of 1/8" aluminum tubing for leadouts on bottom of wing. Turn the wing over and shape the airfoil. Use a razor plane to rough it out, tapering as you go. Be careful not to over taper and cut into the button grooves. Finish shaping with 100-grit sandpaper. Drill holes and mount wing skids and bellcrank blind nuts.
Turn the wing back over and temporarily mount the bellcrank, check for freedom of movement; eliminate any surface drag. Remove bellcrank and epoxy lead weight. Sand in the wash-out as shown on plans; and flatten a piece of 3/16" brass tubing and epoxy in wing tip. Rout out a .030" deep pocket for the cover plate and mount (3) 2-56 blind nuts for hold downs.
Epoxy wing in fuselage and fill rear 1" portion of fuselage with epoxy to anchor rear hold-down tubing. Location of wing is 5/16" leading edge nose fuselage, 2-15/16" engine center per plans. Drill holes and insert 5/32" brass tubing for hold-down bolts front and rear fuselage per detailed plans. Front tubing should be reinforced with heavy fiberglass cloth blocks and hardwood.
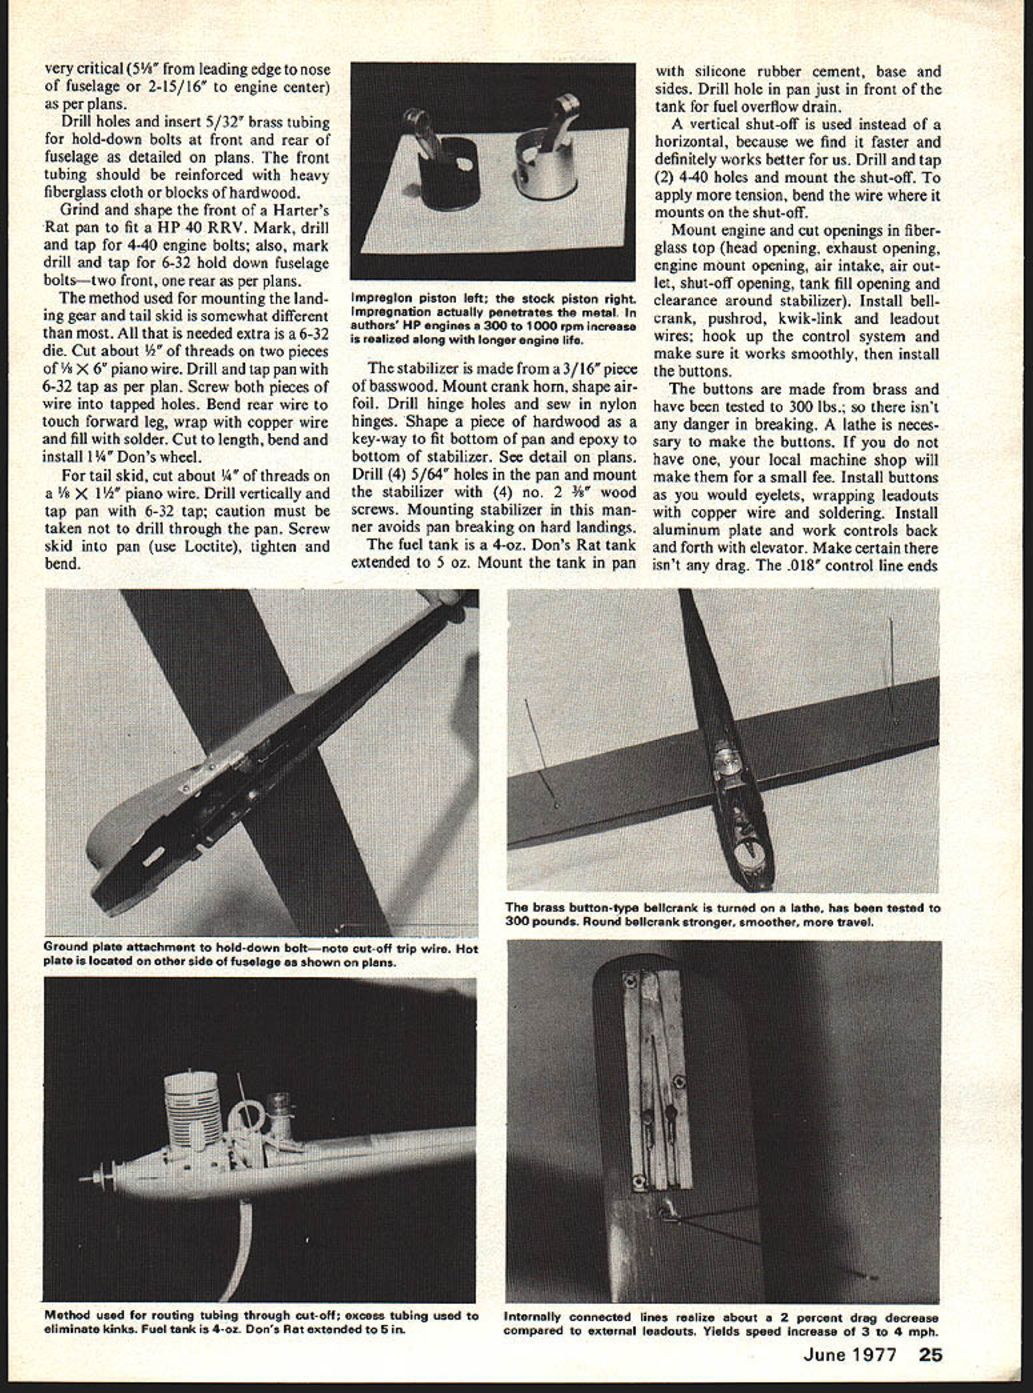
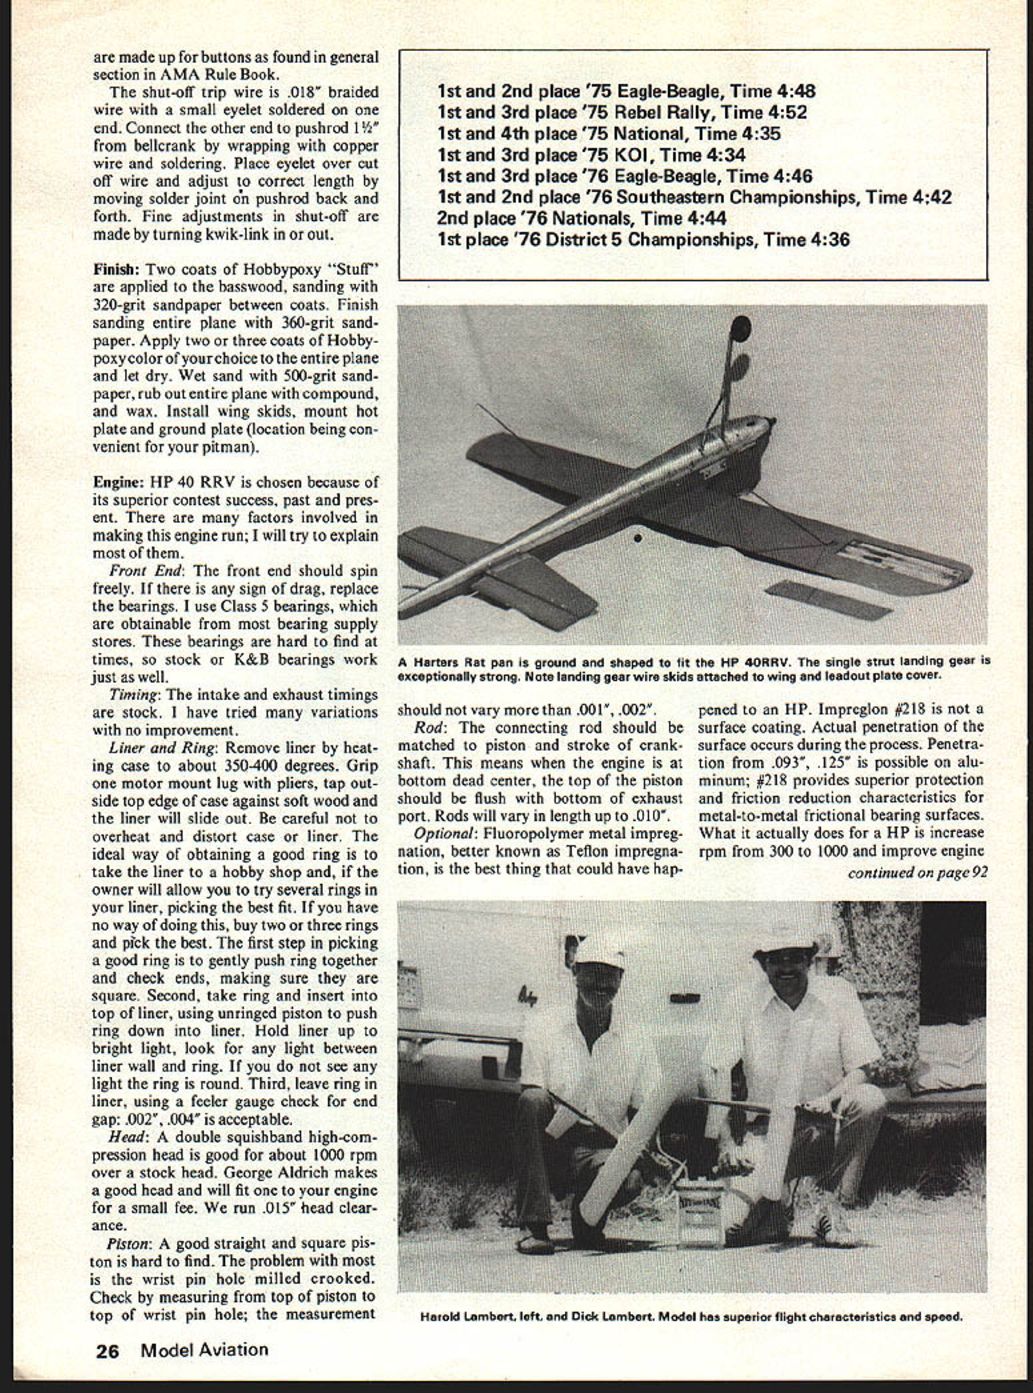
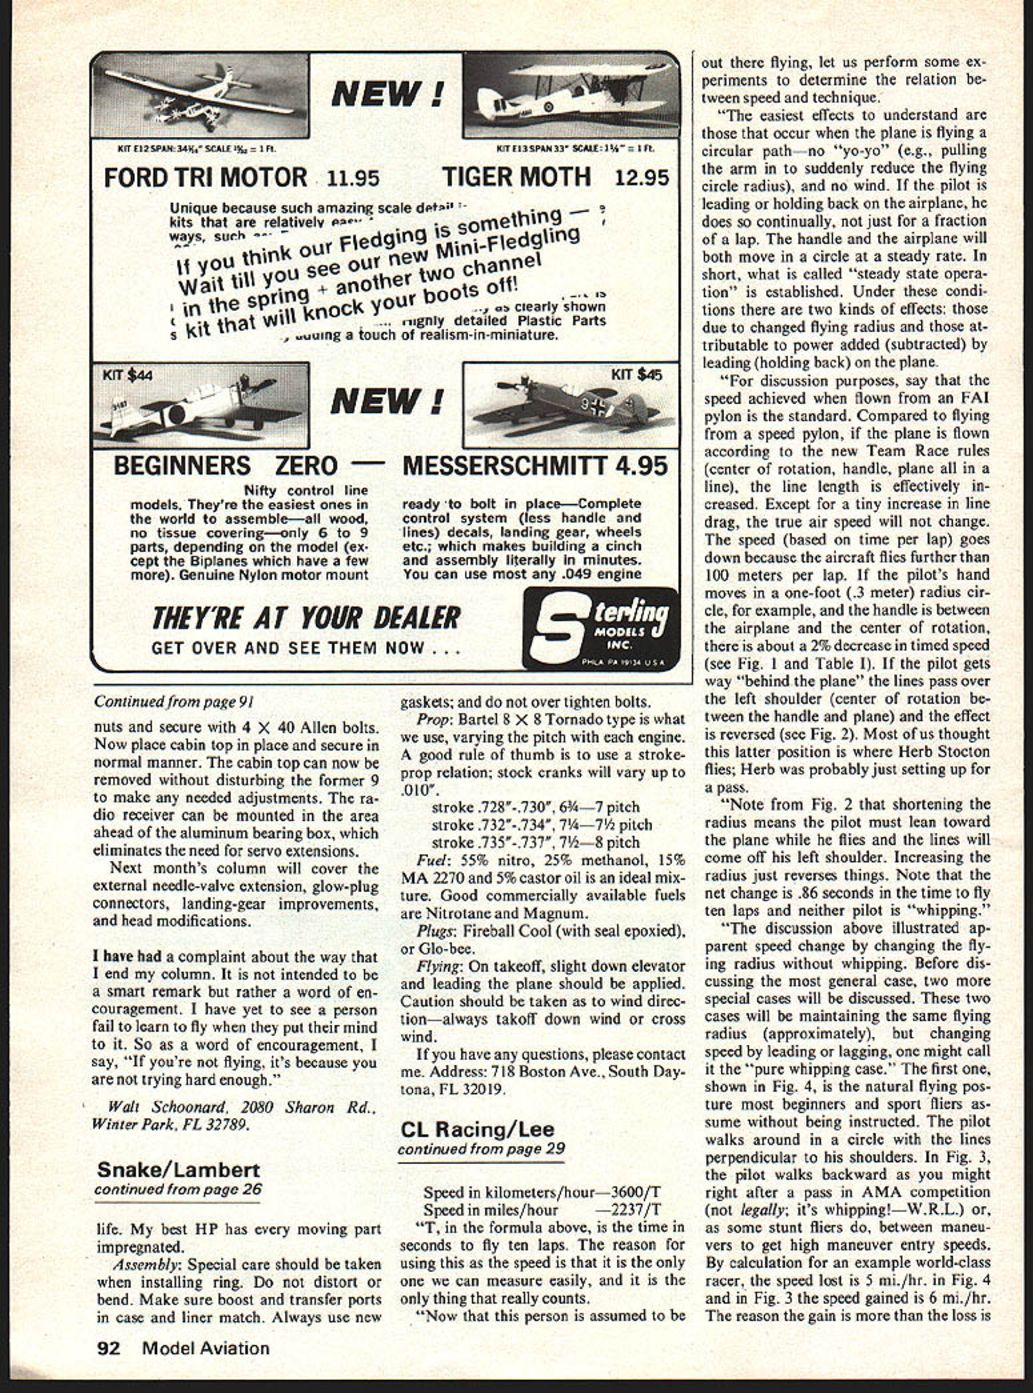
Grind and shape front hardward to fit Hart's Rat pan. K&B 6.5 fits nicely with very little modification. Mark, drill and tap 4-40 engine bolts; also mark, drill and tap 6-32 hold-down fuselage bolts — two front, two rear per plans. Method used mounting landing gear and tail skid is somewhat different and needed extra 6-32 die. Cut about 1/2" threads two pieces 1/8 x 6 piano wire. Drill and tap pan 6-32 per plan. Screw both pieces into wire tapped holes. Bend rear wire to touch forward leg, wrap copper wire and fill solder. Cut length, bend and install 1/4" Don's wheel tail skid. Cut about 3/8 x 1/2" piano wire. Drill vertically and tap pan 6-32 tap. Caution must be taken to drill through pan. Screw skid to pan, use Loctite and tighten. Bend stabilizer made of 3/16" piece basswood. Mount crank horn, shape airfoil. Drill hinge holes, sew nylon hinges. Shape piece hardwood key-way fit bottom pan; epoxy bottom stabilizer. See detail plans. Drill 4 - 5/64" holes in pan to mount stabilizer with four No. 2 3/8" wood screws. Mounting stabilizer manner avoids pan breaking on hard landings.
Fuel tank is 4-oz Don's Rat tank, extended to 5 oz. Mount tank on pan with silicone rubber cement base and sides. Drill hole in pan just front of tank fuel... for fuel overflow drain.
A vertical shut-off is used instead of a horizontal, because we find it faster and definitely works better for us. Drill and tap (2) 4-40 holes and mount the shut-off. To apply more tension, bend the wire where it mounts on the shut-off.
Mount engine and cut openings in fiberglass top (head opening, exhaust opening, engine mount opening, air intake, air outlet, shut-off opening, tank fill opening and clearance around stabilizer). Install bellcrank, pushrod, kwik-link and leadout wires; hook up the control system and make sure it works smoothly, then install the buttons.
The buttons are made from brass and have been tested to 300 lbs.; so there isn't any danger in breaking. A lathe is necessary to make the buttons. If you do not have one, your local machine shop will make them for a small fee. Install buttons as you would eyelets, wrapping leadouts with copper wire and soldering. Install aluminum plate and work controls back and forth with elevator. Make certain there isn't any drag. The shut-off trip wire is .018" braided wire with a small eyelet soldered on one end. Connect the other end to pushrod 1-1/2" from bellcrank by wrapping with copper wire and soldering. Place eyelet over cut off wire and adjust to correct length by moving solder joint on pushrod back and forth. Fine adjustments in shut-off are made by turning kwik-link in or out.
Finish:
Two coats of Hobbypoxy "Stuff" are applied to the basswood, sanding with 320-grit sandpaper between coats. Finish sanding entire plane with 360-grit sandpaper. Apply two or three coats of Hobbypoxy color of your choice to the entire plane and let dry. Wet sand with 500-grit sandpaper, rub out entire plane with compound, and wax. Install wing skids, mount hot plate and ground plate (location being convenient for your pitman).
Engine:
HP 40 RRV is chosen because of its superior contest success, past and present. There are many factors involved in making this engine run; I will try to explain most of them.
Front End:
The front end should spin freely. If there is any sign of drag, replace the bearings. I use Class 5 bearings, which are obtainable from most bearing supply stores. These bearings are hard to find at times, so stock or K&B bearings work just as well.
Timing:
The intake and exhaust timings are stock. I have tried many variations with no improvement.
Liner and Ring:
Remove liner by heating case to about 350-400 degrees. Grip one motor mount lug with pliers, tap outside top edge of case against soft wood and the liner will slide out. Be careful not to overheat and distort case or liner. The ideal way of obtaining a good ring is to take the liner to a hobby shop and, if the owner will allow you to try several rings in your liner, pick the best fit. If you have no way of doing this, buy two or three rings and pick the best. The first step in picking a good ring is to gently push ring together and check ends, making sure they are square. Second, take ring and insert into top of liner, using unringed piston to push ring down into liner. Hold liner up to bright light, look for any light between liner wall and ring. If you do not see any light the ring is round. Third, leave ring in liner, using a feeler gauge check for end gap: .002"-.004" is acceptable.
Head:
A double squishband high-compression head is good for about 1000 rpm over a stock head. George Aldrich makes a good head and will fit one to your engine for a small fee. We run .015" head clearance.
Piston:
A good straight and square piston is hard to find. The problem with most is the wrist pin hole milled crooked. Check by measuring from top of piston to top of wrist pin hole; the measurement should not vary more than .001"-.002".
Rod:
The connecting rod should be matched to piston and stroke of crankshaft. This means when the engine is at bottom dead center, the top of the piston should be flush with bottom of exhaust port. Rods will vary in length up to .010".
Optional:
Fluoropolymer metal impregnation, better known as Teflon impregnation, is the best thing that could have happened to an HP. Impreglon #218 is not a surface coating. Actual penetration of the surface occurs during the process. Penetration from .093"-.125" is possible on aluminum; #218 provides superior protection and friction reduction characteristics for metal-to-metal frictional bearing surfaces. What it actually does for a HP is increase rpm from 300 to 1000 and improve engine
- 1st and 2nd place '75 Eagle-Beagle, Time 4:48
- 1st and 3rd place '75 Rebel Rally, Time 4:52
- 1st and 4th place '75 National, Time 4:35
- 1st and 3rd place '75 KOI, Time 4:34
- 1st and 3rd place '76 Eagle-Beagle, Time 4:46
- 1st and 2nd place '76 Southeastern Championships, Time 4:42
- 2nd place '76 Nationals, Time 4:44
- 1st place '76 District 5 Championships, Time 4:36
continued on page 92
The Snake
continued from page 26
life. My best HP has every moving part impregnated.
Assembly: Special care should be taken when installing ring. Do not distort or bend. Make sure boost and transfer ports in case and liner match. Always use new gaskets; and do not over tighten bolts.
Prop: Bartel 8 x 8 Tornado type is what we use, varying the pitch with each engine. A good rule of thumb is to use a stroke-prop relation; stock cranks will vary up to .010".
- stroke .728"-.730", 6¾ - 7 pitch
- stroke .732"-.734", 7¼ - 7½ pitch
- stroke .735"-.737", 7½ - 8 pitch
Fuel: 55% nitro, 25% methanol, 15% MA 2270 and 5% castor oil is an ideal mixture. Good commercially available fuels are Nitrotane and Magnum.
Plugs: Fireball Cool (with seal epoxied), or Glo-bee.
Flying: On takeoff, slight down elevator and leading the plane should be applied. Caution should be taken as to wind direction—always take off downwind or crosswind.
If you have any questions, please contact me. Address: 718 Boston Ave., South Daytona, FL 32019.
Transcribed from original scans by AI. Minor OCR errors may remain.

