
Snapper
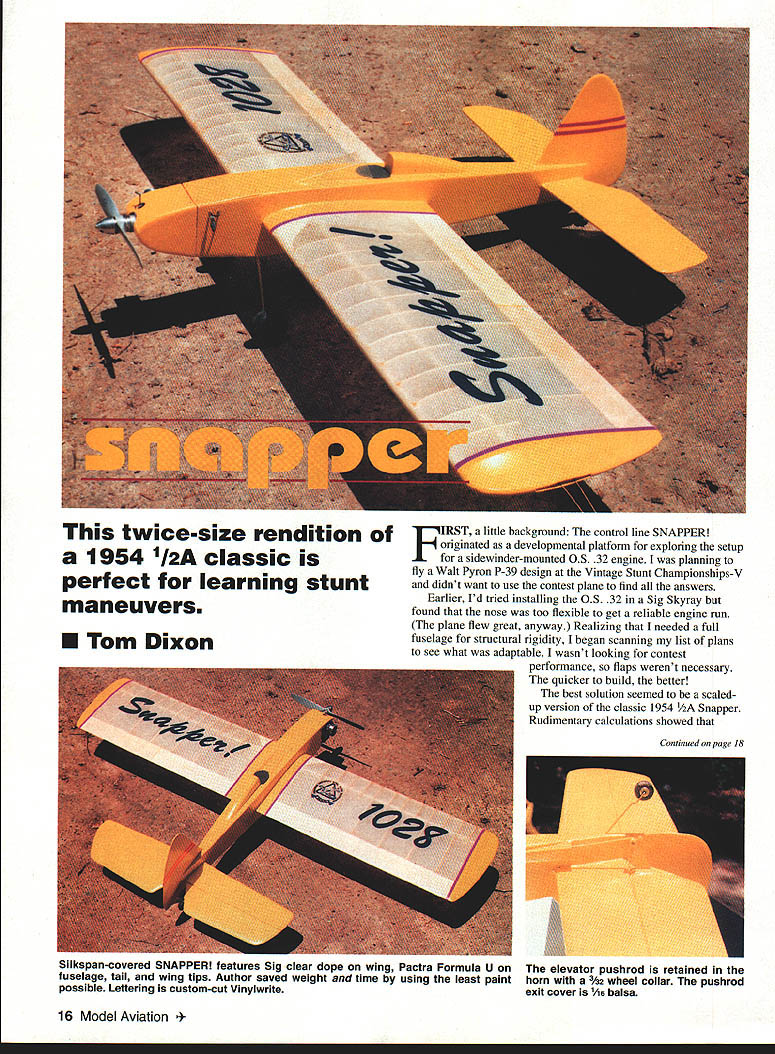
This twice-size rendition of a 1954 1/2A classic is perfect for learning stunt maneuvers.
Tom Dixon
FIRST, a little background: The control-line SNAPPER originated as a developmental platform for exploring the setup for a sidewinder-mounted O.S. .32 engine. I was planning to fly a Walt Pyron P-39 design at the Vintage Stunt Championships-V and didn't want to use the contest plane to find all the answers.
Earlier, I'd tried installing the O.S. .32 in a Sig Skyray but found that the nose was too flexible to get a reliable engine run. (The plane flew great, anyway.) Realizing that I needed a full fuselage for structural rigidity, I began scanning my list of plans to see what was adaptable. I wasn't looking for contest performance, so flaps weren't necessary. The quicker to build, the better!
The best solution seemed to be a scaled-up version of the classic 1954 1/2A Snapper. Rudimentary calculations showed that doubling the linear dimensions would increase the wingspan to 48 inches and the wing area to approximately 460 square inches.
I made a quick trip to the photocopy shop for a 200% enlargement of the original plan from which to work. It's much easier to trace the parts than to scale them up individually.
To better maintain the airfoil section, I added half-ribs between the main ribs. Otherwise, the original plan is unchanged.
In general, I doubled the original wood sizes, but this isn't essential. If you can't find very lightweight 1/16-in. balsa for the stabilizer, for example, substituting medium-weight 3/32-in. balsa won't make a difference.
A few words about the original Half-A Snapper are in order. Designed by George Millikin in 1954, this model was kitted by Southwestern Models of Tulsa, Oklahoma. I must have built five or six of them as a kid, using OK Cub and Cox Babe Bee .049 engines and Dacron lines. The plane flew comfortably inverted and did loops and figure eights.
The original plans brag that the Snapper is "capable of square loops." I doubt it. With its relatively heavy wing loading, the Southwestern Models version would have lacked enough efficiency to do square loops. My larger version can perform this maneuver—and everything else in the AMA pattern—as long as you don't overload it with paint.
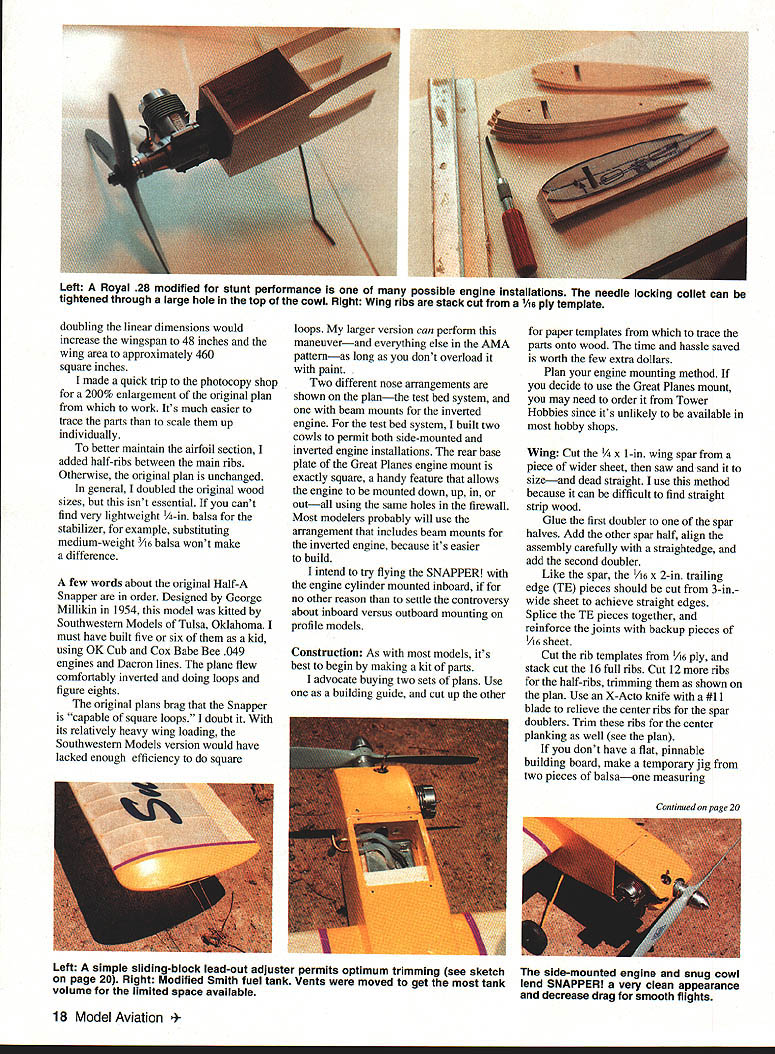
Two different nose arrangements are shown on the plan—the test-bed system, and one with beam mounts for the inverted engine. For the test-bed system, I built two cowls to permit both side-mounted and inverted engine installations. The rear base plate of the Great Planes engine mount is exactly square, a handy feature that allows the engine to be mounted down, up, or out—all using the same holes in the firewall. Most modelers probably will use the arrangement that includes beam mounts for the inverted engine, because it's easier to build.
I intend to try flying the SNAPPER with the engine cylinder mounted inboard, if for no other reason than to settle the controversy about inboard versus outboard mounting on profile models.
Construction
As with most models, it's best to begin by making a kit of parts. I advocate buying two sets of plans. Use one as a building guide, and cut up the other for paper templates from which to trace the parts onto wood. The time and hassle saved is worth the few extra dollars.
Plan your engine-mounting method. If you decide to use the Great Planes mount, you may need to order it from Tower Hobbies since it's unlikely to be available in most hobby shops.
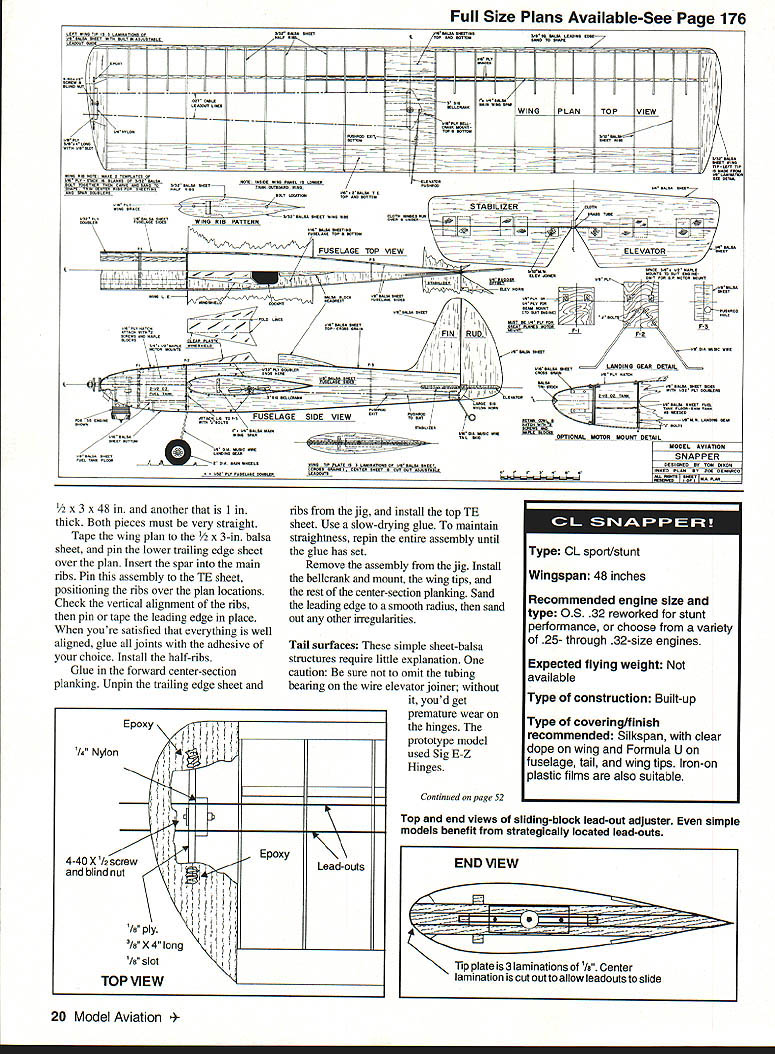
Wing
Cut the 1/4 x 1-in. wing spar from a piece of wider sheet, then saw and sand it to size—and dead-straight grain. I use this method because it can be difficult to find straight strip wood.
Glue the first doubler to one of the spar halves. Add the other spar half, align the assembly carefully with a straightedge, and add the second doubler.
Like the spar, the 1/4 x 2-in. trailing-edge (TE) pieces should be cut from 3-in.-wide sheet to achieve straight edges. Splice the TE pieces together, and reinforce the joints with backup pieces of 1/16-in. sheet.
Cut the rib templates from 1/16-in. ply, and stack-cut the 16 full ribs. Cut 12 ribs for the half-ribs, trimming them as shown on the plan. Use an X-Acto knife with a #11 blade to relieve the center ribs for the spar doublers. Trim these ribs for the center planking as well (see the plan).
If you don't have a flat, pinnable building board, make a temporary jig from two pieces of balsa—one measuring 1/2 x 3 x 48 in. and another that is 1 in. thick. Both pieces must be very straight.
Tape the wing plan to the 1/2 x 3-in. balsa sheet, and pin the lower trailing-edge sheet over the plan. Then fit the lower spar into the main ribs. Pin this assembly to the TE sheet, positioning the ribs over the plan locations. Check the vertical alignment of the ribs, then pin or tape the leading edge in place. When you're satisfied that everything is well aligned, glue all joints with the adhesive of your choice. Install the half-ribs.
Glue in the forward center-section planking. Unpin the trailing-edge sheet from the jig, and install the top TE sheet. Use a slow-drying glue. To maintain straightness, repin the entire assembly until the glue has set.
Remove the assembly from the jig. Install the bellcrank and mount, the wingtips, and the rest of the center-section planking. Sand the leading edge to a smooth radius, then sand out any other irregularities.
Tail surfaces
These simple sheet-balsa structures require little explanation. One caution: be sure not to omit the tubing bearing on the wire elevator joiner; without it, you'd get premature wear on the hinges. The prototype model used Sig E-Z Hinges.
CL SNAPPER!
- Type: CL sport/stunt
- Wingspan: 48 inches
- Recommended engine size and type: O.S. .32 reworked for stunt performance, or choose from a variety of .25- through .32-size engines
- Expected flying weight: Not available
- Type of construction: Built-up
- Type of covering/finish recommended: Silkspan, with clear dope on wing and Formula U on fuselage, tail, and wingtips. Iron-on plastic films are also suitable.
CL SNAPPER! / Dixon
Fuselage: This structure is built in two major assemblies—the engine mount and doublers, and the rest of the full-length sides. Thus, it's important that the doublers fit the wing closely and are properly aligned to it. The doublers have been designed longer than necessary to aid this alignment.
I also indexed the doublers to indicate the amount of fuel tank offset required to achieve equal speed runs whether the engine is mounted upright or inverted. The fuel tank offset in the prototype model is 3/8 in.
Make the doublers and mounts, and tack them to the wing with CyA (cyanoacrylate) glue. Use a triangle to check for squareness with the wing leading edge.
Slip the rear formers over the pushrod, then fit the pushrod through the hole in the fuselage side. Slide the sides up to the doubler assembly, pull them together at the rear, and check that there's no built-in twisting or stress before gluing. Install the rear formers.
Add slow-curing epoxy to the area where the sides join the doublers. Wrap the nose area with masking tape to hold the assembly in place as the epoxy cures. If you're satisfied with the alignment, go ahead and glue the sides to the wing.
When the glue has cured, add the top and bottom planking and then the tail wheel. Slide the hinged stabilizer-and-elevator assembly in place, and connect it to the pushrod. Align the assembly carefully, and glue it in place.
Add the fin-and-rudder assembly. Do touch-up sanding as necessary.
Covering and finishing: I used medium-weight silkspan and Sig dope on the prototype model. If you use one of the iron-on films, be sure to attach it to all the ribs and half-ribs to strengthen the wing. This isn't the sort of model for a concourse finish—just get it neat and fuelproof, and go fly it!
The O.S. .32 engine was reworked for a good stunt run. There's no need to use a fuel with more than 5% nitro content. The propeller is a 10 x 6 Graupner. Sixty-foot lines are about right. Build the model with fixed lead-outs and an ounce of tip weight, and it'll be plenty good for sport flying. Or, add adjustable tip weight and lead-outs for the fine-tuning that contest-level performance demands.
It could be a real kick to enter your simple SNAPPER! in competition against the pro-stunters. You might surprise people.
Afterthoughts
Although I designed the SNAPPER specifically for the O.S. .32 engine, many other engines would be suitable. In fact, the ubiquitous Fox .35 is about perfect. Other candidates include the old Fox .25 and .29, the O.S. .28, the Royal .28, and the Merco .29.
I think that aspiring stunt fliers make a fundamental error by learning on profile models. There's just no easy way to make a profile rigid enough for a good engine run. While profiles can be reinforced for extra rigidity, this takes more work than it does to build a simple box fuselage like that used in the SNAPPER! Another excellent learning stunter that's also fully contest capable is Dee Rice's classic Oriental, now kitted by Control Line Classics. Check it out.
Fly safely and quietly, and enjoy your SNAPPER! If you want to get more pleasure out of stunt flying and learn more about it, consider joining P.A.M.P.A. (Precision Aerobatics Model Pilots Association). Write the organization at:
P.A.M.P.A. 1019 Creek Trail Anniston, AL 36206
Transcribed from original scans by AI. Minor OCR errors may remain.

