
S'neat
A small basic glider for the Sunday flyer, this ship may be power‑pod launched, or towed aloft by hi‑start.
Arni Pedersen and Dick Sarpolus
WHO WANTS to build a S'neat? We designed this model with the expectation that it would appeal to these modelers: the Sunday sport flier who wants a small, basic, sailplane; the beginner who wants to learn to fly with a simple, rugged glider; the beginner who wants to scratch‑build his own model rather than buy a kit; actually, anybody who likes to build from plans and wants a straightforward, basic design. Although there are many fine kits on the market which offer ease of building, good prices, proven designs, etc., modelers as individuals many want a wider choice than they get in the available kits. The big thing is, don't be afraid to build from a magazine article. If you have only built from kits so far, try the S'neat for your first plan project. We think that for a little more work you will have more fun and a bigger sense of satisfaction when the project is completed.
Keeping in mind the purpose of this model, we had several design goals to aim for when laying it out. First it had to be a good flying model; after all, flying is what it's all about. It is not a hot, competition caliber aircraft; it is a honest small sailplane that is easy to fly, capable of thermal soaring under good conditions. Next, it had to be easy to build; this meant the design had to be simple—no hard‑to‑construct shapes and complicated parts. It also had to be rugged; it was expected that many of its builders/flyers would not be experienced; the model must be able to handle mild crashes and be ready to try again. Last but not least, it had to be good looking; nobody is going to build an ugly airplane.
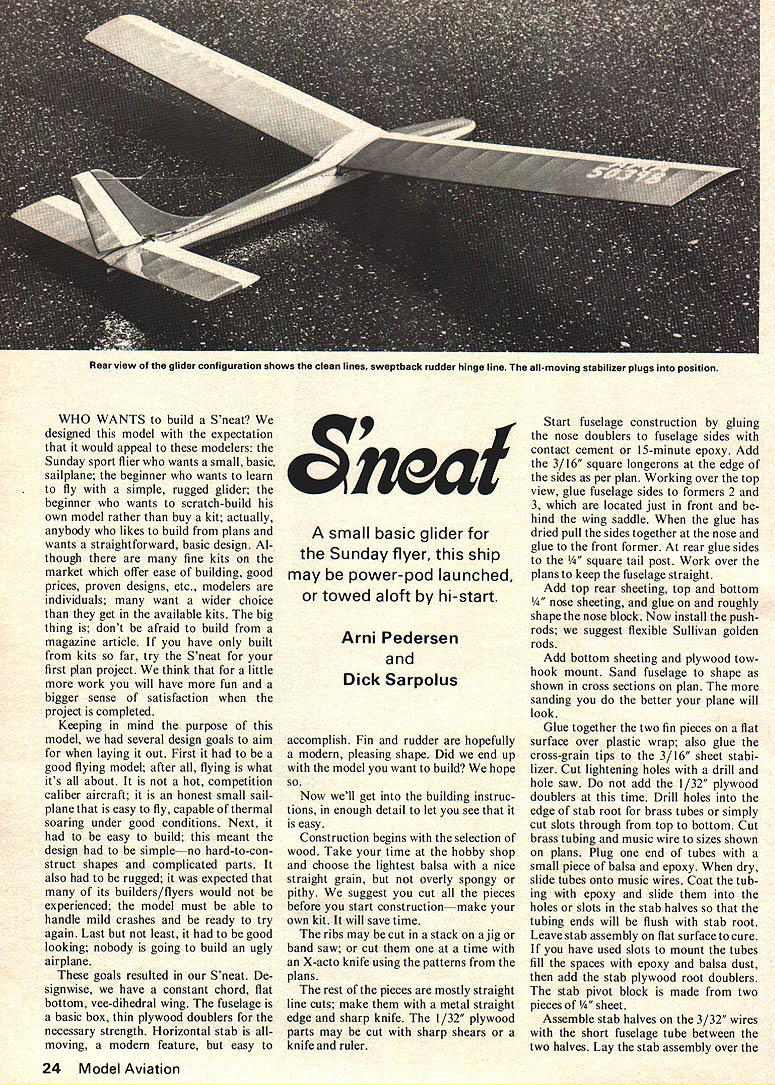
These goals resulted in our S'neat. Designwise, we have a constant chord, flat bottom, vee‑dihedral wing. The fuselage is a basic box, thin plywood doublers for the necessary strength. Horizontal stab is all‑moving, a modern feature, but easy to accomplish. Fin and rudder are hopefully a modern, pleasing shape. Did we end up with the model you want to build? We hope so.
Now we'll get into the building instructions, in enough detail to let you see that it is easy.
Construction begins with the selection of wood. Take your time at the hobby shop and choose the lightest balsa with a nice straight grain, but not overly spongy or pithy. We suggest you cut all the pieces before you start construction—make your own kit. It will save time.
The ribs may be cut in a stack on a jig or band saw, or cut them one at a time with an X‑acto knife using the patterns from the plans.
The rest of the pieces are mostly straight line cuts; make them with a metal straight edge and sharp knife. The 1/32" plywood parts may be cut with sharp shears or a knife and ruler.
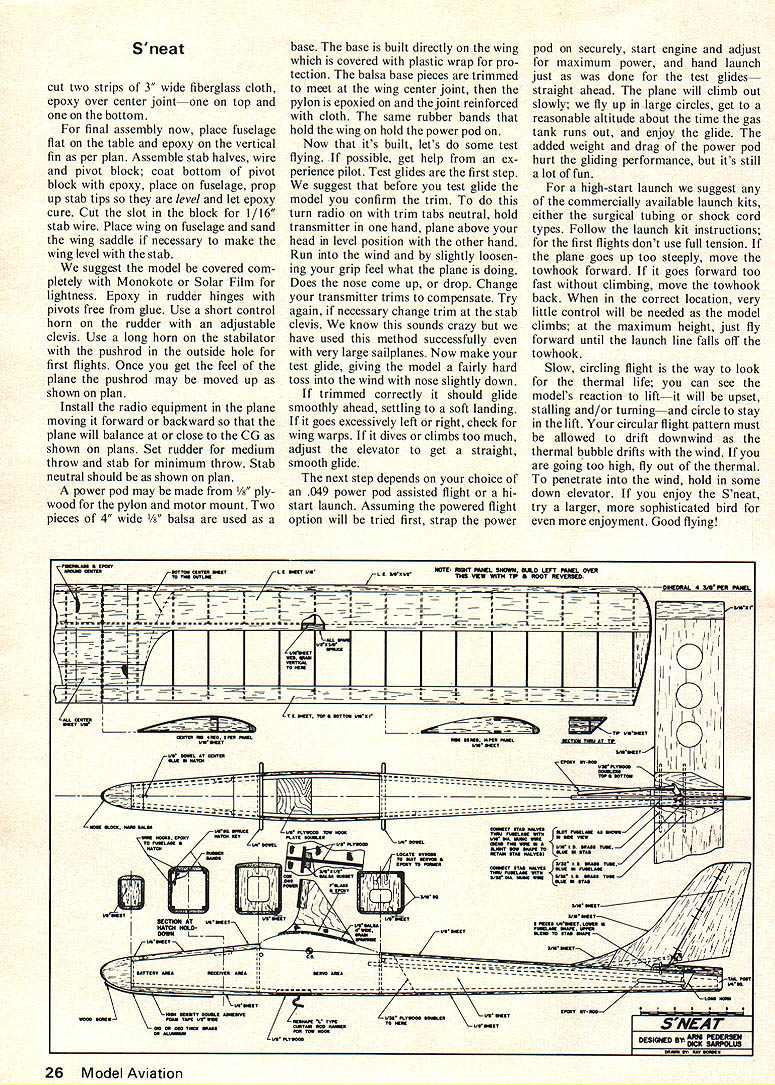
Start fuselage construction by gluing the nose doublers to fuselage sides with contact cement or 15‑minute epoxy. Add the 3/16" square longerons at the edge of the sides as per plan. Working over the top view, glue fuselage sides to formers 2 and 3, which are located just in front and behind the wing saddle. When the glue has dried, pull the sides together at the nose and glue to the front former. At rear glue sides to the 1/4" square tail post. Work over the plans to keep the fuselage straight.
Add top rear sheeting, top and bottom 1/4" nose sheeting, and glue on and roughly shape the nose block. Now install the pushrods; we suggest flexible Sullivan golden rods.
Add bottom sheeting and plywood tow‑hook mount. Sand fuselage to shape as shown in cross sections on the plan. The more sanding you do the better your plane will look.
Glue together the two fin pieces on a flat surface over plastic wrap; also glue the cross‑grain tips to the 3/16" sheet stabilizer. Cut lightening holes with a drill and hole saw. Do not add the 1/32" plywood doublers at this time. Drill holes in the edge of the stab root for brass tubes or simply cut slots through from top to bottom. Cut brass tubing and music wire to sizes shown on plans. Plug one end of the tubes with a small piece of balsa and epoxy. When dry, slide tubes onto music wires. Coat tubing with epoxy, slide tubes into slots; tubing ends will be flush with the stab root. Leave stab assembly flat until cured. If you have used slots to mount the tubes, fill the spaces with epoxy and balsa dust, then add the plywood root doublers. The stab pivot block is made from two pieces of 1/4" sheet. The wing is built in two halves and joined later. Start with the right half. It is most important that your building board or table be really flat. Many wings are made with a built‑in warp from a building board that is not flat. Tape down the plans and cover with clear plastic wrap or waxed paper. Pin down the lower spar, bottom root sheeting and trailing edge sheeting. Glue the ribs to spars and trailing edge sheeting. We recommend Tite Bond. The root rib is slanted slightly; the top should be tipped 1/8" from vertical towards the tip. Now glue on the 3/8" x 1/2" leading edge and the top spar. Glue the vertical grain webbing to the front of the spars as shown on plan. Make sure the grain runs up and down on the webs as it adds a lot of strength. Add the slanted 1/16" sheet wing tip. Glue on the top leading edge sheeting to the root and trailing edge sheeting. Allow the wing panel to dry very thoroughly before removing it from the board.
Repeat this process and build the left wing panel. Shape the leading edge roughly with a plane, if available, then final shape with fine sandpaper. Sand spars flush with the wing root rib; lay one wing panel flat on the table, coat wing roots with epoxy, and place wing roots together with one wing tip raised 3/4" from the table, thus giving it the proper dihedral. Cut two strips of 3" wide fiberglass cloth, epoxy over center joint—one on top and one on the bottom.
For final assembly now, place fuselage flat on the table and epoxy on the vertical fin as per plan. Apply contact cement to stab halves, wire and pivot block; bolt bottom of pivot block with epoxy, place on fuselage, prop up stab tips so they are level and let epoxy cure. Cut the slot in the block for 1/16" stab wire. Place wing on fuselage and sand the wing saddle if necessary to make the wing level with the stab.
We suggest the model be covered completely with Monokote or Solar Film for lightness. Epoxy in rudder hinges with pivots free from glue. Use a short control horn on the rudder with an adjustable clevis. Use a long horn on the stabilator with the pushrod in the outside hole for first flights. Once you get the feel of the plane the pushrod may be moved up as shown on plan.
Install the radio equipment in the plane moving it forward or backward so that the plane will balance at or close to the CG as shown on plans. Set rudder for medium throw and stab for minimum throw. Stab neutral should be as shown on plan.
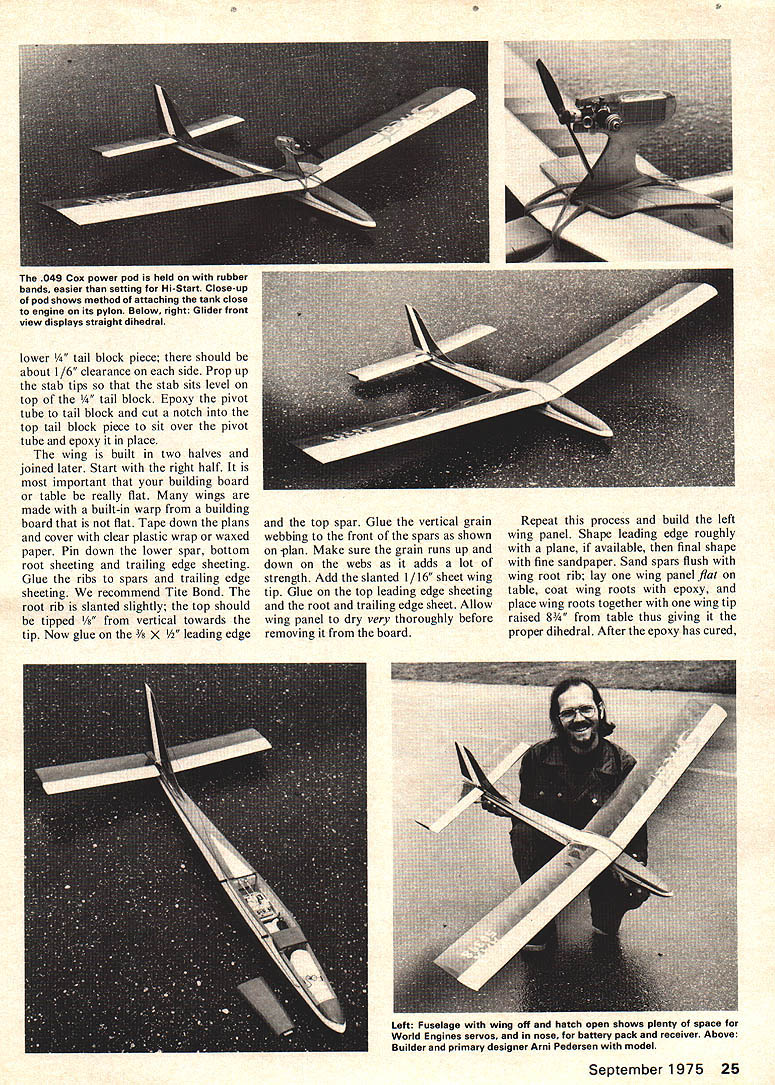
A power pod may be made from 1/8" plywood for the pylon and motor mount. Two pieces of 4" wide 1/8" balsa are used as a base. The base is built directly on the wing which is covered with plastic wrap for protection. The balsa base pieces are trimmed to meet at the wing center joint, then the pylon is epoxied on and the joint reinforced with cloth. The same rubber bands that hold the wing on hold the power pod on.
Now that it's built, let's do some test flying. If possible, get help from an experienced pilot. Test glides are the first step.
We suggest that before you test glide the model you confirm the trim. To do this turn radio on with trim tabs neutral, hold transmitter in one hand, plane above your head in level position with the other hand. Run into the wind and by slightly loosening your grip feel what the plane is doing. Does the nose come up, or drop. Change your transmitter trims to compensate. Try again, if necessary change trim at the stab clevis. We know this sounds crazy but we have used this method successfully even with very large sailplanes. Now make your test glide, giving the model a fairly hard toss into the wind with nose slightly down.
If trimmed correctly it should glide smoothly ahead, settling to a soft landing. If it goes excessively left or right, check for wing warps. If it dives or climbs too much, adjust the elevator to get a straight, smooth glide.
The next step depends on your choice of an .049 power pod assisted flight or a hi-start launch. Assuming the powered flight option will be tried first, strap the power pod on securely, start engine and adjust for maximum power, and hand launch just as was done for the test glides—straight ahead. The plane will climb out slowly; we fly up in large circles, get to a reasonable altitude about the time the gas tank runs out, and enjoy the glide. The added weight and drag of the power pod hurt the gliding performance, but it's still a lot of fun.
For a hi-start launch we suggest any of the commercially available launch kits, either the surgical tubing or shock cord types. Follow the launch kit instructions; first pull strings don't use full tension. If the plane goes up too steeply, move the towhook forward; if it goes forward too fast without climbing, move the towhook back. When in the correct location, very little control will be needed as the model climbs; at the maximum height, just fly forward until the launch line falls off the towhook.
Slow, circling flight is the way to look for thermal lift; you can see the model's reaction to lift—it will be upswept, stalling and/or turning—and circle to stay in the lift. Your circular flight pattern must be allowed to drift downwind as the thermal will be carried by the wind. If you are going too high, fly out of the thermal. To penetrate into the wind, hold in some down elevator. If you enjoy the S'neat, try a larger, more sophisticated bird for even more enjoyment. Good flying!
Transcribed from original scans by AI. Minor OCR errors may remain.

