
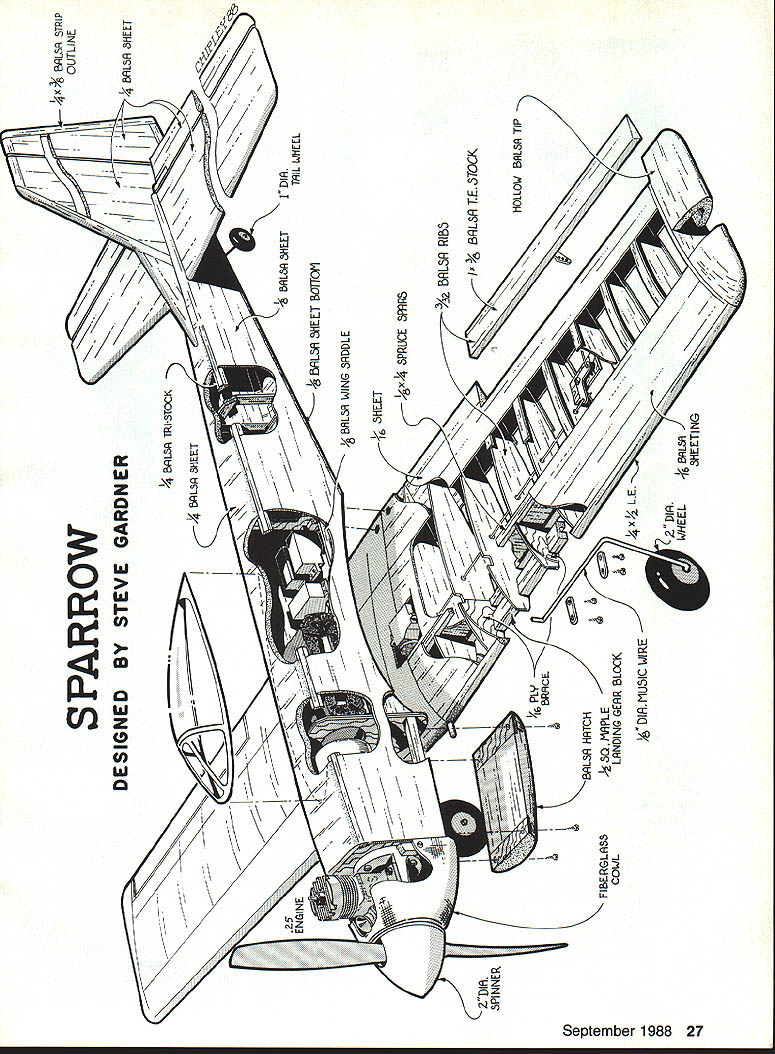
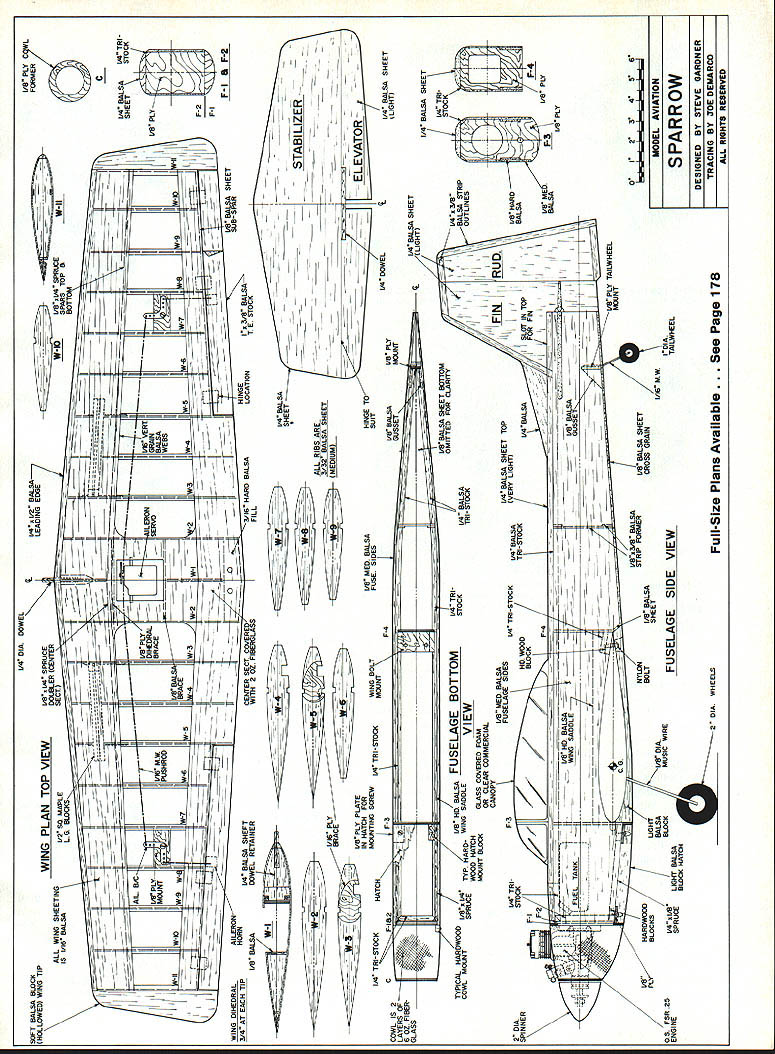

Sparrow
Designed by Steve Gardner
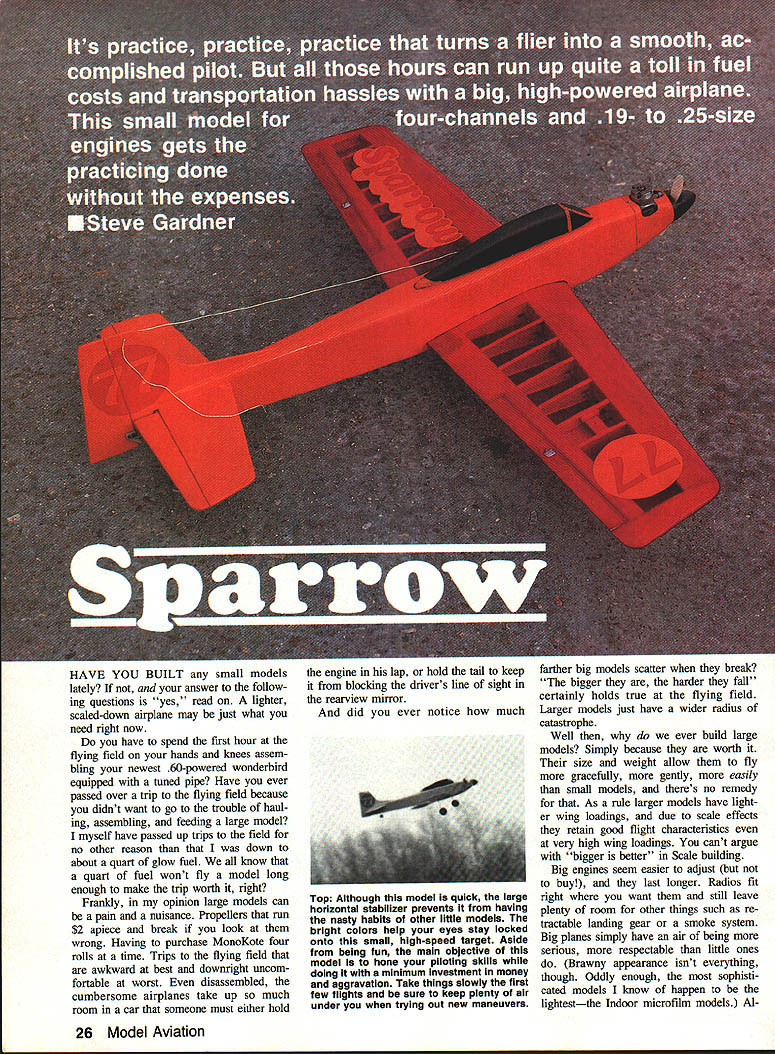
It's practice, practice, practice that turns a flier into a smooth, accomplished pilot. But all those hours can run up quite a toll in fuel costs and transportation hassles with a big, high-powered airplane. This small model for four-channel radios and .19- to .25-size engines gets the practicing done without the expenses.
Have you built any small models lately? If not, and your answer to the following questions is "yes," read on. A lighter, scaled-down airplane may be just what you need right now.
Do you have to spend the first hour at the flying field on your hands and knees assembling your newest .60-powered wonderbird equipped with a tuned pipe? Have you ever passed over a trip to the flying field because you didn't want to go to the trouble of hauling, assembling, and feeding a large model? I myself have passed up trips to the field for no other reason than that I was down to about a quart of glow fuel. We all know that a quart of fuel won't fly a model long enough to make the trip worth it, right?
Frankly, in my opinion large models can be a pain and a nuisance. Propellers that run $2 apiece and break if you look at them wrong. Having to purchase MonoKote four rolls at a time. Trips to the flying field that are awkward at best and downright uncomfortable at worst. Even disassembled, the cumbersome airplanes take up so much room in a car that someone must either hold the engine in his lap or hold the tail to keep it from blocking the driver's line of sight in the rearview mirror.
And did you ever notice how much farther big models scatter when they break? "The bigger they are, the harder they fall" certainly holds true at the flying field. Larger models just have a wider radius of catastrophe.
Why do we ever build large models? Simply because they are worth it. Their size and weight allow them to fly more gracefully and more gently than small models; there's no remedy for that. As a rule larger models have lighter wing loadings due to scale effects and retain good flight characteristics even at very high wing loadings. You can't argue with "bigger is better" in scale building.
Big engines seem easier to adjust (but not to buy), and they last longer. Radios fit right where you want them and still leave plenty of room for other things such as retractable landing gear and smoke systems. Big planes simply have an air of being more serious and more respectable than little ones do. Oddly enough, the most sophisticated models I know of happen to be the lightest—the indoor microfilm models.
Devotees of big models often think smaller-scale airplanes are little better than toys. Smaller craft offer different compensations. Lighter birds present distinctive flying challenges in ways big ones don't. Small models are an antidote to complacency — they can be taken seriously. If you're game, piloting a small ship will teach you to fly smoothly; unless you fly smoothly, reaction time for smaller airplanes with unruly manners might just catch up with you. If you're weary of lugging around support gear for a big model, a little guy is definitely the ticket. You need only a starting battery, a pint of fuel and a transmitter and you're ready to go. Because the smaller plane will fit in cars when disassembled and no tools are needed, a pint of fuel will keep you in the air for four 10-minute flights. A smaller model will bounce where a larger would shatter.
That said, the lighter bird will keep toes off the ground — small models have a characteristic twitchiness. They don't want to fly smoothly; nervous, giddy machines quickly translate control input into abrupt changes of flight path, which amounts to much greater control authority. With practice you can learn to orchestrate intricate maneuvers that are harder to achieve with larger airplanes.
If you can learn to fly a Sparrow smoothly, you'll be able to handle anything larger with a precision you never knew you had. Little airplanes train your reflexes better than the fastest video games! The low inertia of these models makes possible certain maneuvers that are forbidden to larger ones. The Sparrow will do snapping maneuvers like no other airplane I've flown. You can start and stop snaps almost instantaneously once you have the required timing. Eight-sided loops are easy, too, and the corners are sharp.
Finally, smaller models are easier to build, up to a point. Like the early Grumman fighters, the Sparrow is designed to be nearly indestructible in flight. Although it's not in the slightest overbuilt, the airplane allows you to enter abrupt maneuvers at much higher speeds than you might with a larger model. Its light weight and low inertia permit a rapid-fire succession of maneuvers; and despite its low drag, when it comes time to slow down the Sparrow will lose speed rapidly. It is rather like having built-in glide-path control.
Larger aircraft still rule the flying field, but smaller birds complement them nicely. You could certainly do worse than to build a Sparrow for your stable of models, and then learn to put it where you want it. The skills and control authority you'll develop in maneuvering this airplane are guaranteed to carry over into all your flying.
Construction
My standard practice is to build the tail surfaces first, sort of as a warm-up. Tail surfaces are easy to build and not too demanding, so they are a fairly painless way to get into the modeling mood. Not that your tail surfaces shouldn't be as carefully constructed as the rest of your airplane. Good practice here will pay back during final trimming.
The wing is built in two halves over a single-piece plan. The spars and ribs are assembled and checked for twist as the panels are built. The center section is sheeted top and bottom; the outer panels are sheeted on the top only. Ailerons are simple to construct and hinge with CA or conventional hinges; control horns are mounted to keep the servo linkages straightforward. The wing halves are joined at the center with hardwood dihedral braces and retained with music-wire dowels.
Build the fuselage sides over the plan and join them with the prescribed formers and longerons. The firewall should be a sturdy plywood unit to accept the landing-gear block and engine mounting. Install the landing gear in maple blocks and anchor them securely in the fuselage. The battery, fuel tank and radio components are arranged for easy access; a removable hatch over the wing area makes servicing simple.
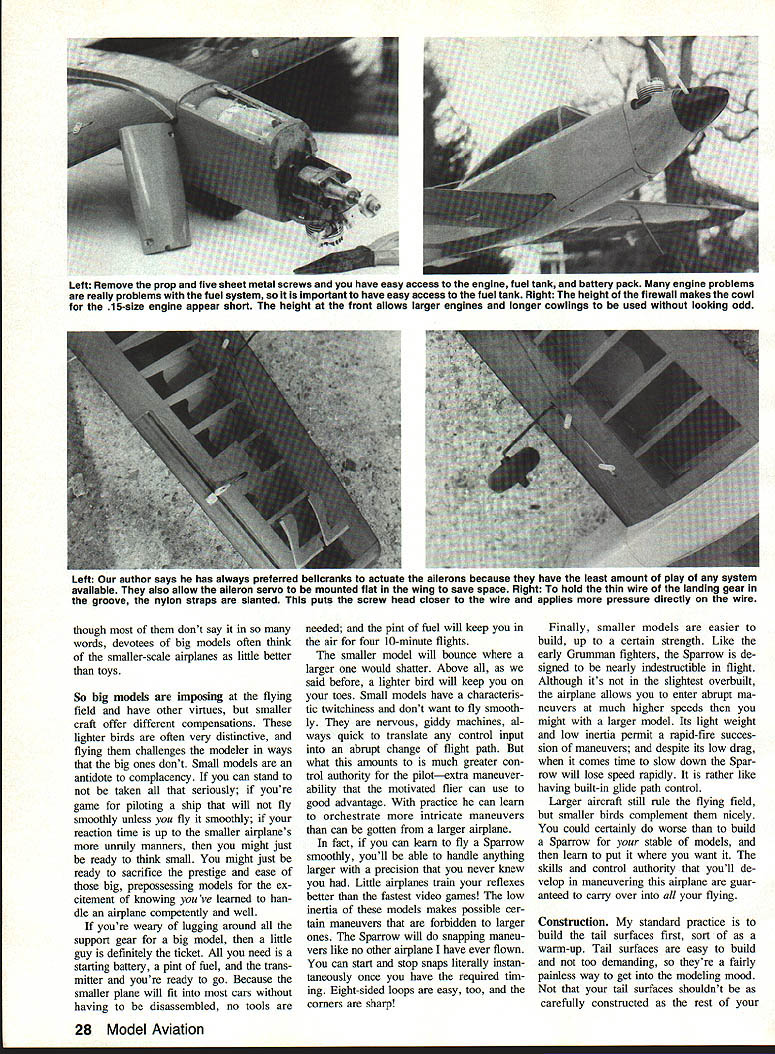
The cowl shown is fiberglass, but a balsa or laminated balsa cowl will work, too. The height of the firewall makes the cowl for a .15-size engine appear short; the height at the front allows larger engines and longer cowlings to be used without looking odd.
Cover the model with your choice of film or silk and dope. Balance the airplane at the recommended CG and check control throws before the first flight. A little care in construction and rigging will reward you with an airplane that is fun to fly and rugged enough to withstand the sort of pilot errors that small, quick models tend to attract.
Tail surfaces
The most critical step in constructing an airplane's tail is the proper choice of wood. Every gram that you build into the tail will add about five grams to the weight of the finished model. Overbuilding will force you to compensate with extra nose weight. Worse still, you may try to fly without adding any extra weight at all. Add the extra nose weight, and performance suffers. Sidestep the problem, and your model won't fly at all.
The ideal wood for the Sparrow tail surfaces—balsa in the 6- to 8-lb.-per-cu.-ft. class—eliminates the need to add per-ounce of weight at all. However, in the form in which we need it this balsa is usually hard to find. What's wanted is a stiff, firm grade of balsa, not that punky material that feels like Styrofoam. This type of balsa is also the wood of choice for building hand-launched glider wings, and free-flighters hoard it like the treasure it is.
Don't try to substitute 3/8-in. balsa for the 1/2-in. thickness specified in the plans. This extra thickness is needed to lend adequate stiffness to the horizontal stabilizer. My rationale is based on having seen just about as many stab failures as wing failures. Not only do stabilizers get a pounding in flight, they're also subject to getting hung on door jambs and trunk lids because of their prominence. Stabs built of 1/2-in. balsa can withstand this abuse and won't come apart until you break them off against the ground.
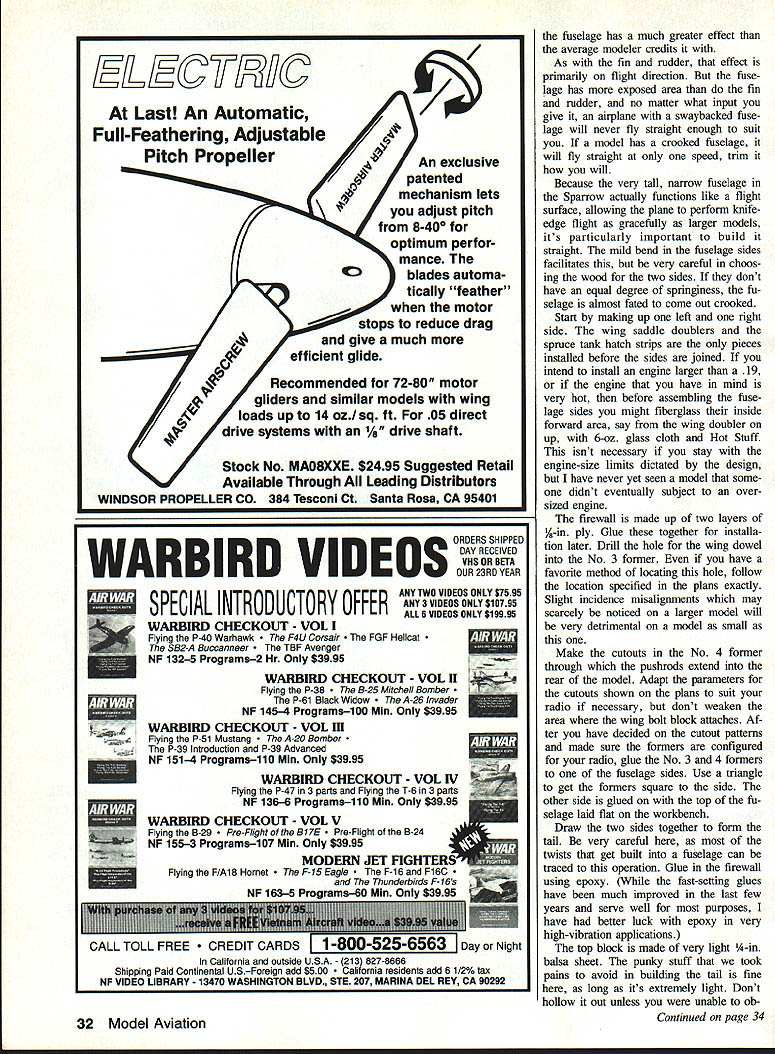
As shown in the plans, the edges of the fin and rudder are built up using strips with the grain running parallel to the edge. The purpose is to make the edges easier to round and to help hold the shape straight. Since pieces of 1/4-in. balsa this small tend not to warp too badly, the strips are optional; but they save you from having to round the part by sanding off the surface.
The elevators are joined by either a strip of hardwood or a dowel. A square of fiberglass cloth may be folded over the dowel and the leading edge of the elevator to reinforce the joint. This will also strengthen the area where the elevator horn is mounted. Trim all the cloth away from the slot for the fuselage, and resist the urge to make the slot in the elevator smaller. Although the clearance may seem excessive now, it can quickly become inadequate if the tail gets wet and the fuselage swells just a tad. In that situation the elevator will jam—and when that happens the flight is over.
Sand the leading edges of the rudder and elevator to a housetop-shaped point, then set the hinges into wood until the hinge pin centerlines are even with the point of the housetop. This will allow you to leave a very small gap in the hinge line. MonoKote hinges may be used if preferred, but because of their particular geometry it may be necessary to enlarge the hole in the fuselage in order to clear the greater motion of the elevator joiner.
Fuselage
Underestimating the structural importance of the fuselage seems to be a fairly common error among modelers. Apparently, such builders assume that the function of the fuselage is merely to hold the wing and tail in proper juxtaposition. This is an oversimplification. Any part of the model which is exposed to the airflow has an impact on performance, and in reality the fuselage has a much greater effect than the average modeler credits it with.
As with the fin and rudder, that effect is primarily on flight direction. But the fuselage has more exposed area than do the fin and rudder, and no matter what input you give it, an airplane with a swaybacked fuselage will never fly straight enough to suit you. If a model has a crooked fuselage, it will fly straight at only one speed; you will trim it to that speed.
Because the very tall, narrow fuselage in the Sparrow actually functions like a flying surface, allowing the plane to perform knife-edge flight as gracefully as larger models, it's particularly important to build it straight. The mild bend in the fuselage sides facilitates this, but be very careful in choosing the wood for the two sides. If they don't have an equal degree of springiness, the fuselage is almost fated to come out crooked.
Start by making up one left and one right side. The wing saddle doublers and the spruce tank hatch strips are the only pieces installed before the sides are joined. If you intend to install an engine larger than a .19, or if the engine that you have in mind is very hot, then before assembling the fuselage sides you might fiberglass their inside forward area (from the wing doubler on up) with 6-oz. glass cloth and Hot Stuff. This isn't necessary if you stay with the engine-size limits dictated by the design, but oversized engines tend to eventually defeat many models.
The firewall is made up of two layers of 1/8-in. plywood. Glue these together for installation later. Drill the hole for the wing dowel into the No. 3 former. Even if you have a favorite method of locating the hole, follow the location specified in the plans exactly. Slight incidence misalignments which may scarcely be noticed on a larger model will be very detrimental on a model as small as this one.
Make the cutouts in the No. 4 former through which the pushrods extend into the rear of the model. Adapt the parameters for the cutouts shown on the plans to suit your radio if necessary, but don't weaken the area where the wing-bolt block attaches. After you have decided on the cutout patterns and made sure the formers are configured for your radio, glue the No. 3 and No. 4 formers to one of the fuselage sides. Use a triangle to get the formers square to the side. The other side is glued on with the top of the fuselage laid flat on the workbench.
Bend the two sides together to form the tail. Be very careful here, as most of the twists that get built into a fuselage can be traced to this operation. Glue in the firewall using epoxy. While many fast-setting glues serve well for most purposes, epoxy is preferred in very high-vibration applications.
The top block is made of very light 1/4-in. balsa sheet. The chunky stuff that we took pains to avoid in building the tail is fine here, as long as it's extremely light. Don't hollow it out unless you were unable to obtain a very light piece. Glue the block to the top of the fuselage and sand it carefully to shape. Obtain wood that's sufficiently light because it should have enough mass to give stiffness to the fuselage. Add the triangle stock as shown in the plans.
Make the tail-wheel strut from 1/16-in. music wire. Sew it to the little plywood former, and install it in the rear of the fuselage. If the lack of a steerable tail wheel bothers you, there's no reason not to add one using your favorite method, but it doesn't seem necessary on this model.
Add the strip balsa uprights and crosspieces to the rear of the fuselage as well as to the wing-bolt block with its triangle reinforcements. Sheet the bottom of this assembly with the grain running crosswise.
Make the hatch of balsa block with small plywood squares inserted into the inner face. Attach it by wood screws to the small hardwood blocks added to the inside of the nose. This helps control vibration in the front of the model by allowing the hatch to take some of the structural load of the nose. The prototype used only two points of attachment at diagonal corners of the hatch, but using four plywood squares works much better. If easy access to the fuel tank isn't important to you (or if you're planning to install an engine larger than the recommended .19 size), you can skip the foregoing and just glue the hatch in place.
Slot the top block for the fin after the fuselage is assembled to ensure accurate alignment. The completed fuselage can then be shaped by rounding the top block and the hatch. You may round off the sharp corners behind the wing by adding more triangle stock if you wish.
The canopy on the Sparrow must be very narrow to fit properly. If you can find a ready-made one that fills the bill, use it. Being unable to find a canopy narrow enough, the prototype used shaped Styrofoam with one coat of 2-oz. glass cloth and epoxy resin, then painted and primed to match the model. Since the canopy was a factor in determining the size of the fin and rudder, include a canopy on your model. The airplane's knife-edge capabilities might be diminished otherwise.
Wing
This is where the builder encounters his biggest challenge. Generally, the wing is the hardest part of the model to build right. More than with any other part of the model, you want the wing to be warp-free — and yet it's the most difficult part to build without warps.
If you want an honest-flying Sparrow, its wing must be straight. Ensure the airframe is straight and warp-free before you cover it; once the webbing is in place the wing will not twist to any great extent. With a wing area this small, the old trick of straightening a wing with MonoKote will work very poorly. Don't rely on it.
Make the spar from carefully selected, straight-grained spruce. Using only very straight-grained wood protects the model from coming apart in the air no matter how much of a beating it's given. Test your sample by flexing it — you should be able to follow each grain layer for at least 10 in.; if not, find a piece with a straighter grain.
The spar is joined in an unusual manner. Two strips of spruce, left over from making the spars, are used to double the joint between the spars at the center of the wing. These are installed between the top and bottom caps like splints.
A 3/16-in. plywood plate is shaped to conform to the wing spar sweep and is epoxied into place after the wing is joined. The wing should be glued into place before the wing is sheeted to ensure a strong bond with the center ribs and with the 1/4-in. balsa pieces on each side. The wing is no stronger than this joint, so be very certain of its accuracy and double-check that the wing is straight before you glue the spar.
The webbing should be installed very carefully. It is under a great deal more strain than many modelers realize. You don't want gaps that would need to be filled with glue, and the webbing should be coated with two coats for best effect. Nothing else gives as much strength for so small a weight increase as proper webbing.
On the prototype, I built up the ailerons from the pieces of trailing-edge sheeting that had been cut out to make the aileron wells. If I could do it over again, I would simply make them from solid balsa as indicated on the plans. The weight savings turned out to be almost nonexistent, and the constructed ailerons were much more time-consuming than making solid ones would have been.
I recommend using bellcranks, because if you're careful about how you rig them they offer the least amount of play of any system this wing can accommodate. I'd think twice about substituting something else. This airplane needs ailerons that center every time you let go of the stick, and even a little play is not acceptable.
Once the sheeting is in place, cover the center joint with 6-oz. glass cloth and epoxy resin or Hot Stuff. The cutout for the servo in the wing sheeting is easier to make before the center section is covered with glass.
The wing is faired into the fuselage with very light balsa block glued on top of the glass. The wing-block bolts should be set into the fairing until they bear on the wing itself. The prototype used 10-32 nylon bolts because of their ability to break away before the wing block does. However, since the nylon bolts are difficult to find in some areas, you can substitute regular 1/4-20 bolts if necessary.
Assembly
Bolt the wing in place and true it to the horizontal stabilizer by eye. Holding the model up with the nose pointed towards you, change the angle of the model until the stab makes a line just above the top surface of the wing. Adjust the stab until it is parallel to the wing, and measure from the top center of the firewall to the tips of the stab to get the proper alignment as indicated in the plan view.
The fin is simply fitted into the slot in the top block, and its alignment will be no better than that of the slot. Use a triangle to get the fin square to the stab. On such a small model any misalignments will have a magnified effect, so be as exacting as you can during assembly.
The cowling is built up in the same way as the canopy, but it's a bit more difficult to make it fit perfectly. With the engine in its mount and the mount on the model, tack-glue foam blocks around the engine to the back of the spinner. Mark the foam at the front to locate the spinner circle. Gently remove the foam and take the engine and mount off the model; then, to preserve the location of the spinner circle, tack the foam back onto the model exactly where you broke it off. Glue the front cowl former onto the foam.
Carve and sand the foam to the shape you prefer. If you try for a fancier shape than the prototype, keep the lines simple or it will look odd. Remove the cowl form from the model, and cut off about 1/2 in. from the outside edge of the foam at the back of the cowl to allow for the thickness of the fiberglass.
Covering and finishing
MonoKote was used for the prototype—orange on the fuselage and tail and transparent red on the wings. The color scheme is up to you, but be sure to make the model easy to see. A small, fast model flying away from you will quickly shrink to a dot, so you want it to stand out as vividly as possible.
Covering the model after assembly, rather than before, is only a little more trouble and eliminates the worry that MonoKote between the various pieces could interfere with the glue joints. The cowling can be painted to match the MonoKote, or you can prime the fiberglass with Ambroid cement and MonoKote the cowling. In fact, though it's obsolete for general model-building purposes, Ambroid will do wonders in making MonoKote stick to epoxy on firewalls and wing center sections.
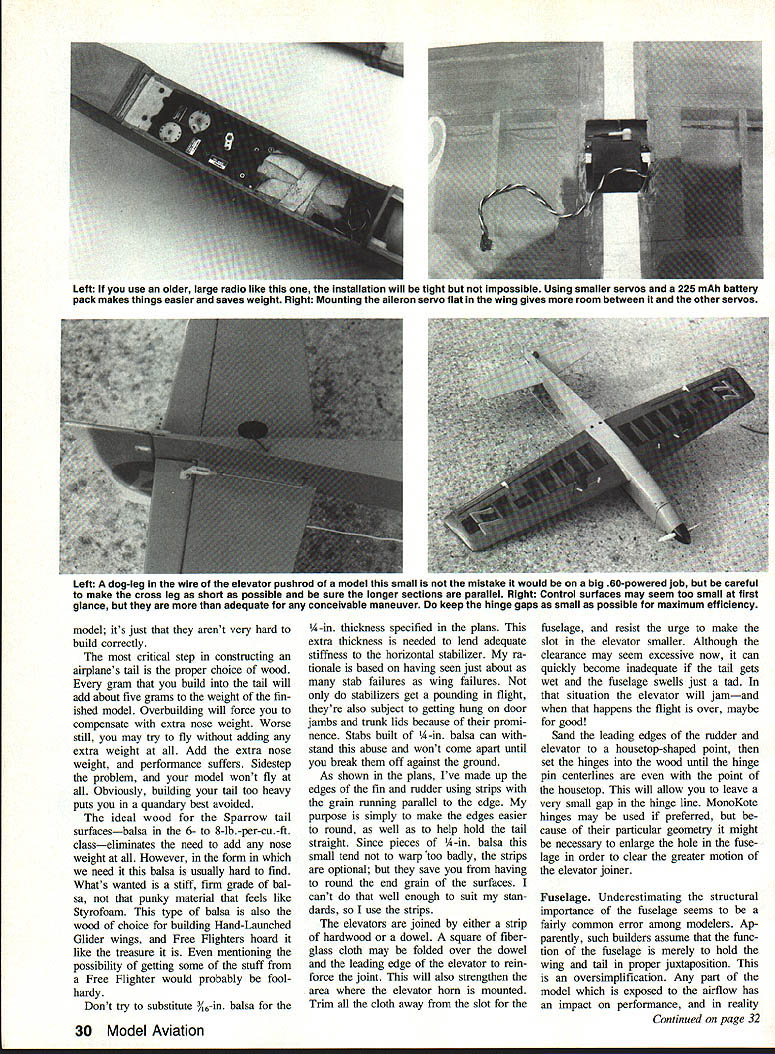
Radio and engine
Radio installation in the Sparrow is tight. I managed to fit an old Tower Hobby System-4 radio with monster servos and a full-size battery pack, but a smaller radio will give you better performance and an easier time with the installation. Use the battery position to balance the model if you can.
I strongly recommend pushrods made of nylon. Nyrod pushrods change length at different temperatures, and in a small model this can make for unacceptable trim changes. Don't use servo tape to install flight-control servos.
The first time around I installed an Enya .15 plain-bearing engine in the prototype. This provided enough power for liftoff at about 40 ft. and for flight in the 50 mph range, but when pulled to the vertical the model quickly slowed down. If piloted smoothly the airplane would do a vertical figure eight, but a bigger engine was clearly called for to improve vertical performance.
Replacing the .15 with a Fox .25 plain-bearing engine made the difference I had hoped for. Upon command the model would climb out briskly and had ample power for sport maneuvers. A hot .15 or a good .20 will also dart the model almost straight up and out of sight. Please resist the urge to put a .40 in this model — you'd have to rebalance the airplane to the point that it would scarcely be flyable unless the engine were three-quarters full throttle, and the overburdened model would also be very hard to land.
Flying
Careful trimming will help you get the most out of the Sparrow. Start with these control throws:
- Aileron: about 3/16 in.
- Elevator: about 3/8 in.
- Rudder: about 1 in.
Balance the model at a point about 3/8 in. in front of the center of gravity shown on the plans. Fly it this way for several flights before you change anything. It's quick, but you'll get used to it after a few flights. Once you feel comfortable with the model, you can move the balance point aft a bit.
When you begin to get your timing right, move the balance point back to the one indicated on the plans. This will make the model a little quicker and will release its snapping and spinning potential.
Snapping maneuvers are the Sparrow's strongest suit. The airplane will perform two full inside or outside vertical snaps and still be heading straight up afterward. You can do partial snaps with precision. Intricate tricks like gliding from three quarters of an outside snap into knife-edge flight are hard to learn, but this airplane is happy doing them. Once you have sharpened your timing, you'll find that the possibilities are almost limitless. If you're quick enough at stirring it into the sticks, chances are the Sparrow will do almost any maneuver.
On days when hauling and flying a larger model doesn't seem worth the trouble, a model like the Sparrow can really help you keep your edge. Fly it for all the singular things that it alone can do. If the model isn't taken all that seriously (at least not right off the bat), the improvement in your flying skills definitely will be.
Transcribed from original scans by AI. Minor OCR errors may remain.

