
SPECIAL FLIGHT ROCKETRY
Dennis Kryway, 1440 Millikens Bend Rd., Herndon, VA 22070
THIS IS THE BEGINNING — Part 1
Part 1 of a series of articles of guidance and instruction for making fiberglass nose cones and body tubes.
Watching someone while they are doing it is the best way to learn to make fiberglass rockets. Without that luxury here and now, it will be a bit more difficult, but with practice, success will be achieved.
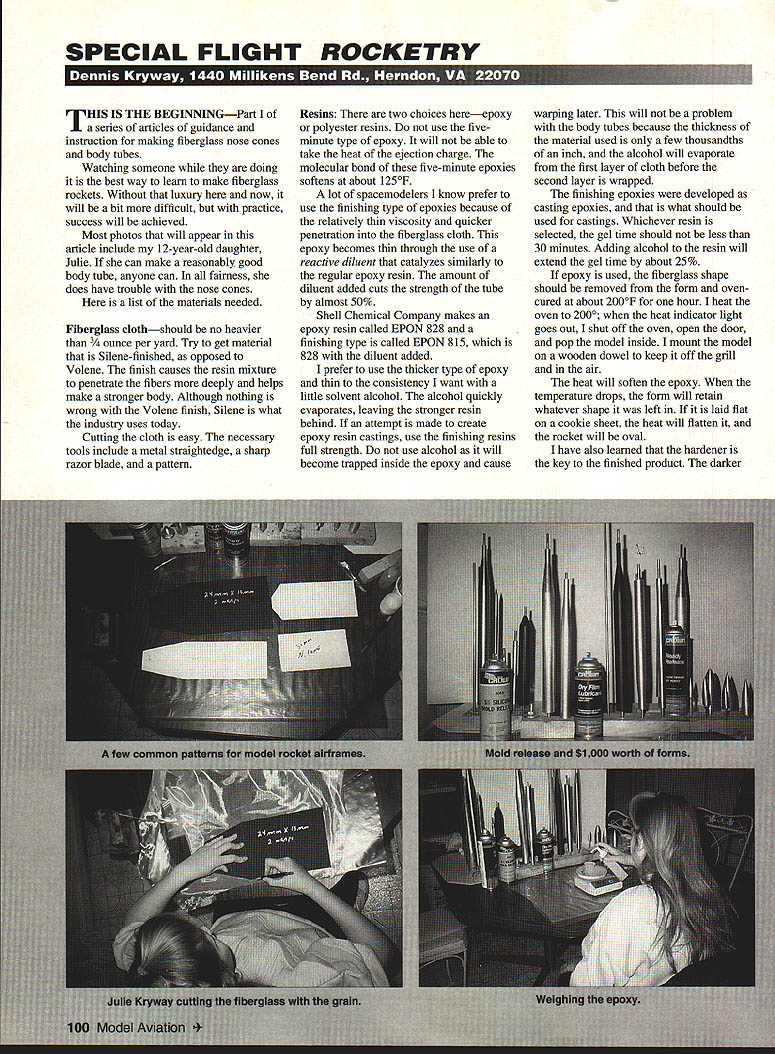
Most photos that will appear in this article include my 12-year-old daughter, Julie. If she can make a reasonably good body tube, anyone can. In all fairness, she does have trouble with the nose cones.
Here is a list of the materials needed and instructions for basic technique.
Materials
- Fiberglass cloth
- Should be no heavier than 3/4 ounce per yard.
- Try to get material that is Silane-finished, as opposed to Volene finish. The Silane finish causes the resin mixture to penetrate the fibers more deeply and helps make a stronger body. Although nothing is wrong with the Volene finish, Silane is what the industry uses today.
- Cutting tools
- A metal straightedge, a sharp razor blade, and a pattern.
Resins
There are two main choices—epoxy or polyester resins.
- Epoxy
- Do not use five-minute type epoxy. It will not be able to take the heat of the ejection charge; the molecular bond of these five-minute epoxies softens at about 125°F.
- Many space modelers prefer finishing-type epoxies because of relatively thin viscosity and quicker penetration into the fiberglass cloth. This finishing epoxy becomes thin through the use of a reactive diluent that catalyzes similarly to regular epoxy resin. The amount of diluent added cuts the strength of the tube by almost 50%.
- Shell Chemical Company makes an epoxy resin called EPON 828 and a finishing type called EPON 815, which is 828 with the diluent added.
- I prefer to use the thicker type of epoxy and thin to the consistency I want with a little solvent alcohol. The alcohol quickly evaporates, leaving the stronger resin behind. If an attempt is made to create epoxy resin castings, use the finishing resins to get full flow and surface finish. Do not use alcohol for castings — it will become trapped inside the epoxy and cause warping later. This will not be a problem with body tubes because the thickness of the material used is only a few thousandths of an inch, and the alcohol will evaporate from the first layer of cloth before the second layer is wrapped.
- Whichever epoxy is selected, the gel time should not be less than 30 minutes. Adding alcohol to the resin will extend the gel time by about 25%.
- If epoxy is used, the fiberglass shape should be removed from the form and oven-cured at about 200°F for one hour. I heat the oven to 200°F; when the heat indicator light goes out, I shut off the oven, open the door, and pop the model inside. I mount the model on a wooden dowel to keep it off the grill and in the air.
- The heat will soften the epoxy; when the temperature drops, the form will retain whatever shape was left in. If it is laid flat on a cookie sheet, the heat will flatten it, and the rocket will be oval.
- The hardener is the key to the finished product. The darker the hardener, the more adhesive qualities the epoxy mixture will have; the lighter the color, the stiffer the finished product will result. Correct proportions must be used. Using slightly less hardener will produce a stiffer product; using slightly more will give a more flexible finished product. The manufacturer will provide proper proportions to use to achieve the desired result. Precision — weigh two parts epoxy rather than eyeballing.
- Polyester
- Polyester resins also come in both finishing and regular types. Polyester resins are cheaper and do set up quicker. Using them with practice allows models to be made in a day that would not be possible using epoxy. Good models can be made with polyester resins. A regular polyester resin will be strong and the finished model will be about the same weight as one made with epoxy.
- Alcohol can be used as a thinner too.
- Polyester resin must be mixed in a paper cup—do not use a plastic cup because the resin's solvents will dissolve plastic. Try to use a wax-covered paper cup because solvents will also dissolve wax.
- I use old liquid soap pump containers for dispensing both epoxy and polyester resins.
Release agents
A release agent must be used on the mold to remove the hardened fiberglass.
- Use a wax-based agent for epoxy and a silicone-based agent for polyester. Many kinds of mold releases are available.
- Crown Products (Illinois) makes a complete line of mold releases. Phone number: 800-766-7655. Call Crown Products and ask the name of the dealer nearest you that carries mold release.
- Three Crown products I use:
- Aerosol #3270 Ready Release for aluminum and steel forms.
- For epoxy releases: #3045 five-percent Silicone Mold Release for aluminum and steel.
- For polyester resins on plastic forms: #6075 Dry Film Lubricant.
Removing the finished shape from the mold
Getting the finished shape off the mold can still be a problem if you don't know the tricks.
- Crown's #3072 Ready Release (form wax) must be melted to remove the fiberglass. One way is to fill the kitchen sink with enough hot water to cover the form. I slowly remove the shell from the form as the wax softens and melts.
- If the form is tapered or if a nose cone is being removed, a vacuum may be created between the form and the nose cone, causing a wall to collapse. If this happens, work as quickly as possible to remove the nose cone from the form, and then drop it back into the hot water and reshape it. It will hold the shape when it cools.
- The big trick when using wax mold release is putting enough on the form. With Ready Release, I spray the form three times, letting it dry between each spray before I start using the fiberglass. If you use 5% Silicone Mold Release, follow the instructions on the can.
- If you use plastic forms, spray them with Dry Film Lubricant; when either the epoxy or polyester hardens, pop the forms into the freezer. The plastic will shrink enough so that the finished article will fall off the form. Delrin works a little better than nylon in the freezer.
Forms
Steel, aluminum, and plastic are the materials commonly used for molds.
- Steel is the best for a number of reasons. The greatest reason is that it can take rough handling; however, it can rust unless you use stainless steel.
- Aluminum is okay but can become beat up quickly, and it will wear out from cleaning a lot faster than steel.
- Delrin, nylon, and Teflon are good for plastic forms but only for nose cones or short body tubes. They release easily but warp after a while.
Practice and procedure
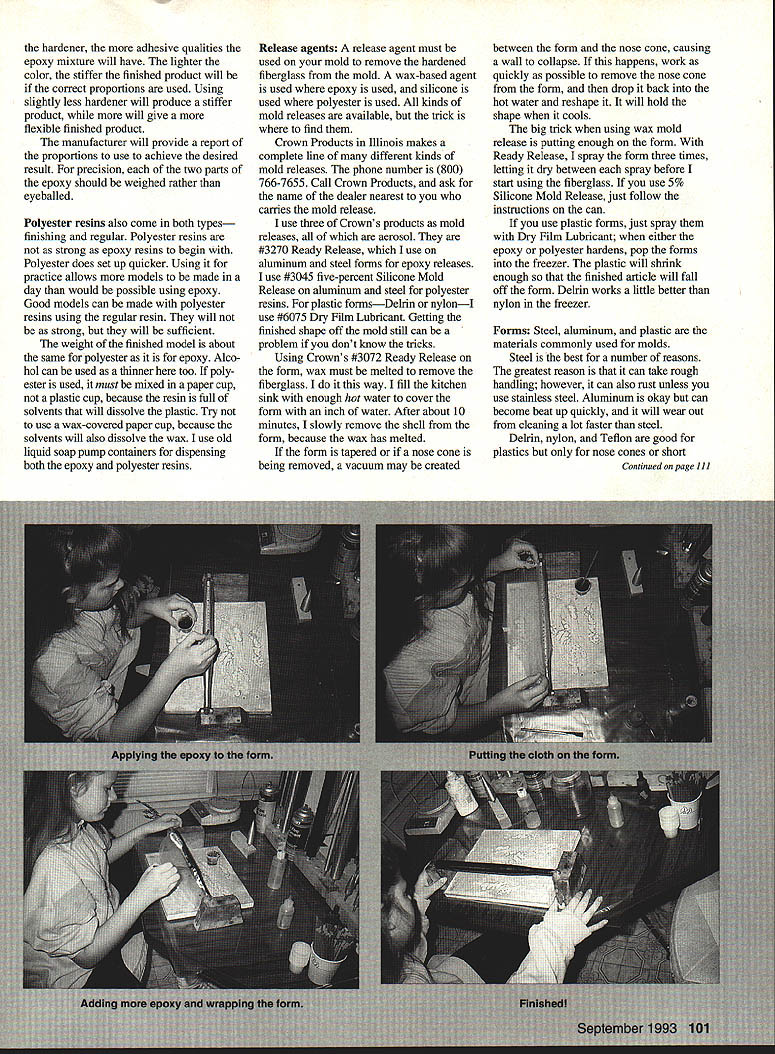
A good way to practice is to spray a smooth brass rod or tube lightly two or three times with mold release, and then cover it with the fiberglass cloth and resin of your choice.
- Carefully cut the cloth.
- Measure the epoxy by weight on an electronic scale.
- Put a line of epoxy dots across the mandrel.
- When the epoxy is down, carefully line up the cloth as straight as possible and put it down on the form. The epoxy will grab the cloth and hold it. Try to get it straight the first time.
- Apply more epoxy to the cloth with an acid brush. The trick here is not to have the cloth wrinkle or fold onto itself. If it does, you will have a hole when you apply the sandpaper.
Here ends Part I.
Transcribed from original scans by AI. Minor OCR errors may remain.

