
Sport Cassutt
Over 25 years ago, then-airline pilot Capt. Tom Cassutt built a tiny monoplane racer that captured the hearts and minds of air‑racing fans throughout the country. Entered in competition in 1958, the Cassutt Special I first flew to victory in the 1958 National Air Racing Championships, which prompted literally hundreds of air‑racing aficionados to request plans and information about Cassutt's clean machine.
In 1959, Cassutt designed an even smaller version of his popular ship, spanning just under 14 feet, and called it the Cassutt Special II. This diminutive speedster was capable of speeds in excess of 230 mph as it flashed around the pylons. Its squared‑off lines and stabilizer tip plates gave it a uniquely saucy appearance as it eased up to the starting line.
My acquaintance with the Cassutt Special II (#11) began about a year ago when our local airport advisory board staged an Airport Appreciation Day, complete with an air show, EAA static display, and pylon races. As luck would have it, there were two Cassutts entered in the races, and I had ample time to go over each one inch‑by‑inch while they were on static display.
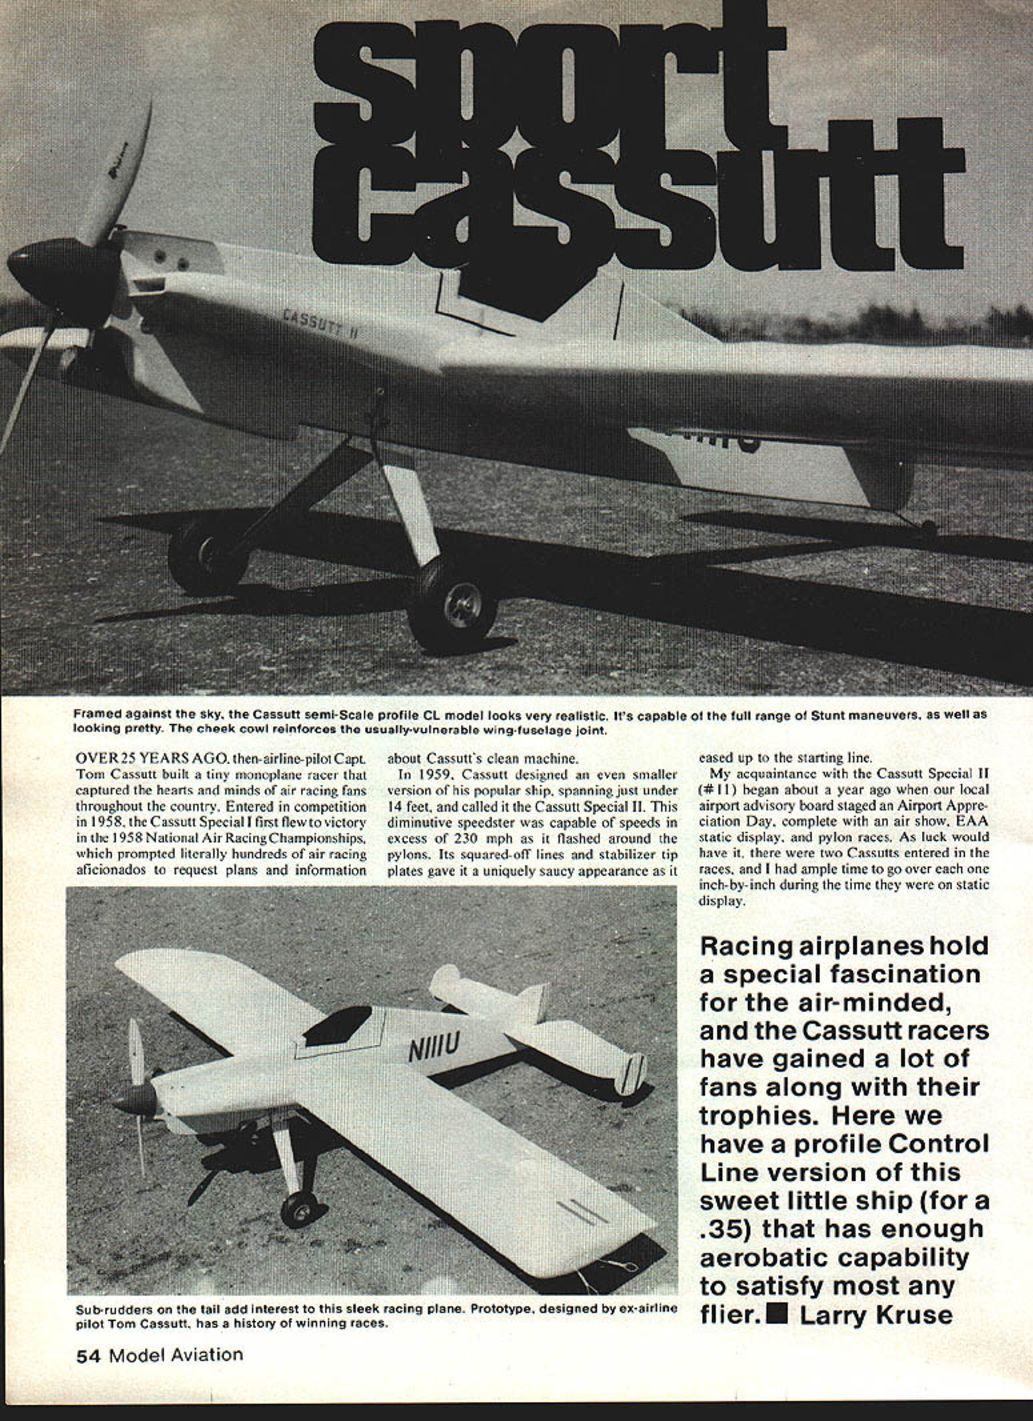
Racing airplanes hold a special fascination for the air‑minded, and the Cassutt racers have gained a lot of fans along with their trophies. Here we have a profile control‑line version of this sweet little ship (for a .35) that has enough aerobatic capability to satisfy most any flier. — Larry Kruse
Construction notes
Since the Cassutt conforms to most of the precepts of profile construction, I won't go into a great amount of detail on how to put the thing together, but there are some areas that need to be touched upon.
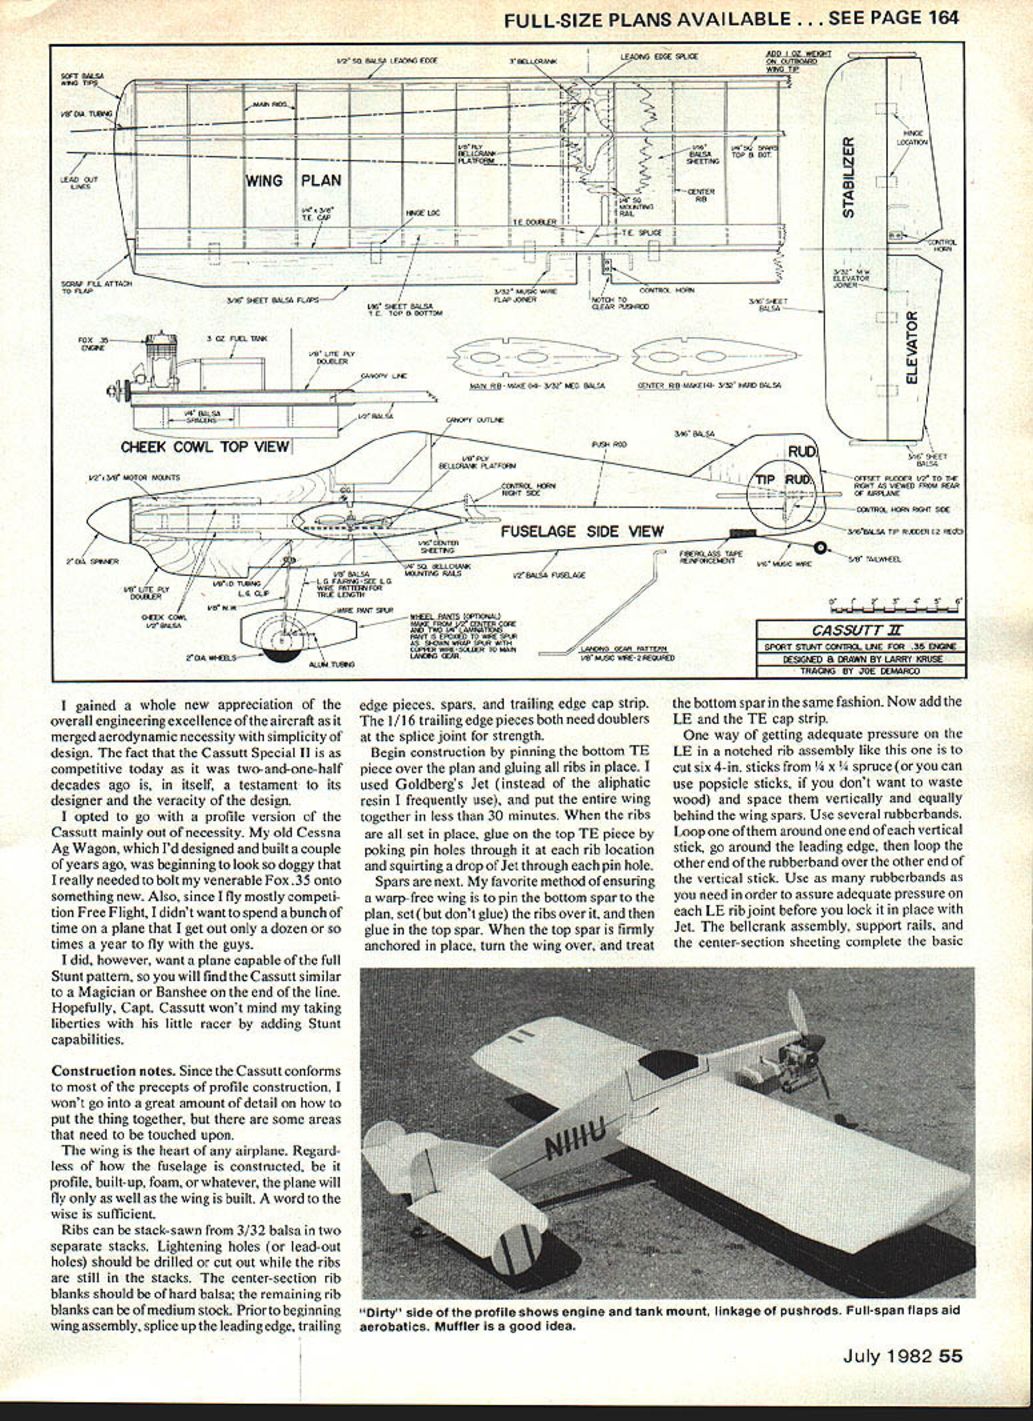
The wing is the heart of any airplane. Regardless of how the fuselage is constructed — profile, built‑up, foam, or whatever — the plane will fly only as well as the wing is built. A word to the wise is sufficient.
Ribs can be stack‑sawn from 3/32" balsa in two separate stacks. Lightening holes (or lead‑out holes) should be drilled or cut out while the ribs are still in the stacks. The center‑section rib blanks should be of hard balsa; the remaining rib blanks can be medium stock. Prior to beginning wing assembly, splice up the leading edge, trailing edge pieces, spars, and trailing edge cap strip. The 1/16" trailing edge pieces both need doublers at the splice joint for strength.
Begin construction by pinning the bottom trailing edge piece over the plan and gluing all ribs in place. I used Goldberg's Jet (instead of the aliphatic resin I frequently use), and put the entire wing together in less than 30 minutes. When the ribs are all set in place, glue on the top trailing edge piece by poking pin holes through it at each rib location and squirting a drop of Jet through each pin hole.
Spars are next. My favorite method of ensuring a warp‑free wing is:
- Pin the bottom spar to the plan.
- Set (but don't glue) the ribs over it.
- Glue in the top spar and allow it to anchor firmly.
- Turn the wing over and glue the bottom spar in the same fashion.
- Add the leading edge and the trailing edge cap strip.
One way of getting adequate pressure on the leading edge in a notched‑rib assembly like this is to cut six 4" sticks from 1/4" x 3/4" spruce (or use popsicle sticks if you don't want to waste wood) and space them vertically and equally behind the wing spars. Use several rubber bands: loop one rubber band around one end of each vertical stick, go around the leading edge, then loop the other end of the rubber band over the other end of the vertical stick. Use as many rubber bands as needed to assure adequate pressure on each leading‑edge rib joint before you lock it in place with Jet.
The bellcrank assembly, support rails, and the center‑section sheeting complete the basic wing.
Wing assembly
Stabilizer surfaces and flaps are both 3/16" balsa. Since these both have to be hinged, don't choose stock so hard the termites have rejected it, or so soft that the hinges might pull free under stress. Medium weight, medium grain is best. Slot the flaps and their adjoining surfaces for hinges.
The fuselage, in typical profile style, is cut from firm 1/2‑in. stock. You'll need to lay up the fuselage blank from a good 36‑in. length of balsa, and then use scrap material to flesh out the canopy/cockpit area. Check your scrap box or the remains of the last kit you built.
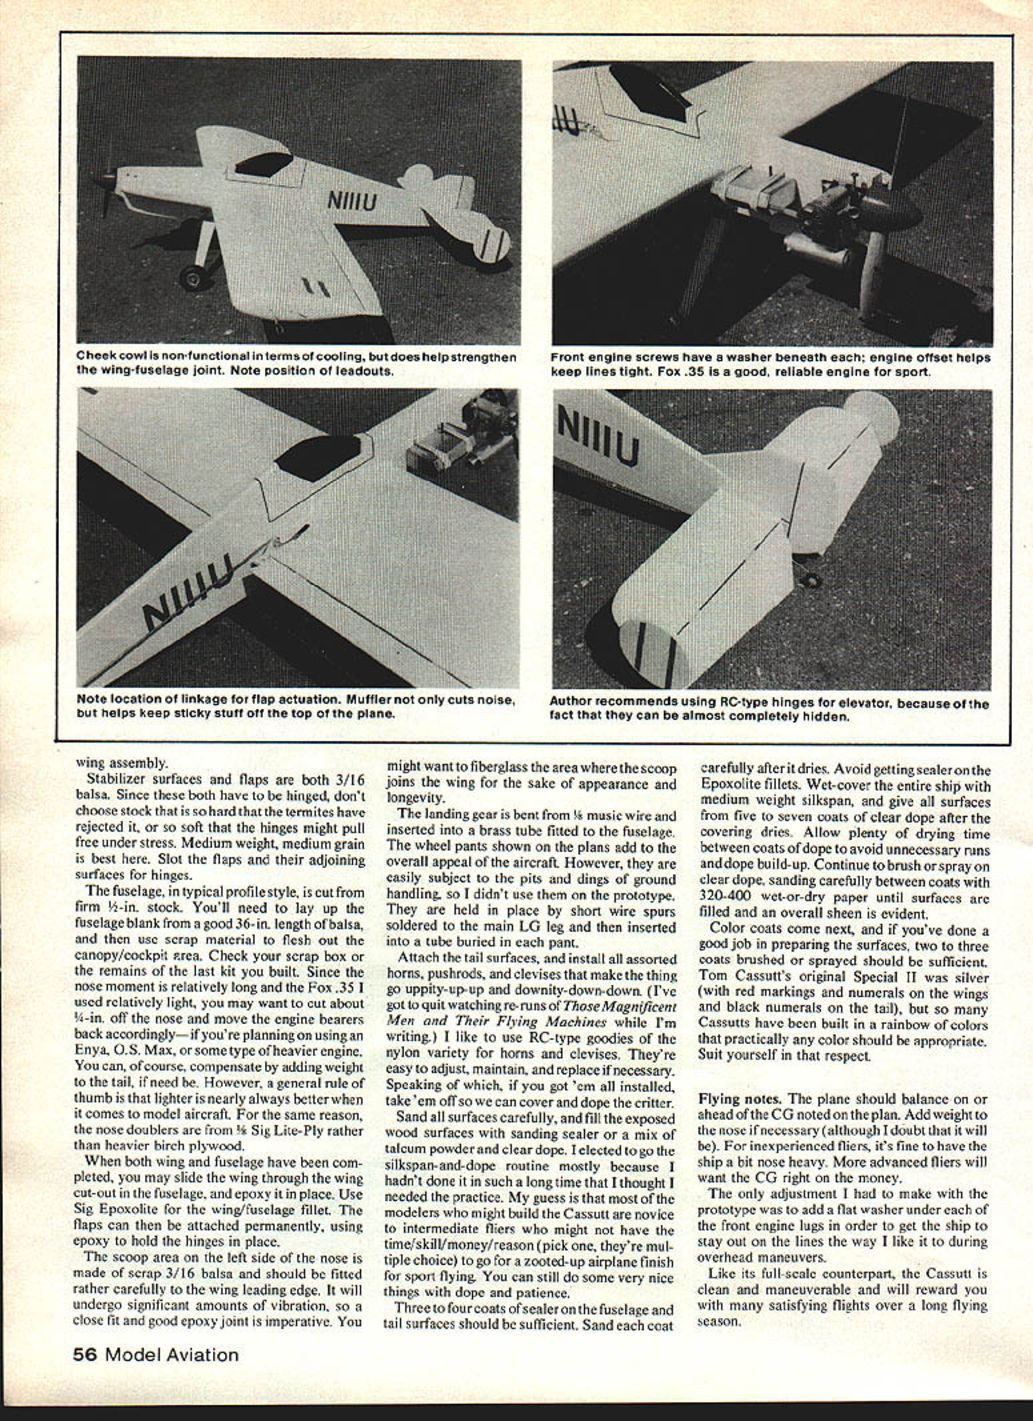
Since the nose moment is relatively long and the Fox .35 I used is relatively light, you may want to cut about 1/4 in. off the nose and move the engine bearers back accordingly if you're planning on using an Enya, O.S. Max, or some other heavier engine. You can, of course, compensate by adding weight to the tail, if need be. However, a general rule of thumb is that lighter is nearly always better when it comes to model aircraft. For the same reason, the nose doublers are from 1/8" Sig Lite‑Ply rather than heavier birch plywood.
When both wing and fuselage have been completed, you may slide the wing through the cutout in the fuselage and epoxy it in place. Use Sig Epoxolite for the wing/fuselage fillet. The flaps can then be attached permanently, using epoxy to hold the hinges in place.
The scoop area on the left side of the nose is made of scrap 3/16" balsa and should be fitted rather carefully to the wing leading edge. It will undergo significant vibration, so a close fit and a good epoxy joint are imperative. You might want to fiberglass the area where the scoop joins the wing for the sake of appearance and longevity.
The landing gear is bent from 1/8" music wire and inserted into a brass tube fitted to the fuselage. The wheel pants shown on the plans add to the overall appeal of the aircraft; however, they are easily subject to pits and dings from ground handling, so I didn't use them on the prototype. They are held in place by short wire spurs soldered to the main landing‑gear leg and then inserted into a tube buried in each pant.
Attach the tail surfaces, and install all assorted horns, pushrods, and clevises that make the thing go uptity‑up‑up and downity‑down‑down. (I've got to quit watching re‑runs of Those Magnificent Men and Their Flying Machines while I'm writing.) I like to use RC‑type nylon hardware for horns and clevises. They're easy to adjust, maintain, and replace if necessary. Speaking of which, if you get them all installed, take them off so we can cover and dope the critter.
Sand all surfaces carefully, and fill the exposed wood surfaces with sanding sealer or a mix of talcum powder and clear dope. I elected to go the silkspan‑and‑dope routine mostly because I hadn't done it in such a long time that I thought I needed the practice. My guess is that most modelers who might build the Cassutt are novice to intermediate fliers who might not have the time/skill/money/reason (pick one — they're multiple choice) to go for a zooted‑up airplane finish for sport flying. You can still do some very nice things with dope and patience.
Finish and covering steps:
- Apply three to four coats of sealer on the fuselage and tail surfaces; sand each coat carefully after it dries. Avoid getting sealer on the Epoxolite fillets.
- Wet‑cover the entire ship with medium‑weight silkspan.
- Give all surfaces five to seven coats of clear dope after the covering dries. Allow plenty of drying time between coats to avoid runs and excessive dope build‑up.
- Continue to brush or spray on clear dope, sanding carefully between coats with 320–400 wet‑or‑dry paper until surfaces are filled and an overall sheen is evident.
- Apply color coats. If you've prepared the surfaces well, two to three coats brushed or sprayed should be sufficient.
Tom Cassutt's original Special II was silver (with red markings and numerals on the wings and black numerals on the tail), but so many Cassutts have been built in a rainbow of colors that practically any color is appropriate. Suit yourself in that respect.
Flying notes
The plane should balance on or ahead of the CG noted on the plan. Add weight to the nose if necessary (although I doubt that it will be). For inexperienced fliers, it's fine to have the ship a bit nose heavy. More advanced fliers will want the CG right on the money.
The only adjustment I had to make with the prototype was to add a flat washer under each of the front engine lugs in order to get the ship to stay out on the lines the way I like it to during overhead maneuvers.
Like its full‑scale counterpart, the Cassutt is clean and maneuverable and will reward you with many satisfying flights over a long flying season.
Transcribed from original scans by AI. Minor OCR errors may remain.

