

The Sportsman
Harold Ruark
THE SPORTSMAN could easily be a scale model of a beautiful high-wing airplane of the ’30s, with their unforgettable lines, or it could be one of the equally beautiful homebuilts of today. Actually, it is neither. The Sportsman was designed to look like a full-size airplane, with enough wing and tail to make it a pleasant flying machine.
I have been a modeler for over 40 years, and as you can see, my age is controlling my style of thinking. This airplane is the result of two previous models, is flown with trike gear, and began with a .30 engine. The .30 engine just wasn’t enough. The Sportsman is powered with an OS .40, and man, what a difference! Plenty of power for take-off, with no worries about snap rolls. A good .35 would be okay, but I consider the .40 to be just right.
Realistic and as pretty as they come, this .40-powered job is a most rewarding project in both building and flying.
A comment or two before we go to construction. Although not a beginner’s airplane, it isn’t difficult to build or fly. A modeler with a moderate amount of experience will have no trouble. The only two items of concern may be the fiberglass cowl and wheel pants. The pants can be purchased from almost any model supply house. The cowl can easily be made by the method described here. The upright engine installation is just straightforward model building, and it still looks good with a Sullivan spinner. So let’s get started with the enjoyable part of all this, construction and flying.
Construction
Fuselage:
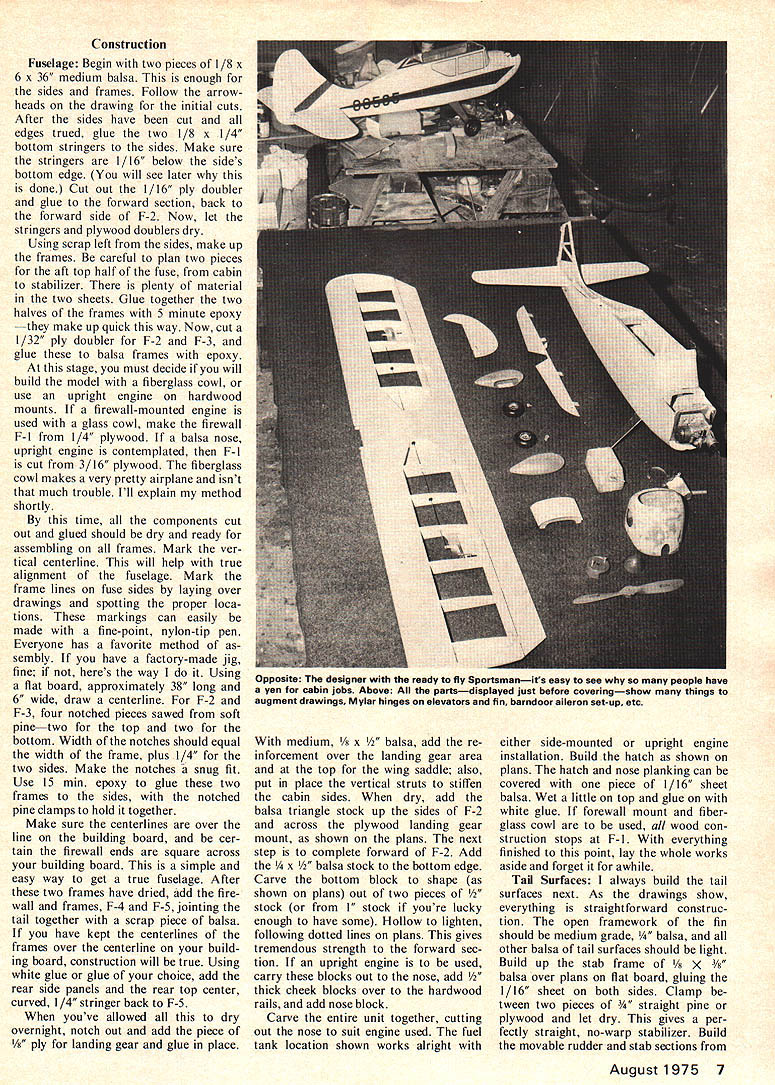
Begin with two pieces of 1/8 x 6 x 36" medium balsa. This is enough for the sides and frames. Follow the arrowheads on the drawing for the initial cuts. After the sides have been cut and all edges trued, glue the two 1/8 x 1/4" bottom stringers to the sides. Make sure the stringers are 1/16" below the side's bottom edge. (You will see later why this is done.) Cut out the 1/16" ply doubler and glue to the forward section, back to the forward side of F-2. Now, let the stringers and plywood doublers dry. Using scrap left from the sides, make up the frames. Be careful to plan two pieces for the aft top half of the fuse, from cabin to stabilizer. There is plenty of material in the two sheets. Glue together the two halves of the frames with 5-minute epoxy—they make up quick this way. Now, cut a 1/32" ply doubler for F-2 and F-3 and glue these to the balsa frames with epoxy. At this stage, you must decide if you will build the model with a fiberglass cowl, or use an upright engine on hardwood mounts. If a firewall-mounted engine is used with a glass cowl, make the firewall F-1 from 1/4" plywood. If a balsa nose, upright engine is contemplated, then F-1 is cut from 3/16" plywood. The fiberglass cowl makes a very pretty airplane and isn't that much trouble. I'll explain my method shortly. By this time, all the components cut out and glued should be dry and ready for assembling on all frames. Mark the vertical centerline. This will help with true alignment of the fuselage. Mark the frame lines on fuse sides by laying over drawings and spotting the proper locations. These markings can easily be made with a fine-point, nylon-tip pen. Everyone has a favorite method of assembly. If you have a factory-made jig, fine; if not, here's the way I do it. Using a flat board, approximately 38" long and 6" wide, draw a centerline. For F-2 and F-3, four notched pieces were sawed from soft pine—two for the top and two for the bottom. Width of the notches should equal the width of the frame, plus 1/4" for the two sides. Make the notches a snug fit. Use 15-minute epoxy to glue the two frames to the sides in the notched pine; clamps hold them together. Make sure centerlines are over the centerline on the building board and be certain the firewall ends are square across the building board. This is a simple and easy way to get a true fuselage. After these two frames have dried, add the firewall and frames F-4 and F-5, joining the tail together with a scrap piece of balsa. If you have kept the centerlines of the frames over the centerline on your building board, construction will be true. Using the white glue or glue of your choice, add the rear side panels and the rear top center, curved, 1/4" stringer back to F-5.
When you've allowed all this to dry overnight, notch out and add the piece of 1/8" ply for landing gear and glue in place.
With medium, 1/8 x 1/2" balsa, add the reinforcement over the landing gear area and at the top for the wing saddle; also put in place the vertical struts to stiffen the cabin sides. When dry, add the balsa triangle stock up the sides of F-2 and across the plywood landing gear mount, as shown on the plans. The next step is to complete forward of F-2. Add the 1/4 x 1/2" balsa stock to the bottom edge. Carve the bottom block to shape (as shown on plans) out of two pieces of 1/2" stock (or from 1" stock if you're lucky enough to have some). Hollow to lighten, following dotted lines on plans. This gives tremendous strength to the forward section. If an upright engine is to be used, carry these blocks out to the nose, add 1/2" thick cheek blocks over to the hardwood rails and add nose block.
Carve the entire unit together, cutting out the nose to suit engine used. The fuel tank location shown works alright with either side-mounted or upright engine installation. Build the hatch as shown on plans. The hatch and nose planking can be covered with one piece of 1/16" sheet balsa. Wet a little on top and glue on with aliphatic. If firewall-mounted and fiberglass cowl are to be used, all wood construction stops at F-1. With everything finished to this point, lay the whole works aside and forget it for awhile.
Tail Surfaces: I always build the tail surfaces next. As the drawings show, everything is straightforward construction. The open framework of the fin should be medium grade, 1/4" balsa, and all other balsa tail surfaces should be light. Build up the stab frame of 1/8 x 3/8" balsa over plans on a flat board, gluing the 1/16" sheet on both sides. Clamp between two pieces of 3/4" straight pine or plywood and let dry. This gives a perfectly straight, no-warp stabilizer. Build the movable rudder and stab sections from 1/16" sheet balsa. Add the triangular cap strips and sand to shape. Add the hinge blocks and hinge the surfaces with Mylar hinges or piano wire. Balance and finish as per plan.
The wings are built in the usual manner. The center section is built first, using the 1/4" sheet bottom, the 1/8" top sheeting ahead of the spar, and the 1/8" cap strips. The dihedral brace is laminated from 1/8" balsa per plan. Build the outer panels on the board over the plan with the bottom sheeting in place. When dry, join panels to center section, checking alignment carefully. The ailerons are single-surface and are built from 1/8" sheet and 1/8" balsa stock. Mylar hinges work well on the ailerons. Add the fiberglass-filled balsa tip blocks and sand to shape.
Landing Gear: The gear shown is a simple trike type, built from 3/16" music wire. Bend to shape and solder the axle to the wheel pants or to a small block if pants are not used. The wheel pants are the only thing on this model that I would buy rather than build. They are available through most supply houses. Mount the gear on the plywood plate and bolt to the fuselage, using rubber shock cord for suspension if desired.
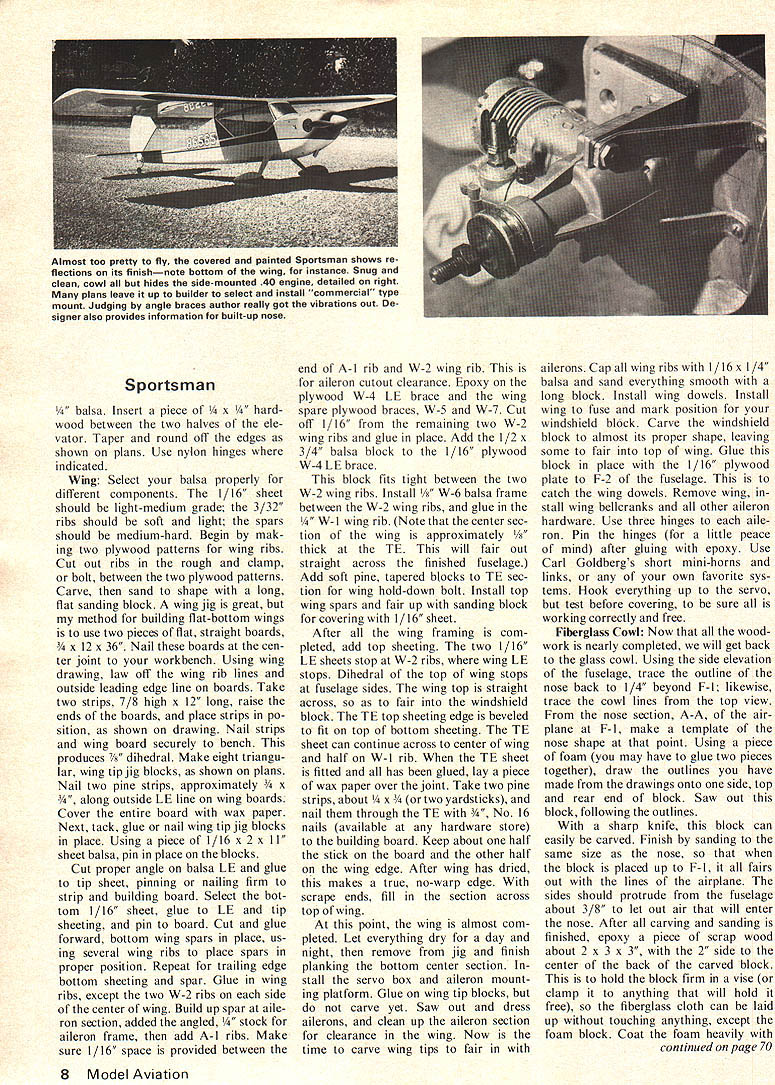
Covering and Finishing: I use Silkspan or Monokote for covering. Do the interior cabin areas first and then the fuselage sides. Use sanding sealer and then fill any imperfections with lightweight filler before final painting. The paint job shown on the prototype was done with spray enamel and a little patience — keep the coats light.
Wheel pants and cowl: The fiberglass cowl is made from a foam plug and glassing technique. If you prefer to avoid fiberglass, the nose can be faired with balsa and the upright engine left exposed with a Sullivan spinner for scale appearance. The 0.S. .40 in the prototype fits neatly under the cowl and gives ample power. A good .35 will work, but the .40 is just right for this ship.
Flying: The Sportsman is easy to trim and flies smoothly. It will loop, roll and has a nice slow landing speed. With the trike gear it is very stable on the ground and takes off in short distances. Use aileron differential and a touch of down elevator trim for the best cruise trim. Landings are straightforward — a little power on final and ease off for a gentle three-point or wheel landing as you prefer.
This model is rewarding to build and fly, and though not for the absolute beginner, a moderately experienced modeler will have no trouble completing and flying the Sportsman.
August 1975
Sportsman
1/4" balsa. Insert a piece of 1/4 x 1/4" hardwood between the two halves of the elevator. Taper and round off the edges as shown on plans. Use nylon hinges where indicated.
Wing
Select your balsa properly for different components. The 1/16" sheet should be light-medium grade; the 3/32" ribs should be soft and light; the spars should be medium-hard. Begin by making two plywood patterns for wing ribs. Cut out ribs in the rough and clamp, or bolt, between the two plywood patterns. Carve, then sand to shape with a long, flat sanding block. A wing jig is great, but my method for building flat-bottom wings is to use two pieces of flat, straight boards, 3/4 x 12 x 36". Nail these boards at the center joint to your workbench. Using the drawing, lay off the wing rib lines and outside leading edge line on boards. Take two strips, 7/8" high x 1/2" long, raise the ends of the boards, and place strips in position, as shown on drawing. Nail strips and wing board securely to bench. This produces 7/8" dihedral. Make eight triangular, wing tip jig blocks, as shown on plans. Nail two pine strips, approximately 3/8 x 3/4", along outside LE line on wing boards. Cover the entire board with wax paper.
Next, tack, glue or nail wing tip jig blocks in place. Using a piece of 1/16 x 2 x 11" sheet balsa, pin in place on the blocks. Cut proper angle on balsa LE and glue to tip sheet, pinning or nailing firm to strip and building board. Select the bottom 1/16" sheet, glue to LE and tip sheeting, and pin to board. Cut and glue forward bottom wing spars in place, using several wing ribs to place spars in proper position. Repeat for trailing edge bottom sheeting and spar. Glue in wing ribs, except the two W-2 ribs on each side of the center of wing. Build up spar at aileron section, add the angled, 1/8" stock for aileron frame, then add A-1 ribs. Make sure 1/16" space is provided between the end of A-1 rib and W-2 wing rib. This is for aileron cutout clearance. Epoxy on the plywood W-4 LE brace and the wing spar plywood braces, W-5 and W-7. Cut off 1/16" from the remaining two W-2 wing ribs and glue in place. Add the 1/2 x 3/4" balsa block to the 1/16" plywood W-4 LE brace.
This block fits tight between the two W-2 wing ribs. Install the W-6 balsa frame between the W-2 wing ribs, and glue in the 3/4" W-1 wing rib. (Note that the center section of the wing is approximately 3/8" thick at the TE. This will fair out straight across the finished fuselage.) Add soft pine, tapered blocks to TE section for wing hold-down bolt. Install top wing spars and fair up with a sanding block for covering with 1/16" sheet.
After all the wing framing is completed, add top sheeting. The two 1/16" LE sheets stop at W-2 ribs, where wing LE stops. Dihedral at the top of wing stops at fuselage sides. The wing top is straight across, so as to fair into the windshield block. The TE top sheeting edge is beveled to fit on top of bottom sheeting. The TE sheet can continue across to center of wing and half on W-1 rib. When the TE sheet is fitted and all has been glued, lay a piece of wax paper over the joint. Take two pine strips, about 1/4 x 3/4" and nail them through the TE with 3/8" No. 16 nails (available at any hardware store) to the building board. Keep about one half the stick on the board and the other half off the wing edge. After wing has dried, this makes a true, no-warp edge. With scrap pieces, fill in the section across top of wing.
At this point, the wing is almost completed. Let everything dry for a day and night, then remove from jig and finish planing the bottom center section. Install the servo box and aileron mounting platform. Glue on wing tip blocks, but do not carve yet. Saw out and dress the ailerons, and clean up the aileron section for clearance in the wing. Now is the time to carve the wing tips to fair in with the ailerons. Cap all wing ribs with 1/16 x 1/4" balsa and sand everything smooth with a long block. Install wing dowels. Install wing to fuse and mark position for your windshield block. Carve the windshield block to almost its proper shape, leaving some to fair into top of wing. Glue this block in place with the 1/16" plywood plate to F-2 of the fuselage. This is to match the wing dowels. Remove wing, install wing bellcranks and all other aileron hardware. Use three hinges to each aileron. Pin the hinges (for a little peace of mind) after gluing with epoxy. Use Carl Goldberg's short mini-horns and links, or any of your own favorite systems. Hook everything up to the servo, but test before covering, to be sure all is working correctly and free.
Fiberglass Cowl
Now that all the woodwork is nearly completed, we will get back to the glass cowl. Using the side elevation of the fuselage, trace the outline of the nose back to 1/4" beyond F-1; likewise, trace the cowl lines from the top view. From the nose section, A-A, of the fuselage at F-1, make a template of the nose shape at that point. Using a piece of foam (you may have to glue two pieces together), draw the outlines you have made from the drawings onto one side, top and rear end of the block. Saw out this block, following the outlines.
With a sharp knife, this block can easily be carved. Finish by sanding to the same size as the nose, so that when the block is placed up to F-1, it all fairs out with the lines of the airplane. The sides should protrude from the fuselage about 3/8" to let the cowl fair into the nose. After all carving and sanding is finished, epoxy a piece of scrap wood about 2 x 3 x 3/4", with the 2" side to the center of the back of the carved block. This is to hold the block firm in a vise (or clamp it to anything that will hold it free), so the fiberglass cloth can be laid up without touching anything, except the foam block. Coat the foam heavily with in place with epoxy, and brace with soft pine or hard balsa blocks, as shown. After boring forward wing dowel holes and wing is centered, bore the nylon screw hole through wing, where the pine insert blocks are. Mark this on plywood wingplate, bore and tap for 1/4"-20 nylon bolt. At this stage, carve your windshield block to the shape shown on drawings, and fair into top of wing.
Make a pattern from paper for the windshield, and from 1/16" or 3/32" sheet balsa, cut and glue the windshield in one piece. Make sure you rabbet the thickness of the windshield balsa out of the block before trying to glue in place. Remove the wing and install the servos, remote mounting arrangement of your choice, with servos in approximate location shown on plans. Use pushrods of your choice. Mine are mini-snap-links, with rod running through a piece of 1-1/2" long, 1/8" dia., nylon tubing, using balsa pushrods and Z-bent, 1/16" wire hookup to the servo arms. Hinge the rudder and elevator, but don't glue hinges yet.
Install horns and linkage to make sure everything is in order and working. Install the engine temporarily on mount, and hook up throttle linkage to servo. When all controls are moving freely, remove radio and pushrods. Now is the time to fair up bottom edges of fuselage. Install landing gear strut with two 6-32 bolts and nuts. Install bottom frame B-1, according to plans, and glue 1/4 x 1/4" stringer through bottom frames. Cut and glue bottom, 1/16" balsa sheeting, with grain running lengthwise. The notch for the tail wheel assembly is cut, and the unit glued in place with epoxy. Be careful not to glue wire to wood. The airplane is now ready for finish.
Covering and Finishing
First, sand the entire woodwork with 120 paper to cut down all sharp, or rough, edges. With ready-mix spackling compound (available at any paint or hardware store), fill all holes and voids, and smooth over with wet paper towel. The spackling dries quickly and sands easily. When satisfied that everything is filled, sand the entire woodwork again with 400 paper.
Covering materials and methods are many, and every modeler has a favorite. My system starts with the fuselage. Apply two coats of dope, with light sanding between coats. Using medium-weight Silkspan, cover the open top section and fin first. Cut a piece of medium-weight Silkspan approximately 1" larger than each half to be covered. Wet the Silkspan with warm water, squeeze out most of the water, and stretch it over the open structure. Using dope to stick the Silkspan, apply to the forward edge of fin, and start stretching and gluing to outside edge first. You don't want it to stick to the fin cross-framing. This takes a little time, but is easily done. Repeat the procedure on the other side. Anyone who has covered a stick-and-tissue model knows the technique.
I have not tried MonoKote on fuselages, but I expect it could be shrunk properly to follow the contour. When dry, the top of fuselage and fin blend into one piece. Cover the solid woodwork of the fuselage the same way. Doping is the next step. Use an aerosol can to spray the open-framed covered section with light coats, so as not to stick the Silkspan to the framing in the ribs. It is only to be stuck to the outer balsa skin and the edges of frame and the last cross frame from the top. About four or five coats will stiffen the area enough. The rest of the covering should be brushed with two coats of dope (to stick the Silkspan to wood). Do not try to fill the cedar bottom with dope. Lay the airplane aside for a couple of days, so that all oils dry from the dope. Cover the wing while dope is drying. I use MonoKote on the entire wing and haven't found anything better.
Using the spackling compound again, smooth off all fuselage seams and overlaps. Let dry, and sand everything with 400 paper. This leaves everything a little fuzzy. Spray four or five coats of automotive-type gray primer, until surface is smooth, sanding lightly between the last two coats. Make sure structure is dust-free. Use epoxy paint to spray or brush on two base coats. I always use white for the base coat. When dry, mask off all windows and windshield, and trim to fit. The windows can be painted on or cut from clear MonoKote. Outline the windows with 1/16" black trim tape. From 6 feet away, it is hard to tell the difference from real glass. As every modeler knows, the few extra hours spent in finishing tasks will end the model well-spent, so take pride in your work and the results will be gratifying.
When everything has dried, assemble the entire airplane. Install the 10 oz. Sullivan tank in engine and radio gear. Balance just a little nose heavy at CG shown on plans. I balanced our Sportsman with the battery position shown.
Flying
This is the best part of the whole project. If all surfaces are straight and true, with radio checked out and engine running properly, ease on the gas and up comes the Sportsman. With any of the present 2-cycle .40 engines, you will find the Sportsman a steady, scale-like little ship not bad at aerobatics. Enjoy your Sportsman. It's a fine airplane.
Transcribed from original scans by AI. Minor OCR errors may remain.

