
Stick and Strip Cutter
Cliff Cashner
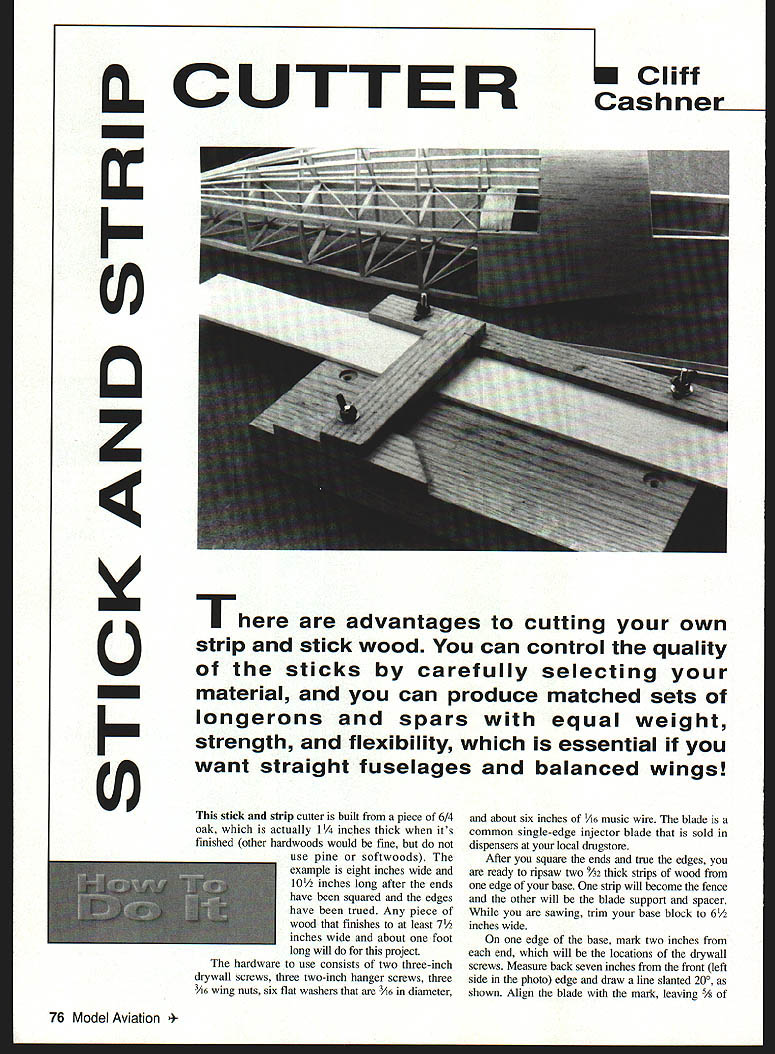
There are advantages to cutting your own strip and stick wood. You can control the quality of the sticks by carefully selecting your material, and you can produce matched sets of longerons and spars with equal weight, strength, and flexibility — essential if you want straight fuselages and balanced wings.
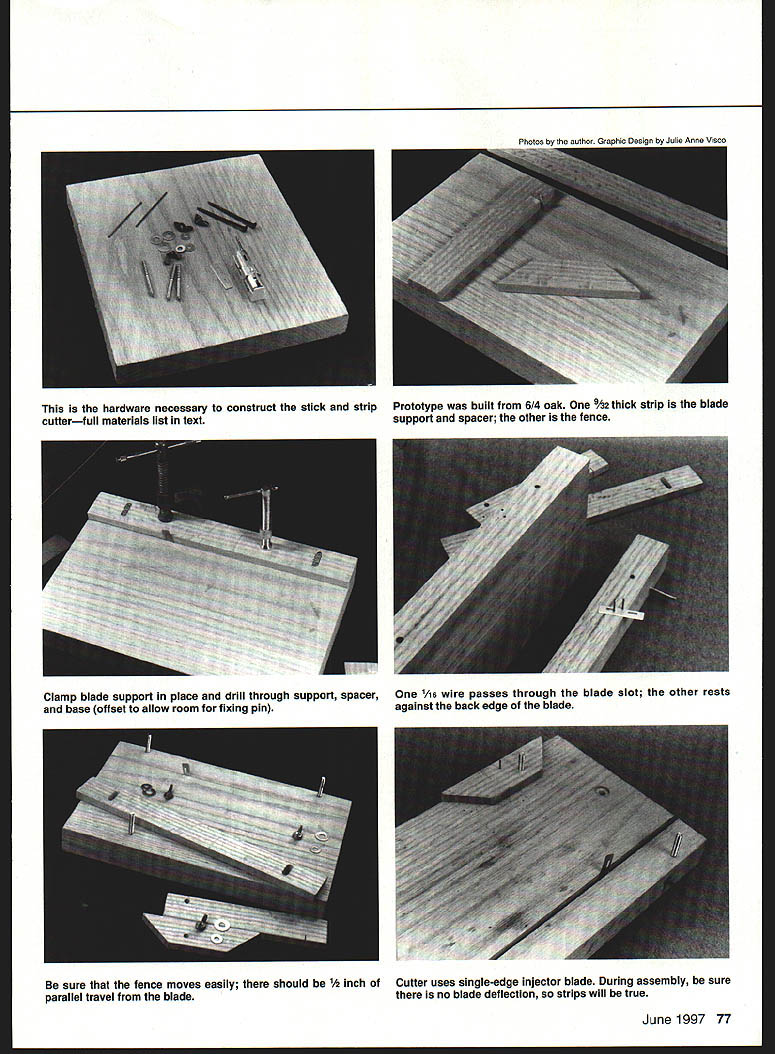
This cutter is built from a piece of 6/4 oak (finished thickness 1 1/4 inches). Other hardwoods are fine, but do not use pine or other softwoods. The example shown was finished to 8 inches wide and 10 1/2 inches long after the ends were squared and the edges trued. Any piece of wood that finishes to at least 7 1/2 inches wide and about 1 foot long will do for this project.
Materials / Hardware
- One piece hardwood (example: 6/4 oak) finished to about 1 1/4" thick, ~7 1/2"–8" wide and ~12" long
- Blade: single-edge injector blade (sold in dispensers at drugstores)
- 2 × 3" drywall screws
- 3 × 2" hanger screws (lag screws)
- 3 × 3/16" wing nuts
- 6 × flat washers sized for 3/16" bolts
- ~6 inches of 1/16" music wire
- Drill bits: 1/16", 3/16" and appropriate sizes for screw pilot holes
- Narrow-kerf saw (e.g., Zona), rip saw, coping saw, files, sandpaper, clamps, drill press or hand drill, square
How to do it
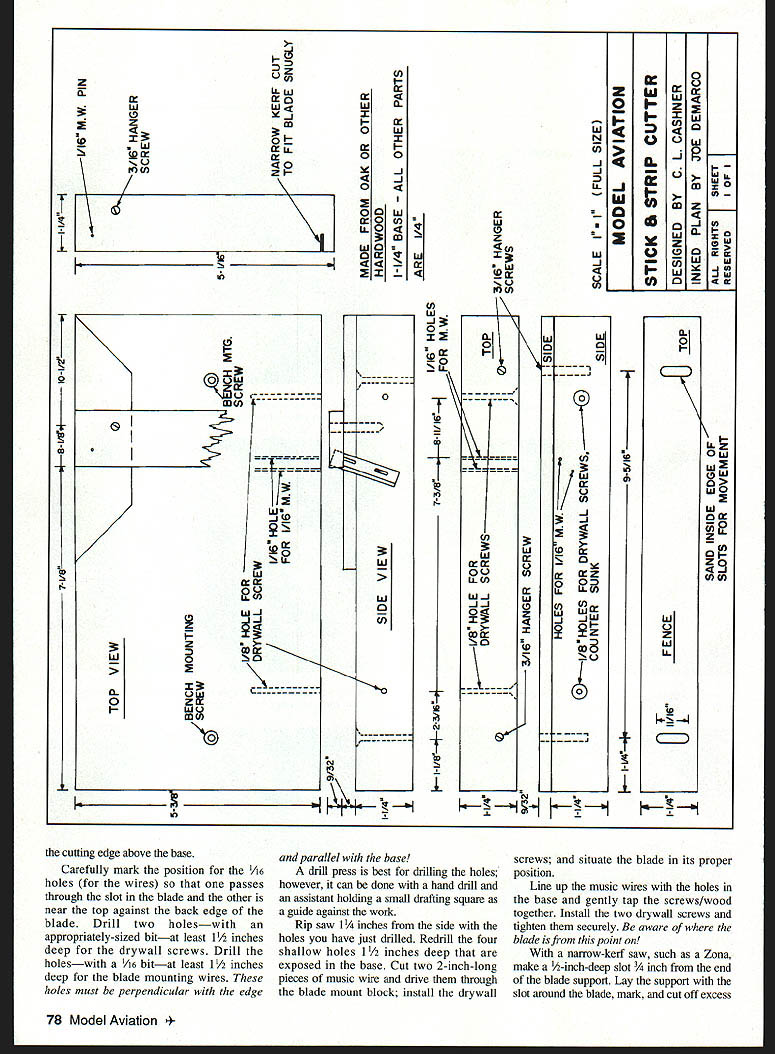
- Preparing the base
- Square the ends and true the edges of the base block.
- Resaw two 9/32" thick strips from one edge of the base. One strip will become the fence; the other will be the blade support and spacer.
- While resawing, trim the base block to 6 1/2 inches wide.
- Marking and initial holes
- On one edge of the base, mark points 2 inches from each end — these are the locations for the two drywall screws.
- Measure back 7 inches from the front (left side in the original layout) and draw a line slanted 20°. Align the blade with this mark, leaving 5/8 inch of the cutting edge above the base.
- Carefully mark positions for the 1/16" wire holes so that one wire will pass through the blade slot and the other will rest near the back edge of the blade.
- Drill pilot holes
- Drill two holes for the drywall screws to a depth of at least 1/2 inch (use appropriately sized bit for the screws).
- Drill the two 1/16" holes for the blade-mounting music wire to at least 1/2 inch deep. These holes must be perpendicular to the edge and parallel with the base. A drill press is best; a hand drill can be used with an assistant holding a small drafting square as a guide.
- Modify the base for the blade support
- Rip-saw 1/4 inch from the side where you just drilled. Re-drill the four shallow holes (now exposed) to 1 1/2 inches deep.
- Cut two 2-inch pieces of 1/16" music wire and drive them through the blade mount block.
- Install the two 3" drywall screws and situate the blade in its proper position. Line up the music wires with the holes in the base and gently tap the screws and wood together. Tighten the drywall screws securely. Be aware of blade location from this point on.
- Create the blade support slot and spacer
- With a narrow-kerf saw, make a 1/2-inch-deep slot 3/4 inch from the end of the blade support strip.
- Lay the support with the slot around the blade, mark and cut off the excess length. The remaining short piece is the spacer.
- Miter the ends of the spacer. Place the spacer and support in position on the base and clamp securely.
- Mark and drill (3/16" bit) a 1 1/4-inch-deep hole through the support, spacer and base. Offset this hole slightly to allow room for a fixing pin.
- Make the adjustable fence
- Position the remaining strip (the adjustable fence) against the blade and parallel with the base.
- Mark the position of the adjusting slots 1 1/2 inches from each end of the fence.
- Each slot should be 3/16" wide and 1 1/16" long across the width of the fence.
- With the fence clamped in position, drill one hole at the outside outline of each slot with a 3/16" bit to a depth of 1 1/8".
- Remove the fence and drill the other end of each slot. Remove the remaining slot material with a coping saw, then smooth and slightly enlarge the slots with a file and sandpaper.
- Assemble the fence and final hardware
- Using a wrench and two 3/16" nuts (#10), thread the hanger screws (lag end in) into the base.
- Install the fence, washers and wing nuts.
- Check that the fence moves easily; it should have about 1/2 inch of parallel travel relative to the blade.
- Mount the spacer and blade support and secure them with washers and a wing nut.
- With the support tightened, ensure the blade is not being bent or deflected. If you detect deflection, enlarge the hole in the blade support to correct it.
- Final blade pinning and mounting
- Once the blade is straight and evenly supported with the wing nut tight, drill a 1/16" hole diagonally from the blade-support wing nut to a depth of 1 1/4 inches and drive in a piece of music wire to lock the support.
- The blade must be straight in order to cut square.
- Optionally drill and countersink the base at both ends so you can secure the cutter to your bench with wood screws.
- Safety
- Although the blade support offers some protection, the cutter still exposes a sharp blade. Mount the cutter solidly and exercise caution when using it to avoid cuts.
Cliff Cashner 5837 Grizzley Dr. Dennison, OH 44621
Transcribed from original scans by AI. Minor OCR errors may remain.

