
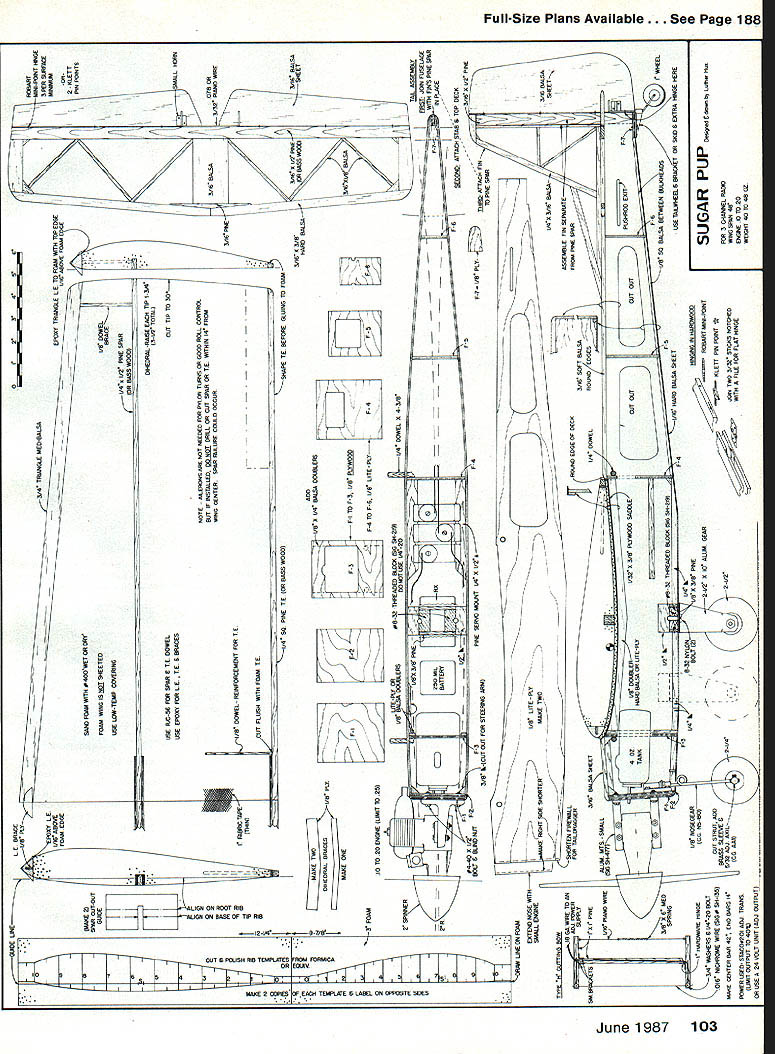


Sugar Pup
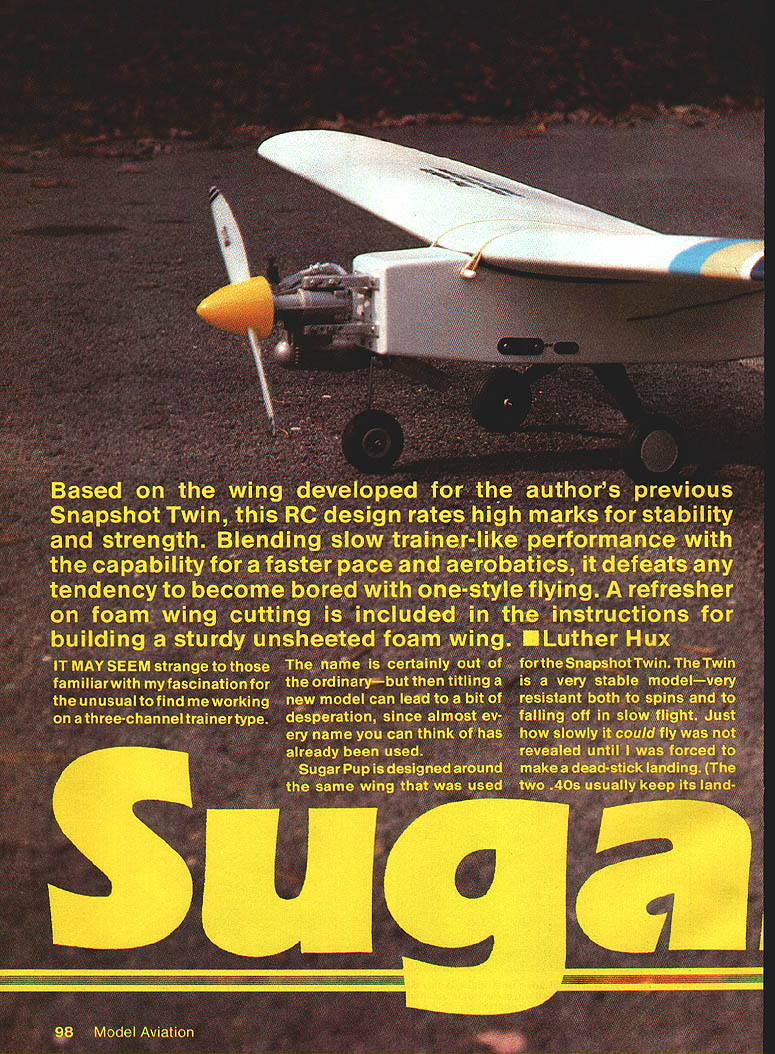
Based on the wing developed for the author's previous Snapshot Twin, Sugar Pup is an RC three‑channel sport/trainer design that rates high marks for stability and strength. It blends slow, trainer‑like performance with the capability for a faster pace and aerobatics, eliminating boredom with a single flying style. A refresher on foam wing cutting is included for building a sturdy unsheeted foam wing. — Luther Hux
Design background
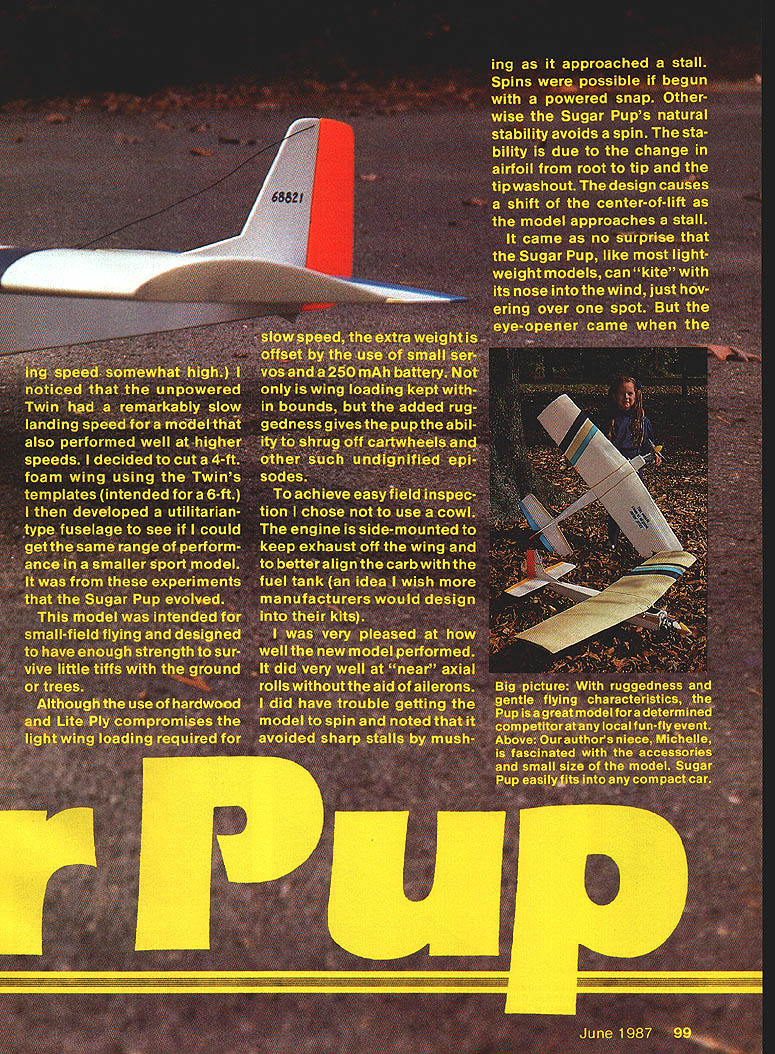
Sugar Pup was developed after experimenting with a 4‑ft. foam wing cut from the Snapshot Twin templates (the Twin uses a 6‑ft. wing). The Twin proved very stable and surprisingly slow in unpowered flight; the smaller wing and a utilitarian fuselage produced the Pup. The model is intended for small‑field flying and built to survive occasional ground or tree encounters.
Key design choices:
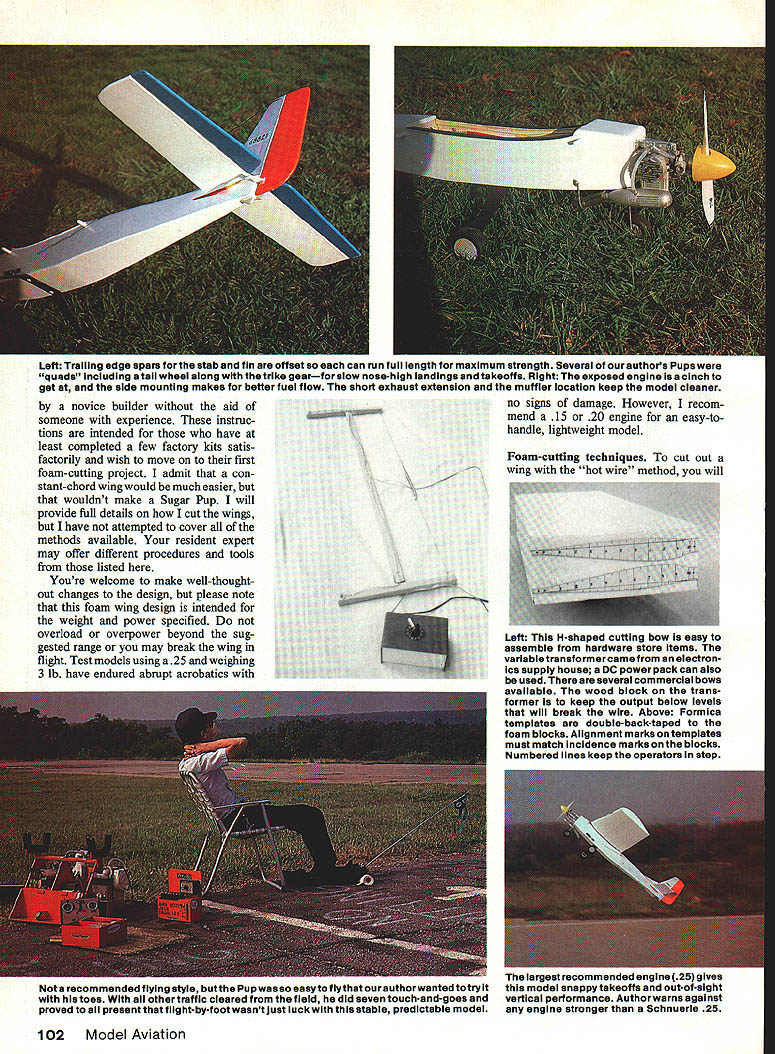
- Side‑mounted engine (keeps exhaust off the wing and better aligns the carb with the fuel tank).
- Hardwood and Lite Ply structure for ruggedness.
- Small servos and a 250 mAh battery to keep wing loading low despite the stronger structure.
- No cowl for easy field inspection.
- Wing uses a change in airfoil from root to tip plus tip washout to shift center of lift approaching a stall, increasing natural stability.
Recommended power:
- .15–.20 engine for an easy‑to‑handle, lightweight model and novice builders.
- A .25 will produce more abrupt aerobatics; test models with a .25 and 3 lb. weight have endured aerobatics with no damage.
Flight characteristics
- Very stable: resists spins and tends to mush into a stall rather than drop abruptly.
- Wing‑leveling: when approaching stall the Pup often sets its wings level by itself. Models with CG farther back are less successful at self‑leveling; balance at or forward of the CG shown on the plans is important.
- Kite behavior: in steady wind the Pup can hover nose into the wind like a tethered kite.
- Rudder/elevator performance: performs at the top of its class for rudder/elevator models—capable of near‑axial rolls without ailerons and touch‑and‑goes close to the ground.
- When overweight (extra batteries, gear) it becomes more typical of a heavier model: firmer, faster landings and more abrupt stalls.
Caveat: The Pup’s forgiving nature can make pilots overconfident—low touch‑and‑goes and daring maneuvers are tempting but risky.
Night flying and lights
- Triangular front light pattern: forms a triangle when viewed from the front; two vertical markers on the sides and two horizontal markers on the bottom. A flashing tail light indicates direction—this pattern is easier to interpret than wingtip/tail arrangements.
- Night flying requires a remote flying site and carefully controlled conditions.
- Balance (CG) is critical: CG too far back reduces self‑leveling and increases risk.
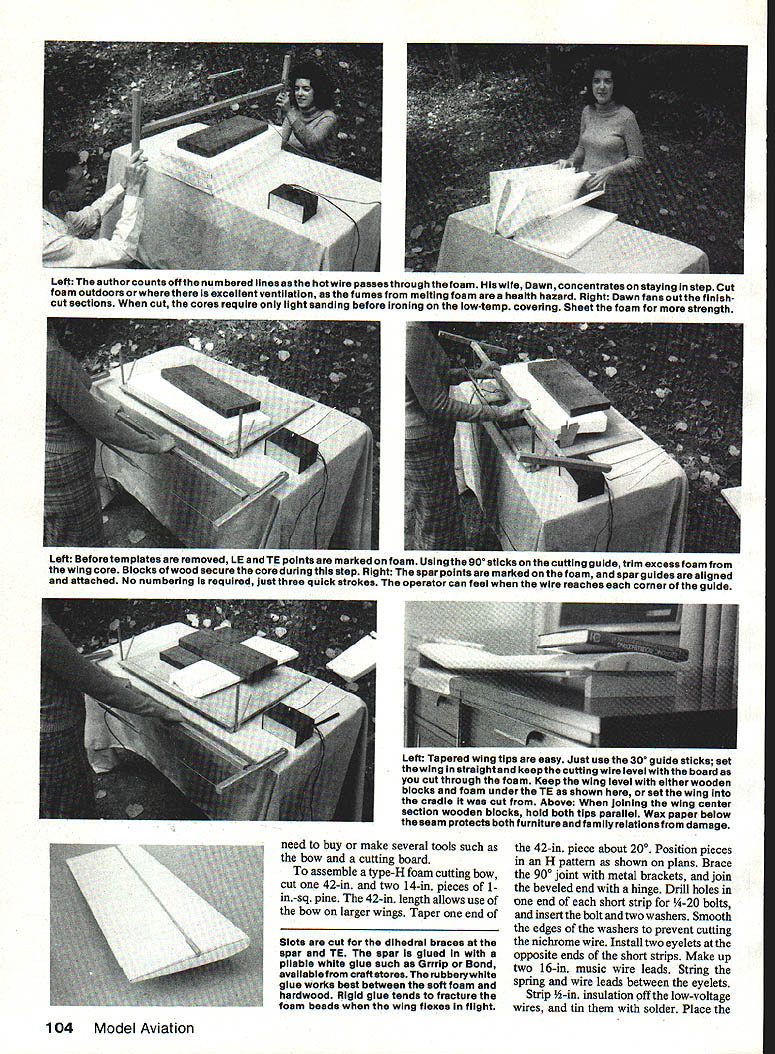
Foam‑cutting techniques
Tools & materials
- Cutting board: 3 ft. square of 3/4‑in. plywood, flat and true.
- Guides: two 12‑in. hardwood strips attached at 90° and 3 in. from one edge; 1‑in. blocks under the board for gussets.
- Two 30° guides for cutting tip angles.
- H‑shaped cutting bow and nichrome wire.
- Variable transformer or DC power pack to control wire temperature.
- Formica sheets for templates, double‑back tape, contact adhesive, jigsaw, disk sander.
- Foam blocks (2–3 in. thick) from hobby suppliers (Sig) or insulation contractors.
- #64 rubberbands or a spring for wire tensioning.
- Weights, clamps, a scrap of plywood to hold foam.
- Safety: work outdoors or in a well‑ventilated area (foam cutting releases hazardous gases). Table surface should be nonconductive (wood or Formica).
Cutting board setup
- Attach the two 12‑in. guides at 90°; add 1‑in. gusset blocks under the board.
- Attach two strips at 30° for tip angle cutting.
- Draw a line from the front edge of one guide to the other to show the wire path; add 90° lines every 6 in. to aid squaring blocks.
Making templates
- Rough‑cut two Formica strips large enough for root and tip rib templates. Join pieces smooth side out with double‑back tape.
- Transfer paper templates to Formica using contact adhesive. Cut with a narrow‑blade jigsaw, leaving the drawn outline.
- Sand templates smooth (no nicks or ruts that will catch the wire).
- Produce four templates: two mirror copies each of root and tip.
- Numbered alignment lines: align paper master, Formica templates, and a straightedge, then transfer numbered lines from master to templates (numbers start at trailing edge).
- Make two spar cutout guides the same way.
Test cuts and wire tuning
- Clamp a scrap foam block on the cutting board. Run the wire over the scrap to verify alignment and cutting depth.
- Transformer dial reference: around positions 25–30 for 24–36 in. cuts (varies by equipment).
- Cutting balance: temperature, wire tension, and cutting speed.
- Target pace: roughly one template mark per second (caller reads numbers in sync).
- If the wire drags, slightly increase voltage (wire will not glow red).
- If the wire melts a large gap and there is no drag, reduce voltage.
- If the cut is rounded in the middle on a 90° angle test, the wire is too loose—add rubberbands or a stronger spring.
- Excess speed can mimic loose tension effects; consistent movement is essential.
- Allow the wire to cool between long cuts to extend life.
Cutting procedure
- Cut stock foam into wing blanks: mark 24‑in. lengths, square the block to the 90° guideline.
- Mark short and long template lengths on the blank and cut to get a swept leading edge and 90° trailing edge corners.
- Draw a guideline 1 in. from the bottom edge at each chord end to align templates (lines must be parallel).
- Apply several coats of double‑back tape to templates; press them firmly in place (or use spray adhesive/pins).
- Cuts should always start from the trailing edge and move to the leading edge (rear surface is more tolerant).
- Work as a two‑person team: one caller reads numbers on the root template; helper times movement on the tip template to match cadence. Agree which side to start on (top or bottom).
- Set wire 1/8 in. behind and above the entry point (T.E.). Caller calls numbers and “half” cues to synchronize progress.
- Because of the shorter chord at the wing tip, the wire moves slower there; the template compensates for this.
Troubleshooting tips
- Deep lines along span indicate inconsistent speed or wire too hot.
- If the cut rounds in mid‑span, increase tension.
- Keep foam cool and allow wire to cool between long runs.
- Use a weight on the foam to prevent slipping.
- Practice on scrap pieces to develop feel.
Wing assembly and finishing
- After cutting, sand each rib lightly to final shape and check for twist or washout.
- Assemble wing on a flat board using rib spacing from the plans.
- Use 1/2‑in. square balsa for leading and trailing edges.
- Sheet wing with 1/8‑in. foam on bottom and top using contact cement; keep center section flat while cement sets.
- Round leading and trailing edges with a sanding block when cured.
- Cap wing saddles with 1/32‑in. ply strips to reduce creasing of soft foam.
- Glue dihedral braces and root sections with 30‑minute epoxy; jig and weight tips flush with dihedral blocks while drying.
- Apply thin fabric tape (R/C‑56 or similar) around the root joint; avoid heavy tape that leaves a ridge.
- Cover foam wing with a low‑temperature film suitable for foam (Coverite Black Baron Film, Solarfilm, Hobby Lobby Super‑kote). "Tex" coverings require a sealing coat of paint.
Tail surfaces
- Cut tailplane and fin from Formica templates. Sand to final shape.
- Use 1/8‑in. plywood doublers at hinge areas for strength.
- Cover control surfaces with 1/32‑in. balsa and epoxy hinges for durability.
- Suggested hinge methods: Robart Mini‑Points or Klett type hinges; elevators tied with .076‑dia. wire if slotted.
- Stab sits 1/2 in. in front of fin spar to clear the elevator wire connector.
- Hardwood fin spar runs inside the fuselage for extra strength; attach fin to spar after the spar is installed.
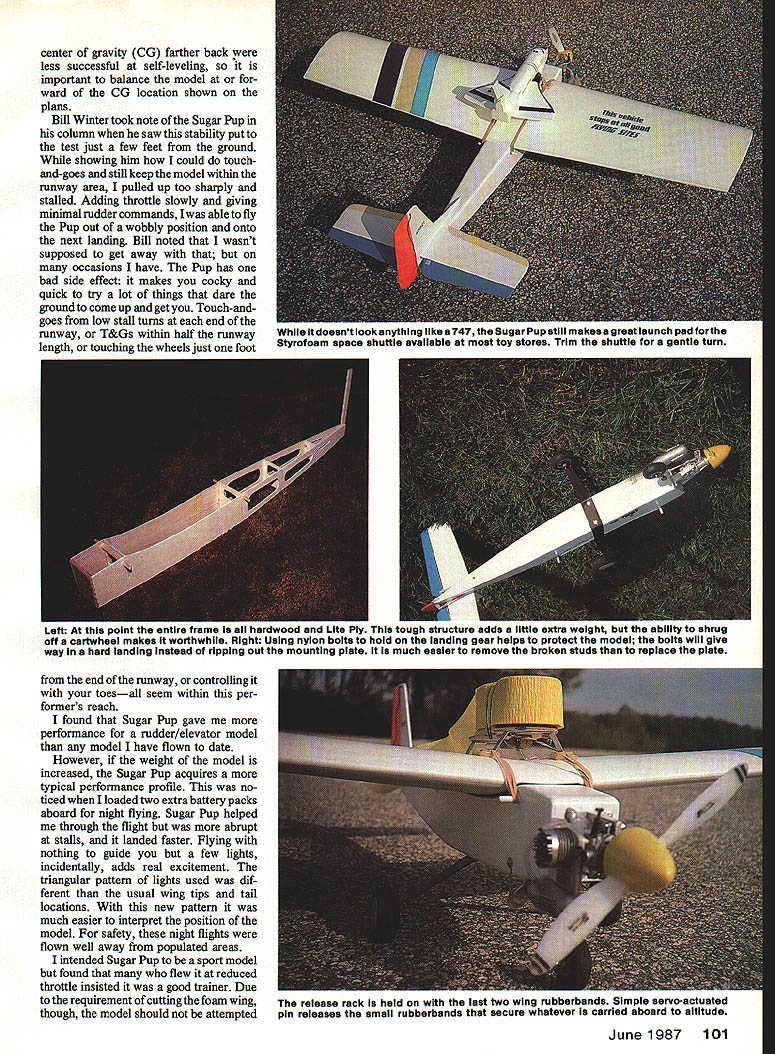
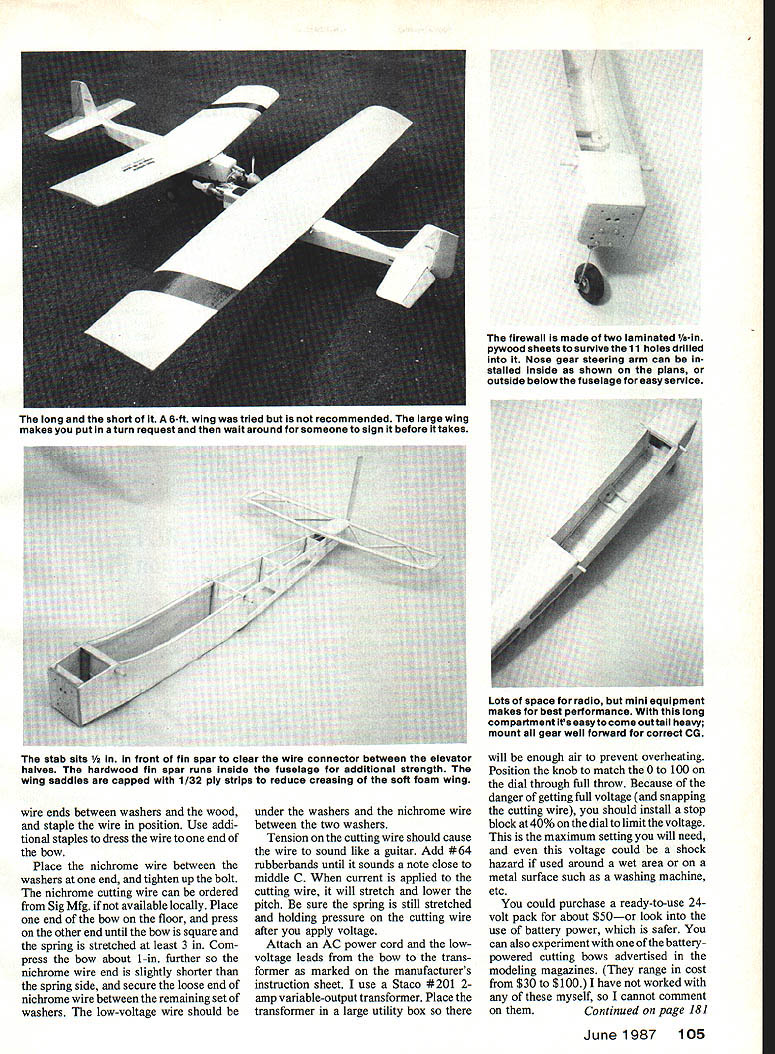
Fuselage construction
- Produce all fuselage parts from plans. Make identical sides by laminating two 1/8‑in. Lite Ply sheets and cutting both with one pass.
- If using a very light engine, extend the nose about 1/2 in. to maintain balance. Omit nose gear to reduce firewall height by ~3/8 in. if desired.
- Mark bulkheads and servo rail positions before separating; note right side markings.
- Glue F‑3 and F‑4 in place; install 1/4‑in. wing dowels and saddle doublers.
- Position pine fin spar with balsa wedges and wrap with rubberbands while epoxy sets.
- Laminate F‑2 centered on F‑1 to make the firewall; mark and drill for aluminum engine mounts and blind nuts.
- Engine mounting: do not mount engine upright (carb too high); side‑mount a few degrees to keep carb and tank aligned and exhaust away from wing saddle.
- Drill nose gear block holes avoiding interference with engine mount blind nuts.
- Epoxy firewall in place with fuselage sides in stepped edge; wrap with rubberbands and gusset with triangle stock.
- Glue 3/8‑in. strips of 1/8‑in. ply to wing saddles. Glue and shape a 1/16‑in. sheet nose block to match wing L.E.
- Build bolt‑on landing gear platform with small #8‑32 bolts (bolts will shear rather than rip out the platform).
- Add 1/4‑in. triangle stock to floor edges in radio compartment; use 3/8‑in. sq. balsa between bulkheads F‑4 to tail.
- Install stab and top deck; leave gap for elevator control wire. Test‑fit hinges but defer final gluing until after covering.
- Install pushrods, servos, nose wheel block and steering arm, tank (tank inside a plastic bag sealed by a rubberband to detect leaks).
- Sheet floor with 1/8‑in. balsa (grain side to side for strength).
Final assembly and finishing
- Complete shaping and sanding; seal firewall holes with paint.
- Cover the model with lightweight heat‑shrink film. Avoid heavy paint jobs.
- Install radio gear and position equipment to keep CG at or forward of the plan location (CG shown without fuel).
- Install engine, fuel tank, landing gear, and check control throws.
- The hardwood fin spar and stab alignment must ensure correct incidence when gluing the stab to the fuselage.
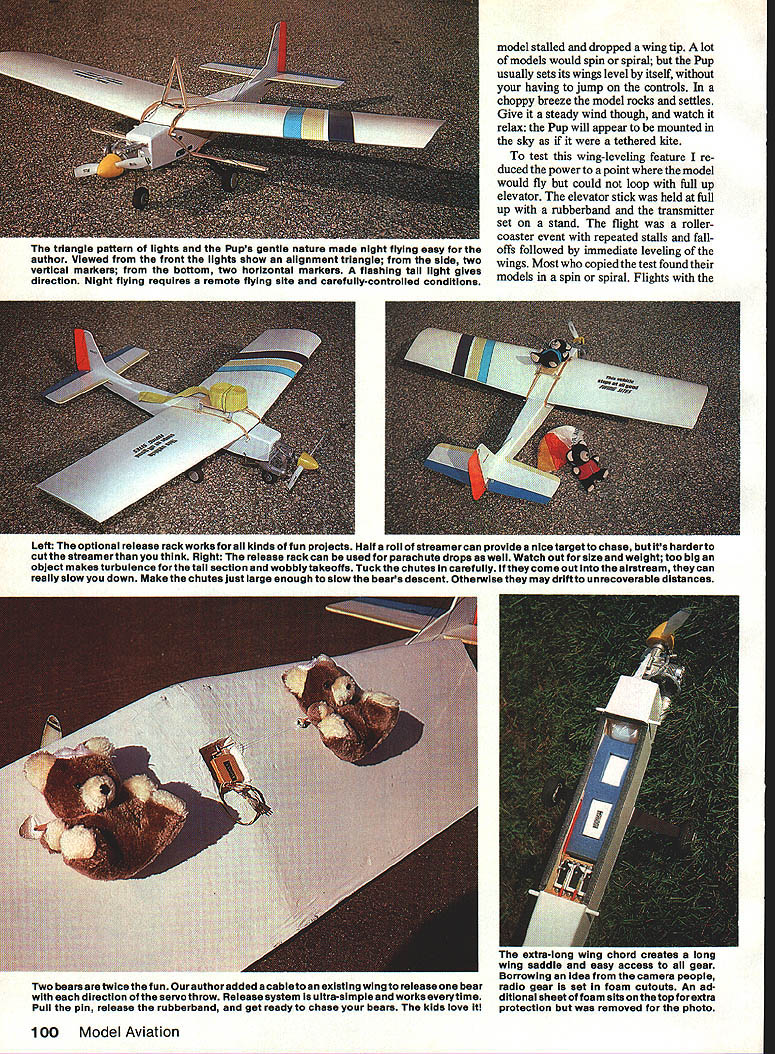
Accessories and payloads
- Optional release racks: simple pull‑pin release reset by rubberband; servo‑actuated throw works well for streamers, parachute drops, or small payloads (toy bears are mentioned as a fun example).
- Watch size and weight: too large payloads increase turbulence and cause unstable takeoffs.
- Tuck parachutes carefully to avoid snagging or excessive drag.
- Radio gear protection: set equipment in foam cutouts and cover with an additional sheet of foam for protection during photos or hauling.
- Trailing‑edge spars and full‑length stab/fin offsets add strength.
- Variants: some builders have fitted tall main wheels or trike gear for slow, nose‑high takeoffs and landings.
Flying tips
- For first flights, have an experienced pilot assist if you are a novice.
- At ~300 ft, glide at low throttle and trim for a flat glide. Note trim adjustments and correct pushrod lengths on the ground.
- Power up and fly without changing trim; under full power the Pup may climb but should not try to loop.
- If the model climbs excessively, add downthrust by shimming engine mounts.
- The Pup performs well at nose‑high, slow flight angles and is forgiving in small stalls if properly balanced.
Now have some fun!
Transcribed from original scans by AI. Minor OCR errors may remain.

