
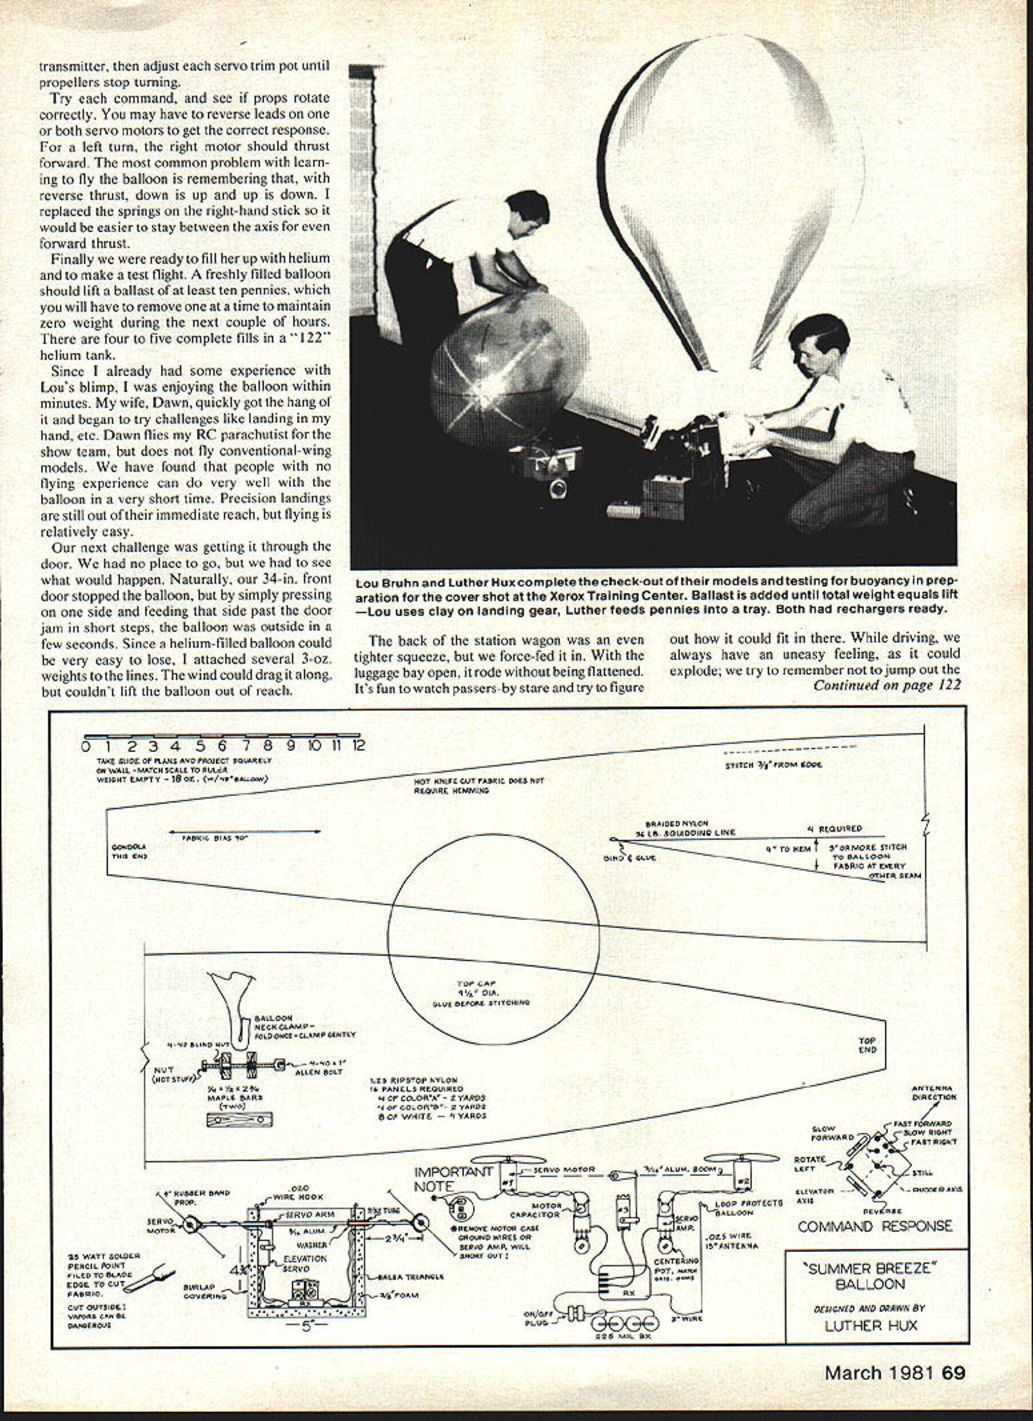
Summer Breeze Balloon
Luther Hux
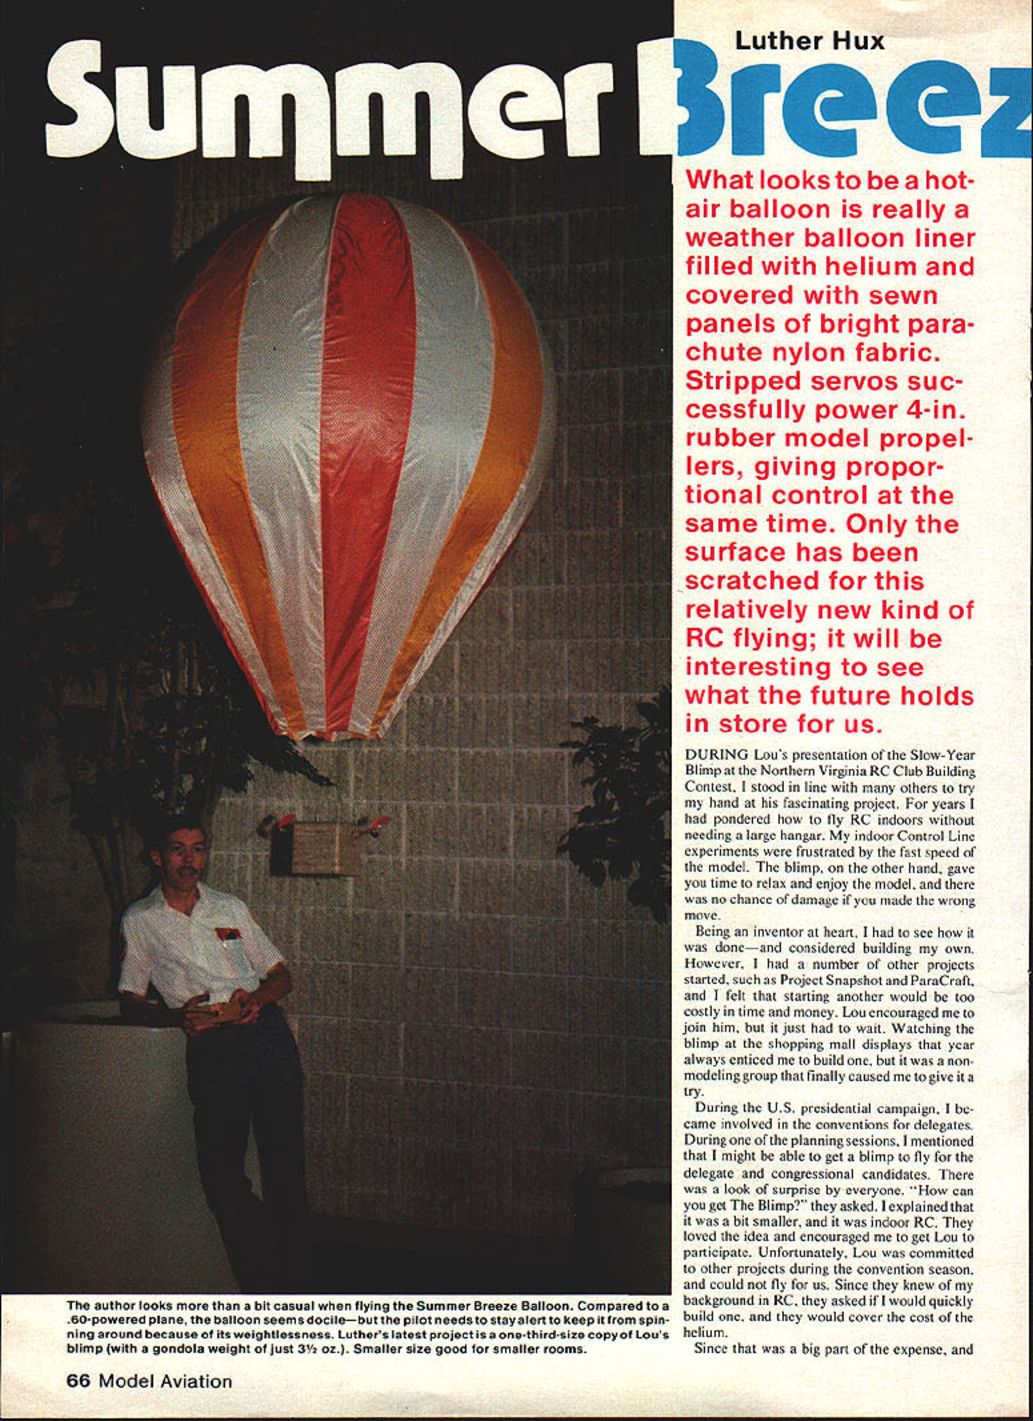
What looks to be a hot-air balloon is really a weather balloon liner filled with helium and covered with sewn panels of bright parachute nylon fabric. Stripped servos successfully power 4-in. rubber model propellers, giving proportional control at the same time. Only the surface has been scratched for this relatively new kind of RC flying; it will be interesting to see what the future holds in store for us.
DURING Lou’s presentation of the Slow-Year Blimp at the Northern Virginia RC Club Building Contest, I stood in line with many others to try my hand at his fascinating project. For years I had pondered how to fly RC indoors without needing a large hangar. My indoor Control Line experiments were frustrated by the fast speed of the model. The blimp, on the other hand, gave you time to relax and enjoy the model, and there was no chance of damage if you made the wrong move.
Being an inventor at heart, I had to see how it was done—and considered building my own. However, I had a number of other projects started, such as Project Snapshot and ParaCraft, and I felt that starting another would be too costly in time and money. Lou encouraged me to join him, but it just had to wait. Watching the blimp at the shopping mall displays that year always enticed me to build one, but it was a non-modeling group that finally caused me to give it a try.
During the U.S. presidential campaign, I became involved in the conventions for delegates. During one of the planning sessions, I mentioned that I might be able to get a blimp to fly for the delegate and congressional candidates. There was a look of surprise by everyone. “How can you get The Blimp?” they asked. I explained that it was a bit smaller, and it was indoor RC. They loved the idea and encouraged me to get Lou to participate. Unfortunately, Lou was committed to other projects during the convention season, and could not fly for us. Since they knew of my background in RC, they asked if I would quickly build one, and they would cover the cost of the helium.
Since that was a big part of the expense, and Lou had offered to show me how to build it. I took on the job just three weeks before the first convention. Lou spent an evening giving me the details of the blimp, and I was planning to start the next night. As I sat there considering how to begin, a photo of a hot-air balloon caught my eye. Instead of copying Lou’s project exactly, why not a hot-air balloon? Well, almost hot air—with a little help from a weather balloon, it would look like the real thing. Since Lou and I are in the same show team, the difference would add variety.
I began to calculate the size equivalent of a sphere compared to the blimp. It appeared that a 42-in. diameter balloon would have enough lift for the fabric and gear—but how many doors are 42 inches wide? The plan to use a weather balloon liner provided the escape here. Since the balloon can be inflated up to 48 inches, there is enough stretch left to squeeze it through a normal door. At first the balloon was a constant fear of breaking the balloon, but it has never happened yet.
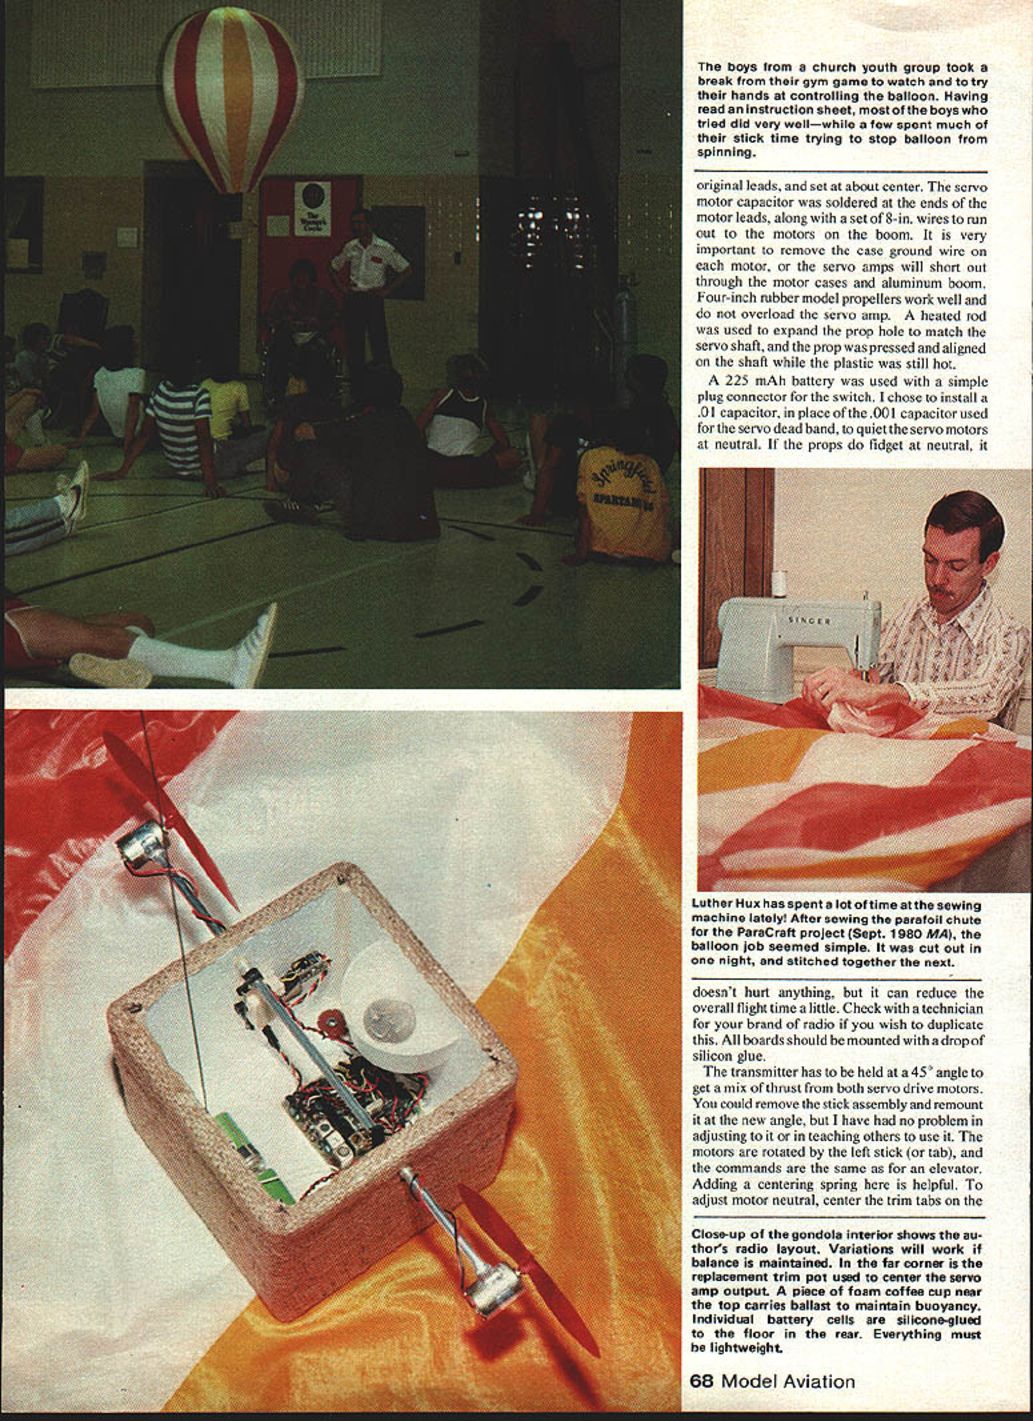
I drew up my cardboard pattern and hot-knife cut the parachute nylon panels while outdoors. I forgot to pay attention to the bias of the fabric on my first sewing attempt, and it turned out like a spiraled candy cane! My wife patiently removed the stitching and I then alternated the bias pattern, so it all came out evenly. On a later balloon, I cut straight with the fabric bias, and had no further problem.
While draping the fabric over the balloon to check the fit, I learned my first big don’t. Don’t tape anything to the balloon. The tape will etch the rubber surface, and cause it to explode.
After comparing the shape of the balloon to the blimp, I decided that Lou’s two-step forward speed would not work as well on the balloon. The blimp’s long length helps it turn smoothly as the motors are switched from fast to slow, but the round shape of the balloon could be difficult to steer if there is any unevenness in power. I needed to perfect and use the proportional system I had designed earlier for the blimp; otherwise, the balloon might spend much of its time spinning instead of advancing forward.
My proportional system does not use a separate battery for the receiver and the motors, so it makes it lighter. Some felt that it was not a good idea to use the same battery for both, but actually a healthy receiver battery with a drained motor battery would not be controllable either, so both systems have to be operated on a timed basis. Neither Lou nor I have had any problems, as we watch the charge/discharge time carefully. If we did fail to estimate the power available, then we would simply wait for the helium leak to let the model sink to within reach, usually in less than a half-hour.
The radio arrived a week and a half before the first convention. I started on the gondola by looking for a light basket that would look authentic, but they were all too heavy. There would be no lift remaining for the banner and the ballast with any of the ready-made baskets. Using my hot-wire foam cutter, I cut a 1/8-in. foam sheet for the sides of the gondola. A number of coverings were considered before settling on brown burlap fabric, which seemed to look the most like wicker. It was attached to the foam box with spray contact adhesive. Other details could have been added to make it more scale-like, but the weight would increase too much.
The radio was stripped of all plastic cases, excess wire and connectors to cut the overall weight. With an ultra-light radio some of this stripping could be eliminated, and if the weight is still too much, you could go in after the plastic parts later. The two servos used to power the pod should not be miniature. They should be about equal to a Kraft 14 or 15. Since they do have to be disassembled, it is best to choose a radio system that matches your other radios. That way you will have a use for the extra gears, pots and plastic cases. Also, you should check out and burn in the radio before starting work. Your radio can still be repaired if needed, but probably not under the guarantee.
If you are buying a new radio for the project, I would recommend you consider the Ace RC kits, and build up only to the stage shown—instead of disassembling in the way described.
The servo amps were Hot-Stuffed to the side of the receiver board, and short drive wire connections were soldered per original wiring. The feedback pot in each servo was measured, and a matching ohm. 1/4-watt trim pot soldered to the original leads, and set at about center. The servo motor capacitor was soldered at the ends of the motor leads, along with a set of 8-in. wires to run out to the motors on the boom. It is very important to remove the case ground wire on each motor, or the servo amps will short out through the motor cases and aluminum boom. Four-inch rubber model propellers work well and do not overload the servo amp. A heated rod was used to expand the prop hole to match the servo shaft, and the prop was pressed and aligned on the shaft while the plastic was still hot.
A 225 mAh battery was used with a simple plug connector for the switch. I chose to install a .01 capacitor, in place of the .001 capacitor used for the servo dead band, to quiet these servo motors at neutral. If the props do fidget at neutral, it doesn’t hurt anything, but it can reduce the overall flight time a little. Check with a technician for your brand of radio if you wish to duplicate this. All boards should be mounted with a drop of silicon glue.
The transmitter has to be held at a 45° angle to get a mix of thrust from both servo drive motors. You could remove the stick assembly and remount it at the new angle, but I have had no problem in adjusting to it or in teaching others to use it. The motors are rotated by the left stick (or tab), and the commands are the same as for an elevator. Adding a centering spring here is helpful. To adjust motor neutral, center the trim tabs on the transmitter. Try each command, and see if the props rotate correctly. You may have to reverse leads on one or both servo motors to get the correct response. For a left turn, the right motor should thrust forward. The most common problem with learning to fly the balloon is remembering that, with reverse thrust, down is up and up is down. I replaced the springs on the right-hand stick so it would be easier to stay between the axis for even forward thrust.
Finally we were ready to fill her up with helium and to make a test flight. A freshly filled balloon should lift a ballast of at least ten pennies, which you will have to remove one at a time to maintain zero weight during the next couple of hours. There are four to five complete fills in a “122” helium tank.
Since I already had some experience with Lou’s blimp, I was enjoying the balloon within minutes. My wife, Dawn, quickly got the hang of it and began to try challenges like landing in my hand, etc. Dawn flies my RC parachutist for the show team, but does not fly convention-flying models. We have found that people with no flying experience can do very well with the balloon in a very short time. Precision landings are still out of their immediate reach, but flying is relatively easy.
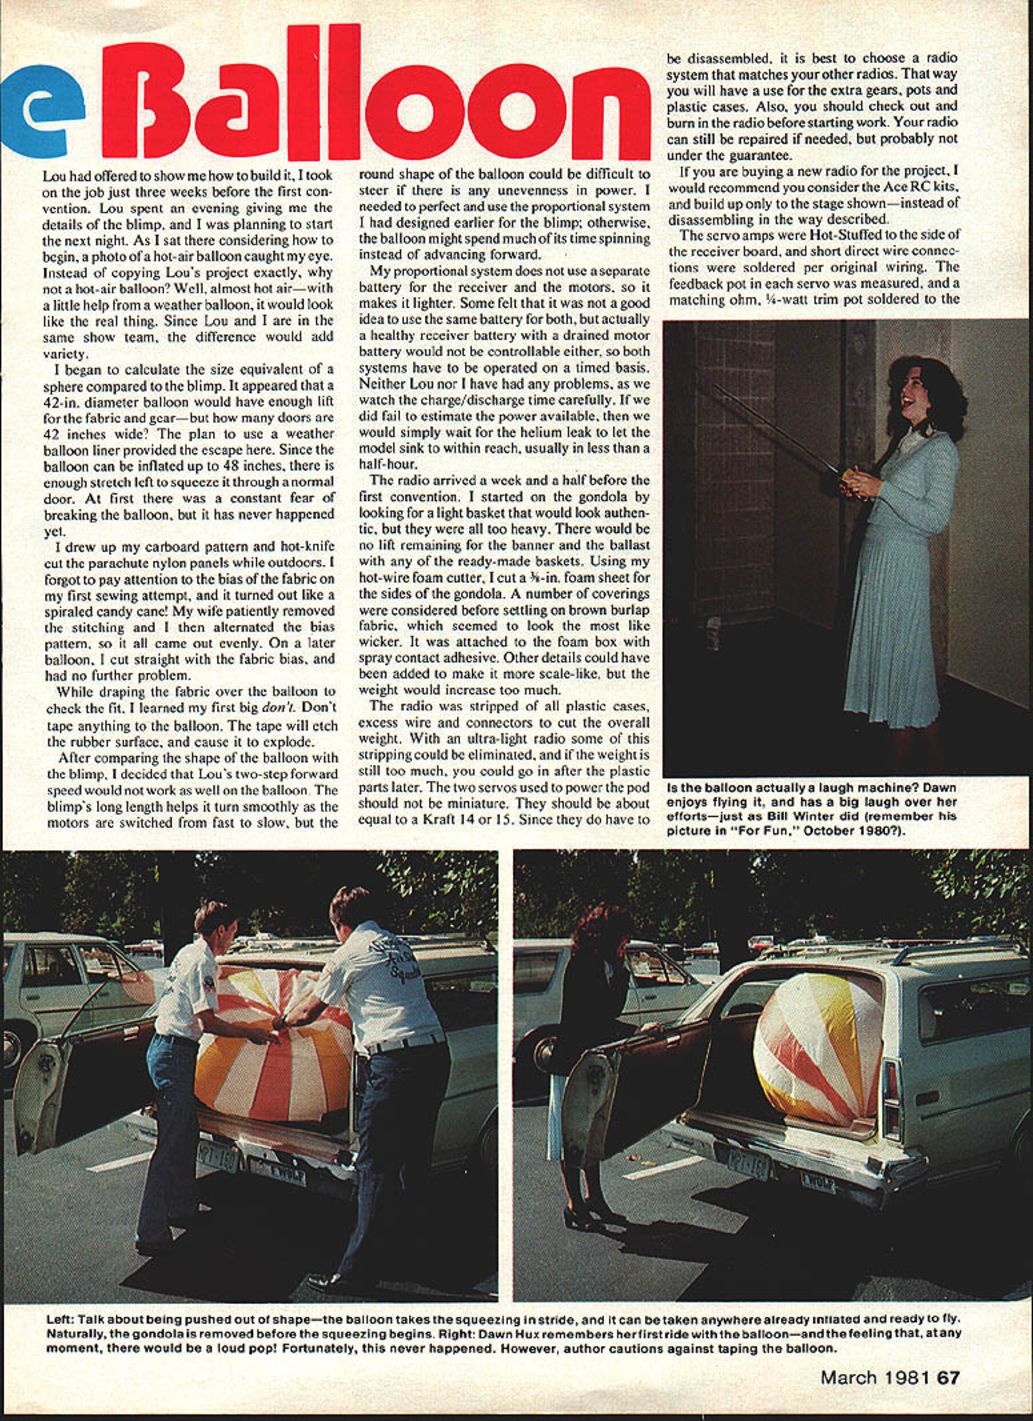
Our next challenge was getting it through the door. We had no place to go, but we had to see what would happen. Naturally, our 34-in. front door stopped the balloon, but by simply pressing on one side and feeding that side past the door jam in short steps, the balloon was outside in a few seconds. Since a helium-filled balloon could be very easy to lose, I attached several 3-oz. weights to the lines. The wind could drag it along but couldn’t lift the balloon out of reach.
The back of the station wagon was an even tighter squeeze, but we force-fed it in. With the luggage bay open, it rode without being flattened. It’s fun to watch passers-by stare and try to figure out how it could fit in there. While driving we always have an uneasy feeling, as it could explode; we try to remember not to jump out the window if it isn’t there.
Summer Breeze Balloon/Hux
At our first convention, we filled up the balloon in a nearby room, and started down the hall to the auditorium. The entrance was a double door but with a fixed center bar. It was a tightest squeeze yet. We applied bumper stickers over the lock and hinges to protect the balloon from sharp edges. People began to wonder about my strange placement of campaign material.
We pushed the balloon through, and we were met by several reporters with a barrage of questions. When our candidate came to the podium, we let the balloon go and flew it up to the front—where many of the people had not yet seen it. Previously, I had described the balloon to the candidate, but he hadn’t seen it. He started his opening remarks and then paused, staring at the balloon and banner. Then he pulled his attention back to what he was saying, and started over again. He was told what to expect, but I guess he just couldn’t believe it.
The TV reporter asked us to fly during the next break to film it. That evening we saw the balloon for a few seconds, as they announced that political news was next. Imagine our surprise to have our first public flight shown on TV. That was the first time Lou saw the balloon, too.
Some conventions were more exciting than others—not the programs, but the flights. In buildings with heavy air-conditioning equipment, the balloon was pushed around quite a lot. A series of air-conditioning vents can play a game with it, full up and full power under each vent, and the opposite between them. Occasionally someone would try to help if the balloon was low enough to reach. With a push like they might give a basketball, they would help give the balloon a little altitude, and it would shoot to the ceiling . . . full down and full power. Then it would bounce off the ceiling . . . full up and full power. It would scramble to be where it was coming down, even though it could not hurt anyone if it settled on them. But imagine if you were just sitting there minding your own business, and something blew in your car. This type of convention flying can cut your flight time between recharge to about 15 minutes where, in still air, you could fly for as long as an hour.
One lady, who was puzzled by the transmitter, took it out of my hands. “What is it?” she asked. “It’s the control to the balloon, and without it I’m about to crash.” I replied calmly, knowing the balloon was harmless. After a second, the word “crash” sank in, and she handed it back like a hot potato, after which she disappeared into the crowd.
I considered going to the big convention, but I could just see the delegates using those big signs to play badminton with my balloon.
After one convention, I offered Bill Winter a chance to fly it in his home. We planned it this way, as the helium was paid for already. It is as you can read in his first “Just For the Fun of It” article, he had quite a reaction. His bull-in-china-shop reaction was a bit of a surprise to me. Considering the room of furniture and an 8-ft. ceiling to learn in, I guess it did seem to be a lot to handle. If he could have tried it in a gym, I’m sure he would have enjoyed it more. But from the looks of the photo in his article I’m not sure how much more fun could be had.
One thing I have to remind most fliers of is inertia—let off the command long before you get to where you want to go. This would make an excellent training aid for astronauts in handling control jets on weightless equipment.
Because of our busy schedules, my balloon and Lou’s blimp did not fly together for some time. Then Chuck Thomas made arrangements for us to fly on a Saturday morning at the Xerox Training Center, to provide an opportunity for Dawn to photograph the two models and their pilots together. Imagine, if you will, Xerox students getting up and strolling through the mezzanine on their way to get a morning cup of coffee—and seeing a hot-air balloon and a blimp waltzing around the building. Their wide-eyed reactions were a lot of fun. One guy asked, in an unsure voice, if he had time to go and get his camera—as if he thought it wouldn’t be there if he took his eyes off of it. Our thanks to Ralph Heath for escorting us for the four-hour photo session.
The plans tell most of the story for building the balloon, but a problem for some will be in where to get the nylon fabric and the weather balloon. The fabric is not available at fabric stores, but you might find a surplus parachute; however, the old chutes were not coated and are much harder to sew. I do not recommend kite ripstop. New parachute fabric is really the best. I ordered my 1.25 ripstop nylon COD from National Parachute Supply, phone 800-526-5946.
Find someone with sewing experience, and read the instructions for your sewing machine for the correct needle and machine setting for this thin fabric.
The weather balloon was purchased from a premiums and specialty advertising supply. Gateway Unlimited in Washington, DC will ship the reusable, white, four-foot weather balloons COD, phone 202-726-8957.
Being the author of Project Snapshot, you probably expect me to put a camera in the balloon. Well, I’ve got one for it, but there is seldom enough light inside a large auditorium. Make plans to see us at the next indoor meet at the Hampton Coliseum in Virginia this coming spring. I can just imagine an aerial photo of an indoor balloon and blimp rally.
Transcribed from original scans by AI. Minor OCR errors may remain.

