

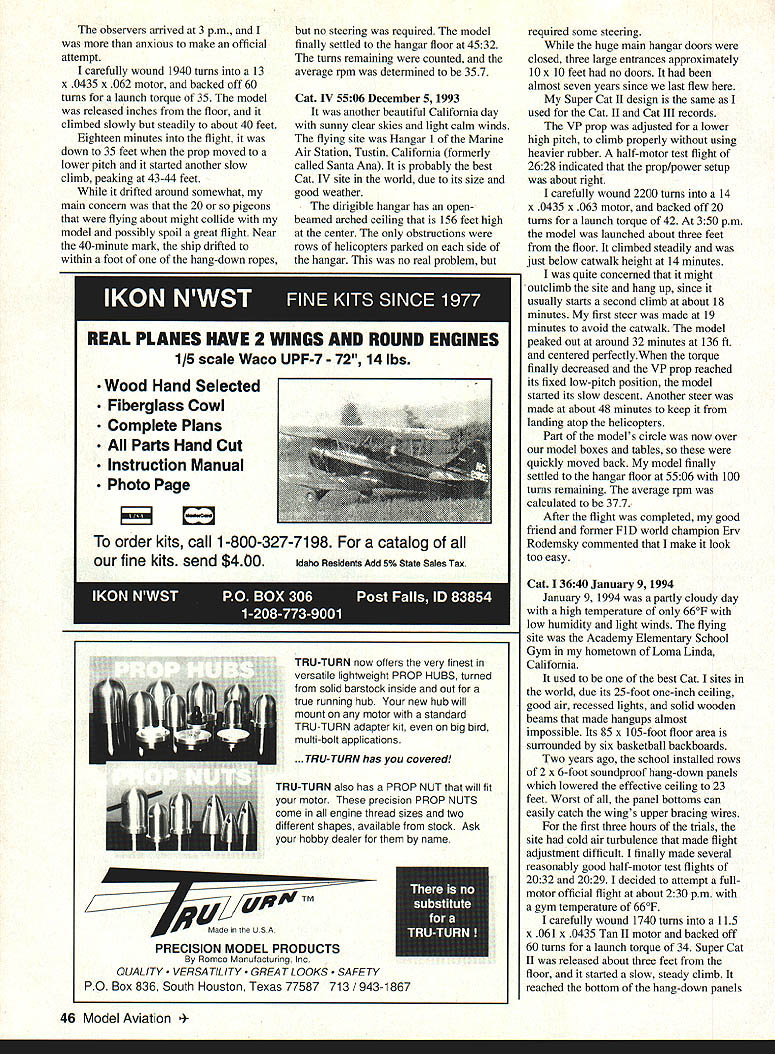
Super Cat II
Bob Randolph
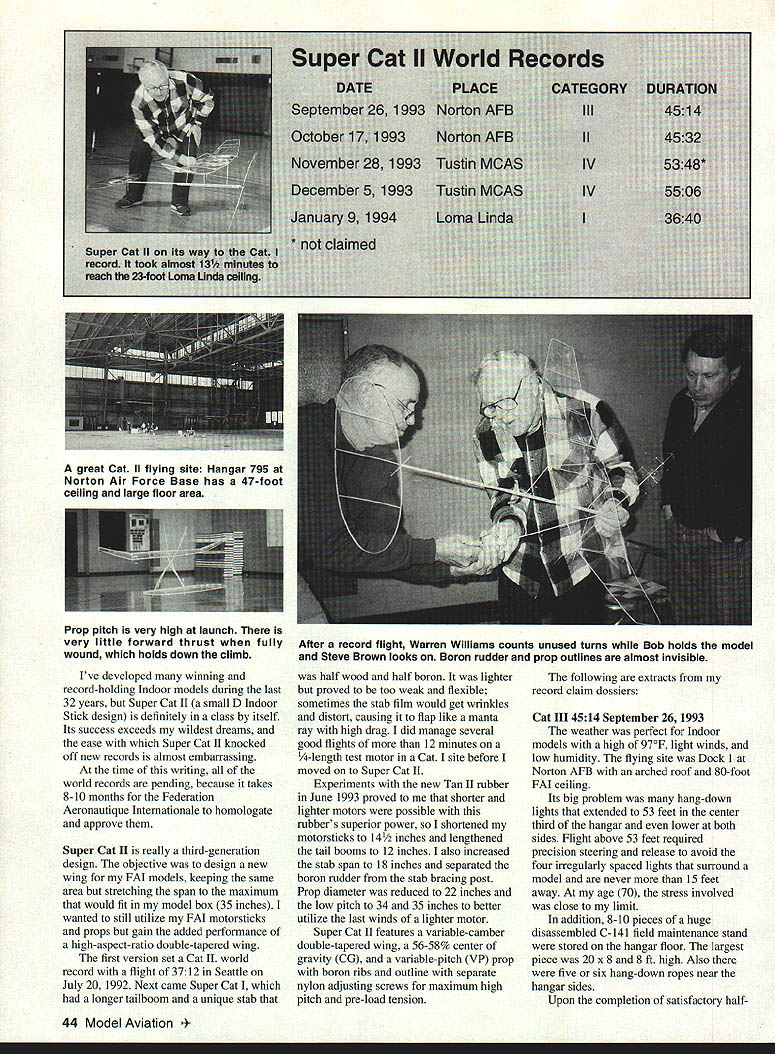
In a five-month span, Super Cat II captured all the indoor model world records. Its 55:06 Cat. IV flight is the longest ever made by a rubber-powered indoor model. It features a variable-pitch propeller that can be adjusted to work its magic in any size flying site.
I've developed many winning and record-holding indoor models during the last 32 years, but Super Cat II (a small D indoor stick design) is definitely in a class by itself. Its success exceeds my wildest dreams, and the ease with which Super Cat II knocked off new records was almost embarrassing.
At the time of this writing, all of the world records are pending, because it takes 8–10 months for the Fédération Aéronautique Internationale to homologate and approve them.
Super Cat II is really a third-generation design. The objective was to design a new wing for my FAI models, keeping the same area but stretching the span to the maximum that would fit in my model box (35 inches). I wanted to still utilize my FAI motorsticks and props but gain the added performance of a high-aspect-ratio double-tapered wing.
The first version set a Cat. II world record with a flight of 37:12 in Seattle on July 20, 1992. Next came Super Cat, which had a longer tailboom and a unique stab that was half wood and half boron. It was lighter but proved to be too weak and flexible; sometimes the stab film would get wrinkles and distort, causing it to flap like a manta ray with high drag. I did manage several good flights of more than 12 minutes on a 3/4-length test motor in a Cat. I site before I moved on to Super Cat II.
Experiments with the new Tan II rubber in June 1993 showed that shorter, lighter motors were possible due to the rubber's superior power. I shortened my motorsticks to 14-1/2 inches and lengthened the tailbooms to 12 inches. I also increased the stab span to 18 inches and separated the boron rudder from the stab bracing post. Prop diameter was reduced to 22 inches and the low pitch to 34–35 inches to better utilize the last winds of a lighter motor.
Super Cat II features a variable-camber double-tapered wing, a 56–58% center of gravity (CG), and a variable-pitch (VP) prop with boron ribs and outline, with separate nylon adjusting screws for maximum high pitch and pre-load tension.
Record flights (extracts from claim dossiers)
- Cat. III — 45:14, September 26, 1993
Flying site: Dock 1, Norton AFB, Seattle. The hangar had an arched roof and an 80-foot FAI ceiling. Many hang-down lights extended to 53 feet in the center third of the hangar, and lower at the sides, requiring precision steering and release. There were also 8–10 pieces of a large disassembled C-141 maintenance stand on the floor and several hang-down ropes near the sides. After satisfactory half-motor tests, three official attempts were made. The first attempt terminated at 12 minutes when the motor broke and dropped off, damaging the model sufficiently to require a backup. Half-motor flights of 24:24, 21:36, and 23:05 at heights of 50, 40, and 39 feet showed the model was ready. A 41:19 flight with a different motor and VP adjustment readied the record flight. I wound 2,040 turns into a 13 x .0435 x .058 motor and backed off 120 turns. Launch torque was 27; floor reading 92°F. The model climbed very slowly and reached 62 feet at peak, clearing the lights, then descended and settled at 45:14, using about 50% of its turns and yielding an average rpm of 413.
- Cat. II — 45:32, October 17, 1993
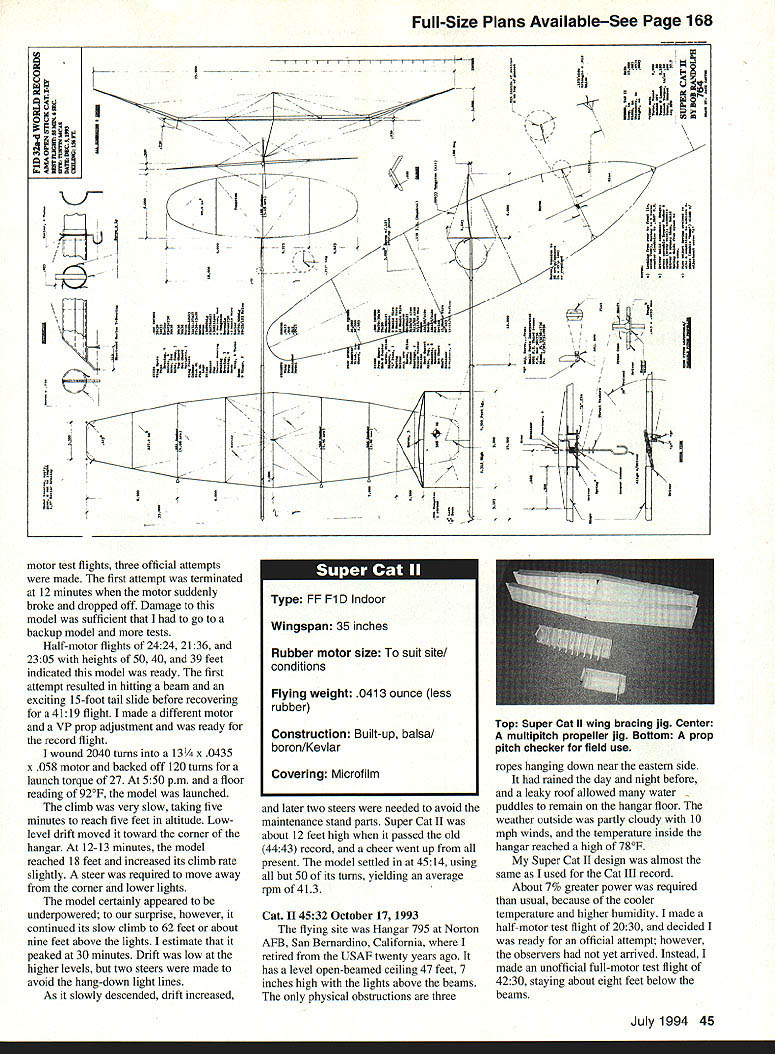
Flying site: Hangar 795, Norton AFB, San Bernardino, California. The open-beamed ceiling was 47 ft. 7 in. high. The day before had been rainy and the roof leaked, leaving water puddles on the floor; the temperature inside reached about 78°F. About 7% more power was required than usual due to cooler temperature and higher humidity. After a half-motor test flight of 20:30 and an unofficial full-motor test of 42:30, official attempts began. I wound 1,940 turns into a 13 x .0435 x .062 motor and backed off 60 turns for a launch torque of 35. The model climbed slowly to about 40 feet, later to 43–44 feet. Pigeons in the hangar and a near pass by a hang-down rope added stress, but the model settled at 45:32. Turns remaining indicated an average rpm of 35.7.
- Cat. IV — 55:06, December 5, 1993
Flying site: Hangar 1, Marine Air Station, Tustin, California. This dirigible hangar has an open-beamed arched ceiling 156 feet high at the center and is one of the best Cat. IV sites in the world. The VP prop was adjusted for a lower pitch so the model would climb properly without heavier rubber. A half-motor test flight of 26:28 indicated the prop/power setup was about right. I wound 2,200 turns into a 14 x .0435 x .063 motor and backed off 20 turns for a launch torque of 42. Launched about three feet from the floor, the model climbed steadily and was just below catwalk height at 14 minutes. It peaked around 32 minutes at 136 ft., centered perfectly, then slowly descended. A late steer kept it off parked helicopters. The model settled at 55:06 with 100 turns remaining; average rpm was 37.7.
- Cat. I — 36:40, January 9, 1994
Flying site: Academy Elementary School Gym, Loma Linda, California. The gym has a 25 ft. 1 in. ceiling (effectively reduced to about 23 ft. by installed soundproof hang-down panels). Early cold-air turbulence made flight adjustments difficult; after several half-motor test flights of about 20:30, I attempted a full-motor official flight with a gym temperature of 66°F. I wound 1,740 turns into an 11.5 x .061 x .0435 Tan II motor and backed off 60 turns for a launch torque of 34. Super Cat II was released about three feet from the floor and climbed slowly, reaching the bottom of the hang-down panels at 13:27. The nine-inch wing post extension kept the model below the panels, but many steers were required due to 50–75 contacts with the panels. The last touch was at 29:12; the model settled at 36:40 with 320 turns remaining (average rpm 37.1).
Construction
The wood sizes used are shown on the drawings and are intended for experienced indoor modelers. Less-experienced builders should increase sizes by 20–30% to avoid ending up with a model too weak to survive initial flights. Wood selection expertise is important for light-yet-strong models and comes only from experience.
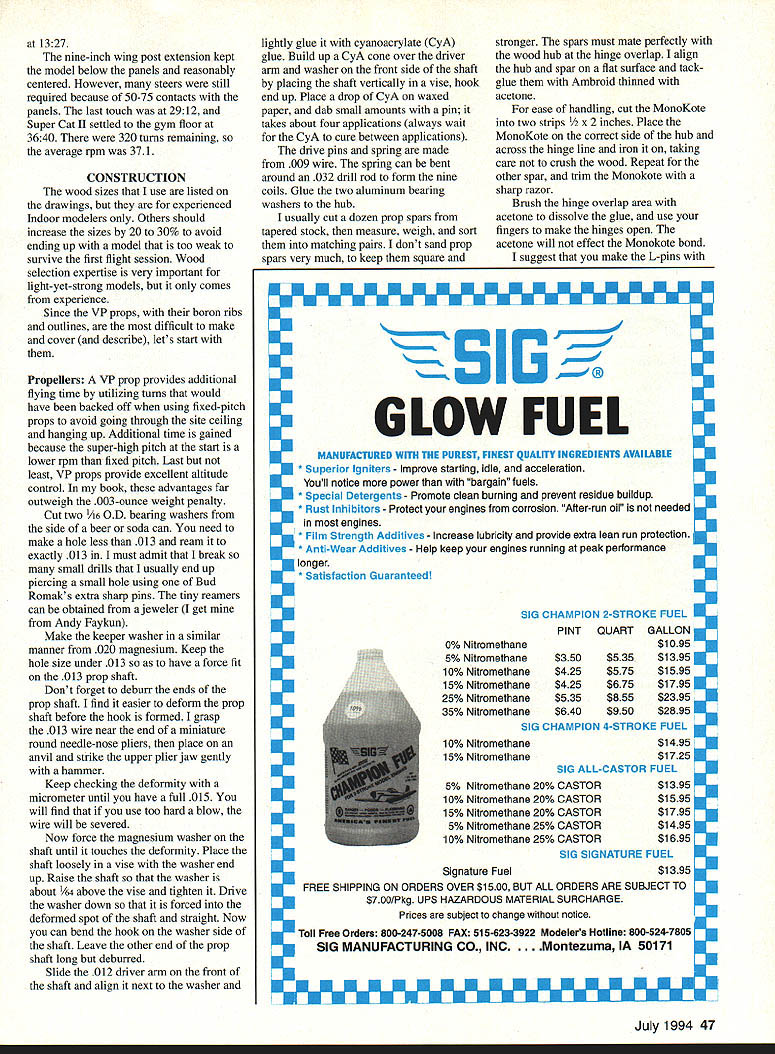
Since the VP props, with their boron ribs and outlines, are the most difficult to make and cover (and describe), start with them.
Propellers (VP)
A VP prop provides additional flying time by utilizing turns that would have been backed off with fixed-pitch props to avoid going through the site ceiling and hanging up. Advantages:
- Additional time because the super-high starting pitch runs at a lower rpm than fixed pitch.
- Excellent altitude control.
- The weight penalty (.003 ounce) is outweighed by the performance benefits.
Building the VP prop (high-level steps):
- Cut two 1/16 in. outer-diameter bearing washers from a beer or soda can side. Make a hole slightly less than .013 in., ream to exactly .013 in. Tiny reamers can be obtained from a jeweler.
- Make a keeper washer from .020 in. magnesium. Keep the hole under .013 in. for a force fit on the .013 in. prop shaft.
- Deburr the prop shaft end. Deform the shaft near the end (before forming the hook) to increase diameter from .013 to about .015 in., checking with a micrometer. Strike gently—too hard a blow will sever the wire.
- Force the magnesium washer onto the shaft until it touches the deformity. Place the shaft in a vise with the washer about 1/32 in. above the vise, then drive the washer down so it seats in the deformed spot and is straight. Bend the hook on the washer side of the shaft; leave the other end long but deburred.
- Slide the .012 in. driver arm onto the front of the shaft, align it next to the washer, and lightly glue with cyanoacrylate (CyA). Build up a CyA cone over the driver arm and washer by placing the shaft vertically in a vise (hook end up) and applying small dabs of CyA, allowing cure between applications.
- Make drive pins and the spring from .009 in. wire. Form the spring by bending around an .032 in. drill rod to produce about nine coils.
- Glue two aluminum bearing washers to the hub.
- Cut a number of prop spars from tapered stock, measure, weigh, and sort them into matching pairs. Minimize sanding to keep spars square and strong. The spars must mate perfectly with the wood hub at the hinge overlap—align and tack-glue with Ambroid thinned with acetone.
- For covering, cut MonoKote into 1/2 x 2 in. strips. Place MonoKote on the correct side of the hub and across the hinge line and iron it on carefully (avoid crushing the wood). Repeat for the other spar and then iron the MonoKote with a sharp razor. Brush the hinge overlap area with acetone to dissolve the glue and open the hinges; acetone will not affect the MonoKote bond.
(Notes: The prop driver is only glued on; handle carefully when hooking up motors. I often cut a dozen prop spars and sort them for matched pairs.)
O-rings
It is impossible to get the torque you want without using O-rings.
- Partial test motors: use one O-ring.
- Full motors: use two O-rings.
Motor test and partial-motor procedures
I strongly recommend proper partial-motor test procedures—skipping them is risky and wastes time. A 1/4-size test motor requires:
- A test stick exactly 3/4 of the distance between the prop shaft and rear hook in length.
- The test stick should weigh exactly three times the lubed weight of the 1/4-motor to be tested.
Because only one-quarter of the full motor turns are put in, the model should be launched at one-quarter of the normal launch height and should climb to one-quarter of the full motor altitude and fly one-quarter of the full time. While more test flights are needed, errors are easier and safer to detect and correct.
Different sites and weather conditions change the optimum power. Partial test motors help find the optimum motor length and size faster and more safely. After finding the optimum 1/4-motor, verify with a half-motor flight. When there is a lot of ground turbulence in larger sites, go directly to half-motor testing. This procedure also allows you to use a small site to adjust for a higher site.
Practical notes:
- Most of my test flights are in a 23-foot site. Last year I made 1,177 flights; only 18 were full-motor flights, but six were record flights.
- Almost all my test sticks are made from .025 in. wire. I use wire balances to quickly find the right amount of clay to add to the center of the test sticks as motor sizes vary.
- A 1/4-motor test stick balance needs moment arms at a 3:1 ratio. The clay must be in the center of the test stick (around the wire). Failure to locate the clay correctly will affect the model’s balance or crush its motorstick.
Motor-test flight example (Condensed)
Three official attempts were made for one of the events. The first attempt terminated early when the motor suddenly broke and dropped off, causing damage and requiring a backup model. Half-motor flights of 24:24, 21:36, and 23:05 at heights of 50, 40, and 39 feet indicated readiness. A subsequent 41:19 flight with a different motor and VP adjustment proved the model ready for the record flight. I wound 2,040 turns into a 13 x .0435 x .058 motor and backed off 120 turns. The launch was slow; the model climbed gradually and, despite appearing underpowered at times, reached the necessary peak and set the record at 45:14, using about 50% of its turns.
VP propeller adjustment
The Super Cat II prop is versatile and can be adjusted for all ceiling heights. Suggested procedure:
- Starting setup:
- Make up a motor about 13 x .065 and put 120 turns in it. This should keep the prop in full low pitch.
- Launch about waist high and catch the model until it is in full cruise flight. Remove the motor and measure the cruise torque. The blades should just start to open at this torque with the pre-load tension screw flush with the hub.
- If necessary, disassemble the prop, remove the spring, and bend the spring so it opens at cruise torque. Set the high-pitch screw about midpoint of its range.
- Test and tune:
- Start again with a 1/4 test motor (3/4 x .065) and put in 100 turns to get level cruise and adjust wing incidence and turn size. Try to keep the model from climbing more than 1/4 to 1/2 altitude by backing off from a fully wound 1/4 motor.
- Once in this range, start opening the high-pitch screw and back off less. The goal is to back off very little and be able to launch with high torque and so much high pitch that the model barely climbs until the torque begins to drop.
- Use turns-remaining at landing to judge power. If it deadsticks, the motor is too strong; if many turns remain, the motor is too weak. The right motor with good VP adjustment should use almost all the turns.
- More pre-load tension makes the prop go to low pitch sooner—about 1/4 turn of the adjustment screw will advance the start by roughly one minute.
- Additional notes:
- You can vary the flight pattern by changing pre-load tension; a second climb can occur when the prop moves toward low pitch if the motor still has power.
- When the high-pitch screw is fully out but the model still climbs too fast at launch, rework the screw amount to provide more travel.
- Until ready to launch, take the motor's high torque by holding the hook end of the prop shaft.
- Make only small adjustments (1/8 revolution) when close to optimum, and log changes in a flight book to revert if needed.
- Do not judge prop changes from partially wound motors—always test with full winds once the model is flying well.
Performance and tips
Many factors contribute to Super Cat II's outstanding performance:
- Extensive flying and practice with partial-motor procedures.
- Mastery of VP prop adjustments.
- Use of the best available rubber (e.g., Tan II).
- Focus on building and testing a limited number of indoor classes.
- Most flight testing at Cat. I sites where flight behavior is easier to observe and fine-tune.
When built and flown correctly, Super Cat II is capable of very high performance. I'm proud of its achievements and wish you good luck with your building and flying.
Recommended suppliers
- Indoor Model Supply
1887 Westhaven NW Salem, OR 97304
- Micro-X Products
5200 Seven Pines Dr. Lorain, OH 44053
- FAI Model Supply (Tan II rubber)
Box 3954 Torrance, CA 90510
- Ray Harlan
15 Happy Hollow Rd. Wayland, MA 01778
- Model Research Labs (.003 boron, film)
25108 Marguerite #160 Mission Viejo, CA 92692
- Bob Oppegard (rubber cutters)
140 East Golden Lake Lane Circle Pines, MN 55014
Transcribed from original scans by AI. Minor OCR errors may remain.

