


Super Chicken
Richard E. Hellyer
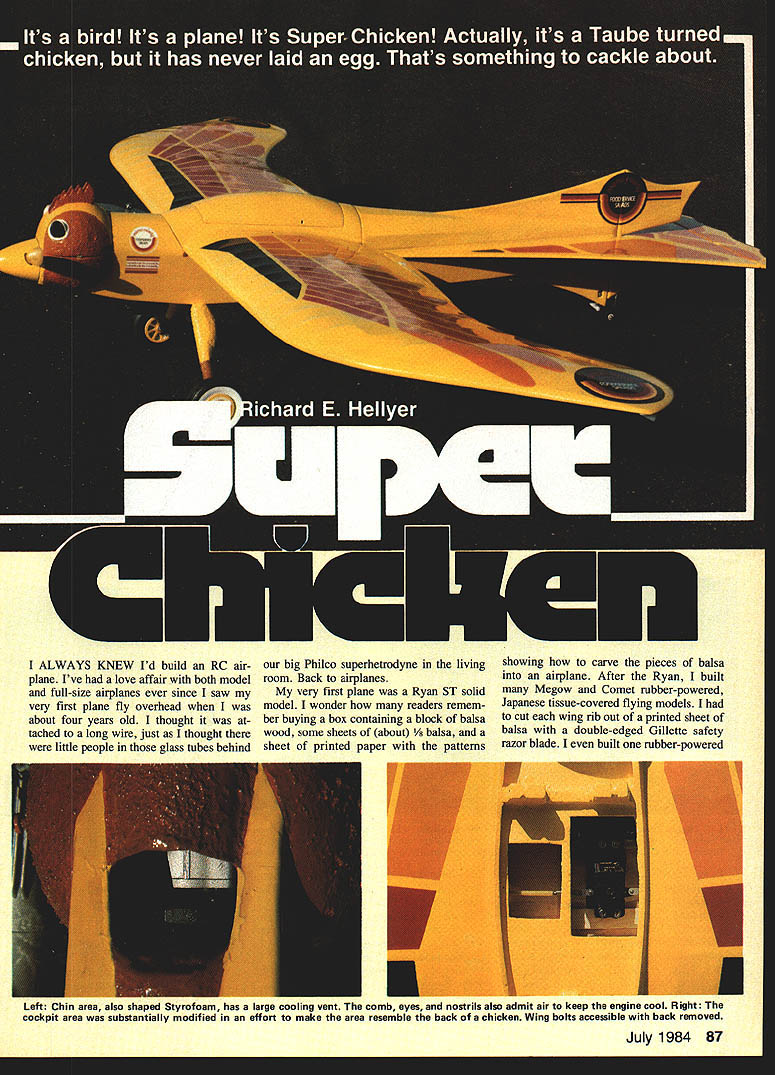
It's a bird! It's a plane! It's Super-Chicken! Actually, it's a Taube turned chicken, but it has never laid an egg. That's something to cackle about.
Background
I always knew I'd build an RC airplane. I've had a love affair with both model and full-size airplanes ever since I saw my very first plane fly overhead when I was about four years old. I thought it was attached to a long wire, just as I thought there were little people in those glass tubes behind our big Philco superhetrodyne in the living room.
My very first plane was a Ryan ST solid model. I wonder how many readers remember buying a box containing a block of balsa wood, some sheets of (about) 1/8 balsa, and a sheet of printed paper with the patterns showing how to carve the pieces of balsa into an airplane. After the Ryan, I built many Megow and Comet rubber-powered, Japanese tissue-covered flying models. I had to cut each wing rib out of a printed sheet of balsa with a double-edged Gillette safety razor blade. I even built one rubber-powered flying model after I was married, a Guillows Nieuport 28, and I just completed my own RC delta wing design, which took over eight years. That's another story.
As most modelers do, I visit my hobby store at least three times a month. During one such visit, my friend Bob Wetle at Al's Hobby Store (Elmhurst, IL) convinced me to build the Balsa U.S.A. Taube. I liked the plane at first sight. It truly had a unique character, something that would inject a little fun at the airstrip. The more I thought about the Taube, the more I thought it lent itself to some modification—perhaps a canvasback duck or a chicken. Yes, a chicken, in honor of one of my clients who manufactures a line of chicken-based restaurant food products.
After researching chickens in the World Book Encyclopedia, I selected the buff Orpington with its all-yellow body and wings, and red comb and cheeks. Here's how I hatched Super Chicken.
Head
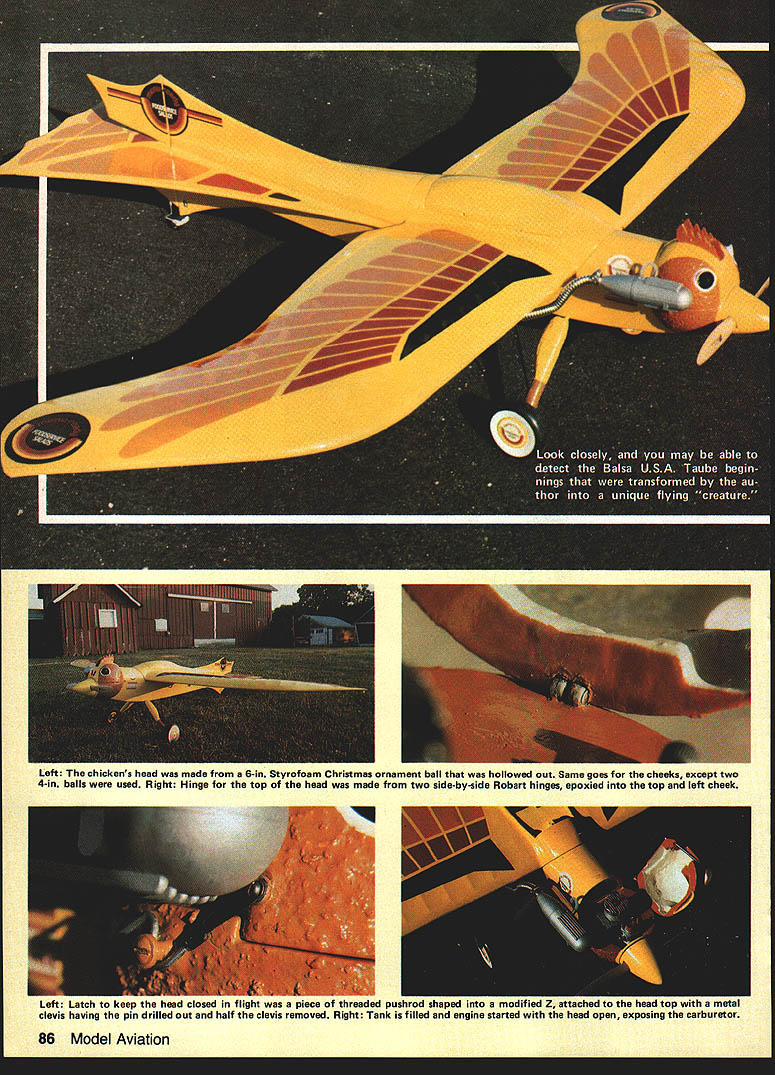
- The head top is made from hollowing out a 6-inch Styrofoam Christmas ornament ball. Two 4-inch Styrofoam balls are cut for the cheeks and epoxied to the balsa sides of the engine area.
- After sanding the outside and scraping out the inside—and sanding the cheeks—I filled the inside and outside of the top and the cheeks with spackle. After sanding, I finished the inside with white, then primed and painted it the same as the rest. A clear Pactra Formula-U spray textured the head and sealed it. I sealed the work with 45-minute Hobbypoxy.
- Plywood eyes and nostrils were made and attached over the freshly sprayed areas. The top air intake was modified to cool the carburetor; a hinge holds the top of the head.
- The head hinge that holds the top of the head to the fuselage is made from two Robart aileron hinges placed side-by-side and epoxied into the left cheek. The horizontal surfaces on the bottom of the head and the tops of the cheeks are formed with 1/8-inch balsa, which is sealed with 45-minute Hobbypoxy, then primed and painted to match the rest of the head.
- A chin latch to keep the head closed was made from a small piece of threaded pushrod shaped into a modified Z. It is attached to the top of the head with a metal clevis whose retainer pin was drilled out and half the clevis removed. The Z snaps around a screw that is epoxied into a hardwood block recessed into the right cheek. The clevis was spackled and sealed, and the head Hobbypoxy-primed.
- Black and aviation-yellow surfaces on the bottom of the head were masked and painted to complete the look.
Flipping open the top of the head exposes the engine, needle valve, fuel line, and clear plastic covering. With it open, I can visually check the 8-oz. Sullivan square fuel tank and the vacuum and fuel lines running in Super Chicken's neck.
The chin is also shaped with Styrofoam and sealed and painted like the head. There is a large cooling vent opening in the bottom of the chin that helps pull cooling air entering from the comb, eyes, and nostrils through the engine compartment.
Cockpit, Neck, and Fuselage Modifications
- The cockpit area was substantially modified from the kit. The original plans called for the cockpit to be an integral part of the top of the wing, with the wing mounting bolts accessible through the two cockpits. I wanted this area to resemble the back of a chicken, so I cut out the middle former and filled the entire area with Styrofoam—shaped, filled with spackle, sanded, and sealed the same as the head.
- The bottom of the filled area is 1/4-inch balsa shaped to fit the top section of the wing. The wing mounting bolts can be reached by removing the back, which is secured to the top of the wing with three flush-mounted 4-40 cap screws, 1-inch length.
- The neck area behind the head was completely reshaped. The original design called for a steep slope from the cockpit area forward to the cowling; that wouldn't look very "chickenish," so I reshaped it. This modification also made it possible to place a flat battery pack over the fuel tank.
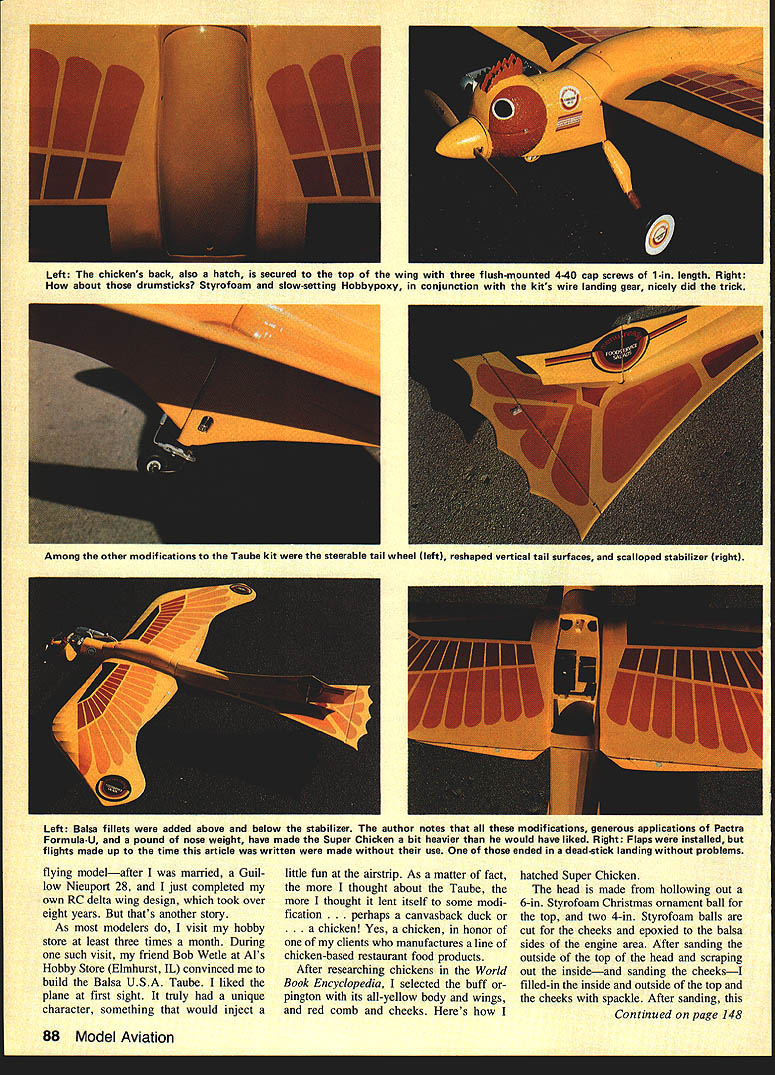
- The back also has a hatch secured to the top wing with three flush-mounted 4-40 cap screws, 1-inch length.
Landing Gear, Tail, and Other Modifications
- The drumsticks were carved from Styrofoam and sealed with slow-setting Hobbypoxy. In conjunction with a wire landing-gear kit, they worked nicely.
- Wheels are 3-3/4 inches, made by Robart; the whitewalls add a distinctive look.
- Other modifications include a steerable tailwheel, reshaped vertical stabilizer, scalloped elevator, and balsa fillets added above and below the horizontal stabilizer.
- Flaps were installed (not on the original plans). I added a fourth servo in the wing, allowing it to hang into the fuselage next to the three tray-mounted servos. Sullivan nylon flexible cables curve out to the flaps; the operative flaps move smoothly, though I hadn't used them in flight when this was written.
Paint, Trim, and Weight
I used Rust-Oleum Light Gray 2081 as a primer followed by the finish paints. I applied generous coats of Pactra Formula-U. The modifications, together with Pactra and about a pound of nose weight, made Super Chicken a bit heavier than I would have liked.
For visual trim, I felt this bird needed something to break the monotony of the vast yellow expanse. The St. Croix Golden Falcon trim caught my eye. I phoned their Park Falls, Wisconsin office and was pleasantly surprised to learn they'd send the Golden Falcon trim for $14.95. I think it makes Super Chicken absolutely sexy.
Engine and Flight Impressions
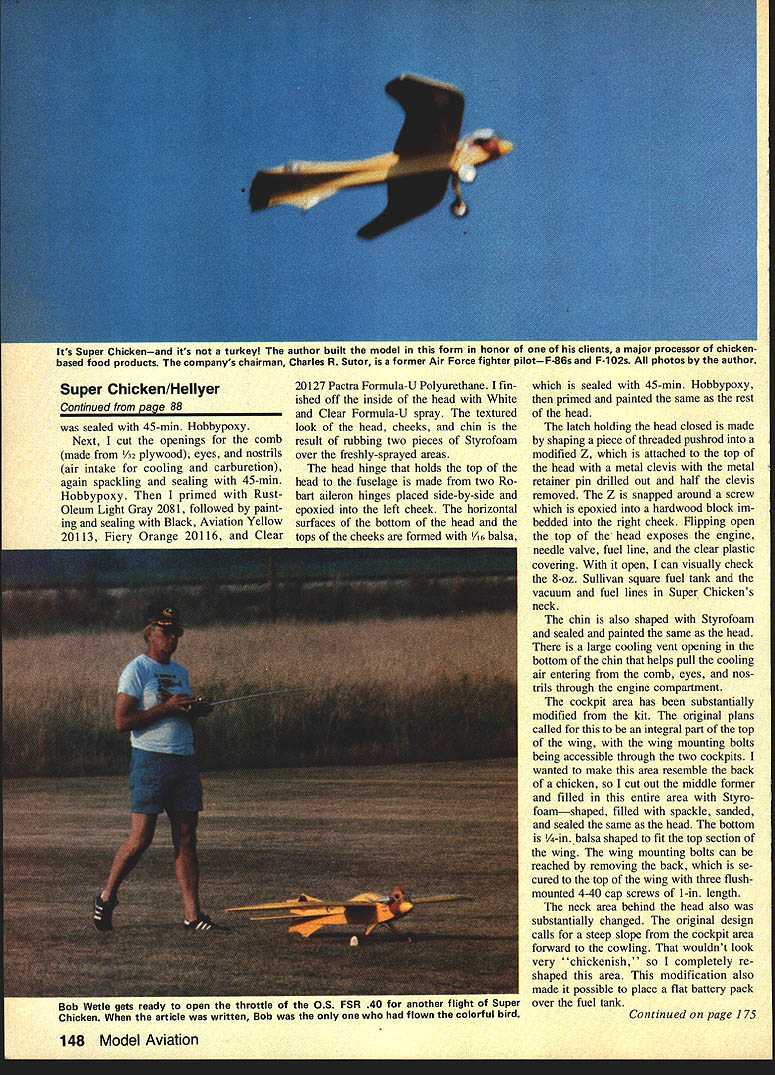
Even so, the mighty O.S. Max FSR .45 really flies Super Chicken like a bird—it's a sight to behold, a real show stopper. It even makes a great dead-stick landing (I found out the hard way after losing the engine on the first flight—too rich) without the flaps.
This was my first factory RC kit construction, and I'd never flown RC before; I still can't fly very well—except with lots of altitude. My instructor, Bob Wetle, is very skilled, knowledgeable, and patient with me, and very loving with Super Chicken when he flies it. In fact, Bob can be heard cackling about the crackle of the O.S. as Super Chicken flies by. And Bob has yet to rub the whitewalls.
Modifications Summary
- Head hatch revealing engine compartment and 8-oz. Sullivan square fuel tank
- Top air intake modified to cool the carburetor; large chin cooling vent
- Styrofoam-shaped back and neck to simulate a chicken's body
- Drumstick landing-gear fairings carved from Styrofoam and sealed with Hobbypoxy
- Robart 3-3/4-inch whitewall wheels
- Steerable tailwheel; reshaped vertical stabilizer; scalloped elevator; balsa fillets
- Flaps added with a fourth wing servo and Sullivan nylon flexible cables
- Rust-Oleum Light Gray 2081 primer, Pactra Formula-U finish; St. Croix Golden Falcon trim (purchased for $14.95)
Transcribed from original scans by AI. Minor OCR errors may remain.

