
Super Stooge
A dependable stooge must hold the plane positively and release easily. — Arlie Preszler
Introduction
One of the valued items of equipment in the flight box of a control-line flier is a good, dependable stooge. This device makes it possible for the control-line flier to fly alone. The purpose of the stooge is to act as a helper and hold the model in place on the flight line after the engine has been started, while the flier walks to the center of the circle. Upon the command of the flier the stooge then releases the model for flight.
Arlie Preszler of Lodi, CA has developed and shared an excellent "super stooge" that works well and is easy to build. This stooge provides a very positive hold and releases reliably. It is compact, fits easily into your flight box, and is easy to clean.
Materials
- Main frame: 3/4" plywood (or other wood available)
- Bottom piece: 1/16" plywood (glued to bottom of main frame to hold reel during storage)
- Anchor pins and release pin: 1/8" music wire
- Cutting tool: Dremel abrasive disk (#409) works well for cutting music wire
- Guides for release pin: cabinet hinges or plastic steerable nosewheel mounts (radio-control parts)
- Small washer (to be soldered to release pin)
- Spring: spring from a ballpoint retractable pen or a purpose-made spring
- Reel: surplus reel (Pylon or Sig reels used for control lines work well)
- Protective finish: several coats of paint or dope for wood parts
- Heavy nylon line for model (with a loop to attach to the release pin)
Construction / Assembly
- Measure the reel and cut the main frame from 3/4" plywood to a circular piece slightly larger than the reel.
- Glue the 1/16" plywood piece to the bottom of the main frame to hold the reel during storage.
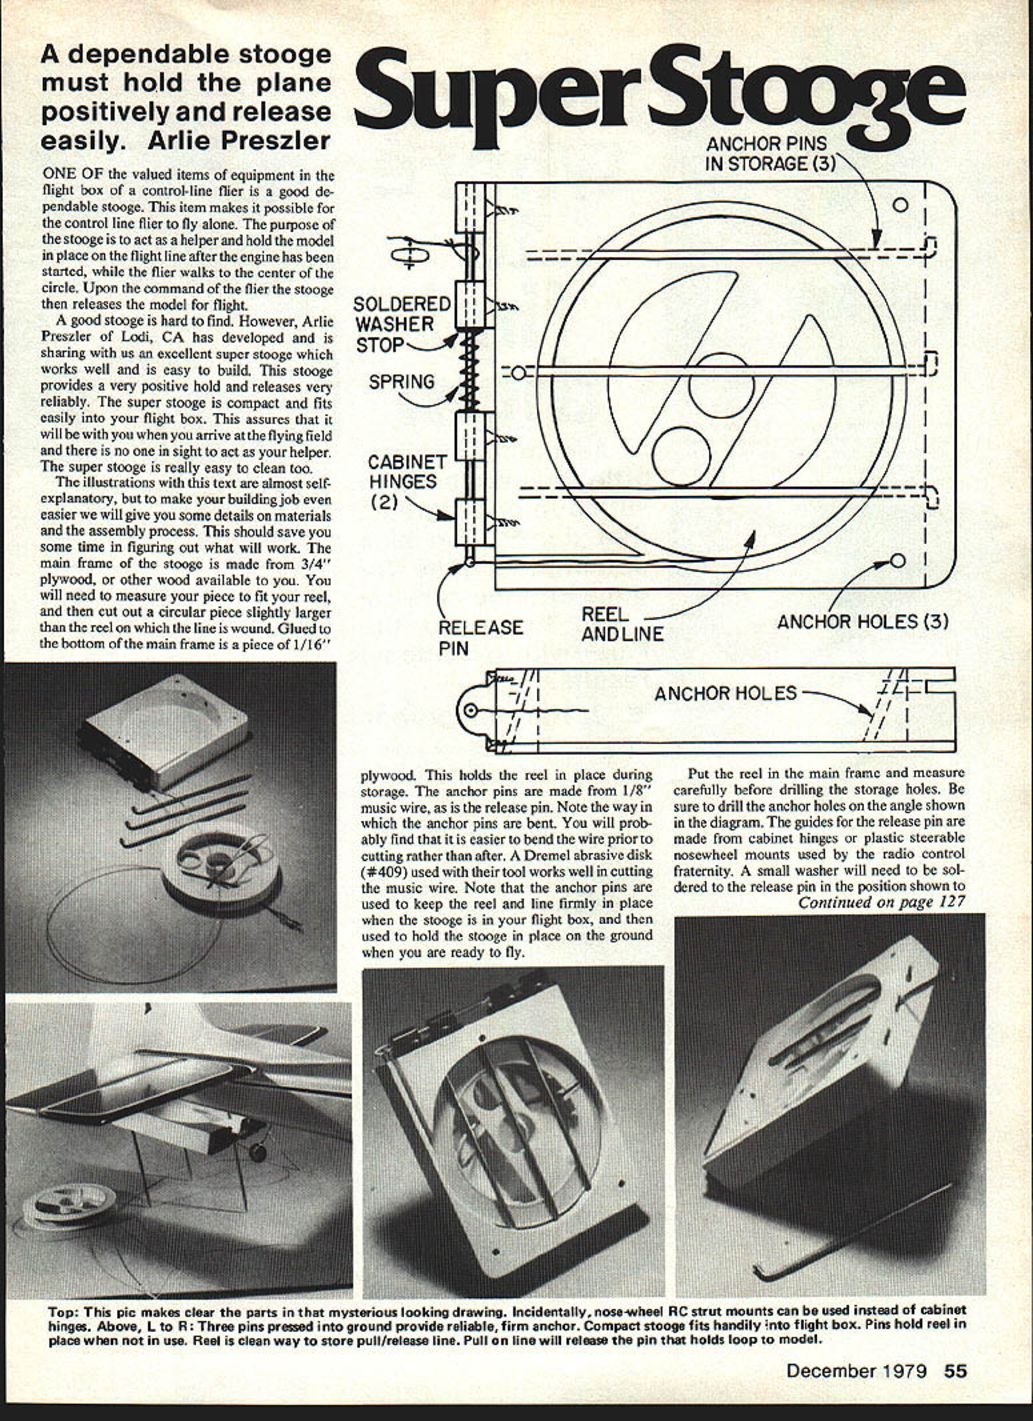
- Make the anchor pins and the release pin from 1/8" music wire. Note the bends shown in the illustration; it is usually easier to bend the wire before cutting it to length.
- Cut the music wire with a Dremel abrasive disk or a similar tool.
- Place the reel in the main frame and measure carefully before drilling the storage holes. Drill the anchor holes at the angle shown in the diagram (the angle lets the anchor pins hold the stooge in the ground).
- Install the guides for the release pin using cabinet hinges or plastic nosewheel mounts.
- Solder a small washer to the release pin in the position indicated (this helps retain the spring and the looped line).
- Install the spring and assemble the release mechanism.
- Mount the surplus reel and wind the nylon fishing line onto it.
- Apply several coats of paint or dope to protect the wood and make cleaning easier.
- Attach a heavy nylon line to your model’s fuselage or tailwheel, making a loop at the free end to fit over the release pin.
Note: The anchor pins keep the reel and line firmly in place in your flight box and also secure the stooge to the ground when you are ready to fly.
Operation
- Remove the anchor pins from their storage positions and force them solidly into the ground through the holes in the stooge.
- Remove the reel from the stooge and run the line out to the center of the flying circle.
- Attach the loop from the tail (or fuselage) of your model to the stooge release pin, making sure everything is secure.
- Start your model, walk to the center of the circle, grab your control handle, and get ready for takeoff.
- Pull the line toward the stooge to release the model for takeoff.
When writing advertisers, mention that you read about them in MA.
Transcribed from original scans by AI. Minor OCR errors may remain.

