
Supercat
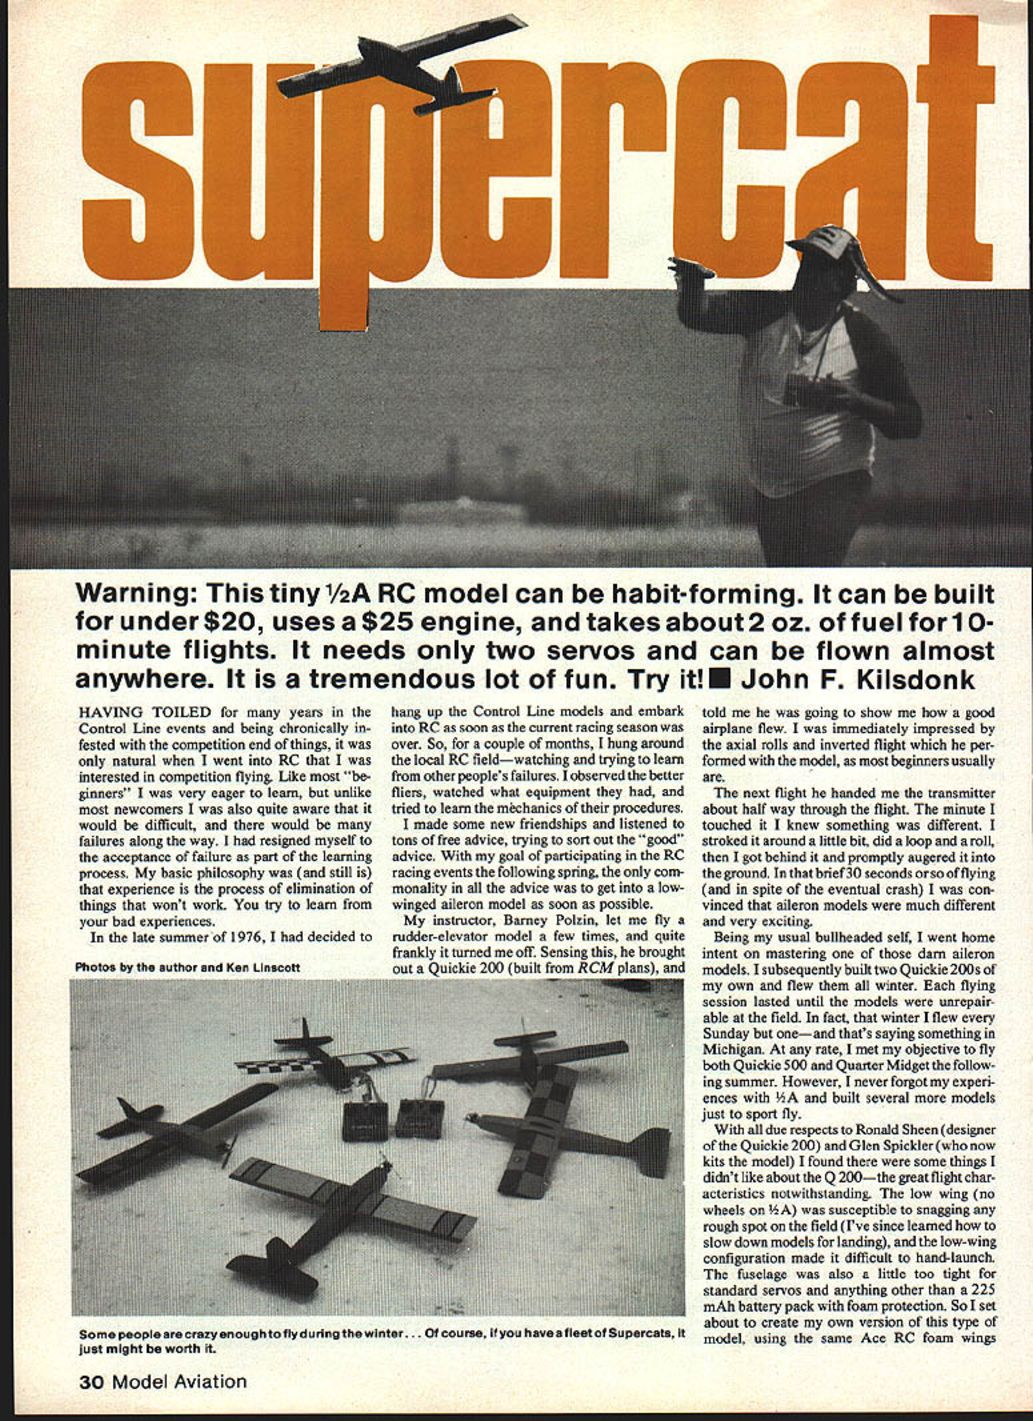
Warning: This tiny 1/2A RC model can be habit-forming. It can be built for under $20, uses a $25 engine, and takes about 2 oz. of fuel for 10-minute flights. It needs only two servos and can be flown almost anywhere. It is a tremendous lot of fun. Try it! — John F. Kilsdonk
Background
Having toiled for many years in Control Line events and being chronically infested with the competition end of things, I was naturally interested in competition flying when I went into RC. Like most beginners I was eager to learn, but unlike many newcomers I accepted that there would be many failures along the way. My basic philosophy was (and still is) that experience is the process of eliminating things that won't work — you try to learn from your bad experiences.
In the late summer of 1976 I decided to hang up Control Line models and embark on RC as soon as the current racing season was over. For a couple of months I hung around the local RC field—watching and trying to learn from other people's failures. I observed the better fliers, watched their equipment, and tried to learn the mechanics of their procedures.
My instructor, Barney Polzin, let me fly a rudder-elevator model a few times, which turned me off. He then brought out a Quickie 200 (built from RCM plans) to show me how a good airplane flew. I was impressed by its axial rolls and inverted flight. On one flight he handed me the transmitter halfway through; after a brief 30 seconds of flying I got behind it and crashed, but I was convinced that aileron models were different and exciting.
Determined, I built two Quickie 200s and flew them all winter. I met my objective of flying Quickie 500 and Quarter Midget the following summer, but I never forgot my experiences with 1/2A and built several more models just to sport fly.
Design goals and changes from the Quickie 200
While respecting Ronald Sheen (designer of the Quickie 200) and Glen Spickler (who kits the model), there were things I didn't like about the Q-200 despite its great flight characteristics:
- The low wing (no wheels on 1/2A) was susceptible to snagging rough spots on the field.
- Low-wing configuration made hand-launching difficult.
- The fuselage was a little too tight for standard servos and anything other than a small battery pack.
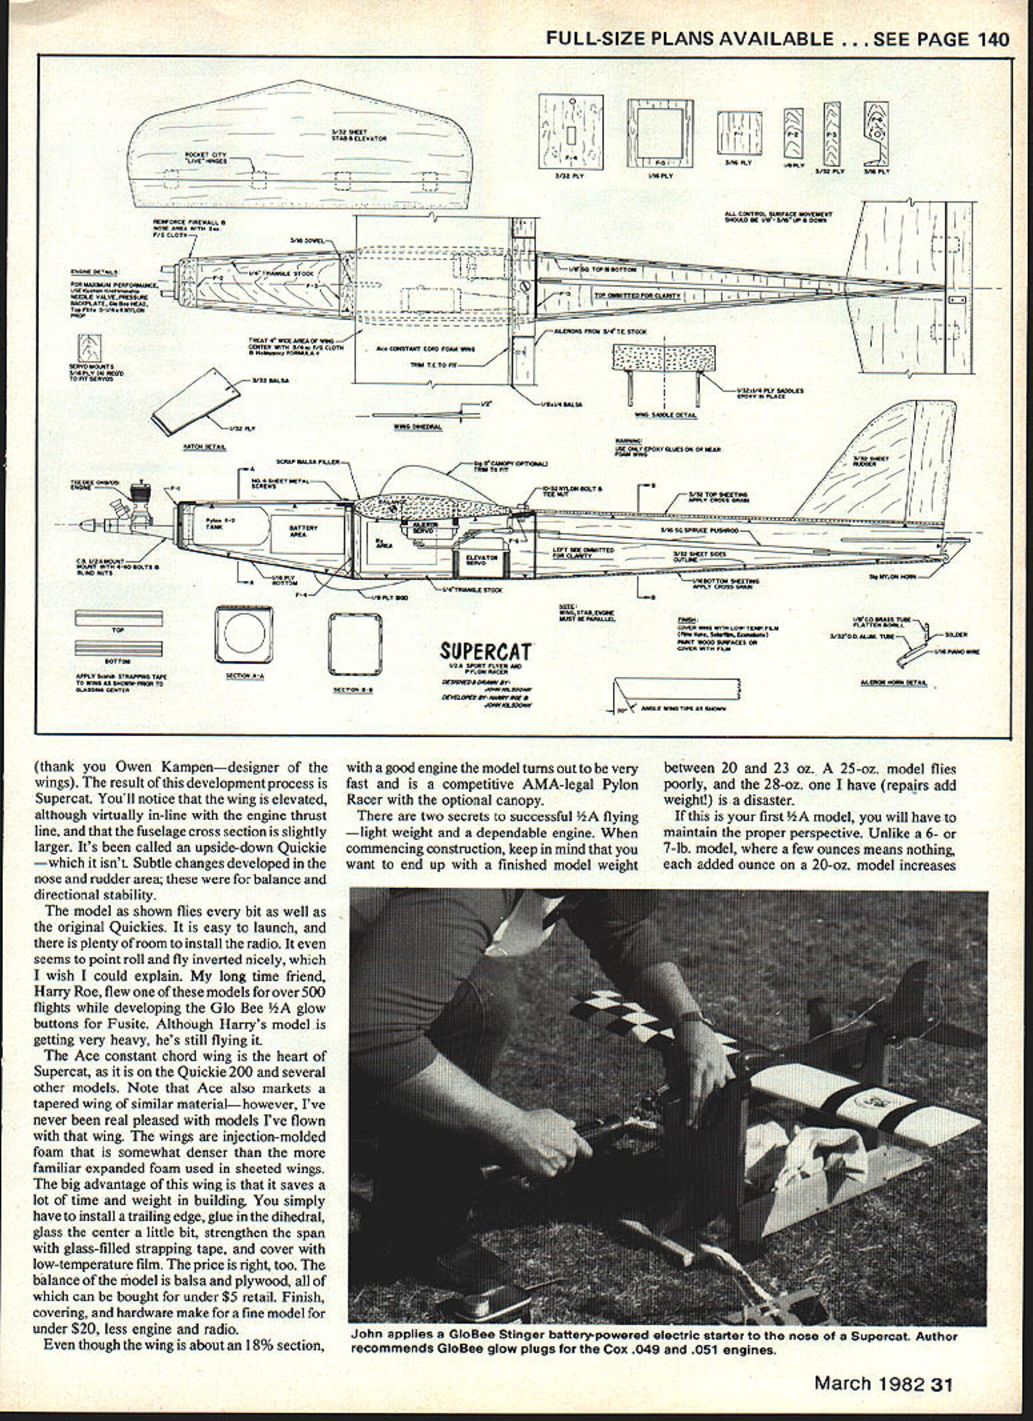
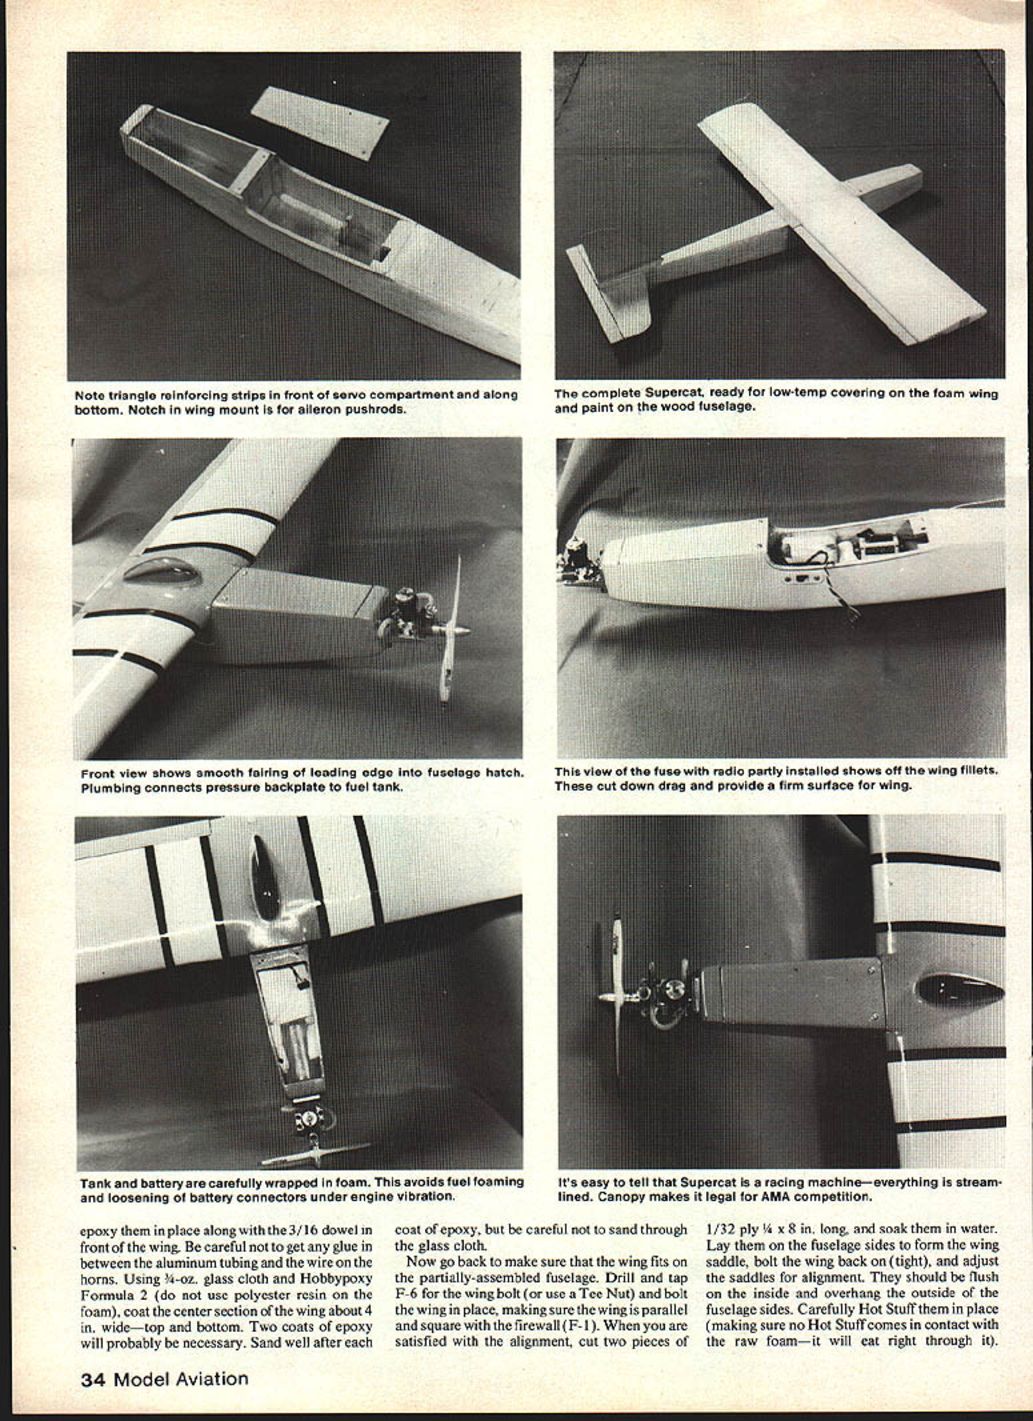
I set out to create my own version using the same Ace RC foam wings. You'll notice the wing is elevated (although nearly in line with the engine thrust line) and the fuselage cross section is slightly larger. It's not an upside-down Quickie, but there are subtle changes in the nose and rudder area for balance and directional stability. The resulting Supercat is easy to launch, has plenty of room for radio gear, and points-rolls and flies inverted nicely.
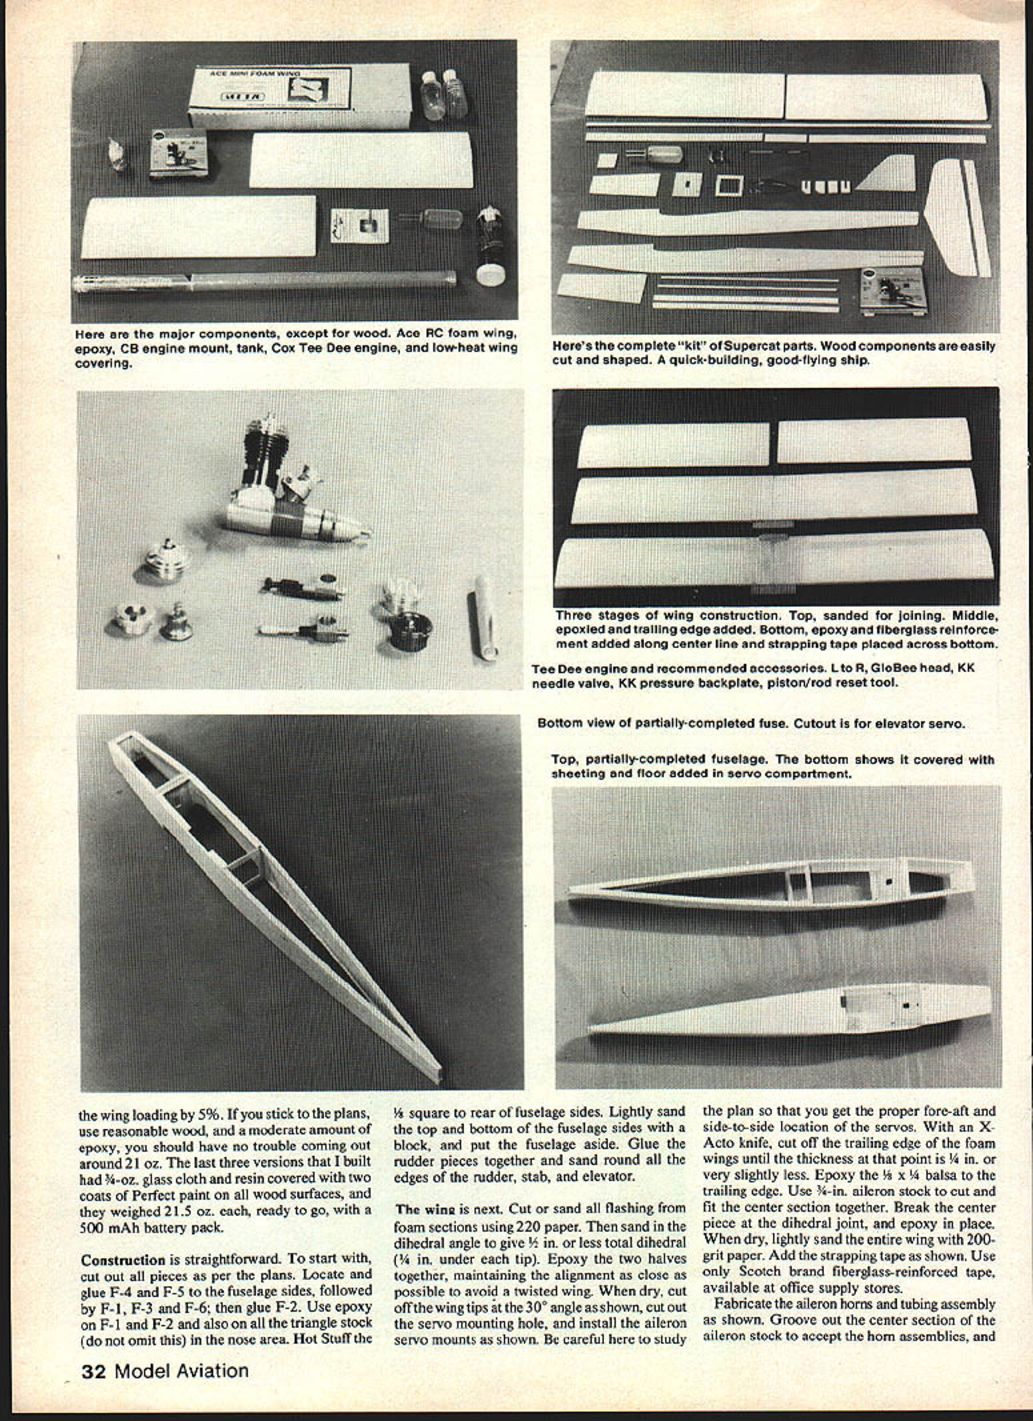
Wing core: Ace injection-molded foam
Ace's constant-chord wing is at the heart of the Supercat, Quickie 200 and several other models. Ace also markets a tapered wing of similar material, but I prefer the constant-chord wing. These wings are injection-molded foam, somewhat denser and familiar to many fliers.
Advantages:
- Saves time and weight in building.
- Simply install a trailing edge, glue in dihedral, glass the center a little, strengthen the span with glass-filled strapping tape, and cover with low-temperature film.
- The wing plus balsa/plywood balance makes for a fine model for under $20 (less engine and radio).
Even though the wing is about an 18% section, with a good engine the model is very fast and can be a competitive AMA-legal Pylon Racer with the optional canopy.
Weight and performance
There are two secrets to successful 1/2A flying — light weight and a dependable engine. Aim for a finished model weight between 20 and 23 oz. A 25-oz. model flies poorly; a 28-oz. model (repairs add weight) is a disaster.
If this is your first 1/2A model, maintain perspective: unlike a 6- or 7-lb. model where a few ounces mean nothing, each added ounce on a 20-oz. model increases the wing loading a noticeable amount. Each added ounce increases the wing loading by about 5%. If you stick to the plans, use reasonable wood, and a moderate amount of epoxy, you should come out around 21 oz. The last three versions I built had 3/32-in. glass cloth and resin covered with two coats of Perfect paint on all wood surfaces, and they weighed 21.5 oz. each, ready to go, with a 500 mAh battery pack.
Construction
Construction is straightforward. Follow the plans and use good alignment practices.
- Cut out all pieces per the plans.
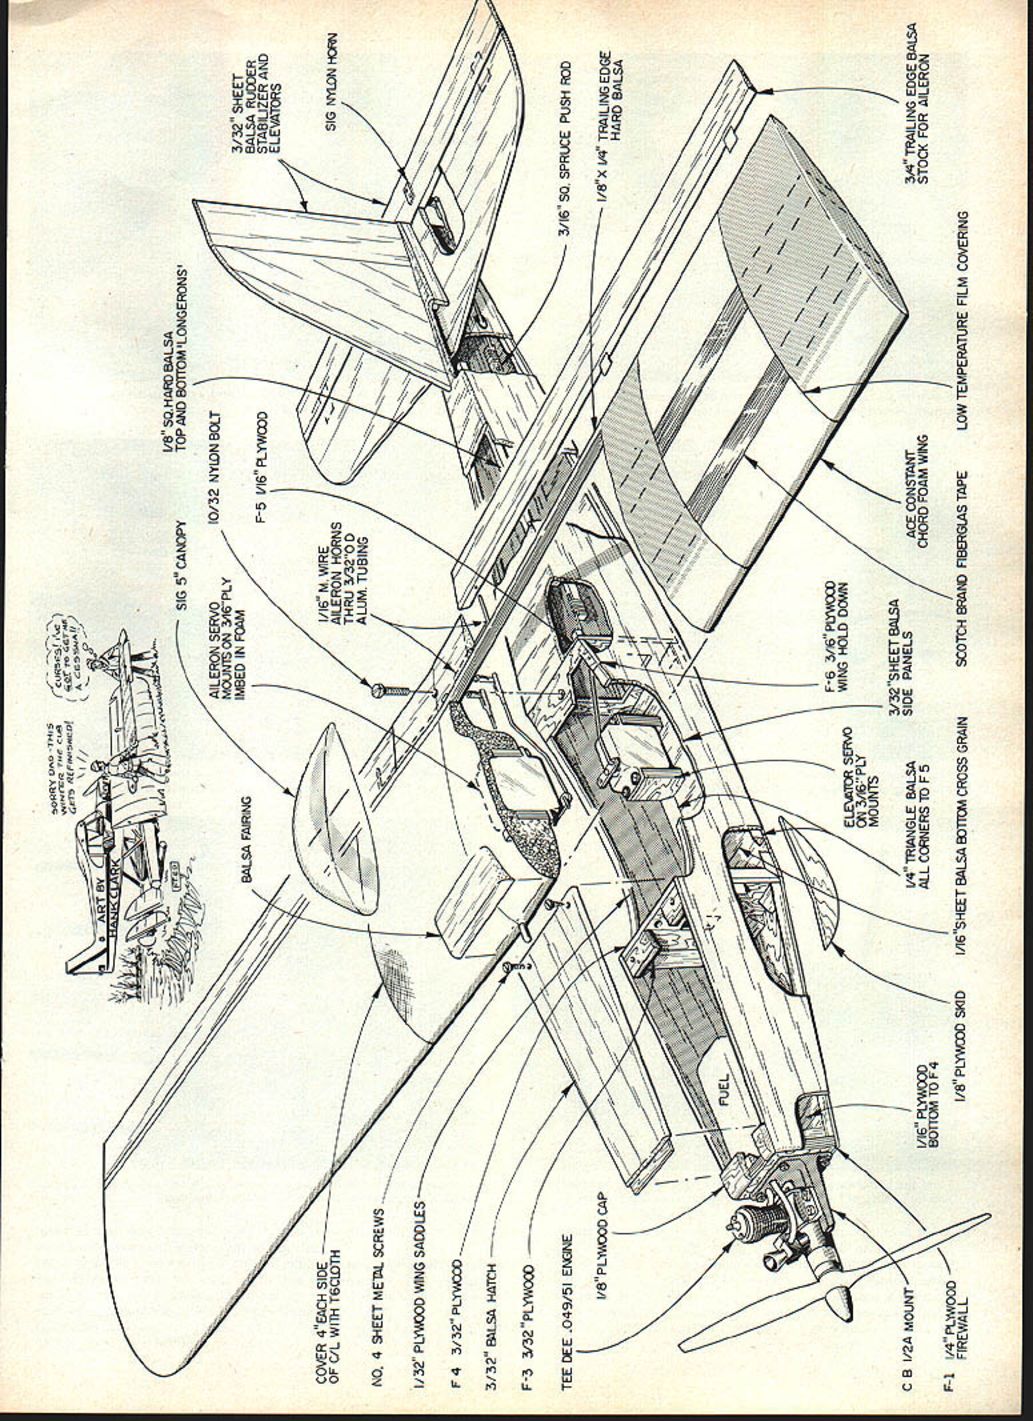
- Locate and glue F-4 and F-5 to the fuselage sides, followed by F-1, F-3 and F-6; then glue F-2.
- Use epoxy on F-1 and F-2 and on all triangle stock in the nose area (do not omit).
- Hot Stuff the 1/4-square to the rear of the fuselage sides.
- Lightly sand the top and bottom of the fuselage sides with a sanding block, and set the fuselage aside.
- Glue the rudder pieces together and sand round all the edges of the rudder, stab, and elevator.
Wing assembly
- Cut or sand all flashing from the foam wing sections using 220 paper.
- Sand in the dihedral angle to give 1/2 in. or less total dihedral (1/4 in. under each tip).
- Epoxy the two halves together, maintaining alignment to avoid a twisted wing.
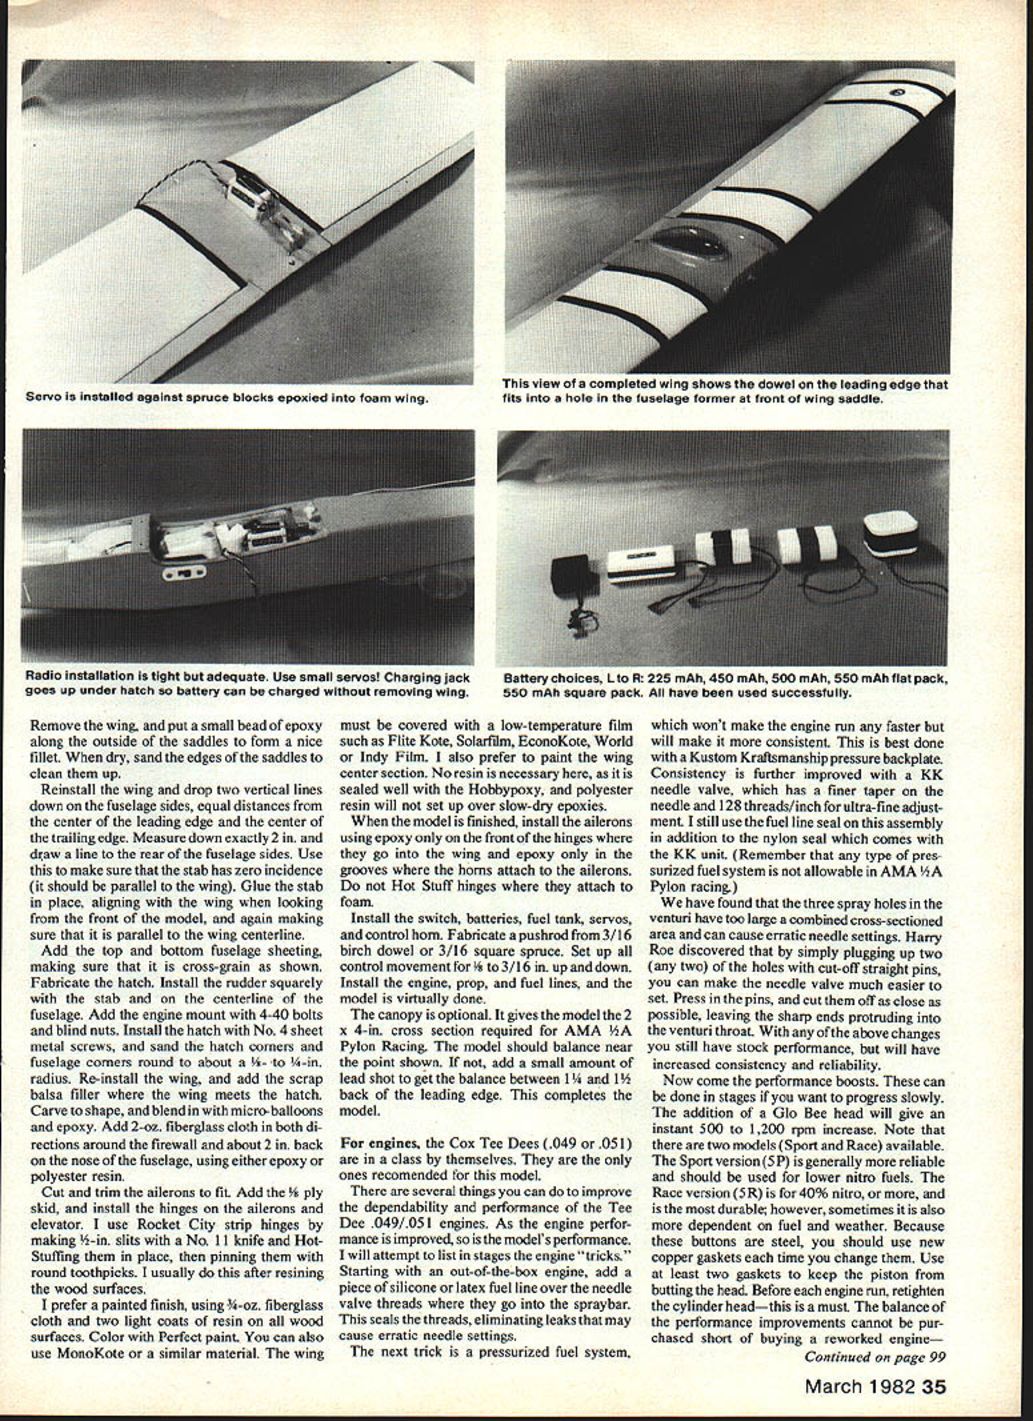
- When dry, cut off the wing tips at the 30° angle as shown on the plans, cut out the servo mounting hole, and install the aileron servo mounts.
- Study the plan carefully for correct fore-aft and side-to-side servo locations.
- With an X-Acto knife, cut off the trailing edge of the foam wing until the thickness at that point is 1/8 in. or slightly less. Epoxy 1/8 x 1/4 balsa to the trailing edge.
- Use 3/16-in. aileron stock to cut and fit the center section together. Break the center piece at the dihedral joint and epoxy in place.
- When dry, sand the entire wing with 200-grit paper. Add the strapping tape as shown (use only Scotch brand fiberglass-reinforced tape, available at office supply stores).
- Fabricate the aileron horns and tubing assembly as shown. Groove out the center section of the aileron stock to accept the horn assemblies and glue the sleeve tubing in place. Install servo linkages and check for free movement.
- Epoxy the 1/8-in. ply and any required reinforcements. Epoxy them in place along with the 3/16 dowel in front of the wing.
- Be careful not to get glue between the aluminum tubing and the wire on the horns.
Glassing the wing center
- Using 1/4-oz. glass cloth and Hobbypoxy Formula 2 (do not use polyester resin on the foam), coat the center section of the wing about 4 in. wide — top and bottom.
- Two coats of epoxy will probably be necessary. Sand well after each coat, but be careful not to sand through the glass cloth.
Fitting the wing to the fuselage
- Make sure the wing fits on the partially-assembled fuselage.
- Drill and tap F-6 for the wing bolt (or use a Tee Nut) and bolt the wing in place, ensuring the wing is parallel and square with the firewall (F-1).
- Cut two pieces of 1/32 ply 1/4 x 8 in. long, soak them in water, and lay them on the fuselage sides to form the wing saddle. Bolt the wing back on (tight) and adjust the saddles for alignment so they are flush on the inside and overhang the outside of the fuselage sides.
- Carefully Hot Stuff the saddles in place (ensure no Hot Stuff contacts raw foam — it will eat right through it).
- Remove the wing and put a small bead of epoxy along the outside of the saddles to form a nice fillet. When dry, sand the edges of the saddles to clean them up.
Tail and sheeting
- Reinstall the wing and drop two vertical lines down on the fuselage sides, equal distances from the center of the leading edge and the center of the trailing edge.
- Measure down exactly 2 in. and draw a line to the rear of the fuselage sides. Use this to ensure the stab has zero incidence (parallel to the wing).
- Glue the stab in place, aligning with the wing when viewed from the front and ensuring it is parallel to the wing centerline.
- Add the top and bottom fuselage sheeting, making sure it is cross-grain as shown. Fabricate the hatch.
- Install the rudder squarely with the stab and on the centerline of the fuselage.
- Add the engine mount with 4-40 bolts and blind nuts. Install the hatch with No. 4 sheet metal screws, and sand the hatch and fuselage corners round to about a 1/8- to 1/4-in. radius.
- Reinstall the wing and add scrap balsa filler where the wing meets the hatch. Carve to shape and blend in with microballoons and epoxy.
- Add 2-oz. fiberglass cloth in both directions around the firewall and about 2 in. back on the nose of the fuselage, using either epoxy or polyester resin.
Control surfaces, hinges and finish
- Cut and trim the ailerons to fit. Add the 1/16 ply skid and install the hinges on the ailerons and elevator.
- Rocket City strip hinges work well: make 1/8-in. slits with a No. 11 knife, Hot-Stuff them in place, then pin with round toothpicks. I usually do this after resining the wood surfaces.
- I prefer a painted finish using 3/4-oz. fiberglass cloth and two light coats of resin on all wood surfaces; color with Perfect paint. You can also use MonoKote or a similar covering material.
- The wing must be covered with a low-temperature film such as Flite-Tite, Solarfilm, EconoKote, World or Indy Film. I prefer to paint the wing center section. No resin is necessary there, as it is sealed well with the Hobbypoxy; polyester resin will not set up over slow-dry epoxies.
- When the model is finished, install the ailerons using epoxy only on the front of the hinges where they go into the wing and epoxy only in the grooves where the horns attach to the ailerons. Do not Hot Stuff hinges where they attach to foam.
Final installation and setup
- Install the switch, batteries, fuel tank, servos, and control horn.
- Fabricate a pushrod from 3/16 birch dowel or 3/16 square spruce.
- Set up all control movement for 1/8 to 3/16 in. up and down.
- Install the engine, prop, and fuel lines.
- Balance the model at the point shown on the plan and set the recommended control throws.
The canopy is optional; it gives the model the 2 x 4-in. cross section required for AMA 1/2A Pylon Racing. The model should balance near the point shown. If not, add a small amount of lead shot to get the balance between 1¼ and 1½ in. back of the leading edge.
This completes the model.
Engines and tuning
For engines, the Cox Tee Dees (.049 or .051) are in a class by themselves and are the only ones recommended for this model.
There are several things you can do to improve the reliability and performance of the Tee Dee .049/.051 engines. As the engine performance is improved, so is the model's performance.
Basic reliability improvements
- Add a piece of silicone or latex fuel line over the needle valve threads where they go into the spraybar. This seals the threads and eliminates leaks that may cause erratic needle settings.
- A pressurized fuel system improves consistency (it won't make the engine run faster). This is best done with a Kustom Kraftsmanship (KK) pressure backplate and a KK needle valve (finer taper and 128 threads/inch for ultra-fine adjustment). I still use the fuel line seal in addition to the nylon seal which comes with the KK unit.
- Note: Any type of pressurized fuel system is not allowable in AMA 1/2A Pylon racing.
Venturi modification
- The three spray holes in the venturi have too large a combined cross-sectional area and can cause erratic needle settings. Harry Roe discovered that by plugging two (any two) of the holes with cut-off straight pins, the needle valve becomes much easier to set. Press in the pins and cut them off as close as possible, leaving the sharp ends protruding into the venturi throat. With the above changes you still have stock performance but increased consistency and reliability.
Performance boosts
- Glo Bee head: The addition of a Glo Bee head will give an instant 500 to 1,200 rpm increase.
- There are two models (Sport and Race). The Sport version (SP) is generally more reliable and should be used for lower-nitro fuels. The Race version (SR) is for 40% nitro or more and is most durable but can be more dependent on fuel and weather.
- Because these buttons are steel, use new copper gaskets each time you change them. Use at least two gaskets to keep the piston from butting the head. Before each run, retighten the cylinder-head — this is a must.
DIY engine work
If you want further improvements that require reworking the engine, the following steps can add small benefits if done properly:
- Drill out the venturi to 5/32-in. diameter (still use the pins).
- Lap the crankshaft to the crankcase.
- Lap the piston and cylinder fit, and alter the crankshaft and cylinder timing.
A more detailed "how-to" was provided in a 3-part series by Joe Klause in Model Builder magazine. These mods work if done properly. Purchased reworked engines are also available.
Fuel recommendations
Ordinary 5–15% sport fuel will not give very good performance in a 1/2A. By adding propylene oxide (to increase vapor pressure) and increasing nitromethane, performance improves. I recommend the following guidelines:
- First Flights: Castor oil 20% / Nitro 10% / Propylene Oxide 10% / Methanol 60%
- Sport: Castor oil 20% / Nitro 25% / Propylene Oxide 5% / Methanol 50%
- Race: Castor oil 20% / Nitro 40% / Propylene Oxide 3% / Methanol 37%
- Ultimate: Castor oil 20% / Nitro 60% / Propylene Oxide 3% / Methanol 17%
If you prefer not to blend your own fuel, premixed fuels are available. Cox fuels are fine but have lower nitro contents. If you prefer higher nitro fuel, Nitrotane A blends all contain adequate propylene oxide.
Maintenance and props
- Frequently check the con-rod ball socket fit in the piston. After disassembly, grasp the piston and push on the rod. If you can feel or hear movement, it is too loose. This can be tightened using a K&K retool. I recommend doing this after each flying session.
- Top Flite S-4 in. nylon props give the best all-around performance. Experiment with other props to suit your tastes.
Suppliers and specialized products
Following is a list of specialized products. Send SASE for info.
- KK Products (needle valves, pressure back-plates, rework tools, reworked engines, and parts): Kustom Kraftsmanship, Box 2699, Laguna Hills, CA 92653. (Also available from Ace RC and some hobby shops.)
- Nitrotane Fuels (N/A blends with propylene oxide): Space Age Fuels, R.R. 3, Kewanee, IL 61443. Phone: (309) 853-9606. (Also available from some hobby shops.)
- GloBee Heads: Twin-K Inc., P.O. Box 31228A, Indianapolis, IN 46231. Phone: (317) 839-6579. (Also available from K.K., Ace RC, and most hobby shops.)
Flying the Supercat
Flying the Supercat is easy. It has no bad habits and it grooves very well. A very gentle straight-ahead hand-launch will get you in the air. I prefer to launch my own by holding the transmitter in my left hand and launching the model with my right. If you're leery of doing this, add some up-trim first. Do not point the nose high on launch — straight ahead into the wind with wrist action is best.
Landings are easy; with practice you can grease it down on the skid every time. Keep it upwind and a little high at the end of the tank to allow for a proper landing setup.
Anecdote: 1979 Nats, Lincoln, NE
We usually carry a 1/4 A model whenever we go to an R/C race for sport flying and evening horseplay. At the 1979 Nats in Lincoln, NE, we had a Supercat along. One evening we went to the local flying field and were greeted by a member of the Sky Knights club. After getting a frequency clip we fueled and flew the Supercat.
We performed low high-speed passes and split-S maneuvers where the engine unloaded up to 33,000 rpm, ending with a spot landing at our feet. A group of local flyers were astonished when they discovered the engine was only an .051 (they had assumed it was a larger Cox .40). My partner, Denny Sumner, then flew a whole flight of rolling circles from takeoff through dead-stick landing, with the final roll less than 50 feet before touchdown. The crowd believed the aileron servo had locked in full right for most of that flight.
We held a small clinic on 1/4 A flying for the local club; they had never seen an aileron 1/4 A with a hot engine. It was apparently quite an experience for them.
I hope you can experience the fun of 1/4 A as I have. Happy flying.
Transcribed from original scans by AI. Minor OCR errors may remain.

