
Swee' Pea No-Cal Scale
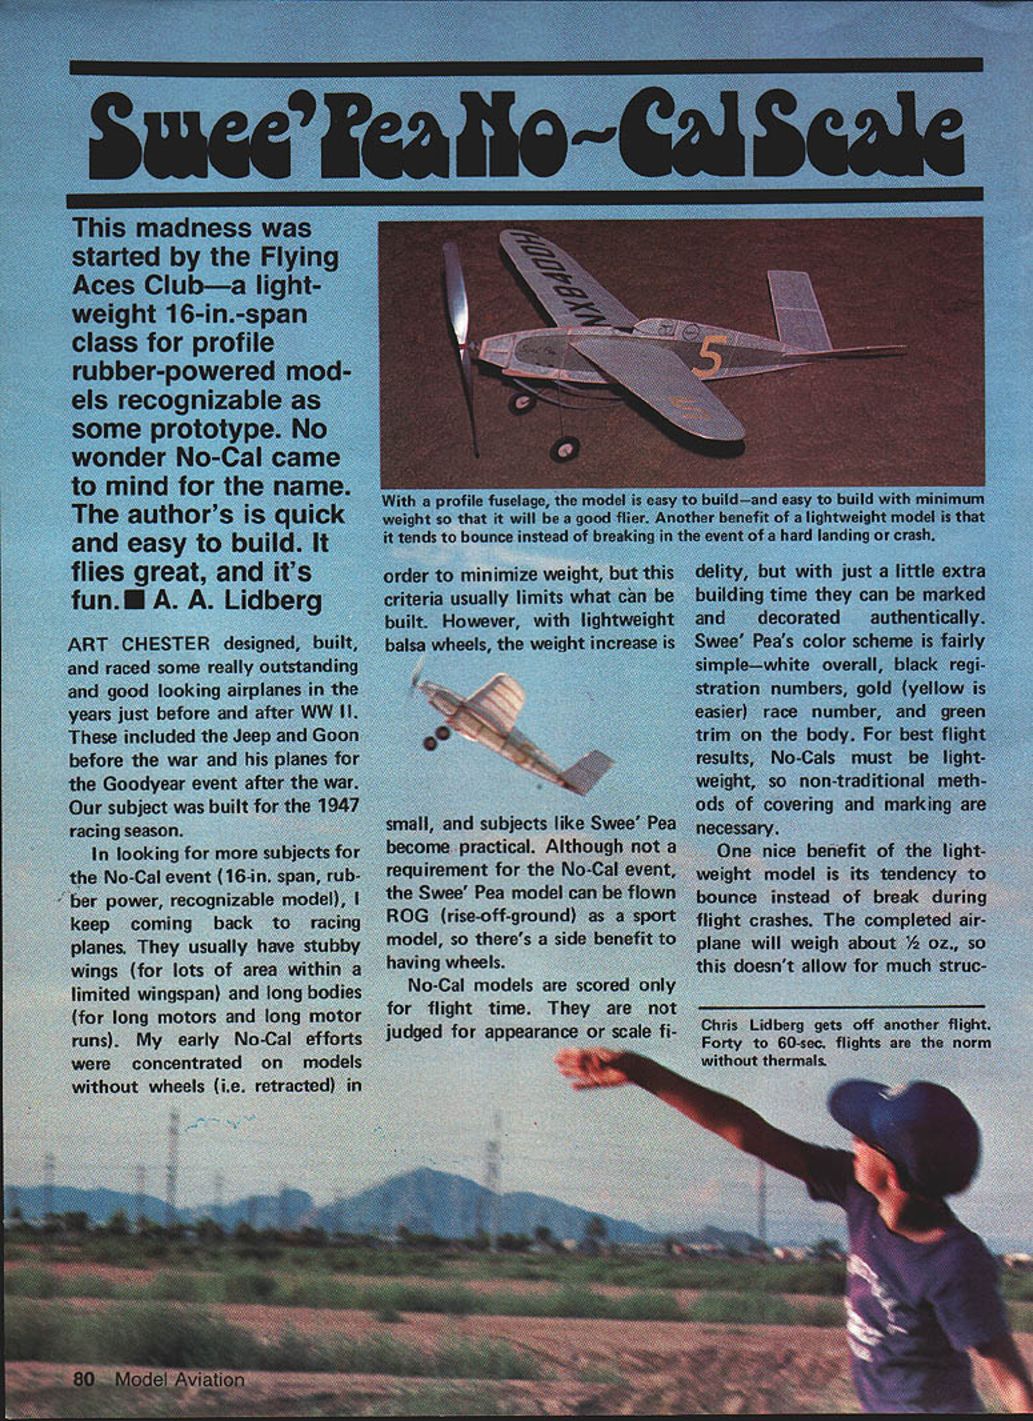
This madness was started by the Flying Aces Club—a lightweight 16-in. span class for profile, rubber-powered models recognizable as some prototype. No wonder No-Cal came to mind for the name. The design is quick and easy to build, it flies great, and it's fun. — A. A. Lidberg
Art Chester designed, built, and raced some outstanding and good-looking airplanes in the years just before and after WW II. These included the Jeep and Goon before the war and his Goodyear racers after the war. Our subject was built for the 1947 racing season.
In looking for subjects for the No-Cal event (16-in. span, rubber power, recognizable model), I keep coming back to racing planes. They usually have stubby wings (for lots of area within a limited wingspan) and long bodies (for long motors and long motor runs). My early No-Cal efforts were on models without wheels to minimize weight, but this criterion limits what can be built. With lightweight balsa wheels, the weight increase is small, and subjects like Swee' Pea become practical. Although not required for the No-Cal event, the Swee' Pea model can be flown ROG (rise-off-ground) as a sport model, so there's a side benefit to having wheels.
No-Cal models are scored only for flight time. They are not judged for appearance or scale fidelity, but with a little extra building time they can be marked and decorated authentically. Swee' Pea's color scheme is fairly simple—white overall, black registration numbers, gold (yellow is easier) race number, and green trim on the body. For best flight results, No-Cals must be lightweight, so non-traditional methods of covering and marking are necessary.
One nice benefit of the lightweight model is its tendency to bounce instead of break during flight crashes. The completed airplane will weigh about 1/2 oz., so this doesn't allow for much structural strength. Clear or colored dope can't be used on the tissue, as it will add weight and may cause warps. The model doesn't need dope, and the markings can be created with marking pens and colored tissue.
Covering and Marking
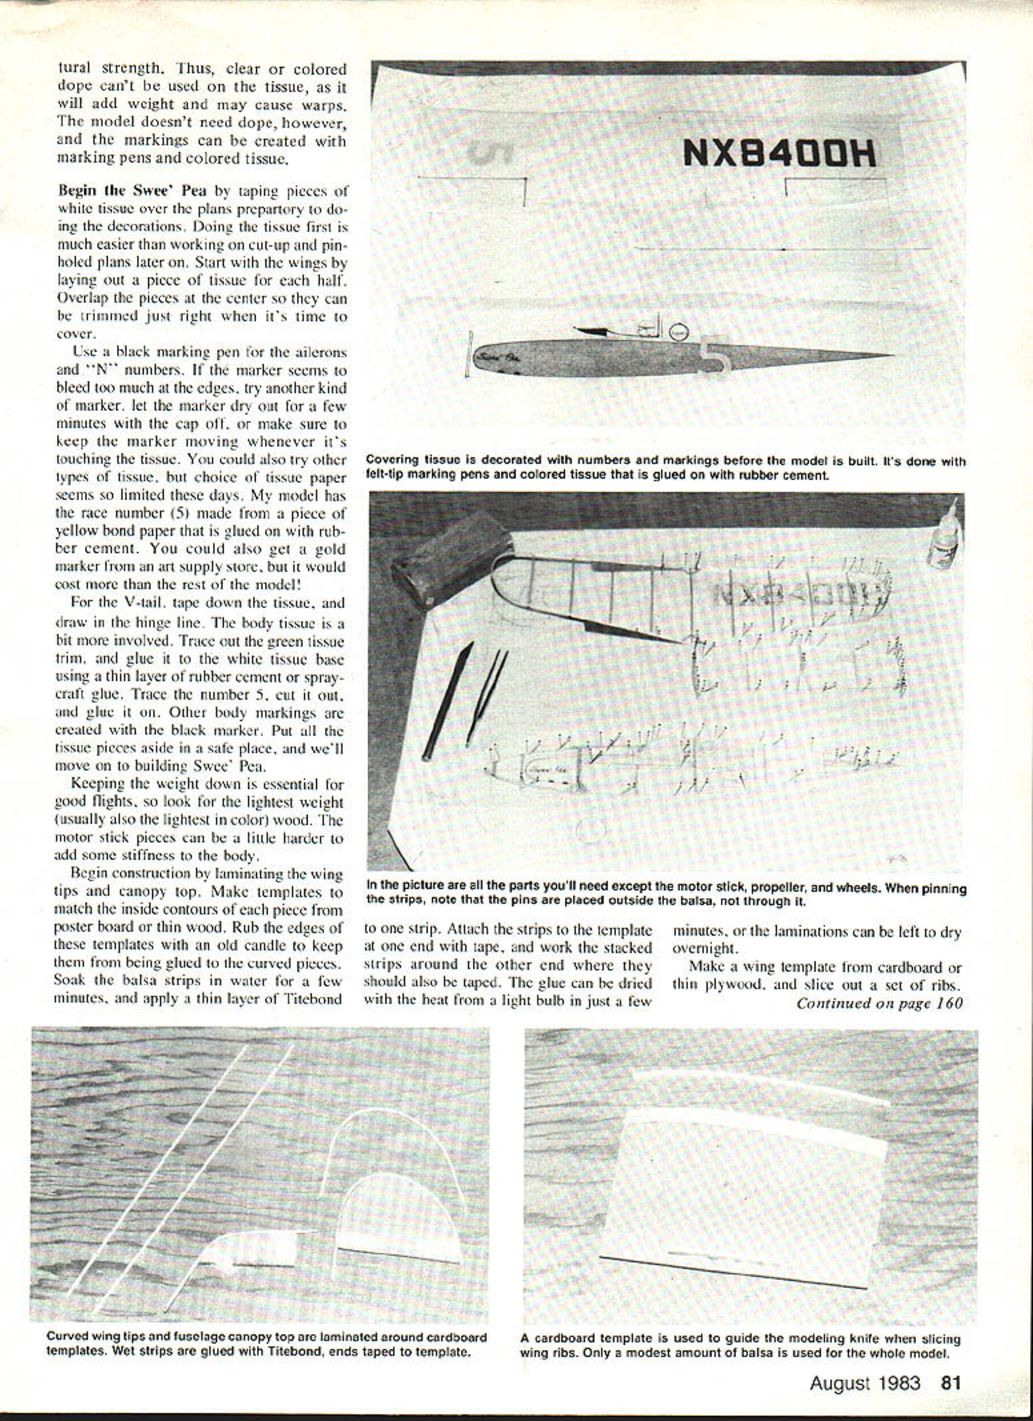
- Begin by taping pieces of white tissue over the plans preparatory to doing the decorations. Doing the tissue first is much easier than working on cut-up and pinholed plans later on.
- Start with the wings by laying out a piece of tissue for each half. Overlap the pieces at the center so they can be trimmed just right when it's time to cover.
- Use a black marking pen for the ailerons and "N" numbers. If the marker bleeds at the edges, try another kind of marker, let the marker dry a few minutes with the cap off, keep the marker moving when touching the tissue, or try other tissue types.
- The race number (5) on my model is made from a piece of yellow bond paper glued on with rubber cement. Alternatively, use a gold marker from an art supply store (more expensive).
- For the V-tail: tape down the tissue and draw in the hinge line.
- For the body: trace the green tissue trim and glue it to the white tissue base with a thin layer of rubber cement or spraycraft glue. Trace, cut out, and glue the number 5. Other body markings are made with the black marker.
- Put all tissue pieces aside in a safe place until building is under way.
Construction
Keeping weight down is essential for good flights, so use the lightest-weight (and usually lightest-colored) wood available. Motor stick pieces may need extra stiffness.
Templates and Laminations
- Make templates to match the inside contours of the wing tips and canopy top from poster board or thin wood. Rub the template edges with an old candle to keep them from sticking to the laminations.
- Soak the balsa strips in water a few minutes, apply a thin layer of Titebond to one strip, attach the strips to the template at one end with tape, and work the stacked strips around the other end and tape. Dry the glue with heat from a light bulb or leave overnight.
- Make a wing template from cardboard or thin plywood, and slice out a set of ribs. Make them all as long as the template.
Wing
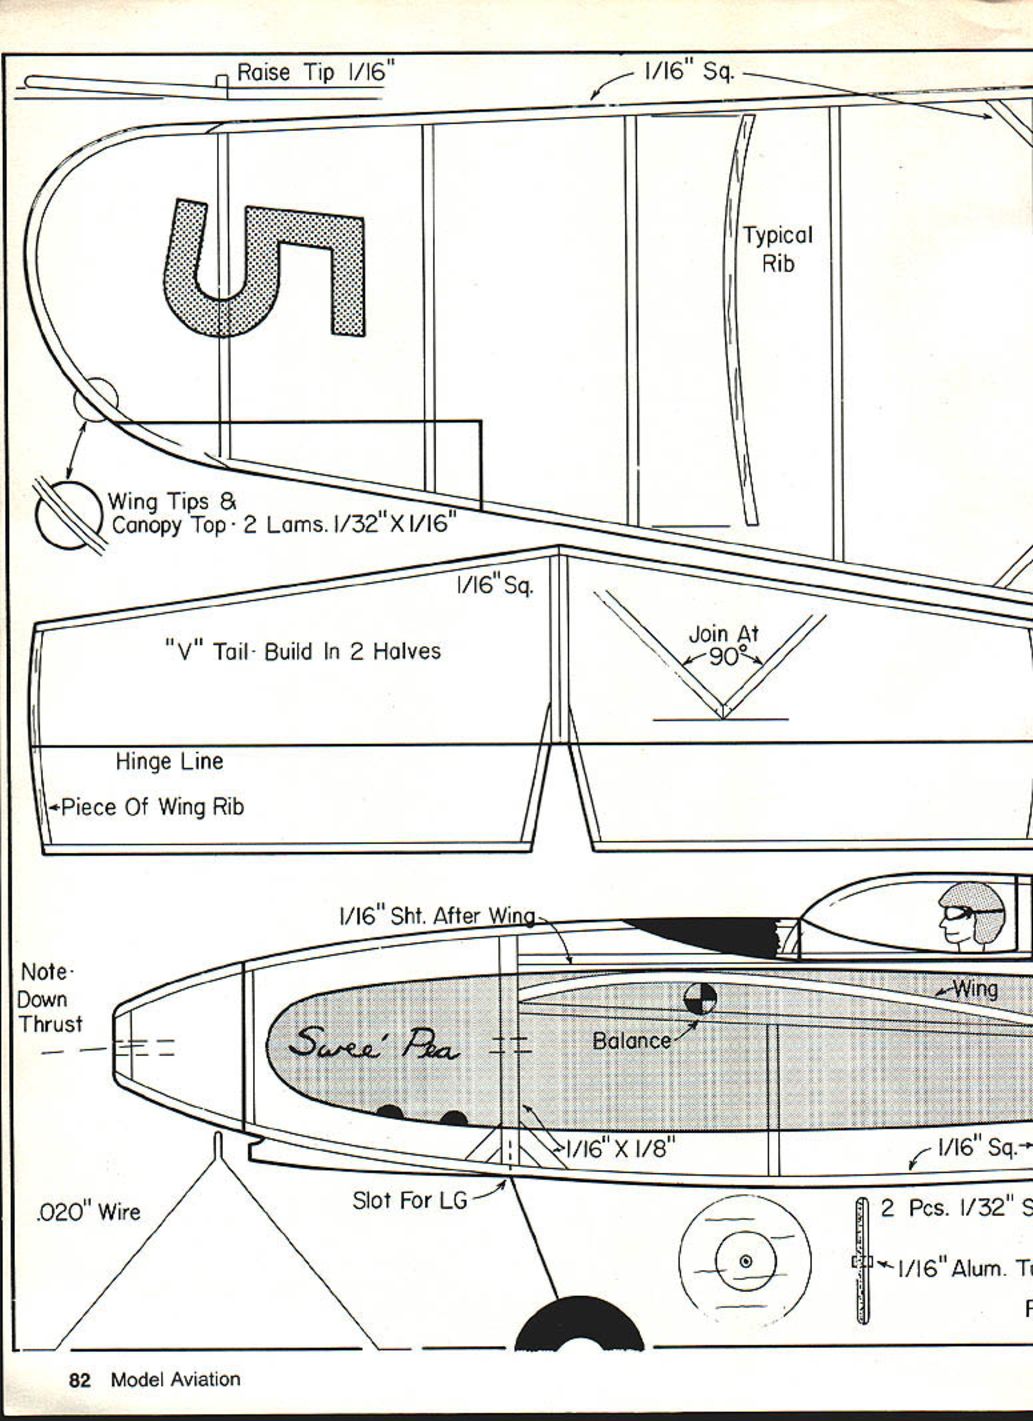
- Pin down the leading and trailing edges (LE & TE) alongside the ribs, not through the 1/16" sq. pieces, and splice on the curved tips, elevating them 1/16" at the very tip. This bent-up tip eases single-piece tissue covering from the center rib out to the tip with few wrinkles.
- Fit and glue each rib (except the center rib) in place, trimming from the TE end to fit.
- Remove either half of the wing from the board and lightly sand the ends of the LE and TE so they will rejoin, with dihedral, with a minimum of glue.
- Cut two dihedral jigs and pin them in place to support the panels at the center. Rejoin the wing halves, adding the center rib and the four stick gussets.
V-tail
- The V-tail is built similarly to the wing, except the tips are made from the front parts of two wing ribs.
- Join the tail halves after they are covered. Sand the mating edges of the tail halves, and join them when dry. Fit and glue the tail into its opening in the body later.
Body and Motor Stick
- Pin down and assemble the body pieces. There is only one body side for this profile model; it is a little flimsy until the motor stick is installed.
- The body has a large rectangular opening for the wing to simplify wing installation. Later, add 1/16" sheet fill-in pieces to secure the wing. To save weight, my model has fill-ins only on top of the wing; below the wing the space is left open.
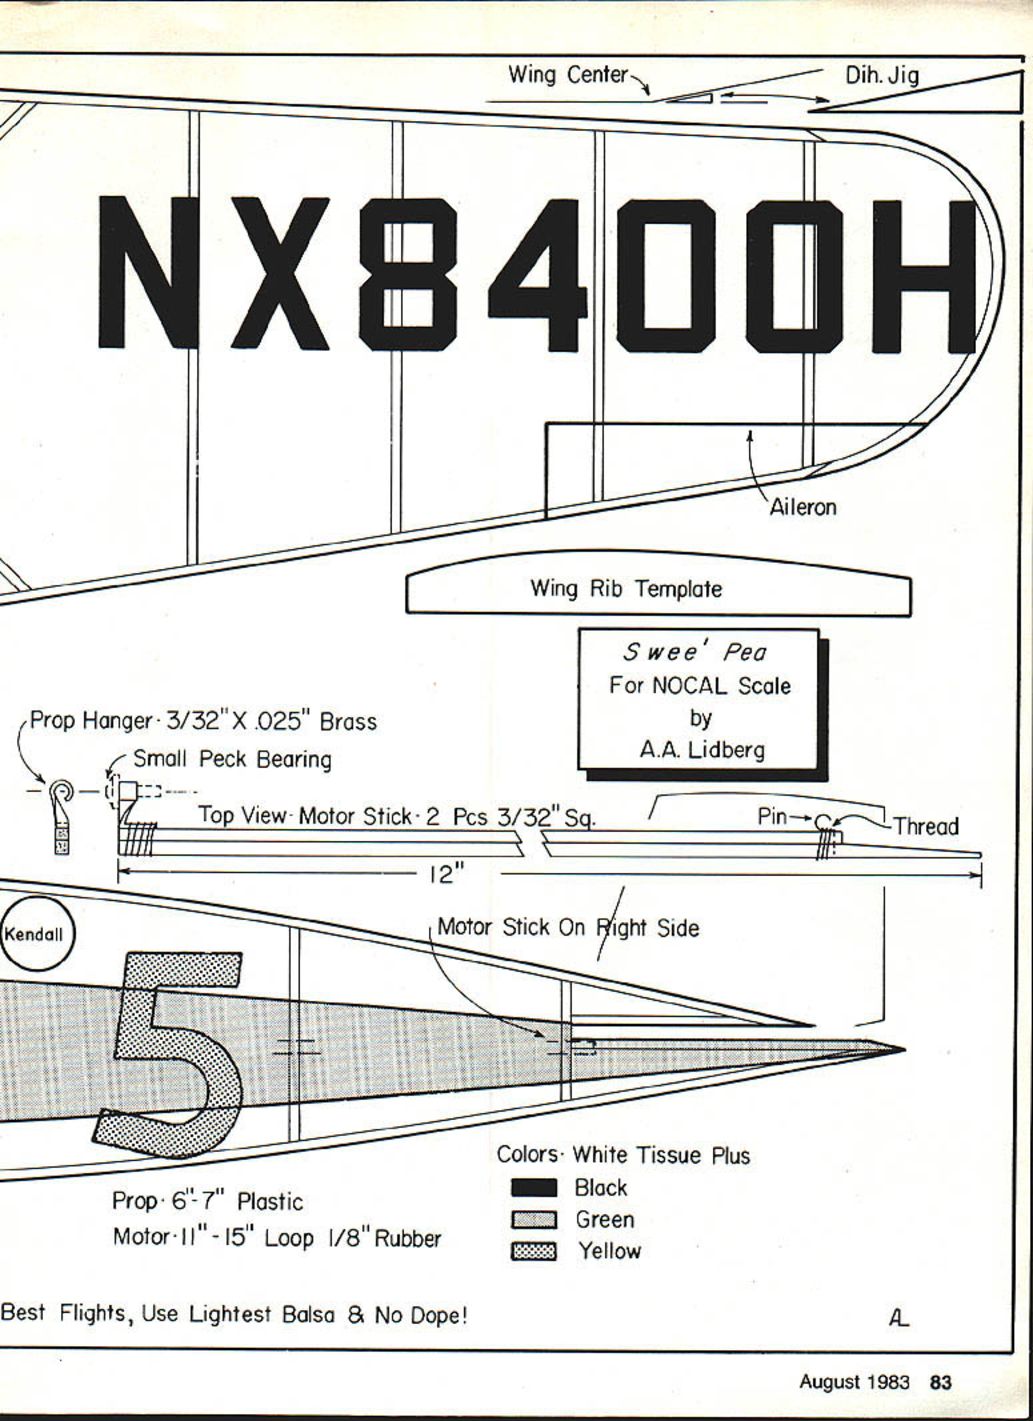
- Make up the motor stick as shown in the plans and glue on a bent pin for a rear rubber hook.
- The prop hanger, made from a strip of metal, allows some thrust-line adjustment. Use a small Peck-Polymers nylon bearing or 1/16" aluminum tubing for the prop shaft bearing—the nylon bearing will last longer. Both accept the 1/16" wire prop shaft.
Prop Hanger
- Brass strip of .025" thickness is available in hobby shops (K&S). Cut it to 3/8" width and bend the strip around a nail or drill bit to fit your bearing.
- Attach the bearing with epoxy or cyanoacrylate (CYA) glue, twist the strip 90°, then bend it back 90°. Trim the hanger to length and glue it to the motor stick.
- Fit the prop shaft through the bearing and assemble the prop hanger to the motor stick. If you use aluminum tubing for the bearing, use a spacer (small piece of Teflon tubing or wrap the shaft with tape) to prevent binding.
- Attach the prop and bend the shaft over to make a freewheeling catch. There's no need for a winding loop; these models are more convenient to wind from the rear with a winder. Have someone hold the prop hub and wind in the normal direction.
Landing Gear and Wheels
- Make up the landing gear wire now, but don't install it until after covering.
- Wheels are made from two layers of 1/32" sheet with a piece of 1/16" aluminum tubing for a bearing. You could also make wheels from meat-tray-type foam.
- Do not use commercial plastic or hardwood wheels; they will likely weigh about as much as the whole model and severely limit flying capability.
- Glue the landing gear wire in place and hold the wheels on with tiny droplets of glue.
Finishing Built-up Structures
- Use a sanding block to smooth the built-up structures.
Covering
- With clear dope as the adhesive, cover each part with its piece of tissue. Cover the body on its left side (viewed from the rear), and the wing and tail on their upper surfaces.
- Trim the tissue carefully; do not water-spray or dope the tissue (water or regular dope can cause warps). A very thin coat of Sig LiteCote or non-tautening dope could add strength, but is usually unnecessary for desert flying conditions.
- Lay the body on its left (covered) side and glue on the motor stick. Fit the wing in place and glue it. Add small fill-in pieces and cover them with green tissue.
- Make a slot for the landing gear with a razor saw, then glue in the landing gear wire.
Final Assembly and Trimming
- Sand mating edges and fit the tail; glue in place when satisfied with fit.
- Check the wing and tail for warps. Straighten if necessary using the heat from an electric stove burner. Use steam only if you don't have a dry heat source; steam can cause shrinkage and more warps.
- Make up a rubber motor and fit it in place. Check the balance; if necessary, add clay at the front or back of the body. My model required a small bit of clay under the tail.
Flying and Trimming
- Try some test glides, which will be fairly steep due to the high drag of the open structure.
- Watch for sharp-turning tendencies; correct them by warping the tail. With a V-tail, each half acts like a combination of rudder and elevator:
- If the right tail is warped downward, it acts like a left rudder plus down elevator.
- To offset a tight right turn: bend the left tail up slightly and the right tail down a bit less.
- Some balance adjustment might also help.
- Try low-power flights with 50 to 100 turns.
- If the model stalls, add more downthrust.
- If it won't climb, try more winds. If that doesn't help, warp both tail halves up slightly until it will climb. This affects the glide and may require adding clay to the front of the body.
My Swee' Pea climbs to the left in about 25-ft.-dia. circles due to a bit of left thrust. When the motor runs out, it turns right in the glide in circles of about the same size.
For longer flights, use a winder or a longer motor. Maximum turns depend on the type and age of rubber, whether you use rubber tube, the temperature where you fly, and other variables. Wind up a motor (hook it on a nail) until it bursts, then use that number of turns less 10% as a practical limit.
Performance
- Expected flight times for a lightly built Swee' Pea: 40–60 seconds without thermals.
- These No-Cals don't glide efficiently but are very light and pick up thermals easily, so longer flights are possible.
Hope you enjoy Swee' Pea. Why not get some friends to build No-Cals and have a contest? Mass launches are fun—the last one down is the winner. Enjoy!
Plans and Notes (measurements and materials)
- Wing span: 16 in.
- Wing tips & canopy top: 2 laminations, 1/32" × 1/16"
- Typical rib: 1/16" sq.
- Wing construction: raise tip 1/16"
- V-tail: build in 2 halves; join at 90°; hinge line marked on tissue
- Motor stick: 2 pcs, 3/32" sq., length ~12"
- Prop hanger: brass strip 3/32" × .025", small Peck (nylon) bearing or 1/16" aluminum tube
- Prop: 6"–7" plastic
- Motor: 11"–15" loop of 1/8" rubber (use winder for longer runs)
- Wire: .020"
- Slot for landing gear: 1/16" × 1/8"
- Colors: white tissue plus black, green, yellow
- Best flights: use lightest balsa and no dope
- Finished weight: about 1/2 oz.
Swee' Pea For No-Cal Scale by A. A. Lidberg
(Continued from page 81)
Transcribed from original scans by AI. Minor OCR errors may remain.

