
Sweepo
Charles Schobloher
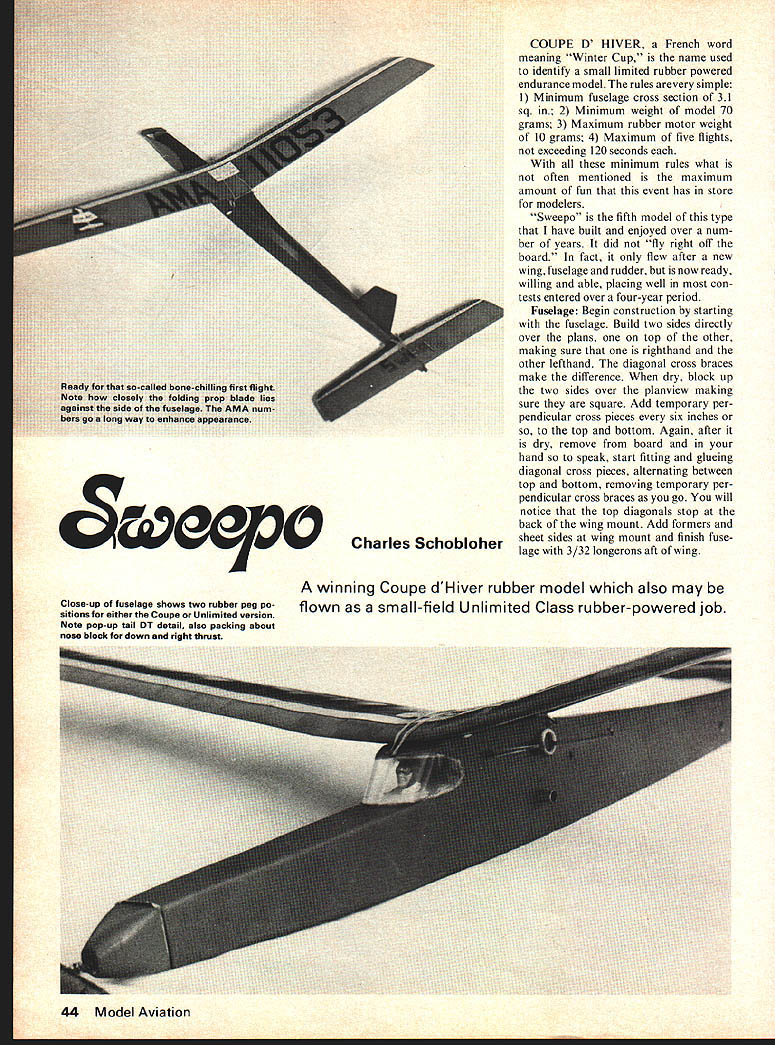
COUPE D'HIVER, a French word meaning "Winter Cup," is the name used to identify a small limited rubber-powered endurance model. The rules are very simple: 1) Minimum fuselage cross section of 3.1 sq. in.; 2) Minimum weight of model 70 grams; 3) Maximum rubber motor weight of 10 grams; 4) Maximum of five flights, not exceeding 120 seconds each.
With all these minimum rules what is not often mentioned is the maximum amount of fun that this event has in store for modelers.
"Sweepo" is the fifth model of this type that I have built and enjoyed over a number of years. It did not "fly right off the board." In fact, it only flew after a new wing, fuselage and rudder, but is now ready, willing and able, placing well in most contests entered over a four-year period.
A winning Coupe d'Hiver rubber model which also may be flown as a small-field Unlimited Class rubber-powered job.
Fuselage: Begin construction by starting with the fuselage. Build two sides directly over the plans, one on top of the other, making sure that one is right-hand and the other left-hand. The diagonal cross braces make the difference. When dry, block up the two sides over the planview making sure they are square. Add temporary perpendicular cross pieces every six inches or so, to the top and bottom. Again, after it is dry, remove from board and, in your hand so to speak, start fitting and gluing diagonal cross pieces, alternating between top and bottom, removing temporary perpendicular cross braces as you go. You will notice that the top diagonals stop at the back of the wing mount. Add formers and sheet sides at wing mount and finish fuselage with 3/32" longerons aft of wing.
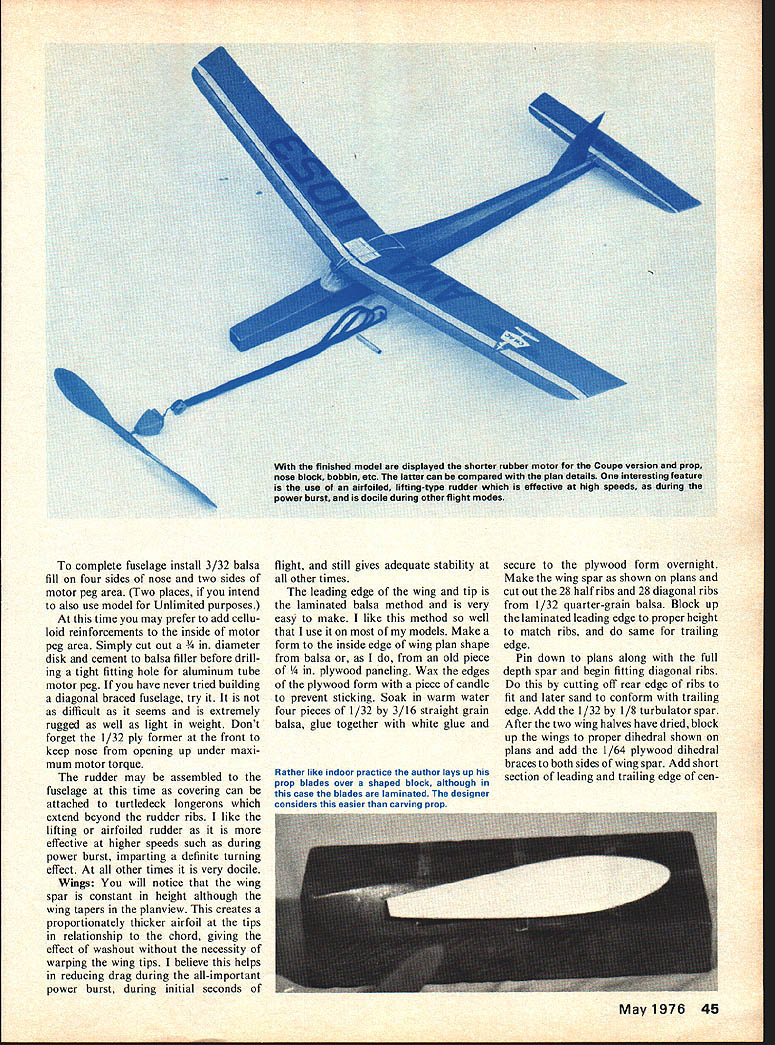
Install 3/32" balsa filler on the four sides of the nose and the two sides of the motor peg area. In places I intend also to use the model for Unlimited purposes; at times you may prefer to add celluloid reinforcements inside the motor peg area. Simply cut out a disk of celluloid, cement to the balsa filler before drilling a tight-fitting hole for the aluminum-tube motor peg. If you have never tried building a diagonal-braced fuselage, try it — it may seem difficult but is extremely rugged and lightweight. Don't forget a 1/32" ply former at the front to keep the nose from opening up under maximum motor torque. The rudder may be assembled after the fuselage covering and attached; the turtledeck longerons extend beyond the rudder ribs, making a lifting airfoiled rudder effective at higher speeds, such as during the power burst, imparting a definite turning effect; at other times it is very docile.
Wings: You will notice the wing spar is of constant height, although the wing tapers in plan view, creating proportionately thicker airfoil tips. This relationship of tip thickness to chord gives the effect of washout without the necessity of warping the wingtips. I believe this helps reduce drag during the all-important power burst in the initial seconds of flight, yet still gives adequate stability at other times. The leading edge and wing tip are laminated balsa; the method is very easy to make and I will use the method on other models.
Make a form of the inside edge of the wing plan shape on a piece of balsa or old 1/4" plywood paneling. Wax the edges of the plywood form piece with a candle to prevent sticking. Soak in warm water four pieces of 1/32" to 3/16" straight-grain balsa and glue together with white glue. Rather like indoor practice, the author lays up prop blades over a shaped block; although in this case the blades are laminated, the designer considers it easier to carve the prop after securing the plywood form overnight.
Make the wing spar shown on the plans. Cut out 28 half ribs and 28 diagonal ribs from 1/32" quarter-grain balsa. Block up the laminated leading edge to the proper height to match the ribs, same for the trailing edge. Pin down the plans and, along the full depth spar, begin fitting diagonal ribs, cutting off the rear edge of the ribs to fit later; sand to conform to the trailing edge. Add a 1/32" x 1/8" turbulator spar. After the two wing halves have dried, block up the wings to the proper dihedral shown on the plans and add 1/64" plywood dihedral braces on both sides of the wing spar. Add short sections of leading- and trailing-edge center section planking on top, 1/32" sheet with the grain running spanwise. The full-depth spar and diagonal ribs will give an extremely strong, warp-free structure. After sanding the wing and trimming the leading edge to a typical airfoil, add a piece of heavy carpet thread to the leading edge, giving a sharp point. To complete fuselage install 3/32 balsa fill on four sides of nose and two sides of motor peg area. (Two places, if you intend to also use model for Unlimited purposes.) At this time you may prefer to add celluloid reinforcements to the inside of motor peg area. Simply cut out a 5/8 in. diameter disk and cement to balsa filler before drilling a tight fitting hole for aluminum tube motor peg. If you have never tried building a diagonal braced fuselage, try it. It is not as difficult as it seems and is extremely rugged as well as light in weight. Don't forget the 1/32 ply former at the front to keep nose from opening up under maximum motor torque.
The rudder may be assembled to the fuselage at this time as covering can be attached to turtledeck longerons which extend beyond the rudder ribs. I like the lifting or airfoiled rudder, as it is more effective at higher speeds such as during power burst, imparting a definite turning effect. At all other times it is very docile.
Wings: You will notice that the wing spar is constant in height although the wing tapers in the planview. This creates a proportionately thicker airfoil at the tips in relationship to the chord, giving the effect of washout without the necessity of warping the wing tips. I believe this helps in reducing drag during the all-important power burst, during initial seconds of flight, and still gives adequate stability at all other times.
The leading edge of the wing and tip is the laminated balsa method and is very easy to make. I like this method so well that I use it on most of my models. Make a form to the inside edge of wing plan shape from balsa or, as I do, from an old piece of 1/4 in. plywood paneling. Wax the edges of the plywood form with a piece of candle to prevent sticking. Soak in warm water four pieces of 1/32 by 3/16 straight grain balsa, glue together with white glue and secure to the plywood form overnight.
Make the wing spar as shown on plans and cut out the 28 half ribs and 28 diagonal ribs from 1/32 quarter-grain balsa. Block up the laminated leading edge to proper height to match ribs, and do same for trailing edge.
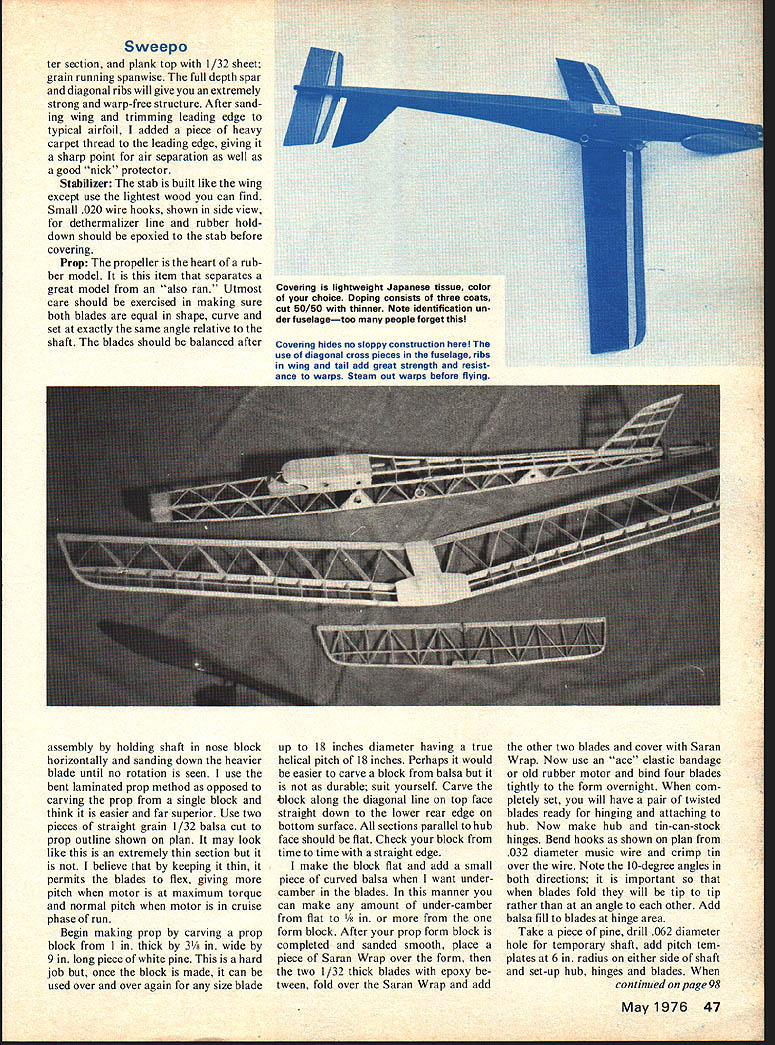
Pin down to plans along with the full depth spar and begin fitting diagonal ribs. Do this by cutting off rear edge of ribs to fit and later sand to conform with trailing edge. Add the 1/32 by 1/8 turbulator spar. After the two wing halves have dried, block up the wings to proper dihedral shown on plans and add the 1/64 plywood dihedral braces to both sides of wing spar. Add short section of leading and trailing edge center section planking on top, 1/32 sheet with the grain running spanwise. The full depth spar and diagonal ribs will give an extremely strong warp-free structure.
After sanding the wing and trimming the leading edge to a typical airfoil, add a piece of heavy carpet thread to the leading edge giving a sharp point. Make the tail surfaces from 1/16 sheet balsa. The elevator hinge line is located 3/8 in. from the trailing edge.
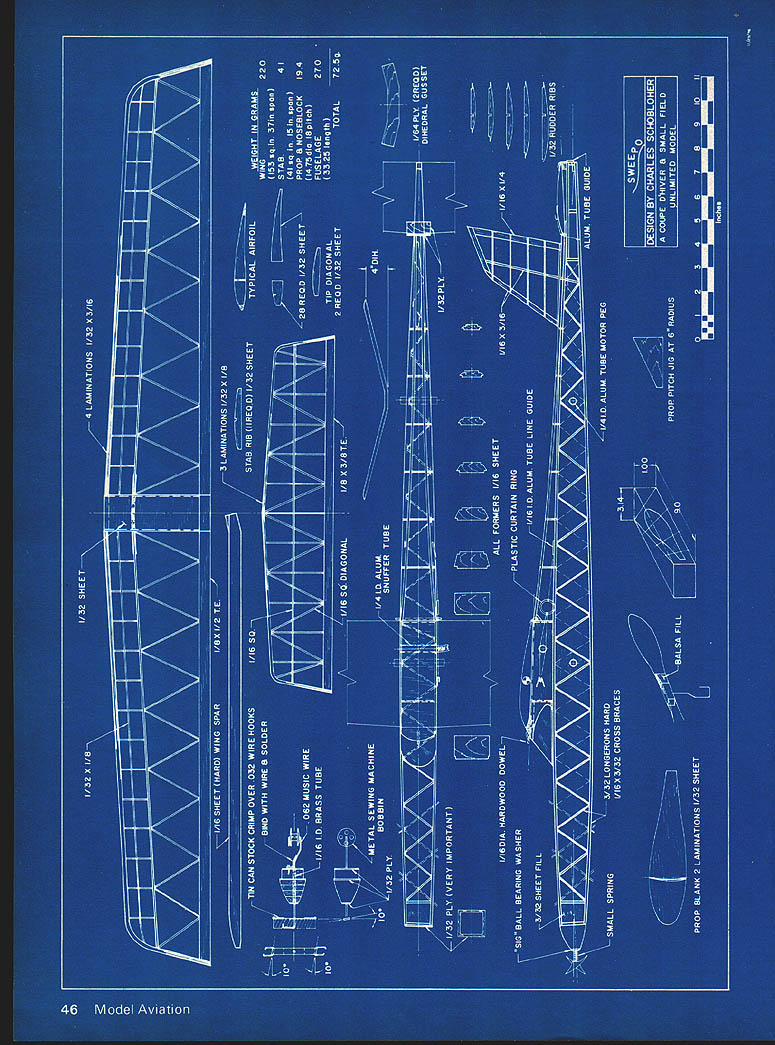
Balance the model at 2 1/4 in. from the leading edge at the wing root for the Coupe version and 2 in. for the Unlimited version. Use approximately 4 oz. of rubber for the Coupe model and 12 oz. for the Unlimited. The finished model weighs 2 oz. for the Coupe and 6 oz. for the Unlimited. The prop is 6 in. diameter, 6 pitch for the Coupe and 10 in. diameter, 8 pitch for the Unlimited. Enjoy flying Sweepo. WEIGHT IN GRAMS WING (2) 220 FUSELAGE 94 TAIL 19 PROP ASSEMBLY 22 TOTAL 355 (12.5 oz.)
TYPICAL AIRFOIL
SWEEPO DESIGN BY CHARLES SCHOBLOHER A COUPE D'HIVER & UNLIMITED MODEL
ALUM. TUBE MOTOR PEG ALUM. TUBE LINE GUIDE
Stabilizer
The stab is built like the wing except use the lightest wood you can find. Small .020 wire hooks, shown in side view, for dethermalizer line and rubber hold-down should be epoxied to the stab before covering.
Prop
The propeller is the heart of a rubber model. It is this item that separates a great model from an "also ran." Utmost care should be exercised in making sure both blades are equal in shape, curve and set at exactly the same angle relative to the shaft. The blades should be balanced after assembly by holding shaft in nose block horizontally and sanding down the heavier blade until no rotation is seen. I use the bent laminated prop method as opposed to carving the prop from a single block and think it is easier and far superior. Use two pieces of straight grain 1/32 balsa cut to prop outline shown on plan. It may look like this is an extremely thin section but it is not. I believe that by keeping it thin, it permits the blades to flex, giving more pitch when motor is at maximum torque and normal pitch when motor is in cruise phase of run.
Begin making prop by carving a prop block from 1 in. thick by 3/8 in. wide by 9 in. long piece of white pine. This is a hard job but, once the block is made, it can be used over and over again for any size blade up to 18 inches diameter having a true helical pitch of 18 inches. Perhaps it would be easier to carve a block from balsa but it is not as durable; suit yourself. Carve the block along the diagonal line on top face straight down to the lower rear edge on bottom surface. All sections parallel to hub face should be flat. Check your block from time to time with a straight edge.
I make the block flat and add a small piece of curved balsa when I want undercamber in the blades. In this manner you can make any amount of under-camber from 1/8 in. or more from the one form block. After your form block is completed and sanded smooth, place a piece of Saran Wrap over the form, then the two 1/32 thick blades with epoxy between, fold over the Saran Wrap and add the other two blades and cover with Saran Wrap. Now use an "ace" elastic bandage or old rubber motor and bind four blades tightly to the form overnight. When completely set, you will have a pair of twisted blades ready for hinging and attaching to hub.
Now make hub and tin-can-stock hinges. Bend hooks as shown on plan from .032 diameter music wire and crimp tin over the wire. Note the 10-degree angles in both directions; it is important so that when blades fold they will be tip to tip rather than at an angle to each other. Add balsa fill to blades at hinge area.
Take a piece of pine, drill .062 diameter hole for temporary shaft, add pitch templates at 6 in. radius on either side of shaft and set up hub, hinges and blades.
Sweepo
everything looks right, epoxy hinge hooks to blades. Be careful in not getting epoxy on hinges as it makes it a useless unfolding prop. Use a lot of care in setting up prop in jig as this is where all the difference in a good or bad assembly will come from. When dry, wrap thread binding around hub to retain wire hooks and recoat with epoxy. Now sand blades to airfoil shape and balance each blade as required. Sand smooth and cover blades with Japanese tissue.
Laminate and cross-grain nose block adding 1/32 plywood as shown. Drill hole for brass tube and carve to fit fuselage. The 1/2 in. thick block should be a snug fit into the 1/32 ply front former of the fuselage. Bend hook, add spring and ball-bearing washer and finish assembly of prop and nose block. I like to use the sewing machine bobbin to hold rubber, as it affords something to hang onto when detaching winder and hooking up prop assembly. I always use a winding tube inside the fuselage and with an extension wire on winder, can pull winding tube back onto wire after motor is fully wound, and holding bobbin, detach winder and hook on prop. This method saves damaging either fuselage or prop if motor explodes while winding.
Now finish model by covering with lightweight Japanese tissue, color of your choice, and put about three coats of 50/50 thinned dope on everything. Balance model as shown on plans and steam out any warps that may have crept into the framework.
Flying: Now is the time to complete your "basement flying." That is, you have made a winding tube from rolled up mylar or a cardboard tube that is snug fit into fuselage, and practice winding your motor to check that prop turns free and true. Take your model out to flying field to begin testing, testing, until it flies perfectly. Put hand winds into motor and launch upwards at an 85-degree angle. If it stalls, add both down-thrust and right side-thrust. Now put 2/3 maximum power with winder and try again, making any corrections necessary. The model should make approximately two full turns to the right under maximum power. If during cruise portion of power-run the model doesn't climb, add more down-thrust. Keep testing your model, adding thin card stock shims such as I.B.M. cards between nose block and front of fuselage until you cannot improve flight. With approximately 375 turns prop should run for 19 seconds. This motor run is short compared to most Coupes, however, I believe model should climb as fast as possible to get above ground turbulence. When properly adjusted you should be able to javelin throw model into ozone without stalling.
Remember, always to light your fuse, and may "Hunga," God of Thermals, look with favor upon your model.
Transcribed from original scans by AI. Minor OCR errors may remain.

