
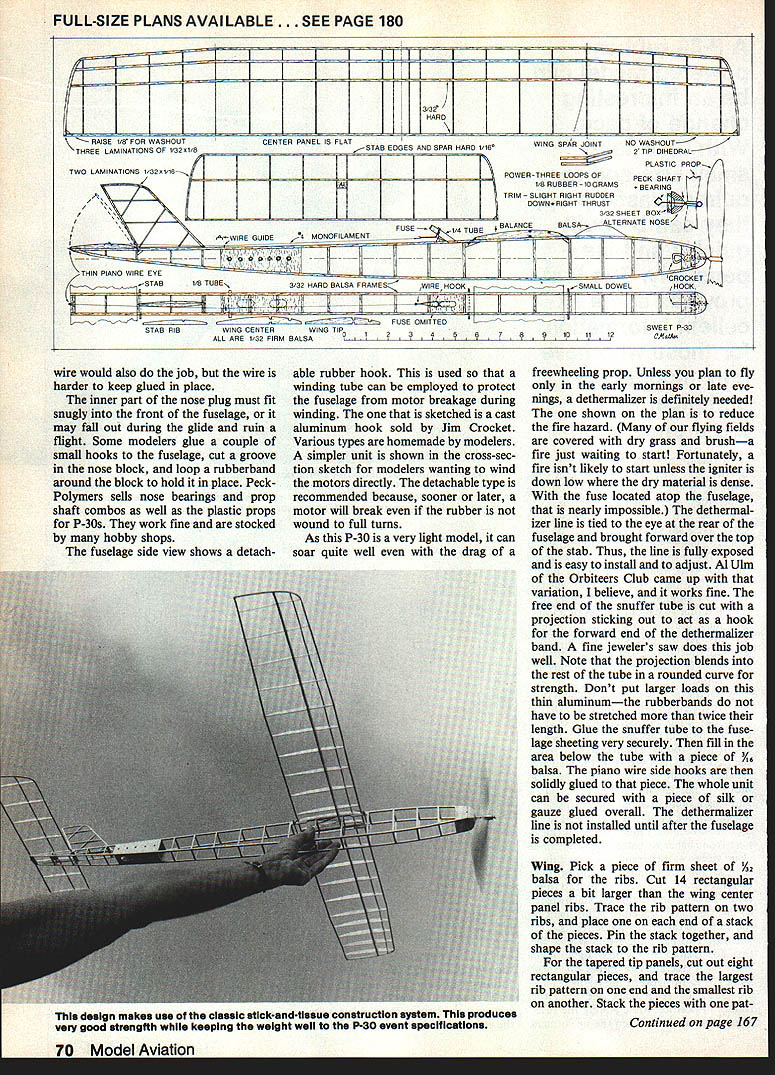

Sweet P-30
The P-30 is a small rubber-powered free-flight model that must use the commercially available plastic freewheeling propeller (about 9½ in. diameter). The freewheeling prop creates significant drag that increases rapidly with gliding speed. That factor might suggest a large-chord, thick airfoil wing to improve glide, but a large wing reduces climb—altitude is important for long flights.
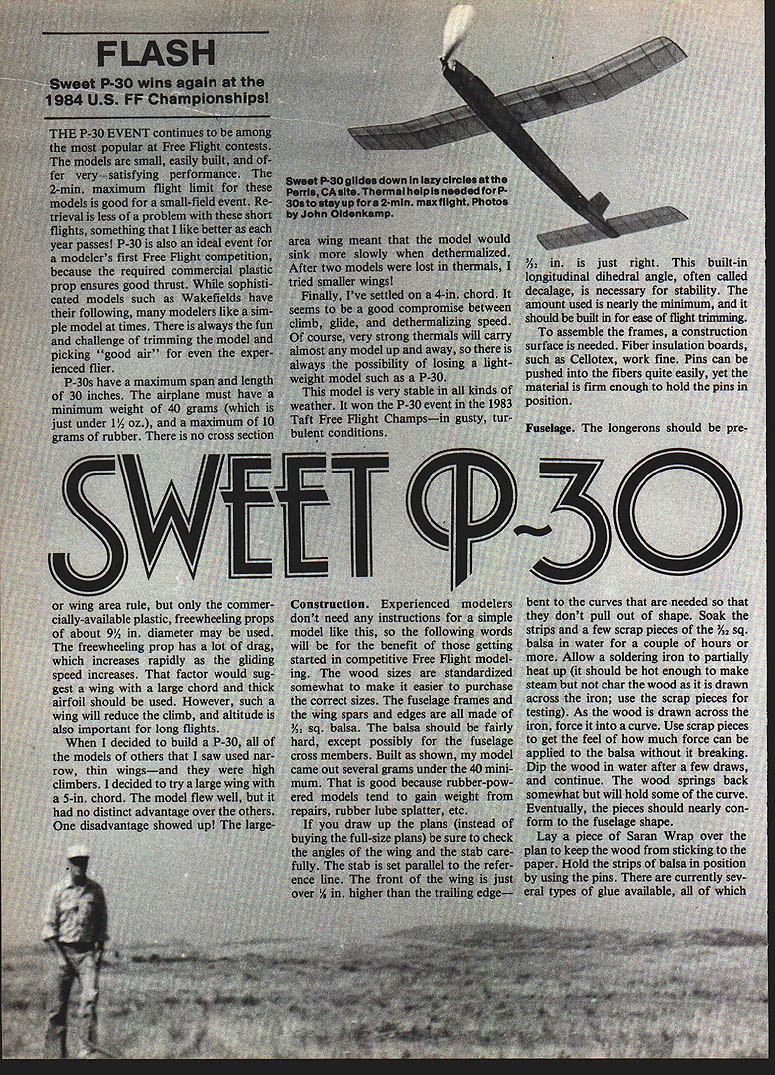
After experimenting (5-in. chord wings, which flew well but had no distinct advantage and were slow to dethermalize), I settled on a 4-in. chord. It is a good compromise between climb, glide, and dethermalizing speed. Even so, very strong thermals can carry any lightweight model away. This design is very stable in a variety of conditions and won the P-30 event in the 1983 Taft Free Flight Championships in gusty, turbulent conditions.
Key design choices
- Plastic freewheeling prop, approx. 9½ in. diameter.
- Wing chord: 4 in. (compromise between climb and glide).
- Construction uses standardized balsa sizes to simplify material sourcing.
Materials (typical)
- 1/32" sq. balsa for fuselage frames, wing spars, and edges (fairly hard stock).
- 3/32" sq. and sheet balsa for cross members, tips, and longerons.
- 1/16" hard balsa for stabilizer and fin outlines (3/32" may be substituted).
- 1/8" triangular stock for dihedral braces (or equivalent).
- Plastic freewheeling prop (P-30 style).
- Glue: aliphatic resin (Titebond or similar).
- Piano wire (1/32" for hooks) or small dowels (medical swab sticks) for hold-downs.
- Tissue covering, clear dope, thinner, castor oil (optional).
- Rubber motor: 1/4" strip (see Flying).
Construction
Experienced modelers will need little guidance; the following notes are aimed at those starting in competitive free flight modeling.
- Use firm, fairly hard balsa for structure; lighter fuselage cross-members may be softer.
- Draw plans full size or buy plans. If drawing, check wing and stabilizer angles carefully.
- The stabilizer is set parallel to the reference line. The wing’s front is about 3/32 in. higher than the trailing edge—this longitudinal decalage is necessary for stability and should be built in.
- Use a flat construction surface such as fiber insulation board (Cellotex) so pins hold securely without damaging the board.
Glues and techniques
- Aliphatic resins (Titebond) are recommended: they soak in, form strong joints, don’t shrink, and dry slowly enough for careful fitting.
- Aliphatic glue is thick; squeezing some into a small bottle and adding a few drops of water slightly thins it and makes application easier. Mix only small amounts as diluted glue will not keep long.
- Coat both mating edges, allow glue to soak a few seconds, join pieces, and remove excess with a damp brush immediately.
- Build matched side frames: when one side frame’s glue is dry, remove pins, cover with Saran Wrap, and build the second frame on top to produce matched pairs.
- Drill rear motor holes after separating the frames and run a glue ring around each hole on the inside to strengthen the area. Provide several peg-hole positions to allow motor slack adjustment for the freewheeling unit.
Fuselage
- Pre-bend longerons by soaking 3/32" sq. balsa for a few hours and carefully drawing across a warm soldering iron to form curves. Use scrap pieces to practice and avoid charring.
- Protect plans with Saran Wrap, pin strips in place, and glue frames together.
- Use two jig formers (rectangular sheet balsa pieces) glued lightly between the frames to assemble the box fuselage. After cross members and sheeting are added, cut the jig formers free.
- Cut observation holes in bottom sheeting near the rear peg holes.
- Use small dowels (medical swab sticks) or 1/32" piano wire for wing and stab hold-downs; harden and glue wire in place if used. Ensure the inner nose plug fits snugly to prevent the front fuselage from falling out during glide.
- Some builders use small hooks and a grooved nose block held by a rubber band to retain the nose block.
- Peck Polymers and hobby shops stock nose bearings, prop-shaft combos, and suitable plastic props for P-30s.
- Provide a detachable rubber hook for use with a winding tube to protect the fuselage when motors break during winding. A detachable hook is recommended if you wind motors directly—motors will eventually break when wound full turns.
Dethermalizer and snuffer tube
- A dethermalizer is recommended unless flying early or late when thermals are weaker.
- The forward dethermalizer shown on the plan reduces fire hazard when flying over dry grass/brush because the igniter is kept away from low, dense vegetation.
- Route the dethermalizer line from an eye at the rear fuselage, forward over the top of the stabilizer so it is exposed and easy to adjust (variation used by the Orbiters Club).
- The free end of the snuffer tube is cut with a small projection to act as a hook for the forward end of the dethermalizer band; round the projection curve for strength. Glue the snuffer tube securely to the fuselage sheeting and fill below with a 3/16" balsa block. Glue piano-wire side hooks to that block and reinforce with silk or gauze as needed.
- Do not overstress the thin aluminum tube—the rubber bands need only be stretched about twice their length. Install the dethermalizer line after fuselage completion.
Wing
- Use firm 3/32" sheet balsa for ribs.
- Cut 14 rectangular pieces slightly larger than the center-panel rib pattern. Trace the rib pattern on two end pieces, stack, pin, and shape the stack to that pattern.
- For tapered tip panels, cut eight rectangular pieces. Trace the largest tip rib on one end of the stack and the smallest rib on the other end; pin and shape the stack to the patterns.
- Cut 3/32" sheet strips for laminated tips slightly longer than minimum, soak overnight, and bend like the fuselage longerons. Laminate tips are light and strong. Square tips are acceptable if you prefer.
- Assemble the center panel on the plan. Use the hardest strips for the leading edge and top spars. Extend spars beyond the last rib for a lapped joint with tip spars—stronger than a butt joint.
- Add bottom spars after removing the center panel from the board if easier; pin the surface flat again while glue sets.
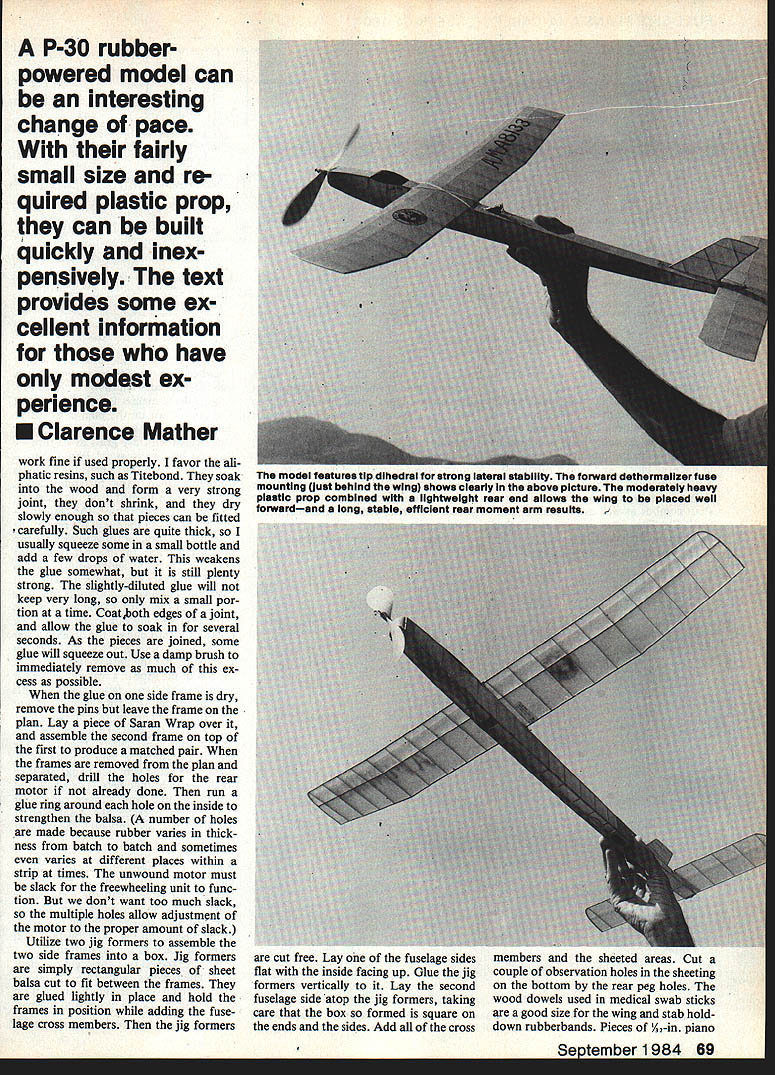
- Assemble tip panels initially without spars to ease shaping. The right tip is flat; the left tip has 1/2 in. washout (trailing edge raised). Prop up the left trailing edge while assembling so ribs incorporate the twist.
- Pin the center panel and set tips in position, propped for correct dihedral. Cut mating angles on tip leading and trailing edges. Small gaps can be filled with aliphatic glue brushed into the joint.
- Tape tips in place while glue dries. Install dihedral braces (1/8" triangular stock or equivalent), then add bottom spars and sheeting.
Tail surfaces
- Outlines for the stabilizer and fin are made from hard 1/16" balsa (3/32" acceptable if 1/16" is unavailable or hard to work with).
- Make stab ribs as with the wing ribs.
- The fin uses a symmetrical airfoil: as each fin rib is cut, slice off the curved left side and assemble the fin over the plan. After removing from the plan, glue the left-side pieces back on. This gives the fin thickness to resist warping and be more effective than a flat plate.
- The fin airfoil need not be exact but should provide some thickness for strength and effectiveness.
Covering and finishing
- Sand all parts with fine sandpaper to remove bumps and rough spots.
- Coat all wood that contacts tissue with two or three coats of clear dope before applying covering. These coats may be fairly thick; sand lightly between coats.
- Lay tissue over the structure and brush thinner-doped dope lightly through the tissue so thinner penetrates and softens the dope to adhere to tissue. Reapply thinner where areas remain loose.
- Cover the fuselage before gluing the fin on; cover the fin after gluing it to the fuselage.
- Reinforce the motor compartment area of the fuselage with two layers of cross-grained tissue: apply the first layer, water-shrink, apply a coat of finishing clear dope, then apply the second layer.
- For finishing clear dope, thin 3:1 (thinner:dope) is recommended. Nitrate dope with three drops of castor oil per ounce of thinned mix gives some flexibility and reduces excessive shrinking. Two finishing coats are usually sufficient.
- Glue the fin on with a small right offset for a right turn. After covering and shrinking, check from the rear that about 1/2" more of the left side of the fin is visible than the right (right-turn bias).
- If warps develop during finishing, steam the warped part (boil water in a spouted kettle and hold the part in the steam) and twist gently the opposite direction to remove the warp.
Flying
- Use 10 grams of 1/4" rubber strip formed into three loops (six strands) for the motor. Make a secure knot by wetting the ends (saliva) and tying an overhand knot; pull tight near breaking tension.
- Run the motor through the rear hook/peg and to the second peg. The stabilizer will be pulled up in the dethermalizer position.
- To engage the dethermalizer, place a small rubber band over the snuffer tube end, straddle the fuselage, loop under the side hooks, and connect to the monofilament hook while pushing the rear of the stab down to latch.
- Balance the model about 1" forward of the trailing edge; add weight front or rear as needed. From the rear, the stab should appear parallel to the wing center section (right tip may be slightly high).
- Lubricate the motor; placing the motor in a small plastic bag, then pouring lube inside, reduces mess (tip credited to Fudo Takagi).
- Test in a grassy or weedy area to avoid prop damage from hard landings—freewheeling prop blades can snap when landing hard on a firm surface.
- Hand-glide into the breeze with a slight nose-down attitude to check handling. The model will glide slowly due to light weight and prop drag.
- If violent diving or stalling occurs, check wing and stab angles and balance. Adjust launch speed if angles and balance are correct.
- To correct tendencies:
- If diving on power: reduce downthrust or try a milder motor.
- If stalling on power: add downthrust or reduce power.
- If climbing steeply in a tight circle: add right thrust or decrease stabilizer incidence.
- Most models need some downthrust to avoid power stalls. Anticipate this by placing a 1/32" balsa shim between the top of the nose block and the fuselage if needed.
- Wind the motor about 100 turns initially and launch slightly nose-high. Ideally, the model will climb a few feet and then glide down in a large right turn. Gradually increase turns as flights smooth out to find the best motor run for the day.
- When fully stretched and wound, the motor may take on the order of 1,000 turns (depending on rubber, ambient conditions, and how much stretch is used).
Bud Tenney P.O. Box 545 Richardson, TX 75080
Transcribed from original scans by AI. Minor OCR errors may remain.

