
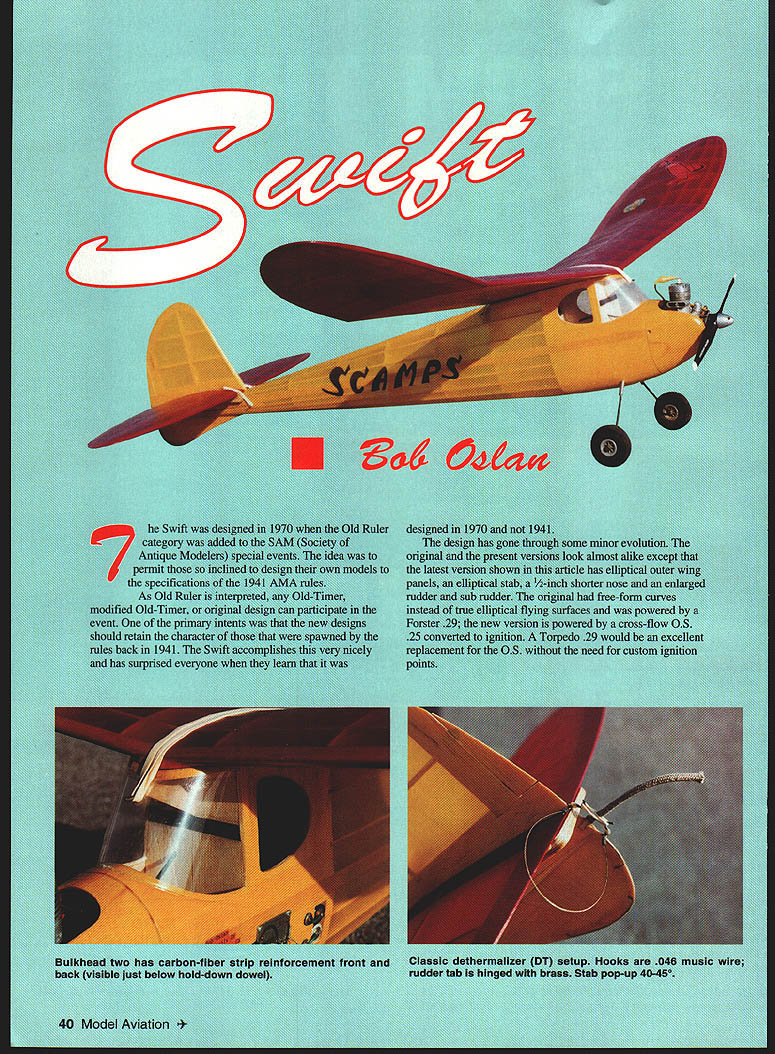
Swift
Bob Oslan
The Swift was designed in 1970 when the Old Ruler category was added to the SAM (Society of Antique Modelers) special events. The idea was to permit those so inclined to design their own models to the specifications of the 1941 AMA rules.
As Old Ruler is interpreted, any Old-Timer, modified Old-Timer, or original design can participate in the event. One primary intent was that the new designs should retain the character of those spawned by the rules back in 1941. The Swift accomplishes this very nicely and often surprises people when they learn it was designed in 1970 and not 1941.
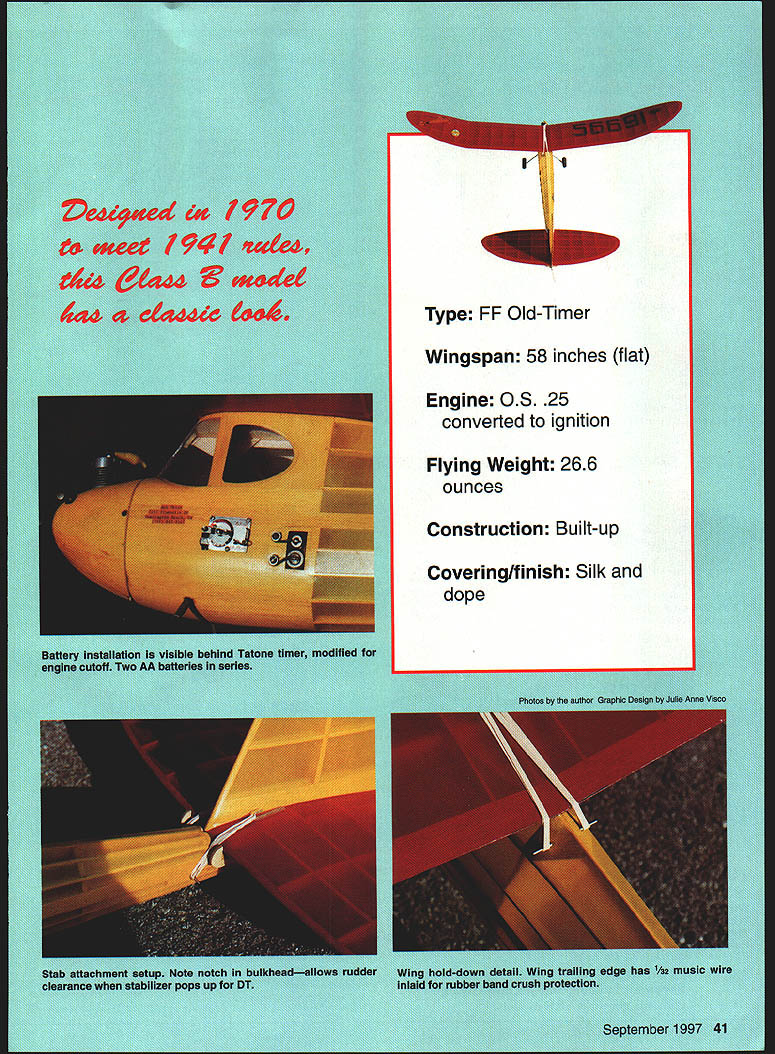
The design has gone through minor evolution. The original and the present versions look almost alike except that the latest version shown here has elliptical outer wing panels, an elliptical stab, a 1/2-inch shorter nose, and an enlarged rudder and subrudder. The original had free-form curves instead of true elliptical flying surfaces and was powered by a Forster .29; the new version is powered by a cross-flow O.S. .25 converted to ignition. A Torpedo .29 would be an excellent replacement for the O.S. without the need for custom ignition points.
Performance: quite good. In still morning air the model routinely does 4–4 1/2 minutes on a 25-second engine run. ROG: Rise Off Ground.
Specifications
- Type: FF Old-Timer
- Wingspan: 58 inches (flat)
- Engine: O.S. .25 converted to ignition
- Flying weight: 26.6 ounces
- Construction: Built-up
- Covering/finish: Silk and dope
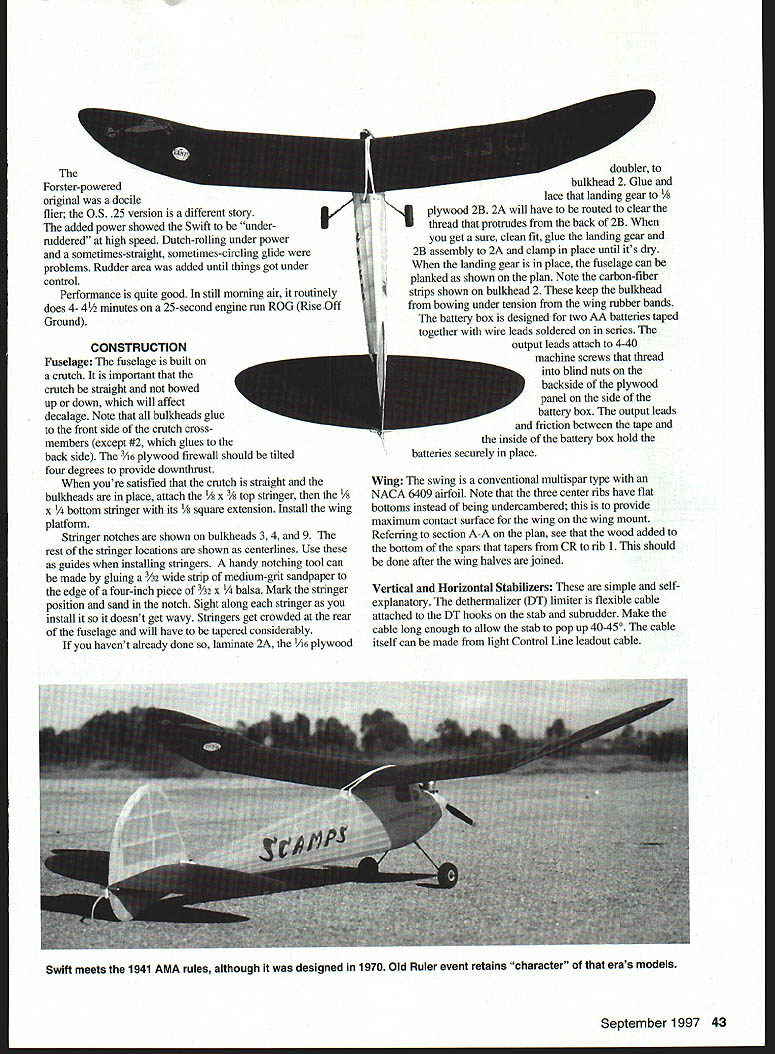
Notes: The Forster-powered original was a docile flier; the O.S. .25 version required added rudder area to control Dutch-rolling at high speed. Once corrected, performance is very good.
Construction
Fuselage
- The fuselage is built on a crutch. It is important that the crutch be straight (not bowed up or down), as bowing will affect decalage.
- All bulkheads glue to the front side of the crutch crossmembers except bulkhead #2, which glues to the back side.
- The 3/16" plywood firewall should be tilted four degrees to provide downthrust.
- When the crutch and bulkheads are in place and straight, attach the 1/8" x 3/8" top stringer, then the 1/8" x 1/4" bottom stringer with its 1/8" square extension. Install the wing platform.
- Stringer notches are shown on bulkheads 3, 4, and 9; the rest of the stringer locations are indicated by centerlines. Use these as guides when installing stringers.
- A handy notching tool can be made by gluing a 7/32" wide strip of medium-grit sandpaper to the edge of a four-inch piece of 3/32" x 4" balsa. Mark the stringer position and sand in the notch.
- Sight along each stringer as you install it so it doesn't get wavy. Stringers get crowded toward the rear and must be tapered considerably.
- Laminate the 1/16" plywood doubler (part 2A) to bulkhead 2 if not already done.
- Glue the landing gear to 1/8" plywood part 2B, lace as required. Part 2A must be routed to clear the thread that protrudes from the back of 2B. When you have a clean fit, glue the landing gear and 2B assembly to 2A and clamp until dry.
- After the landing gear is in place, plank the fuselage as shown on the plan.
- Note carbon-fiber strips at bulkhead 2 to keep the bulkhead from bowing under the tension of the wing rubber bands.
Battery box:
- Designed for two AA batteries taped together with wire leads soldered in series.
- Output leads attach to 4-40 machine screws that thread into blind nuts on the back side of the plywood panel on the side of the battery box.
- Friction between the tape and the inside of the battery box holds the batteries securely in place.
Wing
- Conventional multi-spar type with a NACA 6409 airfoil.
- The three center ribs have flat bottoms (not undercambered) to provide maximum contact surface for the wing mount.
- Referring to section A–A on the plan, wood is added to the bottom of the spars, tapering from CR to rib 1. This addition should be done after the wing halves are joined.
- Install CR rib 1 after the wing halves are joined.
Vertical and Horizontal Stabilizers
- Simple and straightforward construction.
- Dethermalizer (DT) limiter: use a flexible cable attached to the DT hooks on the stab and subrudder. Make the cable long enough to allow the stab to pop up 40–45°. A light control-line leadout cable works well.
Covering
- The original Swift was covered with silk because it conforms easily to compound curves. Other light- or medium-weight coverings will work satisfactorily if you prefer not to use silk.
- Choose colors that are easy to see. A yellow fuselage and rudder with scarlet wings and stab provide good visibility in varied lighting conditions.
Flying
- The Swift climbs and glides to the left. Start with the downthrust and center of gravity (CG) shown on the plan.
- Washout/washin settings:
- Wash out both wing outer panels about 1/4" (trailing edge higher than leading edge).
- Wash in the left inner wing panel 3/16" (leading edge higher than trailing edge).
- Right inner panel should be flat.
- These settings should help prevent the model from spiraling under power.
- If the glide is straight, use stab tilt to induce a left turn. The rudder tab is quite sensitive; use it sparingly for power trim only.
- Begin trimming:
- Achieve a smooth hand glide with no obvious stalling tendencies.
- Try a power flight with only enough power to attain a shallow climb. Use a 15-second engine run for this test and observe carefully.
- Gradually increase power and make small adjustments, observing each change's effect.
- Goal: attain a fast left spiral climb and a smooth rollout into the glide with no stall after the engine quits.
Enjoy the Swift—it's a fun airplane.
Bob Oslan 7142 Bluesails Dr. Huntington Beach, CA 92647
Supply Sources
- Torpedo 29 (engines):
Shilen Aerosports 205 Metro Park Blvd. Ennis, TX 75120 (972) 875-1442 FAX: (972) 875-5402
- Glow-to-ignition conversions:
Apollo Motors 665 Chaparral Rd. Covina, CA 91724 (818) 332-0023
- Silk, coils, timers, etc.:
RN Models 1924 E. Edinger Santa Ana, CA 92705 (714) 258-0805
- Carbon fiber:
Model Research Labs 25108 Marguerite #160 Mission Viejo, CA 92692
Transcribed from original scans by AI. Minor OCR errors may remain.

