
Table Saw Accessory Tools
Your small table saw can be made even more useful for model building purposes by adding the accessory tools described in this article. — Blaine Beron‑Rawdon
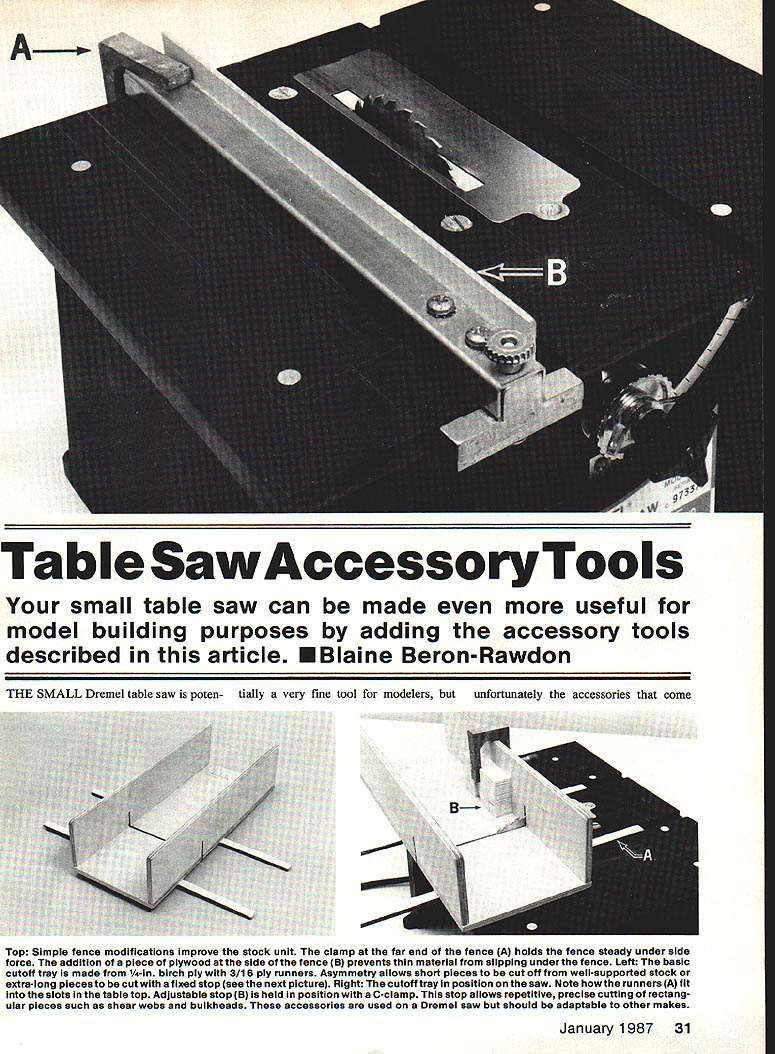
The small Dremel table saw is potentially a very fine tool for modelers, but unfortunately the accessories that come with it are limited both in scope and in the quality of work they can produce. The basic saw unit is well made — the table is flat and square, the saw mechanism is rigid, and the blade tilt and height mechanisms work well. Important alignment adjustments can be made for a precision setup.
The saw motor is powerful enough to cut balsa well and to cut spruce and birch plywood of moderate thicknesses. The accessories that come with the saw are too flexible or too sloppy for the sort of precision work needed in model building. The tools described here are of my own design; more experienced woodworkers could make tools quicker and more refined, but these quick, easy-to-make fixtures will help the small table saw (and maybe a drill press) perform many modeling tasks. They are made from common modeling material — birch plywood.
Before starting to make tools, make basic adjustments to the saw. It is important that the fence and saw blade be parallel to the grooves in the table. The fence is adjusted by loosening the two screws that connect the fence clamp. Check alignment again after retightening — the clamp tends to slip a bit. The main saw unit is adjustable: by loosening the two big screws that connect the table top, the saw blade can be made perpendicular to the table at the zero-degree setting. Using a tri-square, set the blade; loosen the two screws holding the tilt scale and slide the scale until it reads zero. Tighten the screws again. These easy adjustments will save a lot of frustration when making the tools.
Fence modifications
The saw fence provided has two basic problems.
- First, it is flexible side-to-side, so the gap between the fence and blade varies depending on the side pressure exerted while cutting. I solved this crudely but effectively by clamping the far end of the fence to the saw table once the fence is in position. This solution is crucial to precision ripping — without consistent-width pieces you cannot make accurate parts.
- Second, the fence edge where it meets the table is slightly radiused. This causes problems when cutting thin stock because the material tends to get caught and move around the gap. This problem can be solved by gluing a strip of 1/8-in. plywood to the blade side of the fence.
Cutoff tray
A cutoff tray is one of the most useful accessories. It is good for making precise rectangular pieces such as shear webs and bulkheads, and it can be used to notch ribs and trailing edges.
The basic concept is a simple tray that holds the wood in position. Runners fit the slots in the table top and guide the tray over the blade. An adjustable stop held in position with a C-clamp allows precise adjustment of the length of the part with near-perfect repeatability.
I make my trays asymmetrical so short pieces can be cut off from well-supported stock on one side, or extra-long pieces can be cut on the other with a fixed stop. Once the runners are fitted into the table slots, the adjustable stop is held in position with a C-clamp. The runners should be 1/8 to 3/16-in. plywood and about 0.428 in. wide. For maximum precision you'll need to use two runners; they tend to bind if not well made, so you might try a single runner first. The grooves in the table saw may be a few thousandths of an inch irregular — I cleaned mine up with a file so the runners run smoothly without more than a little slop. Once you have adjusted your saw to make a runner 0.428 in. wide, make a few extras for the other tools.
I prefer a narrow slot in my standard 90° cutoff tool because the slot gives an accurate estimate of the blade location for quick cutting. For this reason I avoid using the basic tray for bevel cuts, which would widen the slot.
Precision stop for the cutoff tray
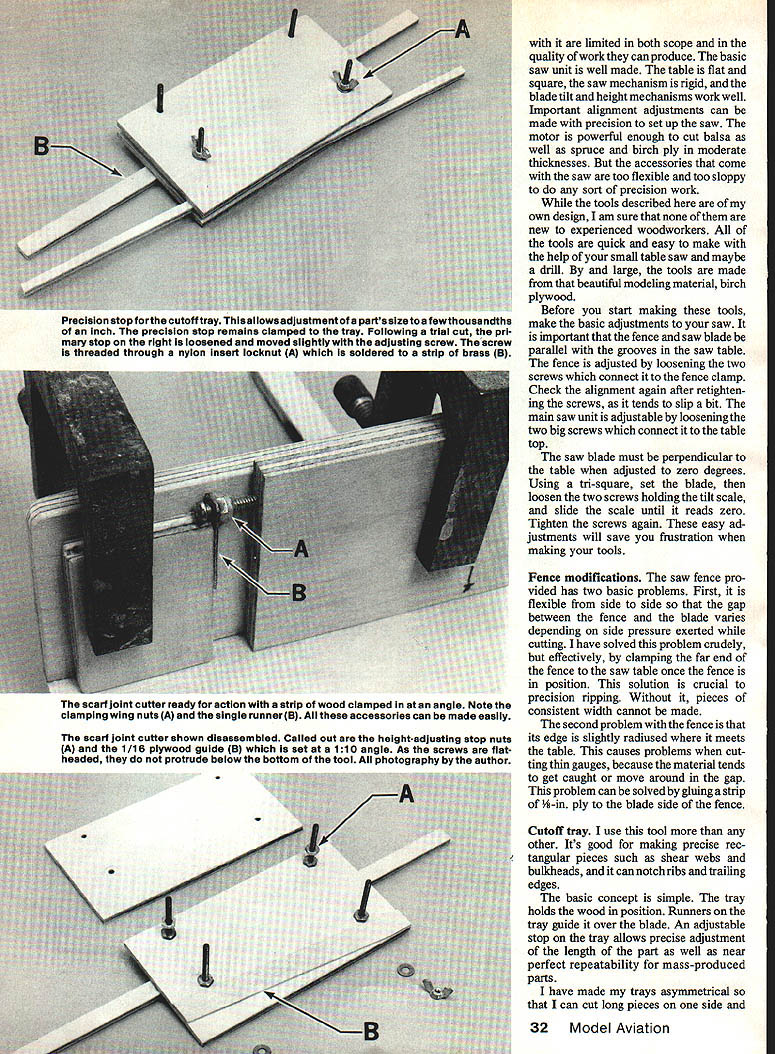
I found it difficult and frustrating to adjust the cutoff stop to a few thousandths of an inch. The precision stop uses a double-stop in which the position of the inboard stop is precisely adjusted by turning a screw threaded through the outboard stop.
In use, a trial cut is made and the part measured. The adjustment screw can then be turned a calculated amount to correct the size error. I have used a screw with 40 threads per inch so that each turn is only 0.025 in. Adjustments to within 0.003 in. can be made routinely, and the rest of the saw will actually provide that accuracy in the cut part.
My adjustable stop was made by soldering a nylon-insert locknut to a strip of brass which was then glued to a rectangular piece of 1/4-in. plywood. To minimize flex of the brass, the screw was located as close as possible to the top of the ply block. This necessitated grooving the top of the block for clearance from the screw and screwdriver.
Scarf joint cutter
The scarf joint cutter is another valuable tool. It allows spruce and balsa spars and sticks to be joined without loss of strength.
Basically, it is a clamp mounted on a runner. The wood is clamped in the tool which is set in position at an angle according to a guide. Then the clamp is slid past the saw, which trims the wood off in a long taper. The typical slope for scarf joints in structural materials is 1:10, so I glued my guide at this angle.
The upper portion of the clamp is located laterally by four screws fixed in the lower portion. The vertical location of the upper portion is determined by the thickness of the piece being cut and by two stop-nuts on the outboard screws which are adjusted to the same height as the piece. The grain of the upper and lower main pieces should run perpendicular to the runner in order to minimize flex as the clamp is tightened.
Precision fence
This tool is similar in concept to the precision stop. It allows adjustment of the fence to within a few thousandths of an inch.
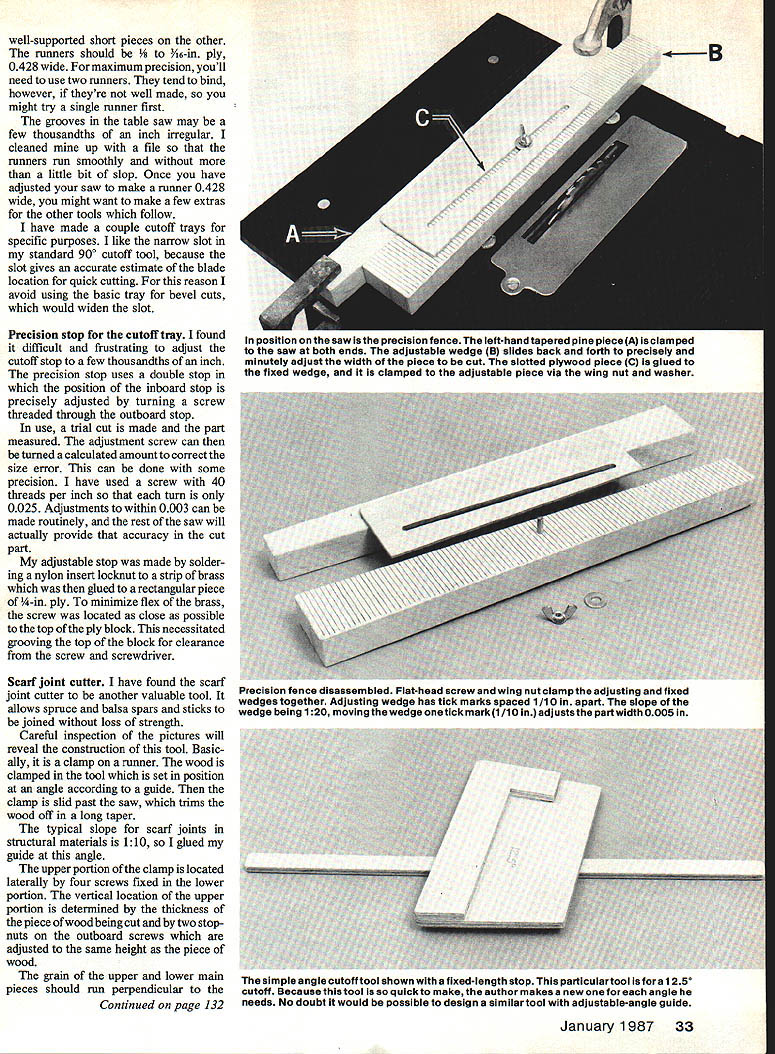
Two equally tapered pieces of pine form the basis of the tool. The outboard piece is fixed to the saw table with clamps. The inboard piece is slid fore and aft to make fine adjustments in the width of the cut. I have used a 1:20 taper (0.5 in. over 10 in.) so that a 0.100-in. adjustment fore/aft changes the width by 0.005 in.
The pine pieces are cut from a clear and straight piece of 1 x 2 (3/4 x 1-1/2) pine. First rough-cut a piece to the taper desired. Make sure it provides the slope you want. Then tape a second piece of 1 x 2 to it so that the first piece runs along the fence and the second is cut at an angle (much as the scarf cutter above would do). Untape it, flip it around, and clean up the first rough cut. This gives you the basic pieces.
Tapered spar template
The tapered spar template allows long, straight, tapered pieces to be made quickly and with repeatable quality. This tool is most useful for making spar caps which taper in depth and/or width, allowing more freedom in structural design. Preset-and-tapered spars can also allow a tapered wing with constant-depth webs in which the spar cap depth decreases to accommodate the decreased wing thickness.
Construction works on the same principle as the precision fence. First rough-cut the tapered piece that you want and refine it with a razor plane and sandpaper. Be as accurate as possible, as this piece will be the template. Temporarily attach the template with double-sided tape to the stock material to be cut. This combination is run through the saw to cut the finished spar cap.
I have used this method very successfully. The accuracy of caps produced by this method is remarkable. For increased precision, use it in conjunction with the precision fence.
Angle tool
The angle tool allows stock material to be cut at a precise angle. This particular design provides for only a single angle to be cut. While a similar tool with an adjustable angle guide could be designed, I have not found the need to build one.
The principle is the same as that of the cutoff tray or the scarf joint cutter. It is simply a device to hold the wood at a precise angle while it is slid past the saw blade. The particular design shown incorporates a fixed stop so that the stock is sawed both to length and angle simultaneously.
Dual blade notch cutter
This use of the saw is probably the least proper of all these tools. To my knowledge, there is no dado blade to fit the Dremel saw. In order to cut spar and turbulator notches in ribs, I mount two blades on the saw. The width of the cut can be controlled by adding washers between the blades.
This is not ideal for several reasons. The metal piece around the blade which brings the table surface to the blade must be removed to use this arrangement. This is not a problem if you use a cutoff tray to support the piece; if you intend to rip a notch, a new metal piece must be made. Another problem is that the second blade rests on the threaded portion of the saw drive shaft, which can damage the threads. Finally, because the fit is sloppy, the blade is not automatically centered. This problem can be minimized by carefully centering the blade by hand before fully tightening the retaining nut. Be sure the retaining nut has a sufficient number of threads engaged to hold the blade securely.
Safety
A few words about safety are in order. Despite its small size, the Dremel table saw can do serious damage.
- Always wear eye protection.
- Use ear protection — it preserves hearing, makes cutting more pleasant, and helps you concentrate.
- Before each cut check the location of your fingers and consider the possibility of slipping into the blade.
- Use a push stick when required.
I am sure you will find that these tools will increase the utility of your table saw. Most of these designs can be adapted to other makes of saw than the Dremel. As you make more tools, they will become easier and easier. I hope these ideas will be useful in getting started or in inspiring your own designs.
Transcribed from original scans by AI. Minor OCR errors may remain.

