
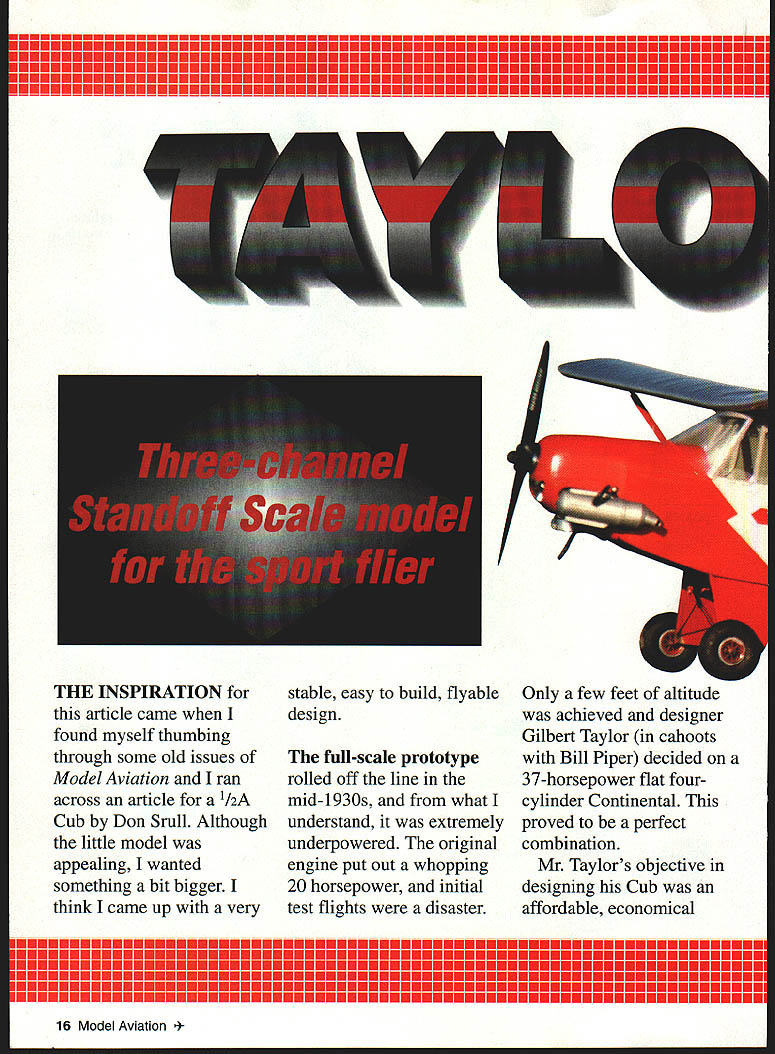
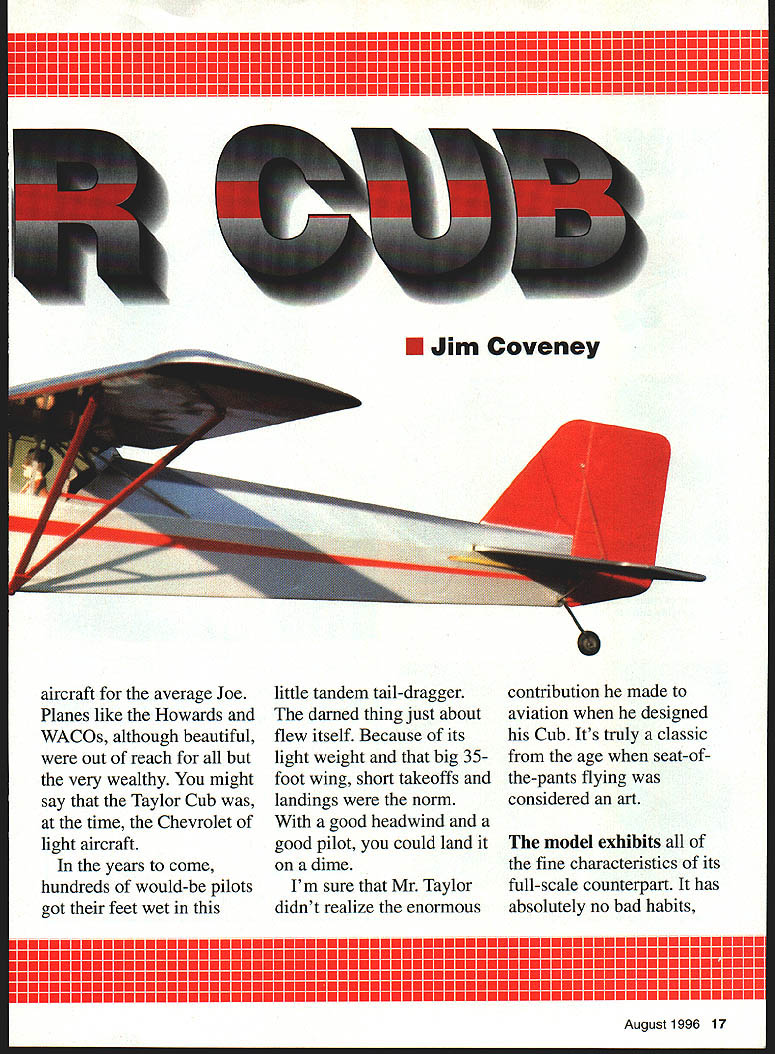
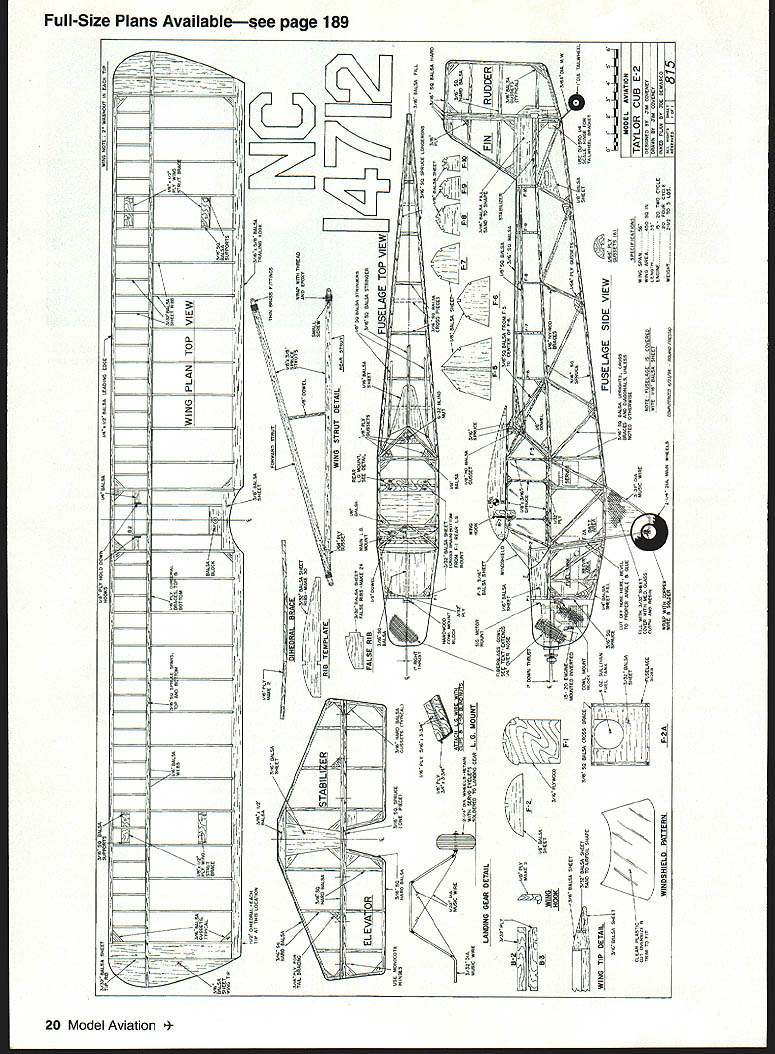
Taylor Cub
Three-channel Standoff Scale model for the sport flier
The inspiration for this article came when I found myself thumbing through some old issues of Model Aviation and came across an article for a 1/2A Cub by Don Srull. Although the little model was appealing, I wanted something a bit bigger. I think I came up with a very stable, easy-to-build, flyable design.
The full-scale prototype rolled off the line in the mid-1930s, and from what I understand, it was extremely underpowered. The original engine put out a whopping 20 horsepower, and initial test flights were a disaster. Only a few feet of altitude was achieved and designer Gilbert Taylor (in cahoots with Bill Piper) decided on a 37-horsepower flat four-cylinder Continental. This proved to be a perfect combination.
Mr. Taylor's objective in designing his Cub was an affordable, economical aircraft for the average Joe. Planes like the Howards and WACOs, although beautiful, were out of reach for all but the very wealthy. You might say that the Taylor Cub was, at the time, the Chevrolet of light aircraft.
In the years to come, hundreds of would-be pilots got their feet wet in this little tandem tail-dragger. The darned thing just about flew itself. Because of its light weight and that big 35-foot wing, short takeoffs and landings were the norm. With a good headwind and a good pilot, you could land it on a dime.
I'm sure that Mr. Taylor didn't realize the enormous contribution he made to aviation when he designed his Cub. It's truly a classic from the age when seat-of-the-pants flying was considered an art.
The model exhibits all of the fine characteristics of its full-scale counterpart. It has absolutely no bad habits and flies beautifully on three channels. I suppose you could incorporate ailerons if necessary, but they are not required. The model will perform smooth, scale-like turns.
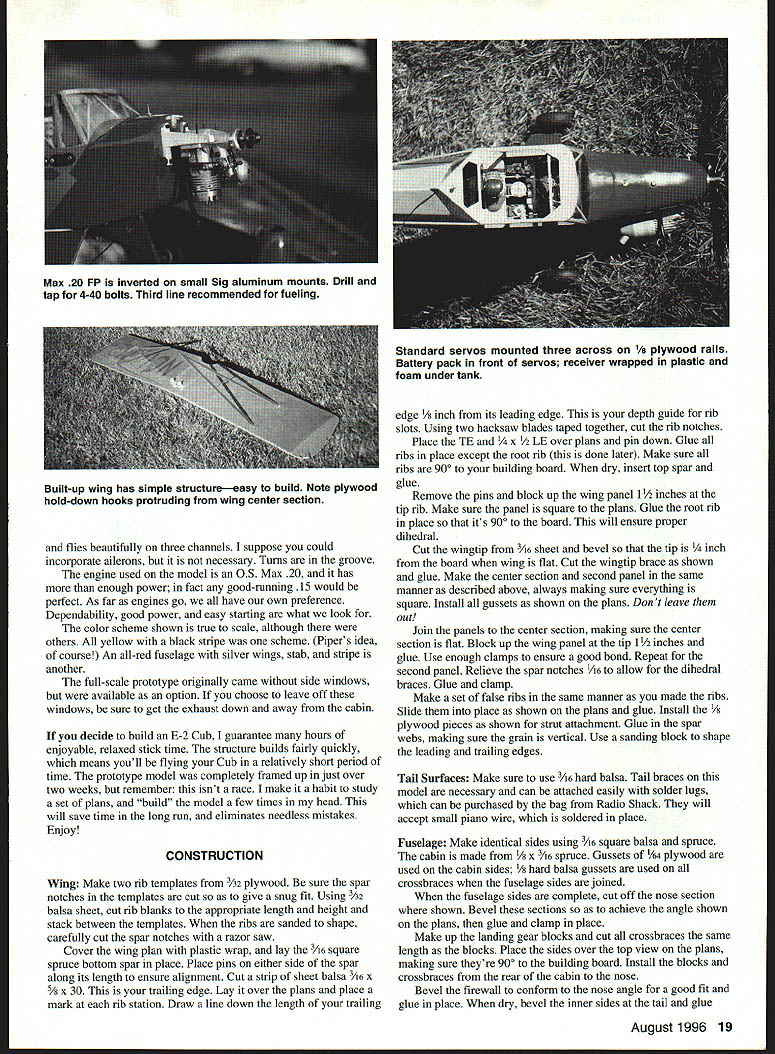
Engines from .05 to .20 cu. in. will work; the OS Max .20 used on the model has more than enough power. In fact, a good-running .15 would be perfect. As far as engines go, I prefer dependability, good power, and easy starting.
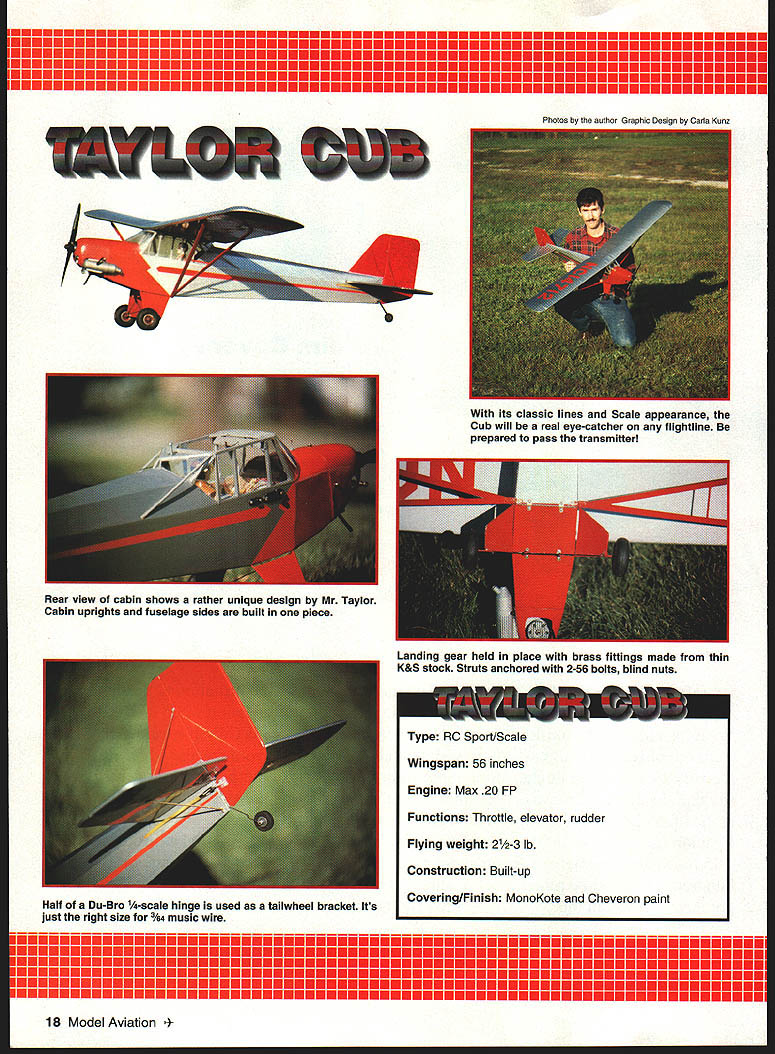
The color scheme shown is true scale, although others use the yellow-and-black stripe scheme (Piper's idea, of course). An all-red fuselage with silver wings and a stab stripe is another option. The full-scale prototype originally came with side windows as an option; choose to leave off the windows if you want to be sure to get the exhaust down and away from the cabin.
Decide to build an E-2 Cub and I guarantee hours of enjoyable, relaxed stick time. The structure builds fairly quickly, which means you'll be flying the Cub in a relatively short period of time. The prototype model was completely framed up in just over two weeks. Remember, this isn't a race — make it a habit to study the plans and build the model a few times in your head; it will save time in the long run and eliminate needless mistakes. Enjoy.
CONSTRUCTION
Wing
- Make two rib templates from 3/32" plywood. Be sure the spar notches in the templates are cut to give a snug fit.
- Using 3/32" balsa sheet, cut rib blanks to appropriate length and height. Stack between the templates, sand the ribs to shape, and carefully cut the spar notches with a razor saw.
- Cover the wing plan with plastic wrap. Lay a 3/16" square spruce bottom spar in place. Place pins on either side of the spar along its length to ensure alignment.
- Cut a strip of sheet balsa 3/16" x 3/8" x 30" for the trailing edge. Lay it over the plans and mark rib stations. Draw a line down the length of the trailing edge 1/8" from its leading edge as a depth guide for the rib slots.
- Using two hacksaw blades taped together, cut the rib slots. Place the trailing edge over the plans and pin down. Glue the ribs in place except for the root rib, which is done later. Make sure ribs are 90° to the building board.
- Dry-insert the top spar and glue. Remove pins and block up the wing panel 1/2" at the tip rib. Make sure the panel is square to the plans. Glue the root rib in place; its 90° to the board will ensure proper dihedral.
- Cut the wingtip from 3/16" sheet and bevel to match the tip board with the wing flat. Cut and glue the wingtip brace as shown on the plans.
- Make the center section and the second panel in the same manner, always making sure everything is square. Install the gussets shown on the plans — don't leave them out.
- Join the panels at the center section, making sure the center section is flat. Block up each wing panel tip 1/2" and glue. Use enough clamps to ensure a good bond.
- Relieve the spar notches slightly (about 1/64") to allow dihedral.
Glue and clamp as needed. Make a set of false ribs in the same manner as the ribs, slide them into place as shown on the plans, and glue. Install 1/8" plywood pieces as shown for strut attachment. Glue in the spar webs, making sure the grain is vertical. Use a sanding block to shape the leading and trailing edges.
Tail Surfaces
- Use 3/16" hard balsa for tail components.
- Tail braces on this model are necessary and can be attached easily with solder lugs, which can be purchased at hobby shops. They will accept small piano wire, which is soldered in place.
Fuselage
- Make identical sides using 3/16" square balsa and spruce. The cabin is made from 1/8" x 3/16" spruce. Gussets of 1/64" plywood are shown on the cabin sides; 1/8" balsa gussets are used on all crossbraces when the fuselage sides are joined.
- When the fuselage sides are complete, cut out the nose section where shown. Bevel these sections so as to achieve the angle shown on the plans, then glue and clamp in place.
- Make up the landing gear blocks and cut all crossbraces the same length as the blocks. Place the sides over the top view on the plans, making sure they're 90° to the building board. Install the blocks and crossbraces from the rear of the cabin to the nose.
- Bevel the firewall to conform to the nose angle for a good fit and glue in place. When dry, bevel the inner sides at the tail and glue in place.
Struts
These are functional — an absolute must! They also help in adjusting washout by positioning the rear strut until the desired amount is achieved. Besides, I think they give the model a lot of character. Build them exactly as shown on the plans and they should fit perfectly. Make brass fittings from thin K&S stock, available at hobby shops.
The Cowl
This is the part of scratch-building that scares off many of us. Until recently, I, too, would overlook a lot of beautiful airplanes if a ready-made cowl wasn't available. This can be very limiting — and when you come right down to it, who wants to be limited?
Materials and supplies:
- Foam block (Sig Mfg. blocks are suitable; I used a 5" x 12" x 36" sheet)
- Medium glass cloth
- Polyester resin
- A few epoxy brushes
- Release agent (car wax)
- Automotive glazing putty for final surfacing
Steps:
- Cut a piece of foam slightly larger than the size you'll need. Determine the length by measuring the distance from the firewall to 7/8" behind the thrust washer.
- Make templates from top and side views as shown on the plans. Tack-glue the block to the firewall. When shaping the foam, consider it an extension of the fuselage and sand it flush with the block.
- When satisfied with the shape, remove the block and add an additional 1/2" of foam to the rear of the mold. Carefully sand this to shape to provide an overlap on the nose.
- Give the foam a few coats of white gesso to protect it from the resin. When dry, apply a heavy coat of wax as a release agent. Glue a stick into the foam so it can be placed in a vise.
- Use three layers of cloth and resin. One layer consists of five separate pieces of cloth (one for each side, and one for the front). When dry, sand as smooth as you can without hitting the cloth.
- Wipe off all dirt and grease, apply the glazing putty, let dry, and sand smooth. Dig out the foam and check out your home-grown cowl!
Finish
The prototype was covered with aluminum and red MonoKote. The cowl, gear, and struts were sprayed with red Chevron paint — this is the best paint I've found to use on a model. The cabin uprights and fuselage sides are built in one piece.
MonoKote covers like a blanket in one coat, levels beautifully, doesn't smell much, and dries hard overnight. Note: when spraying red, always use a white base coat first to avoid bleeding. The cabin was painted with Testors model paint; to match the MonoKote, mix a little gray into a bottle of silver. A 1/2-inch-scale Williams Bros. Sportsman pilot was used; remember the pilot of the full-size Cub flew from the rear seat.
Flying
- Make sure your Cub is balanced properly. Install radio gear neatly and securely, and ensure control surface movement is free of any binding.
- Check and cycle batteries regularly. Do repairs and maintenance at home so the time spent at the field is enjoyable.
When my model was completed, Long Island was getting more than its fair share of inclement weather. Being the optimist that I am, I would give the batteries a few hours to charge each night, just in case. On the fifth day of this seemingly endless torture I finally got to fly my creation.
In the late afternoon, after a torrential downpour, everything got really quiet. People on the field returned, the sky turned a deep blue, and the car was packed in record time. Some local spectators spotted my little Cub and proceeded to ask a million questions.
I gave my trusty radio a good range check and made certain that all was secure. I fired up the OS Max .20 and set it a little rich. Usually about this time my knees turn to Jell-O, but this was different. I set the model down on the blacktop, and without hesitation, poured on the coals. With a little right rudder it tracked straight down the runway tail-high. A touch of elevator and it was off. A small amount of right trim was needed to overcome torque.
Turns are very smooth and scale-like; in fact, no one knew it was a three-channel model — they thought it had ailerons. After about ten minutes of pure satisfaction, the engine quit. I decided this would be a good time to land. Would you believe, a perfect three-point landing, as smooth as silk?
I hope you have as much fun building and flying your Cub as I have with mine. Good luck!
Enjoy.
Jim Coveney 25 Rottkamp St. Valley Stream, NY 11580
Transcribed from original scans by AI. Minor OCR errors may remain.

