


Technologies From Russia
In the Soviet Union, where materials are in short supply and planes and engines are hard to come by, the modelers who go out on a design limb are the ones who make their mark. Here, professional modeler Alexey Kashkin shares with our author some of the special technology in his latest F1A Towline Glider. ■ Svetlana Filippova
Introduction
Conditions under which Russian modelers must operate force them to be innovative and to do everything themselves, because it's practically impossible to buy models, engines, and other supplies in a store. It should therefore come as no surprise that plenty of original and clever techniques for constructing model airplanes and engines can be found in Russia.
Suitable modeling materials are scarce, so everybody tries to adopt the cheapest, most economical building methods. At the same time we do our best to keep the models strong and light. We also try to make efficient use of time spent in the workshop.
This is especially true of Russia's professional modelers—those who earn their living by building and flying models—and sometimes by selling them.
Alexey Kashkin: background
Recently I talked with Alexey Kashkin, a friend who successfully sells his F1A Towline Gliders to foreign sportsmen and even to other modelers in the U.S.S.R. I asked him to share some of his building secrets.
Alexey is 28 years old and has been flying models for 18 years. He learned to build at a sport school for children and took a liking to Free Flight F1A models. After about a year of building, Alexey began experimenting with different methods, often finding better techniques and improving structures. Of course, some experiments were unproductive, but that's to be expected with any type of research.
Alexey was second in F1A at the U.S.S.R. Cup contest in 1986, was Champion of the Air Force in 1985, and has placed well in many other contests. During his years as a professional modeler in the Soviet Air Force (1981–1989), Alexey matured as a builder, developing and perfecting his own construction techniques.
Alexey has distilled that decade of experience into his latest F1A model. The secrets of a complicated design can't be summed up in a few words, so Alexey and I discussed his model in detail. Below are the techniques that interested me most.
Tail booms
Materials and equipment
To make the tail booms Alexey uses an unusual technology. Special equipment and materials are needed:
- Inside and outside forms (molds).
- A length of surgical rubber tubing (the kind used by F2D Combat fliers for fuel tanks) that can be inflated and enlarged (a "bladder").
- A pressure gauge.
- Fiberglass/epoxy for the inner form.
- A very smooth plug for the outer mold.
- Two thin sheets of tempered aluminum foil (special modeling alloy).
- Carbon fiber cloth.
- Protective nonstick film (plastic film used to cover Combat models).
- Epoxy and an oven or constant heat source.
Molds and plug
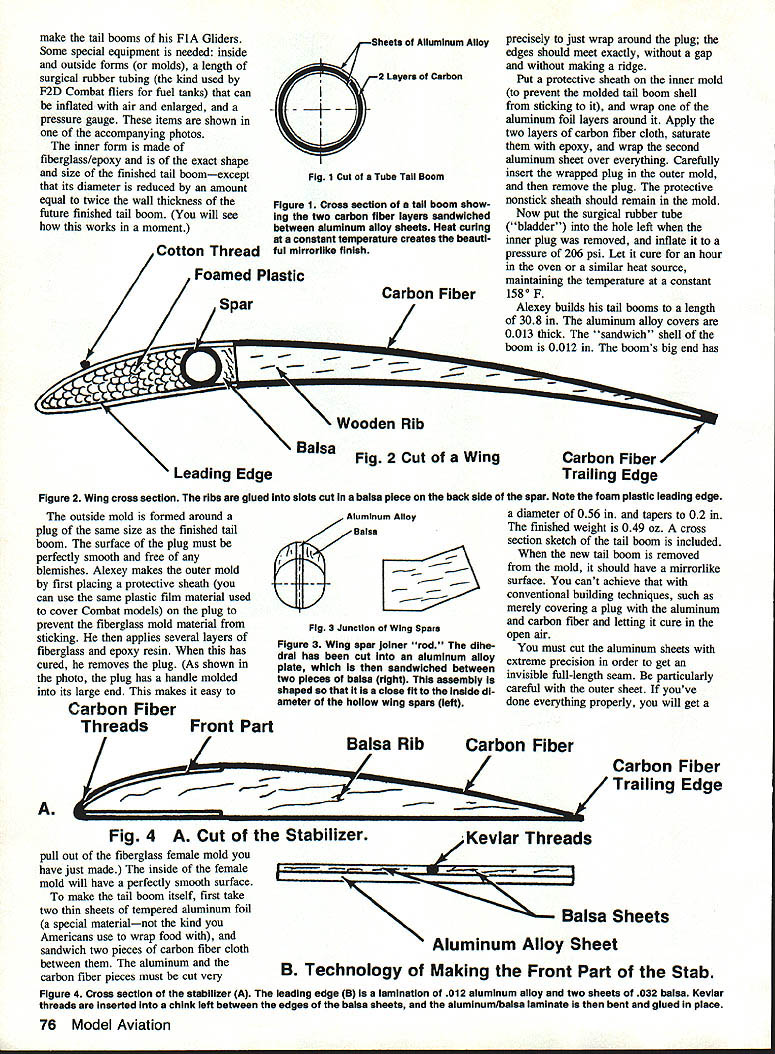
- The inner form is made of fiberglass/epoxy and is exactly the shape and size of the finished tail boom, except its diameter is reduced by an amount equal to twice the future wall thickness. This makes room for the sandwich shell.
- The outside mold (female mold) is formed around a plug that matches the finished tail boom size. The plug's surface must be perfectly smooth and blemish-free.
- To make the outer mold, Alexey places a protective sheath on the plug to prevent sticking, then applies several layers of fiberglass and epoxy. When cured, the plug is removed; the female mold interior is perfectly smooth. The plug can have a handle molded into its large end for easy removal.
Making the boom shell: steps
- Cut two thin sheets of tempered aluminum alloy and two pieces of carbon fiber cloth precisely so they will wrap around the finished plug; edges must meet exactly without gaps or ridges.
- Put a protective sheath on the inner mold to prevent sticking, and wrap one aluminum layer around it.
- Apply the two layers of carbon fiber cloth and saturate them with epoxy.
- Wrap the second aluminum sheet over the carbon layers.
- Carefully insert the wrapped plug into the outer mold, then remove the plug—the protective sheath should remain in the mold.
- Put the surgical rubber bladder into the hole left by the inner plug and inflate to a pressure of 206 psi.
- Cure for one hour in an oven or similar heat source at a constant 158°F.
Specs and finish
- Tail boom length: 30.8 in.
- Aluminum alloy covers: 0.013 in. thick.
- Sandwich shell thickness: 0.012 in.
- Large-end diameter: 0.56 in.; tip diameter: 0.20 in.
- Finished weight: 0.49 oz.
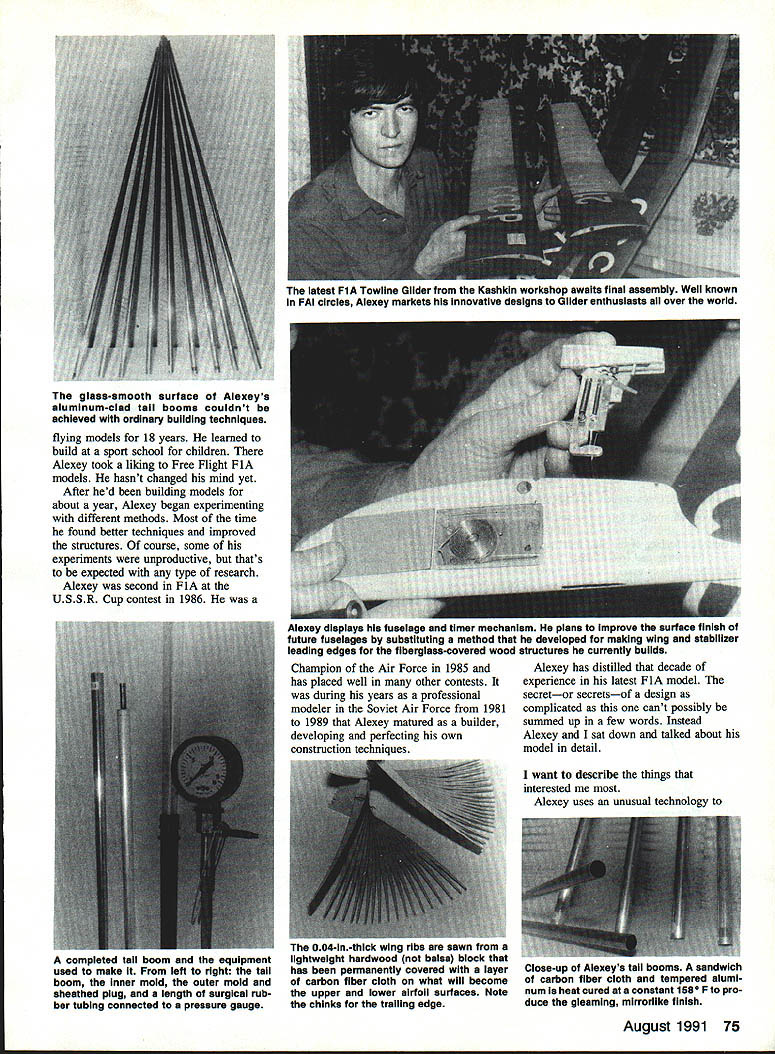
When removed from the mold, the boom should have a mirror-like surface, which is difficult or impossible to achieve with conventional open-air curing techniques. Precision in cutting the aluminum sheets is critical to get an invisible full-length seam and a perfect finish.
Wing spars and trailing edges
Wing spars
- Spars are made similarly to the tail booms, except:
- There are three layers of carbon fiber cloth at the root end and one layer at the tip.
- The spar has a constant outside diameter.
- Alexey's spars weigh 0.42 oz.
- The direction of the carbon fiber weave is not critical; layers may be crossed or aligned as convenient.
Carbon fiber trailing edges
- Alexey uses carbon fiber trailing edges. Process:
- Lay six layers of carbon fiber cloth on a very flat surface and saturate with epoxy resin.
- Target thickness: 0.032 in.
- Apply pressure to the top while the epoxy cures.
- Slice the cured sheet into strips 0.08 in. wide using a diamond-coated cutting disk.
- Result: a trailing edge lighter than wood that will not warp.
Wing ribs
- Make metal templates of the root and tip ribs and glue them on opposite sides of a wooden block. Use a lightweight hardwood (not balsa) for the block.
- Carve the block using the templates and sand it smooth.
- Remove templates and glue a layer of carbon fiber cloth around the wooden block on the sides corresponding to the upper and lower airfoil surfaces. Use epoxy and a vacuum bag while curing to ensure the cloth adheres firmly and smoothly.
- After curing, cut a slot in the trailing-edge portion of the block for the carbon fiber trailing edge strip.
- Slice the block into individual ribs 0.04 in. thick with a diamond-edged saw.
Two such sets of ribs are shown in accompanying photos (not included here).
Leading edge sheeting and wing assembly
- The wing leading-edge sheeting is made much like the tail boom and spars, but uses only one layer of carbon fiber cloth between two aluminum sheets.
- The leading edge is based on a contoured piece of foam plastic (a common technique used for CL Combat and R/C Pattern plane wings).
- The foam leading edge is glued to the spars; a balsa piece is added behind the spar, and vertical slots for the ribs are cut in the balsa. Ribs are glued in place. All joints are epoxied.
- Alexey makes the wing root ribs of fiberglass for durability.
- The wing is covered with plastic film and tautened with a hot iron or heat gun, then covered with tissue paper and painted.
- A thick cotton thread (a "turbulator strip") is glued to the upper side of the wing.
Dihedral, joiner, and panel attachment
- Dihedral is built into the spar joiner "root." Alexey constructs the joiner by sandwiching an aluminum alloy plate, cut to the correct dihedral angle, between two pieces of balsa. The assembly is then shaped to closely match the inside diameter of the hollow wing spars.
- Trailing edges of the wing panels are held in position by a short length of wire glued into the wing rib. To improve retention, wrap the wire with a few layers of cotton thread before epoxying it in place.
- The wire slips into a metal tube in the fuselage.
Stabilizer, fin, and fuselage
Stabilizer
- Construction (except for the leading edge) is similar to the wing.
- Ribs are 0.024 in.-thick balsa.
- Carbon fiber trailing edge: 0.02 in. thick and 0.04 in. wide.
- Leading edge: formed from a sheet of 0.012 in. aluminum alloy and two sheets of 0.032 in. balsa. These are laid on a flat surface and adhered with epoxy, cured under pressure and at high temperature.
- Before bending the laminate around the stabilizer leading edge, Alexey leaves a small chink between the balsa sheet edges and inserts about 20 threads of Kevlar into the chink. He then bends and glues the aluminum/balsa laminate in place.
- Covering: plastic film.
Fin and fuselage
- The glider's fin is balsa with a fiberglass plate glued on top and is covered the same way as the wings.
- The fuselage is built from wood and covered with fiberglass. Alexey intends in the future to use the same shell and mold methods described for the wing and stabilizer leading edges to achieve a better surface finish.
Conclusion
Alexey's construction techniques contain many fine points that cannot all be described in a single article. His models use innovative methods throughout, and he continues to experiment. If he discovers a new way of building Free Flight models, he may well share it in the future.
Transcribed from original scans by AI. Minor OCR errors may remain.

