

Tellipsoar
THE TELLIPSOAR is a high-performance, Standard Class RC sailplane that is rugged and gentle enough for the beginner. It was not an overnight dream, but was developed over a period of seven years.
The original design was called the Ellipsoar and was published in Sailplane in 1970. The name came from the wing and stab design. The wing and stab were elliptical in planform, and the wing had elliptical dihedral. In 1969 the elliptical dihedral was very rare, but several years later Hobie Alter realized the performance advantages and incorporated elliptical dihedral in the Hobie Hawk.
During the first four years I changed the airfoil and span every year. The original design had a 7-ft. wing span with an Eppler E-387 airfoil. I won several contests with this design and finished the year in fifth place in ECSS. During the next three years I tried a 9-ft. wing with an Eppler E-385, a 9-ft. wing with an Eppler E-387, and an 11-ft. wing with a flat-bottom Eppler 385. My eleven-year-old son Doug built a fuselage, and he always had second choice on one of the four wings. During this period of time we won 28 trophies, and I managed to finish every year in the top ten in ECSS.
In the spring of 1974 I started the drawings for a new design called the Tellipsoar because of the T-tail configuration, but I had no intention of completing the aircraft until the fall. Several weeks prior to the York, PA, contest that year, I was holding a local contest to practice for the FAI Glider Contests which I had been asked to C.D. at the Aerolympics. My son Doug was flying the Ellipsoar with the original wing, and at the end of the first two events was so far ahead of the field that it was embarrassing. The speed event was the same story, as he came through the final gate two feet off the ground, four seconds ahead of the field. However, in his jubilation, he turned right instead of left, and took on a goal post at about 40 mph. Needless to say, the goal post won.
That evening he begged me to help him build a Tellipsoar before the York contest. I had already carved the plug for the fuselage. A good friend said he would take molds and furnish fuselage pieces; we agreed I would build the stab and assemble the fuselage, Doug would build the wing. Well, to make a long story short, we finished the airplane the day before the York contest and managed to get a test flight prior to the meet. At York, I believe Doug won a perfect score — 15 minutes, nos[e?], three perfect 100-point landings. The performance left Otto Heithecker, Don Goughnour and Kelly Pike mouths open, convinced the Tellipsoar was a real winner.
During the next year I discovered the real secret of the Tellipsoar's success: it is a very high-performance sailplane that will do everything you want it to. It has very positive control and is stable enough for a real novice. I have flown several complete flights, including launches, touching the transmitter to ask for changes in flight altitude; it never hesitates downwind or at slow speeds. Please don't let the wing-stab design scare you.
Once you have a building jig you can build the wing in less time than other sailplane wings I have built. You need to make a jig from some scrap plywood paneling. Cut shaped supports from 3/8-in. ply and 1/8-in. board. Cut the building surface from 3/8-in. ply wall paneling. After you have nailed the jig together you can build the wing anywhere your wife can spare a four-foot area. If you have building space for the entire 100-in. jig, I suggest building two halves and bolting them together at the center; that way you can build the entire wing in two evenings. After you have completed the jig, line up the plans on the board. Next, cut and glue the entire bottom sheeting including cap strips. For the center section, the next operation is to attach three bottom 3/16-in. spars. After the sheeting, you can install ribs, sub-leading edge and primary top spar. After you have installed brass tubing, install secondary top spars and spar webs, making sure to use plywood vertical-grain balsa as shown on the plans. The final operation before removing the wing from the building jig is to install the top sheeting.
After the wing is removed from the building jig, trim the top and bottom sheeting, attach the leading edge, shape the leading edge and attach plywood center-section ribs. Before leaving the wing I have several comments. First, make sure the bottom sheeting and spars stay down bu...
Tellipsoar
fuselage, and a good friend said he would take the molds and furnish the fuselage pieces. I agreed to build the stab and assemble the fuselage if Doug would build the wing. Well, to make a long story short, we finished the airplane the day before the York contest and managed to get in one test flight prior to the meet.
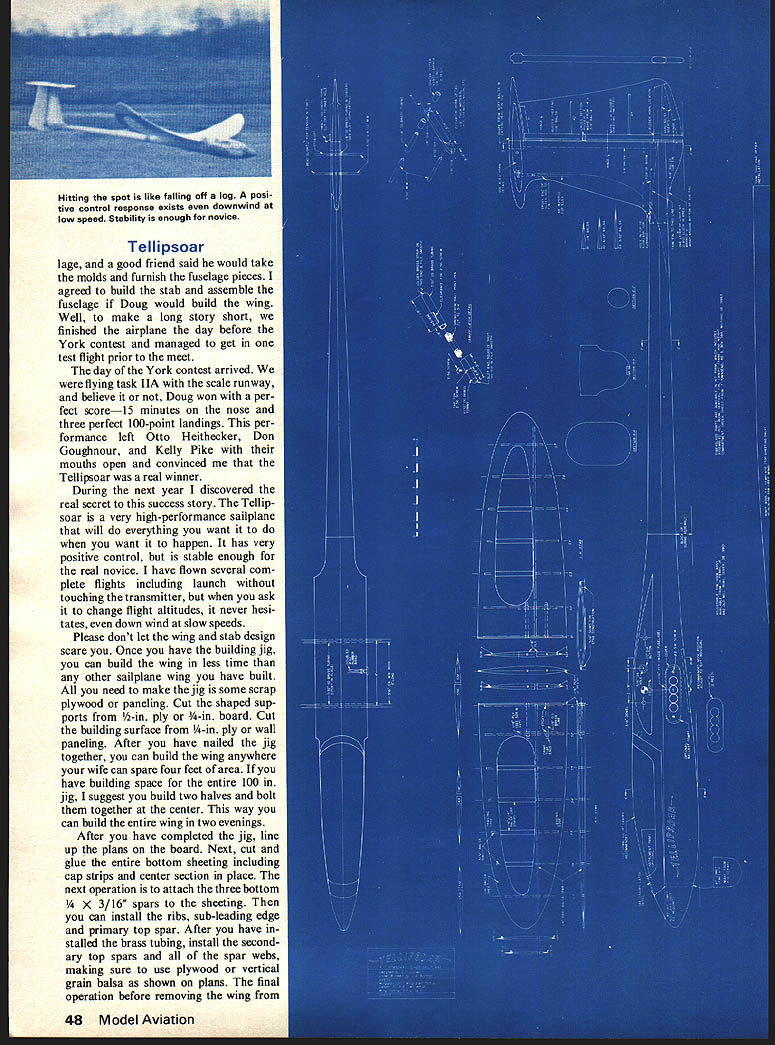
The day of the York contest arrived. We were flying task 11A with the scale runway, and believe it or not, Doug won with a perfect score—15 minutes on the nose and three perfect 100-point landings. This performance left Otto Heithecker, Don Goughnour, and Kelly Pike with their mouths open and convinced me that the Tellipsoar was a real winner.
During the next year I discovered the real secret to this success story. The Tellipsoar is a very high-performance sailplane that will do everything you want it to do when you want it to happen. It has very positive control, but is stable enough for the real novice. I have flown several complete flights including launch without touching the transmitter, but when you ask it to change flight altitudes, it never hesitates, even downwind at slow speeds.
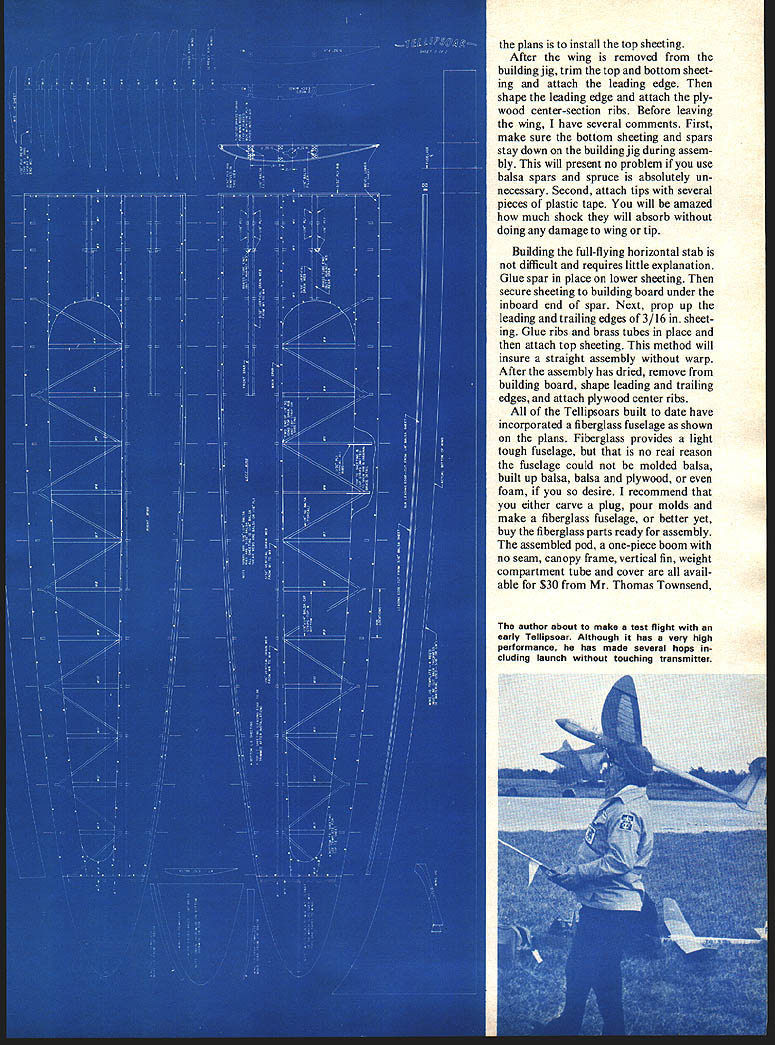
Please don't let the wing and stab design scare you. Once you have the building jig, you can build the wing in less time than any other sailplane wing you have built. All you need to make the jig is some scrap plywood or paneling. Cut the shaped supports from 1/2-in. ply or 3/4-in. board. Cut the building surface from 3/8-in. ply or wall paneling. After you have nailed the jig together, you can build the wing anywhere your wife can spare four feet of area. If you have building space for the entire 100-in. jig, I suggest you build two halves and bolt them together at the center. This way you can build the entire wing in two evenings.
After you have completed the jig, line up the plans on the board. Next, cut and glue the entire bottom sheeting including cap strips and center section in place. The next operation is to attach the three bottom 1/4 x 3/16-in. spars to the sheeting. Then you can install the ribs, sub-leading edge and primary top spar. After you have installed the brass tubing, install the secondary top spars and all of the spar webs, making sure to use plywood or vertical-grain balsa as shown on the plans. The final operation before removing the wing from the building jig is to install the top sheeting. After the wing is removed from the building jig, trim the top and bottom sheeting, attach and shape the leading edge, and attach the plywood center-section ribs. Before leaving the wing, I have several comments. First, make sure the bottom sheeting and spars stay down on the building jig during assembly. This will present no problem if you use balsa spars and spruce is absolutely unnecessary. Second, attach tips with several pieces of plastic tape. You will be amazed how much shock they will absorb without doing any damage to wing or tip.
Building the full-flying horizontal stab is not difficult and requires little explanation. Glue spar in place on lower sheeting. Then secure sheeting to building board under the inboard end of spar. Next, prop up the leading and trailing edges of 3/16-in. sheeting. Glue ribs and brass tubes in place and then attach top sheeting. This method will insure a straight assembly without warp. After the assembly has dried, remove from building board, shape leading and trailing edges, and attach plywood center ribs.
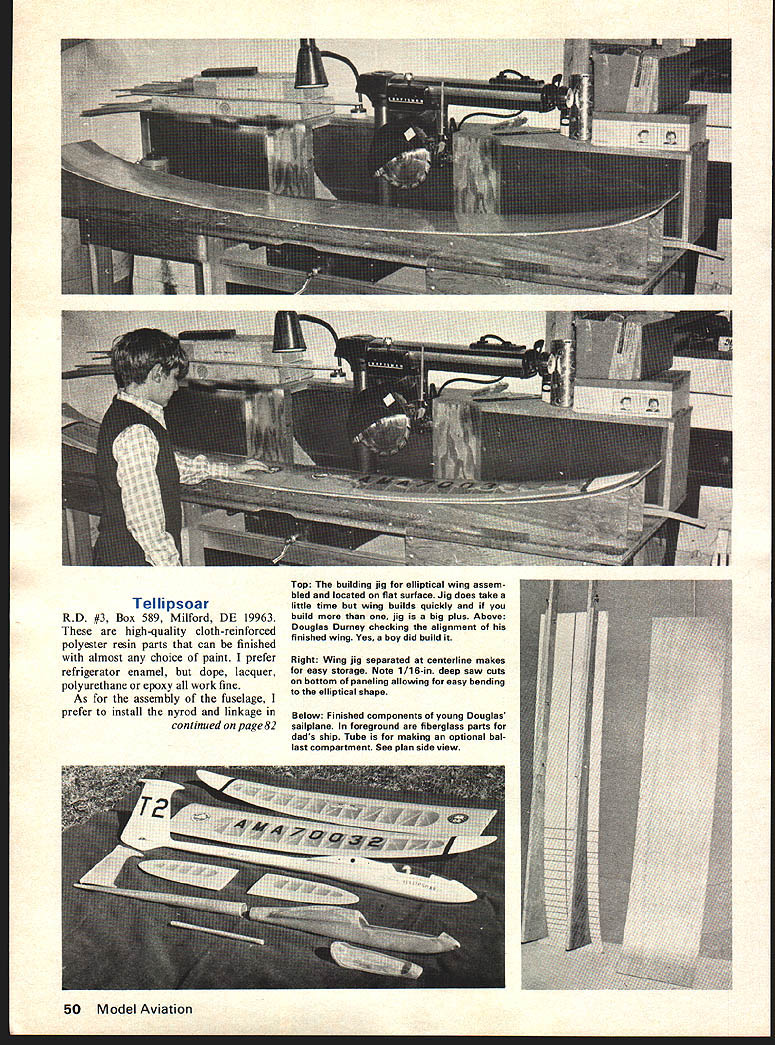
All of the Tellipsoars built to date have incorporated a fiberglass fuselage as shown on the plans. Fiberglass provides a light, tough fuselage, but that is no real reason the fuselage could not be molded balsa, built up balsa, balsa and plywood, or even foam, if you so desire. I recommend that you either carve a plug, pour molds and make a fiberglass fuselage, or better yet, buy the fiberglass parts ready for assembly. The assembled pod, a one-piece boom with no seam, canopy frame, vertical fin, weight compartment tube and cover are all available for $30 from Mr. Thomas Townsend,
Tellipsoar
R.D. #3, Box 589, Milford, DE 19963.
These are high-quality cloth-reinforced polyester resin parts that can be finished with almost any choice of paint. I prefer refrigerator enamel, but dope, lacquer, polyurethane or epoxy all work fine.
As for the assembly of the fuselage, I prefer to install the nyrod and linkage in in the fuselage before attaching it to the boom. At this point you should attach the horizontal stab to the fin and make sure that it is aligned in both planes before securing the rear fin post in place. Also, make sure the stab linkage is good and free without too much play in the action. Next assemble the fin to the boom and reinforce the sides. Then I recommend that you attach the rudder and the rudder horn and control rod. Now you can set the boom assembly aside and install the weight compartment and brass tubes for the winch wires.
At this point you are ready to make final assembly between the pod and boom. Attach the stab to the vertical fin and the wing to the pod. This provides a good reference for correct alignment. Rough up the inside of the boom and the outside of the pod and epoxy the two together, checking alignment between wing and stab and making sure the angle between wing and stab is as shown on the drawing. Also make sure pod and boom are in a straight line in the vertical plane.
Finishing the model from this point is rather straightforward and presents little problem. I prefer MonoKote on the wing and stab but silk and dope, or any other covering will work. My preference is transparent MonoKote because of the excellent visibility it provides, and the fact that it is a lot easier on the lungs.
Almost any radio can be installed in Tellipsoar. It will accommodate any of the popular bricks or servo trays. Mount the batteries as far forward as possible and use styrofoam to make sure it stays there. In my opinion, the battery should always be mounted ahead of the receiver or servos because it is the heaviest part of the airplane and could do a lot of damage in the event of a crash. Earlier Ellipsoar (right), published in Sailplane 1970, and the T-tailed Tellipsoar (left) resulted from seven years' constant development.
The TELLIPSOAR high-performance Standard Class R/C sailplane is rugged, gentle enough for the beginner, and an overnight dream. It was developed over a period of seven years. The original design was called Ellipsoar and was published in Sailplane 1970. The name came from the wing-stab design — wing and stab elliptical planform, wing elliptical dihedral. In 1969 elliptical dihedral was very rare. Several years later Hobie Alter realized the performance advantages and incorporated elliptical dihedral in the Hobie Hawk.
During the first four years I changed the airfoil and span. The year after the original design I used a 7-ft wingspan and the Eppler E-387 airfoil and won several contests; the design finished the year in fifth place at ECSS. During the next three years I tried a 9-ft wing with the Eppler E-385, a 9-ft wing with the Eppler E-387, and an 11-ft wing, flat-bottom. The Standard class sailplane has frequently demonstrated its superiority over first-class competition. George Durney, Eppler 385. Eleven-year-old son Doug built the fuselage and was always second choice for the four wings. During this period we won 28 trophies and managed to finish in the top ten at ECSS.
In the spring of 1974 I started drawings for a new design called Tellipsoar because of the T-tail configuration. I had no intention of completing the aircraft until fall. Several weeks prior to the York, PA contest that year, while holding the right canopy removed to show the installation of the Kraft brick — although the fuselage construction (glass pod, boom, fin, canopy outline) was up and commercially available — at the local contest practice for the FAI Glider Contest the CD asked about Aerolympics. My son Doug flying Ellipsoar with the original wing ended the first two events far ahead of the field. In the embarrassing speed event the same story — he came through the final gate two feet off the ground, four seconds ahead of the field. However, jubilation turned to dismay when he turned right instead of left and took a goal post at about 40 mph. Needless to say, the goal post won. That evening he begged me to help him build Tellipsoar before the York contest; I had already carved the plug fuselage.
Well, to make a long story short, we finished the airplane the day before the York contest and managed to get a test flight prior to the meet. The day of the York contest arrived; Doug flew on a paved runway. I believe Doug won a perfect score — 15 minutes, three perfect 100-point landings. The performance left Otto Heithecker, Don Goughnour and Kelly Pike mouths open and convinced them Tellipsoar was a real winner.
During the next year we discovered the real secret of the success. The Tellipsoar is a very high-performance sailplane; it will do everything you want to have happen. It has very positive control and is stable enough for the real novice. I have flown several complete flights, including launch, with my hand touching the transmitter to ask for a change of flight altitude. It never hesitates downwind or at slow speeds. Please don't let the wing-stab design scare you.
Once you have the building jig, you can build the wing in less time than other sailplane wings I have built. You need to make a jig from some scrap plywood or paneling. Cut shaped supports from 3/8-in. ply on 1/2-in. board. Cut the building surface from 1/4-in. ply wall paneling. After you have nailed the jig together you can build the wing anywhere — if your wife can spare four feet of area you have building space for the entire wing jig. I suggest you build two halves and bolt them together at the center; that way you can build the entire wing in two evenings.
After you have completed the jig, line up the plans on the board. Next cut and glue the entire bottom sheeting including cap strips in the center section. The next operation is to attach the three bottom 3/16-in. spars. The sheeting can then have ribs, sub-leading edge and primary top spar installed. After you have installed the brass tubing, install the secondary top spars and spar webs, making sure to use plywood vertical-grain balsa as shown on the plans. The final operation before removing the wing from the jig is to install the top sheeting.
After the wing is removed from the building jig, trim the top and bottom sheeting, attach the leading edge and shape the leading edge, then attach the plywood center-section ribs. Before leaving the wing I have several comments. First, make sure the bottom sheeting and spars stay down...
Transcribed from original scans by AI. Minor OCR errors may remain.

