
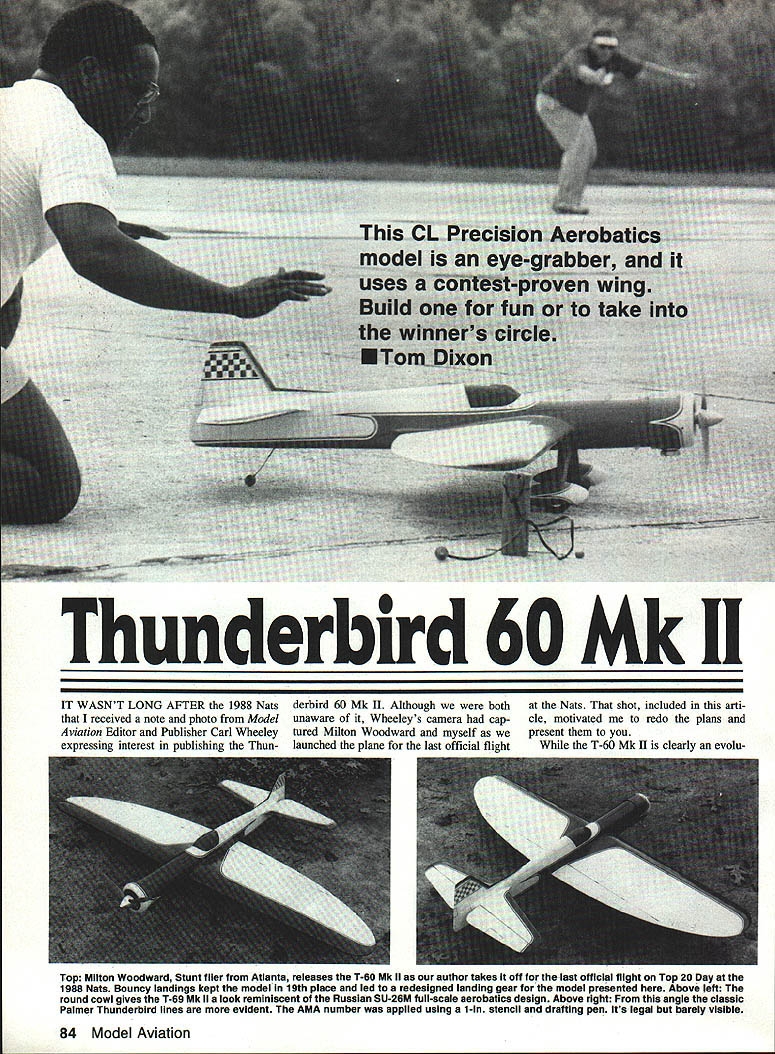
Thunderbird 60 Mk II
It wasn't long after the 1988 Nats that I received a note and photo from Model Aviation editor and publisher Carl Wheeley expressing interest in publishing the Thunderbird 60 Mk II. Although we were both unaware of it at the time, Wheeley's camera had captured Milton Woodward and myself as we launched the plane for the last official flight at the Nats. That shot, included with this article, motivated me to redo the plans and present them here.
Inspiration
The T-60 Mk II is clearly an evolution of the previous 60-size Thunderbird presented in the September 1987 issue, but it is cosmetically much different. Its look was inspired by two factors:
- A three-view drawing of Bob Palmer's round-cowled Thunderbird that toured England and Africa in the 1950s (the drawing appears in Ron Moulton's Control-Line Manual).
- Seeing the gorgeous full-size Gee Bee Sportster replica built and flown at the 1985 Nats by Ken Flaglor.
The model was built for the 1985 Nats but was not painted until 1988. Like many Stunters, it echoes classic full-size designs.
Construction
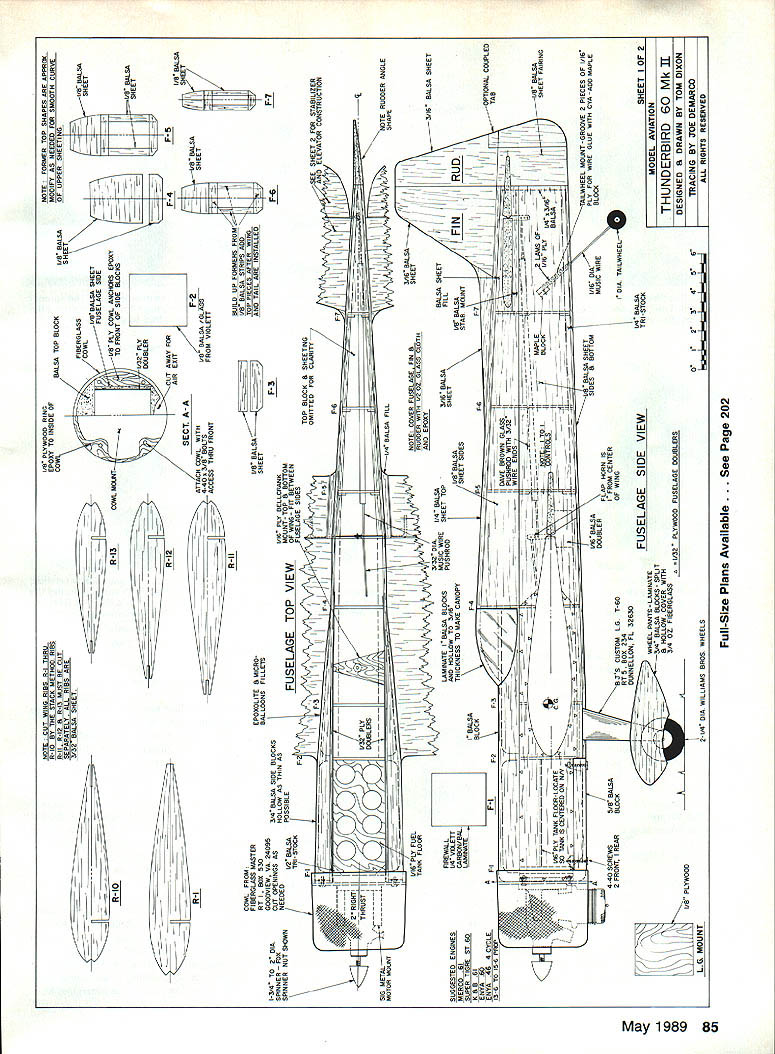
- Wing and tail structures are built in a similar manner to those described in previous articles on Palmer elliptical-wing Stunters.
- Use a jig — some sort of jig is mandatory.
- A long sanding block helps bring everything true to shape and helps visualize the rib-and-spar structure.
This time around I sheeted the stab-elevator assembly and used solid-sheet flaps. This structure is more rigid and easier to finish without being heavier.
Fuselage
The fuselage is where the real work is encountered. Some new techniques were used along with older methods:
- Shape the front from 1/4-in. side blocks and a 1-in. top block carved to shape and hollowed until they're nearly paper thin. These blocks are nonstructural and need only be thick enough to withstand handling the plane.
- Build the basic fuselage box, then add the side and top blocks and carve away the excess.
- Make a template to help get a uniformly round shape.
My canopy is merely a painted balsa block, but you may choose a plastic canopy for more realism.
Cowl
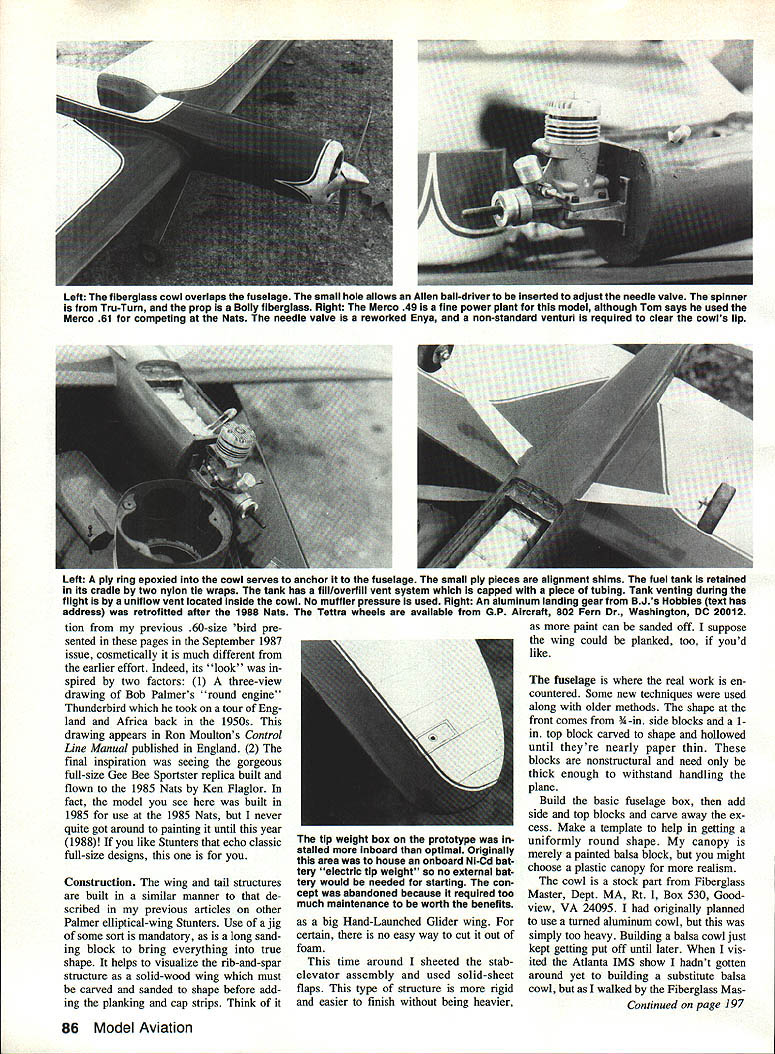
The cowl is a stock part from Fiberglass Master (Box 530, Goodview, VA 24095). I had originally planned to use a turned-aluminum cowl, but I used the fiberglass one because it was simple to build. Building a cowl is the hardest part; it's easy to keep putting it off.
Powerplant and performance
- The .61 and .49 engines are both suitable for this model. A solid .45 (Royal or O.S.), suitably de-tuned, would also be plenty of power.
- My current setup is a Merco .61SS with a .285 venturi, SST silencer with 10 holes open, no pressure, Taffinder's 5% nitro PA fuel, and an 11 x 6 Bolly three-blade prop.
- I added two .020 head gaskets to further soften the four-cycle/two-cycle transition.
- This combination gets through the pattern using just 3 oz. of fuel.
- Lines are 70 ft. of .018 cable.
- The model weighs 64 oz. in current trim.
Finish
The finish shown here is Sig dope — nitrate clear base followed by butyrate color — over silkspan on the wing, and .56-oz Sig glass cloth and epoxy everywhere else. I am completely convinced that glass cloth and epoxy is the only way to go for speed, strength, fuel-proofing, and stability of finish. As far as I can tell, it is as light or lighter than a traditional dope-and-paper finish. I have had very good results using Loctite Finishing Epoxy with the cloth; it sands like chalk and leaves very little material on the plane.
If you use dope for the colors, a nitrate bonding coat must first be applied over the epoxy, as butyrate won't adhere directly to epoxy very well. My usual sequence:
- Spray two coats of nitrate clear over the sanded epoxy-glass surface.
- Sand lightly.
- Spray a filler coat of lacquer and nitrate.
- Wet-sand with 400-grit paper.
- Spray the colors.
Final notes
One last thought: if I were to build this model again, I would add another inch to inch-and-a-half to the tail moment length. This would increase the elevator's response and leverage and would also look more scale-like. You may wish to incorporate this change into your own T-60 II.
Fly safe, fly quiet. Contact Don McClane, 221 N.W. 2nd Ave., Suite 300, Portland, OR 97209 to find out how you can join PAMPA, the association of model stunt fliers and enthusiasts.
Transcribed from original scans by AI. Minor OCR errors may remain.

