
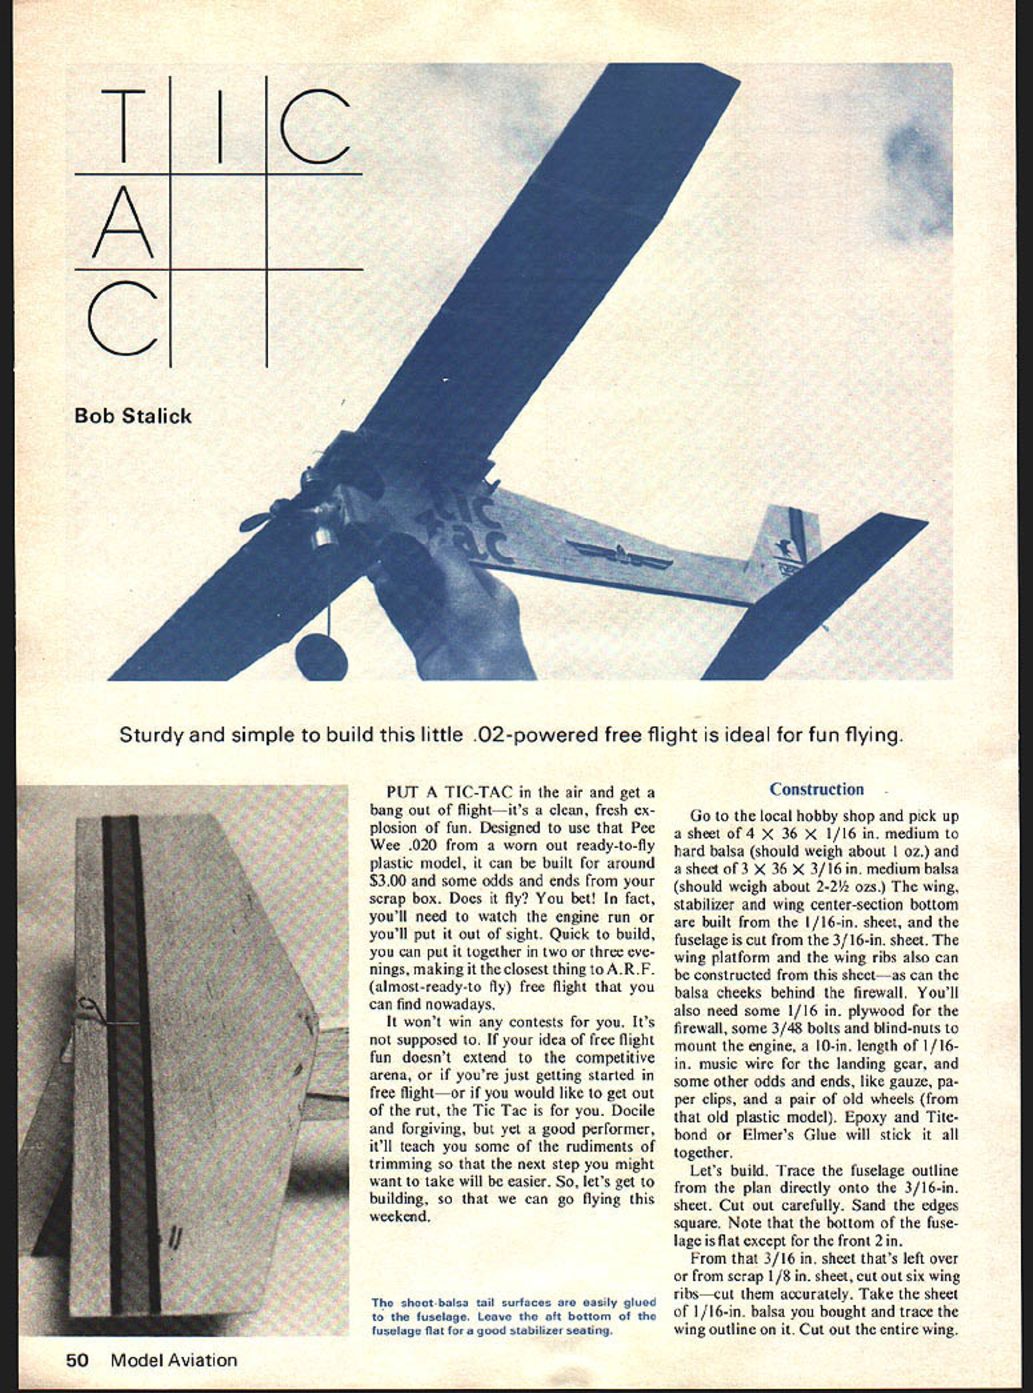
Tic Tac
Bob Stalick
PUT A TIC-TAC in the air and get a bang out of flight—it's a clean, fresh explosion of fun. Designed to use that Pee Wee .020 from a worn out ready-to-fly plastic model, it can be built for around $3.00 and some odds and ends from your scrap box. Does it fly? You bet! In fact, you'll need to watch the engine run or you'll put it out of sight. Quick to build, you can put it together in two or three evenings, making it the closest thing to A.R.F. (almost-ready-to-fly) free flight that you can find nowadays.
It won't win any contests for you. It's not supposed to. If your idea of free flight fun doesn't extend to the competitive arena, or if you're just getting started in free flight—or if you would like to get out of the rut, the Tic Tac is for you. Docile and forgiving, but yet a good performer, it'll teach you some of the rudiments of trimming so that the next step you might want to take will be easier. So, let's get to building, so that we can go flying this weekend.
Construction
Go to the local hobby shop and pick up a sheet of 4 x 36 x 1/16 in. medium to hard balsa (should weigh about 1 oz.) and a sheet of 3 x 36 x 3/16 in. medium balsa (should weigh about 2–2½ ozs.). The wing, stabilizer and wing center-section bottom are built from the 1/16-in. sheet, and the fuselage is cut from the 3/16-in. sheet. The wing platform and the wing ribs also can be constructed from this sheet—as can the balsa cheeks behind the firewall. You'll also need some 1/16-in. plywood for the firewall, some 3-48 bolts and blind-nuts to mount the engine, a 10-in. length of 1/16-in. music wire for the landing gear, and some other odds and ends, like gauze, paper clips, and a pair of old wheels (from that old plastic model). Epoxy and Tite-bond or Elmer's Glue will stick it all together.
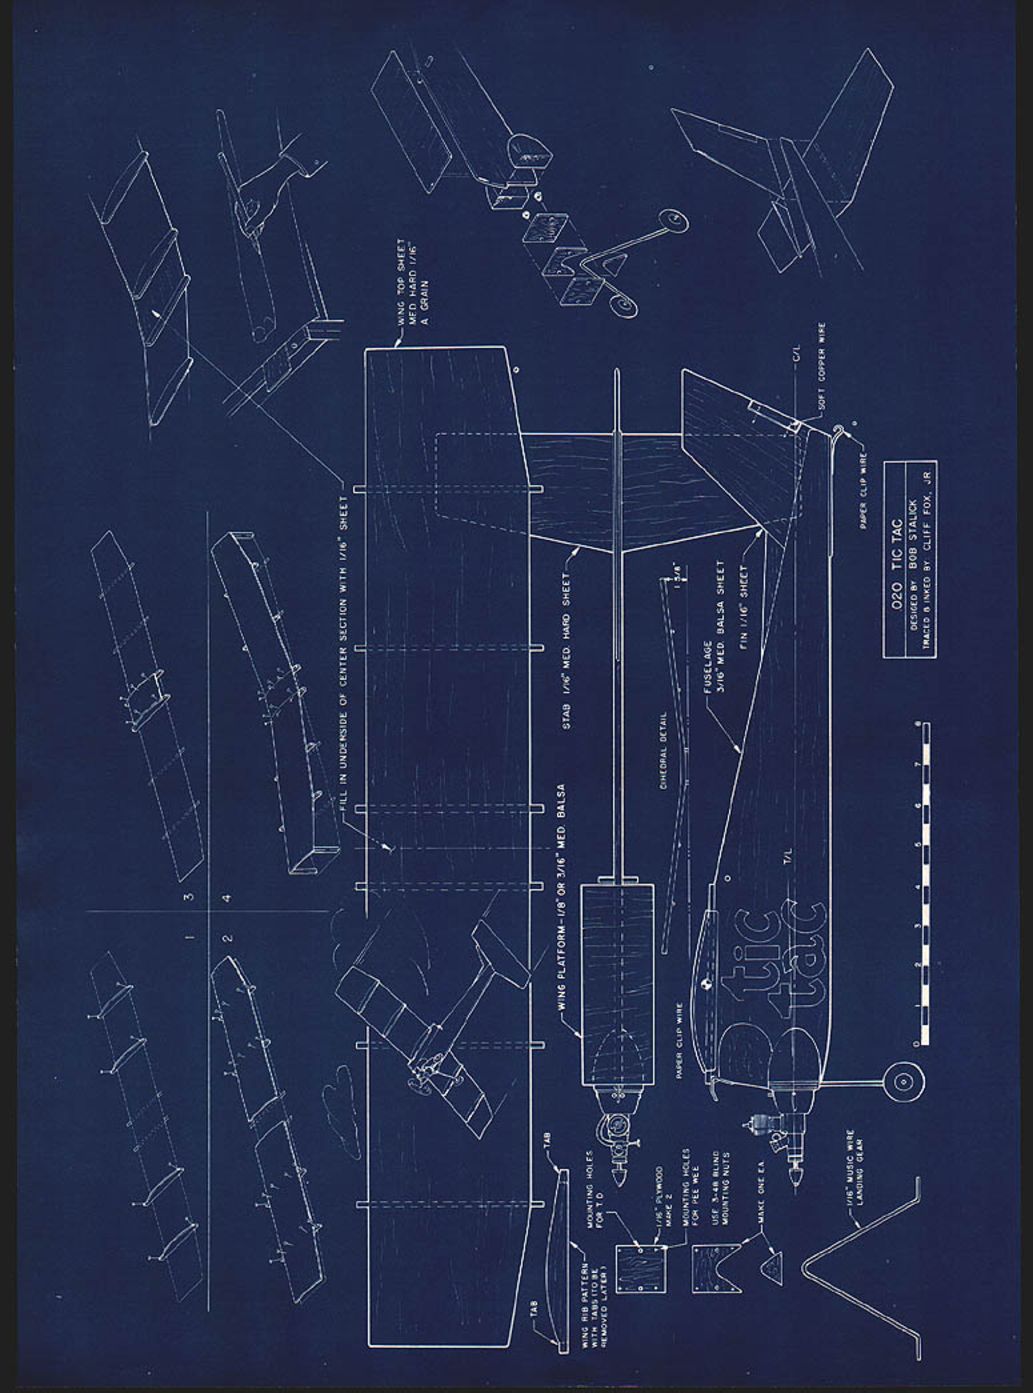
Let's build. Trace the fuselage outline from the plan directly onto the 3/16-in. sheet. Cut out carefully. Sand the edges square. Note that the bottom of the fuselage is flat except for the front 2 in.
From that 3/16-in. sheet that's left over or from scrap 1/8-in. sheet, cut out six wing ribs—cut them accurately. Take the sheet of 1/16-in. balsa you bought and trace the wing outline on it. Cut out the entire wing.
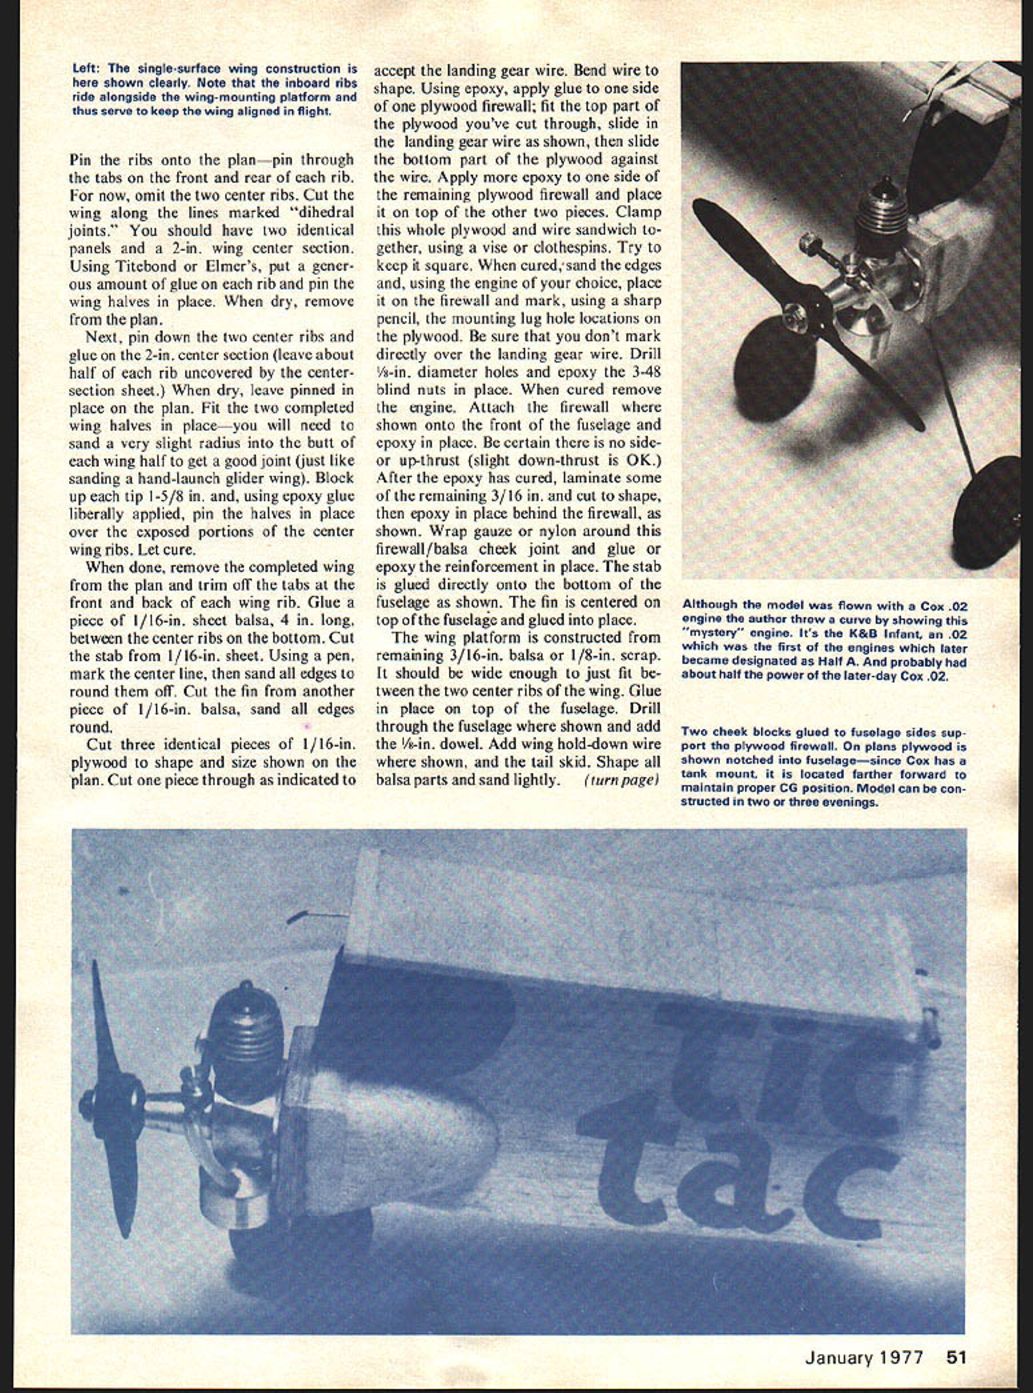
The single-surface wing construction is shown clearly. Note inboard ribs ride alongside the wing-mounting platform and thus serve to keep the wing aligned in flight. Pin ribs onto plan, pin through tabs front and rear rib. Now omit two center ribs. Cut wing along lines marked dihedral joints. You should have two identical panels and a 2-in. wing center section. Using Tite-bond (Elmer's) put a generous amount of glue on the ribs, pin wing halves in place, dry, remove plan. Next pin down two center ribs and glue the 2-in. center section; leave about half a rib uncovered on the center section sheet. Dry, leave pinned in place on the plan. Fit two completed wing halves together—you will need to sand a very slight radius on the butt of each wing half to get a good joint, just like sanding a hand-launch glider wing. Block up tip 1-5/8 in., use epoxy glue liberally applied to the butt joint; pin halves in place over exposed portions of the center wing ribs. Let cure. When done, remove the completed wing from the plan; trim off tabs front and back of the wing ribs. Glue a piece of 1/16-in. sheet balsa 4 in. long between the center ribs on the bottom.
Cut the stabilizer from 1/16-in. sheet. Using a pen, mark the center line; sand the edges and round off. Cut the fin from another piece of 1/16-in. balsa; sand edges and round.
Cut three identical pieces of 1/16-in. plywood to the shape and size shown on the plan. Cut the piece through at the indicated slot to accept the landing gear wire. Bend the wire to shape. Using epoxy, apply glue to the side plywood firewall pieces; fit the top part of the plywood you've cut through, slide the landing gear wire as shown, and slide the bottom part of the plywood against the wire. Apply epoxy to the side of the remaining firewall plywood piece and place on top of the other two pieces. Clamp the whole plywood-wire sandwich together using a vise or clothespins. Try to keep it square. When cured, sand the edges. Using the engine of your choice, place the engine on the firewall and mark, using a sharp pencil, the mounting lug hole locations on the plywood. Be sure you don't mark directly over the landing gear wire. Drill 3/32-in. diameter holes and epoxy 3-48 blind nuts in place. When cured, remove the engine.
Attach the firewall as shown onto the front fuselage with epoxy. Be certain there is no side or up-thrust; slight down-thrust is OK. After the epoxy has cured, laminate some remaining 3/16-in. cut shapes and epoxy in place behind the firewall as shown. Wrap gauze or nylon around the firewall/balsa cheek joint and glue with epoxy for reinforcement. The stabilizer is glued directly onto the bottom fuselage as shown. The fin, centered on the top fuselage, is glued in place. The wing platform is constructed from the remaining 3/16-in. balsa or 1/8-in. scrap that is wide enough to just fit between the two center ribs of the wing. Glue in place on the top Drill through the fuselage where shown and add the 1/8-in. dowel. Add wing hold-down wire where shown and the tail skid. Shape all balsa parts and sand lightly. (turn page)
Pin the ribs onto the plan—pin through the tabs on the front and rear of each rib. For now, omit the two center ribs. Cut the wing along the lines marked "dihedral joints." You should have two identical panels and a 2-in. wing center section. Using Titebond or Elmer's, put a generous amount of glue on each rib and pin the wing halves in place. When dry, remove from the plan.
Next, pin down the two center ribs and glue on the 2-in. center section (leave about half of each rib uncovered by the center-section sheet). When dry, leave pinned in place on the plan. Fit the two completed wing halves in place—you will need to sand a very slight radius into the butt of each wing half to get a good joint (just like sanding a hand-launch glider wing). Block up each tip 1-5/8 in. and, using epoxy glue liberally applied, pin the halves in place over the exposed portions of the center wing ribs. Let cure.
When done, remove the completed wing from the plan and trim off the tabs at the front and back of each wing rib. Glue a piece of 1/16-in. sheet balsa, 4 in. long, between the center ribs on the bottom. Cut the stab from 1/16-in. sheet. Using a pen, mark the center line, then sand all edges to round them off. Cut the fin from another piece of 1/16-in. balsa; sand edges and round.
Cut three identical pieces of 1/16-in. plywood to shape and size shown on the plan. Cut one piece through as indicated to accept the landing gear wire. Bend wire to shape. Using epoxy, apply glue to one side of one plywood firewall; fit the top part of the plywood you've cut through, slide in the landing gear wire as shown, then slide the bottom part of the plywood against the wire. Apply more epoxy to one side of the remaining plywood firewall and place it on top of the other two pieces. Clamp this whole plywood-and-wire sandwich together, using a vise or clothespins. Try to keep it square. When cured, sand the edges and, using the engine of your choice, place it on the firewall and mark, using a sharp pencil, the mounting lug hole locations on the plywood. Be sure that you don't mark directly over the landing gear wire. Drill 3/32-in. diameter holes and epoxy the 3-48 blind nuts in place. When cured, remove the engine. Attach the firewall where shown onto the front of the fuselage and epoxy in place. Be certain there is no side- or up-thrust (slight down-thrust is OK).
After the epoxy has cured, laminate some of the remaining 3/16-in. and cut to shape, then epoxy in place behind the firewall, as shown. Wrap gauze or nylon around this firewall/balsa cheek joint and glue or epoxy the reinforcement in place. The stab is glued directly onto the bottom of the fuselage as shown. The fin is centered on top of the fuselage and glued into place. The wing platform is constructed from remaining 3/16-in. balsa or 1/8-in. scrap. It should be wide enough to just fit between the two center ribs of the wing. Glue in place on top of the fuselage. Drill through the fuselage where shown and add the 1/8-in. dowel. Add wing hold-down wire where shown and the tail skid. Shape all balsa parts and sand lightly. (turn page) A sturdy, simple build — little .020-powered free flight ideal for fun flying. Put Tic Tac in the air and get a bang-out flight — it's clean, fresh, explosion fun. Designed to use a Pee Wee .020 or a worn-out ready-to-fly plastic-model engine, it can be built around $3.00 from some odds and ends in the scrap box. Does it fly better? In fact you'll need to watch the engine run or you'll put it out of sight. Quick build — can be put together in two or three evenings, making it the closest thing to an ARF (almost-ready-to-fly) free flight you can find nowadays. It won't win contests — that's not the idea. The idea is free flight fun; it doesn't extend into the competitive arena. If you're just getting started in free flight or would like to get out of a rut, Tic Tac is docile, forgiving yet a good performer. It'll teach some rudiments of trimming; the next step you might want to take will be easier. So let's get building — you can go flying this weekend. The sheet-balsa tail surfaces are easily glued to the fuselage. Leave the aft bottom of the fuselage flat for good stabilizer seating.
Construction
Go to your local hobby shop and pick up:
- 4" x 36" x 1/16" medium-hard balsa sheet (should weigh about 1 oz)
- 3/16" medium balsa sheet (should weigh about 2–2½ oz)
- 1/16" sheet for wing and stabilizer
- 3/16" sheet for wing center-section bottom
- 3/16" sheet for fuselage
- 1/16" plywood for firewall
- 1/16" music wire, 10-in. length, for landing gear
- some 3-48 bolts and blind nuts to mount engine
- other odds and ends such as gauze, paper clips, a pair of old wheels from an old plastic model
Epoxy, Titebond or Elmer's glue will stick everything together.
Let's build
Trace the fuselage outline from the plan directly onto the 3/16-in. sheet. Cut out carefully. Sand edges square. Note: bottom fuselage is flat except at the front.
From the leftover 1/8-in. scrap sheet, cut out six wing ribs — cut accurately. Take the 1/16-in. balsa sheet and trace the wing outline from the plan. Cut out the entire wing.
The single-surface wing construction is shown clearly. Note: the inboard ribs ride alongside the wing-mounting platform and thus serve to keep the wing aligned in flight. Pin ribs onto the plan, pin through the tabs at the front and rear ribs. Now omit the two center ribs. Cut the wing along the lines marked for the dihedral joints so you should have two identical panels and a 2-in. wing center section.
Using Titebond or Elmer's, put a generous amount of glue on the rib pins, place the wing halves and let dry. Remove the plan. Next pin down the two center ribs and glue the 2-in. center section, leaving about half a rib uncovered on the centersection sheet. Leave pinned in place on the plan until dry.
Fit the two completed wing halves together; you will need to sand a very slight radius on the butt of each wing half to get a good joint (just like sanding a hand-launch glider wing). Block up the tip 1-5/8" and, using epoxy, glue liberally at the joint. Pin halves in place over the exposed portions of the center wing ribs. Let cure. When done, remove the completed wing from the plan and trim off the tabs at the front and back of the wing rib.
Glue a piece of 1/16-in. sheet balsa, 4" long, between the center ribs on the bottom.
Cut the stabilizer from 1/16-in. sheet. Using a pen, mark the centerline and sand edges, rounding off. Cut the fin from another piece of 1/16-in. balsa and sand edges, rounding off.
Cut three identical pieces of 1/16-in. plywood to the shape and size shown on the plan. Cut the piece through where indicated to accept the landing-gear wire. Bend the wire to shape. Using epoxy, apply glue to the side plywood firewall, fit the top part of the plywood you've cut through, slide the landing-gear wire through as shown, and slide the bottom part of the plywood against the wire. Apply epoxy to the side of the remaining plywood firewall and place the top over the other two pieces. Clamp the whole plywood/wire sandwich together using a vise or clothespins. Try to keep it square while it cures. Sand edges when cured.
Using the engine of your choice, place it on the firewall and mark, using a sharp pencil, the mounting-lug hole locations on the plywood. Be sure that you don't mark directly over the landing-gear wire. Drill 3/32-in. diameter holes and epoxy the 3-48 blind nuts in place. When cured, remove the engine. Attach the firewall where shown onto the front of the fuselage and epoxy in place. Be certain there is no side- or up-thrust (slight down-thrust is OK).
After the epoxy has cured, laminate some of the remaining 3/16-in. and cut to shape, then epoxy in place behind the firewall, as shown. Wrap gauze or nylon around this firewall/balsa-cheek joint and glue or epoxy the reinforcement in place.
The stab is glued directly onto the bottom of the fuselage as shown. The fin is centered on top of the fuselage and glued into place. The wing platform is constructed from remaining 3/16-in. balsa or 1/8-in. scrap; it should be wide enough to just fit between the two center ribs of the wing. Glue in place on top of the fuselage.
Drill through the fuselage where shown and add the 1/8-in. dowel. Add the wing hold-down wire where shown and the tail skid. Shape all balsa parts and sand lightly.
Tic Tac
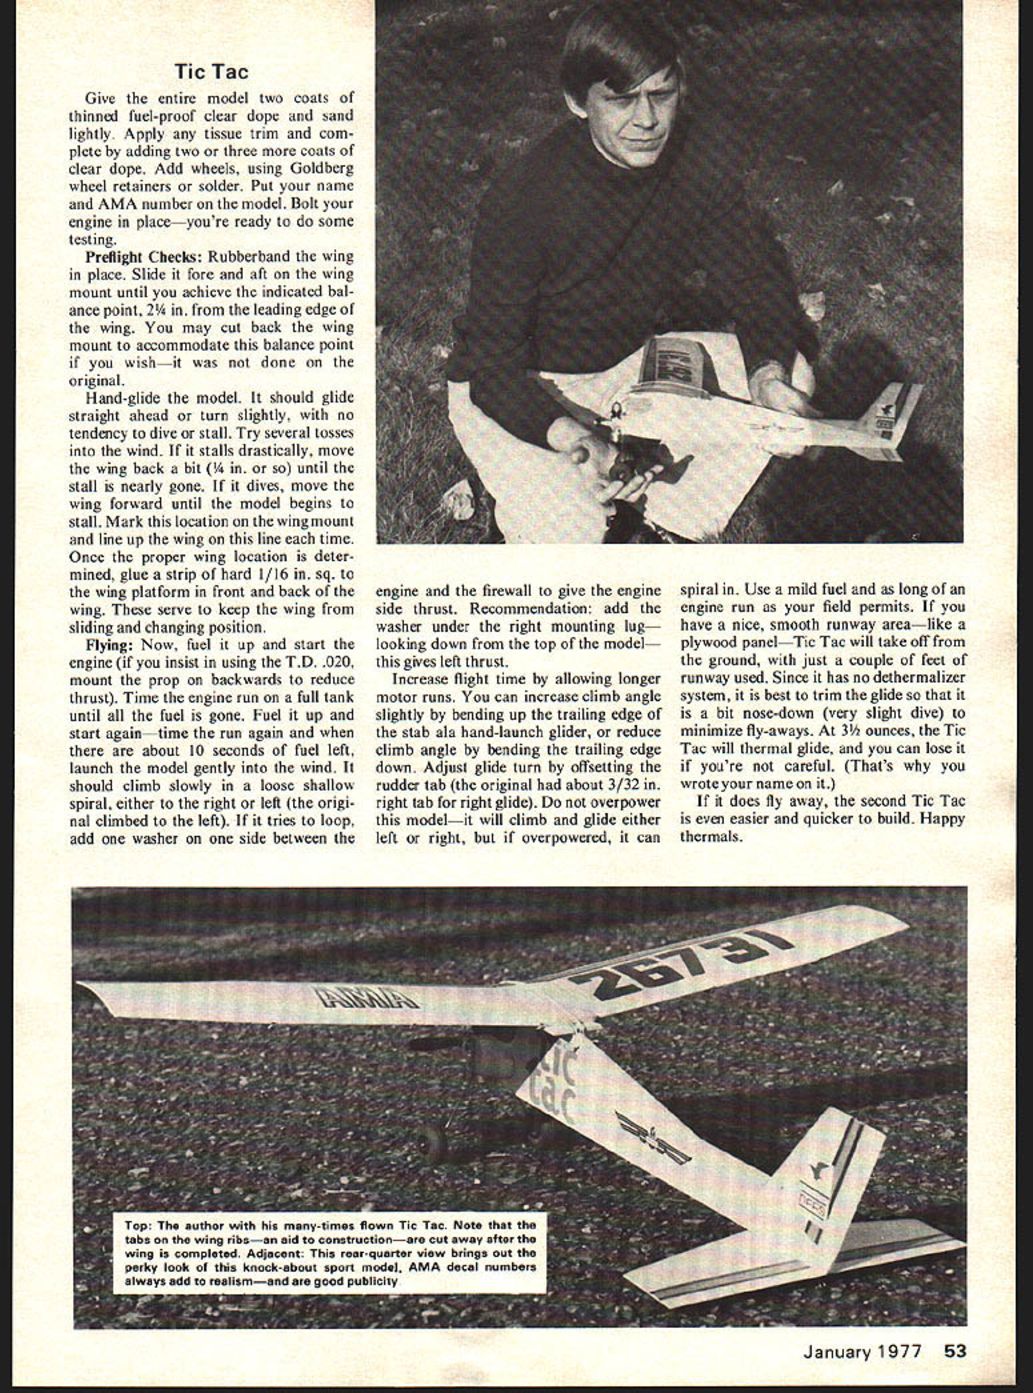
Give the entire model two coats of thinned fuel-proof clear dope and sand lightly. Apply any tissue trim and complete by adding two or three more coats of clear dope. Add wheels, using Goldberg wheel retainers or solder. Put your name and AMA number on the model. Bolt your engine in place—you're ready to do some testing.
Preflight Checks: Rubberband the wing in place. Slide it fore and aft on the wing mount until you achieve the indicated balance point, 2¼ in. from the leading edge of the wing. You may cut back the wing mount to accommodate this balance point if you wish—it was not done on the original.
Hand-glide the model. It should glide straight ahead or turn slightly, with no tendency to dive or stall. Try several tosses into the wind. If it stalls drastically, move the wing back a bit (¼ in. or so) until the stall is nearly gone. If it dives, move the wing forward until the model begins to stall. Mark this location on the wing mount and line up the wing on this line each time. Once the proper wing location is determined, glue a strip of hard 1/16 in. sq. to the wing platform in front and back of the wing. These serve to keep the wing from sliding and changing position.
Flying: Now, fuel it up and start the engine (if you insist in using the T.D. .020, mount the prop on backwards to reduce thrust). Time the engine run on a full tank until all the fuel is gone. Fuel it up and start again—time the run again and when there are about 10 seconds of fuel left, launch the model gently into the wind. It should climb slowly in a loose shallow spiral, either to the right or left (the original climbed to the left). If it tries to loop, add one washer on one side between the engine and the firewall to give the engine side thrust. Recommendation: add the washer under the right mounting lug—looking down from the top of the model—this gives left thrust.
Increase flight time by allowing longer motor runs. You can increase climb angle slightly by bending up the trailing edge of the stab ala hand-launch glider, or reduce climb angle by bending the trailing edge down. Adjust glide turn by offsetting the rudder tab (the original had about 3/32 in. right tab for right glide). Do not overpower this model—it will climb and glide either left or right, but if overpowered, it can spiral in. Use a mild fuel and as long of an engine run as your field permits. If you have a nice, smooth runway area—like a plywood panel—Tic Tac will take off from the ground, with just a couple of feet of runway used. Since it has no dethralizer system, it is best to trim the glide so that it is a bit nose-down (very slight dive) to minimize fly-aways. At 3½ ounces, the Tic Tac will thermal glide, and you can lose it if you're not careful. (That's why you wrote your name on it.)
If it does fly away, the second Tic Tac is even easier and quicker to build. Happy thermals.
Transcribed from original scans by AI. Minor OCR errors may remain.

