
TIGER MOTH XL-716
Insight into building and flying a 1/5-scale classic biplane by Gary Ritchie
It's no exaggeration to say that building scale model aircraft is an art form. In fact, one could say that building any type of scale model is an art form. But with model aircraft there is that other dimension: flying. At this point, the art form morphs into a white-knuckle, heart-pumping, high-adrenaline adventure.
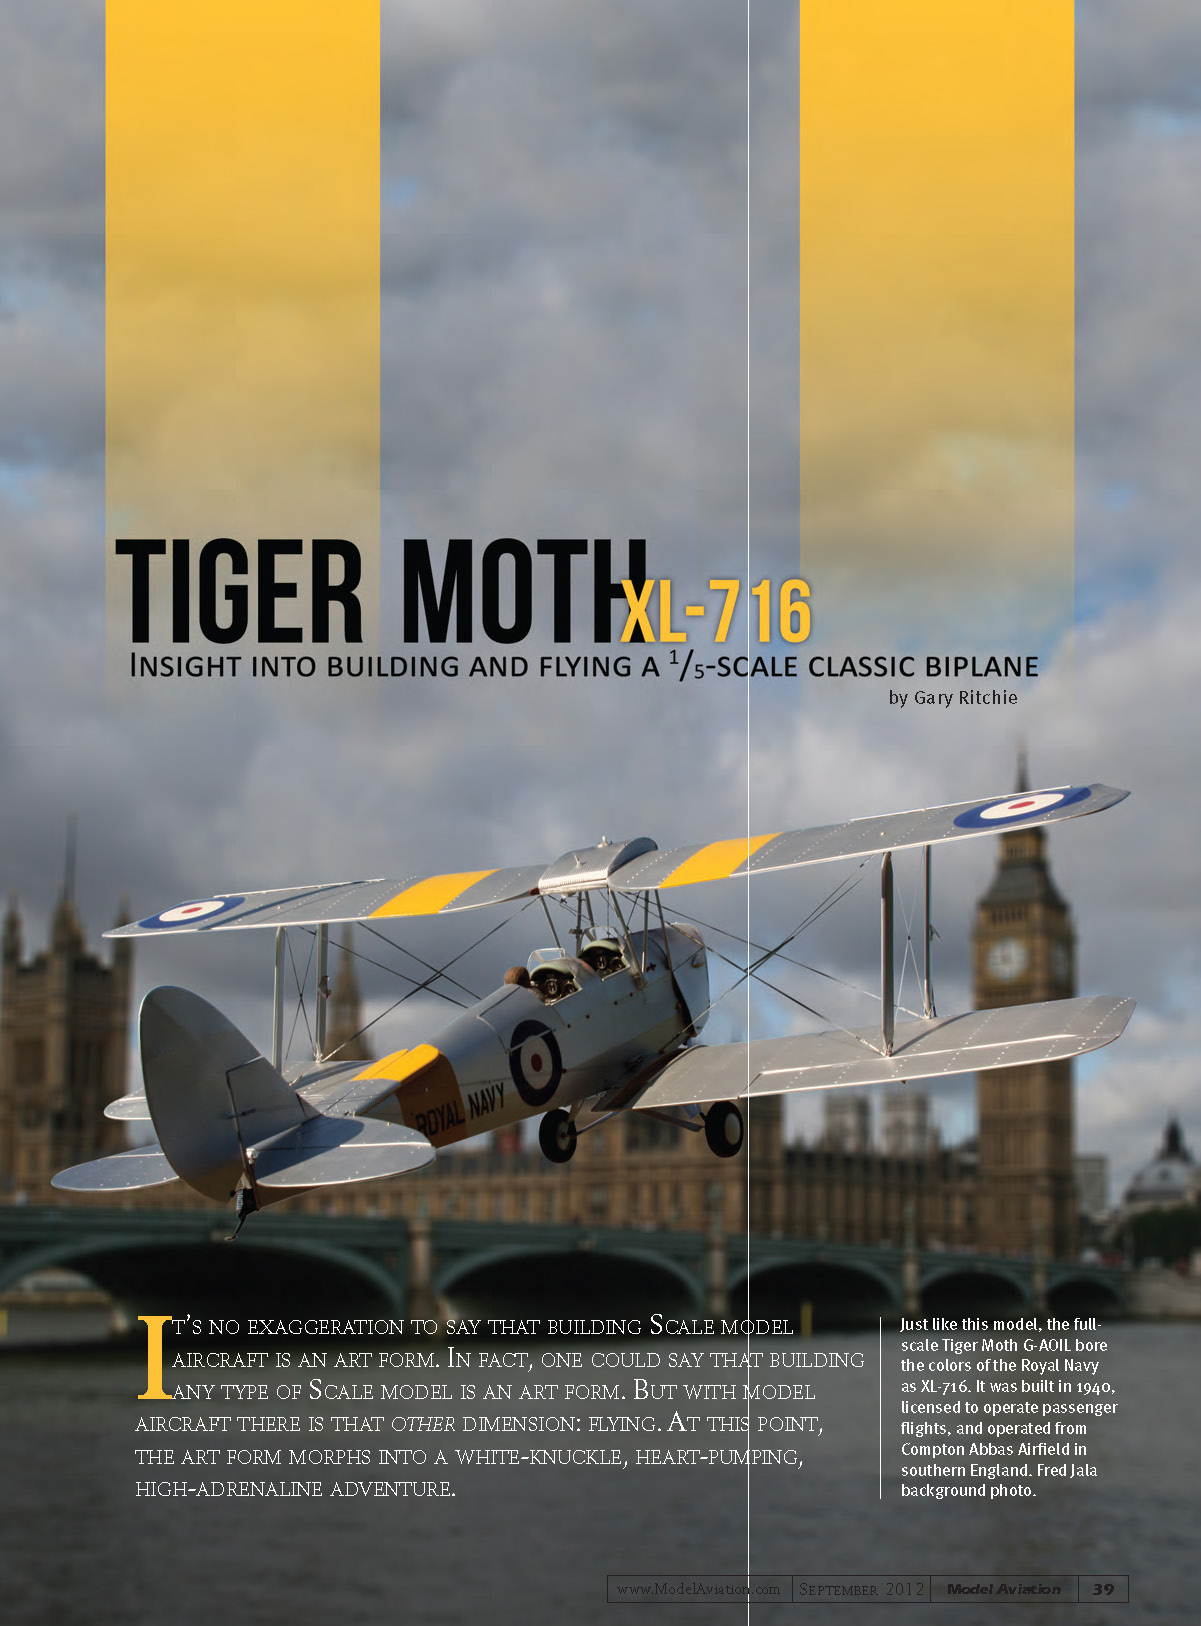
I began my adventure a couple of years ago, scouring www.airliners.net looking for a photo of a pretty Tiger Moth to model. It didn't take me long to find XL-716, a Royal Navy Tiger Moth stationed at Compton Abbas Airfield in Dorset, England. It was a lovely silver airplane with bold yellow stripes and big, beautiful roundels on its wings and fuselage. It was love at first sight.
So I searched until I found a set of 1/5-scale Tiger Moth plans ($30) on the Bob Holman Plans website. I called Bob to find out how true to scale the plans were. "Spot on," Bob said.
"I'll take 'em," I said.
When the large rolled plans arrived, I began examining them and learned that they had been rendered by a gentleman named Dennis Bryant back in the 1970s and were designed for a glow engine. No surprise here.
A note on the plans indicated that laser-cut wood parts, vacuum-formed fairings, and a fiberglass nose were available from Traplet Publications (for $110). I ordered a set—a smart move on my part.
A Seven-Month Build
Another note on the plans said, "Notice: this model requires very accurate workmanship. It should not be attempted by inexperienced modelers." Whoever wrote it wasn't kidding—this was a long and arduous build.
The tail, wing assemblies, and fuselage were assembled on the plans using the pin method—gluing with CA or aliphatic adhesive as appropriate. I won't spend much time discussing this procedure because it was relatively straightforward. I would rather explain how I achieved some of the scale effects on this model.
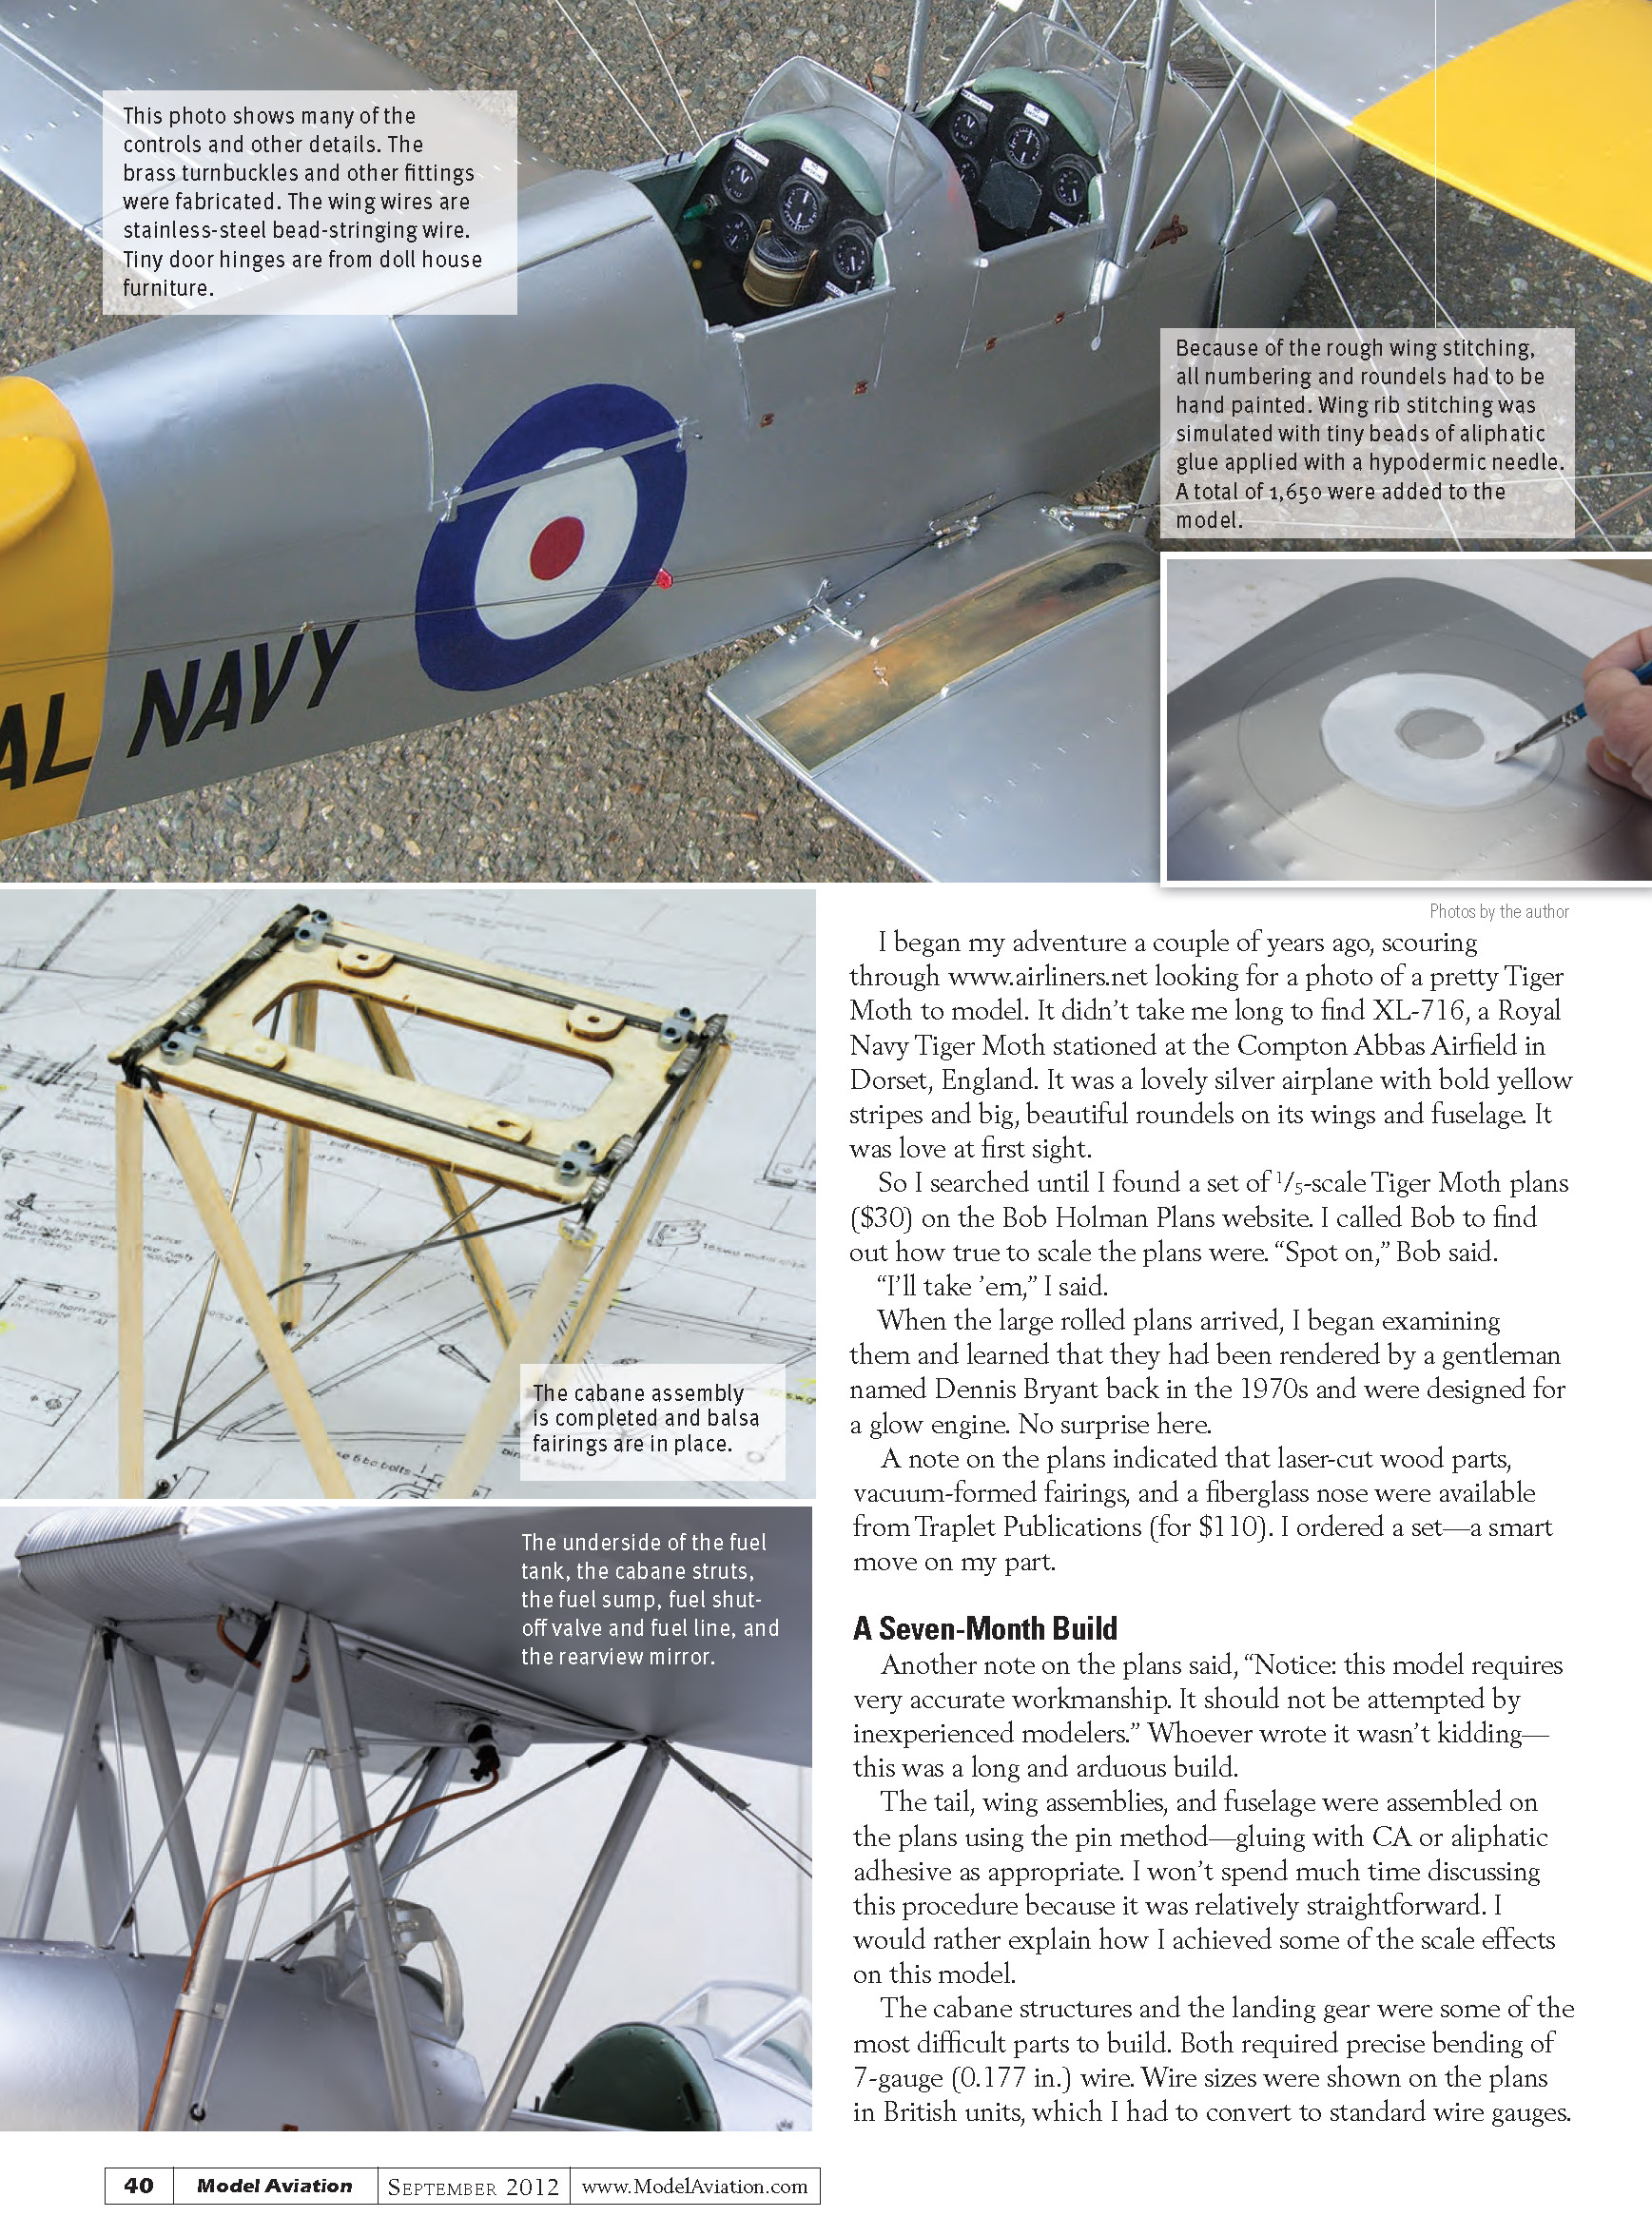
The cabane structures and the landing gear were some of the most difficult parts to build. Both required precise bending of 7-gauge (0.177 in.) wire. Wire sizes were shown on the plans in British units, which I had to convert to standard wire gauges. Thank goodness for the Internet.
Before bending the wire, I cut it into sections of appropriate length using a Dremel cut-off wheel. To achieve the precise bend angles indicated on the plans, I held each wire segment in a vice, heated it with a torch until red, then bent it with heavy pliers. In some cases, I got the incorrect angles and had to re-bend them or start over with another piece of metal.
The landing gear and the cabane struts were faired with balsa strips. These fairings were epoxied to the metal rods after they were cleaned with sandpaper. They were then sheeted with cardstock, which was hardened with thin CA.
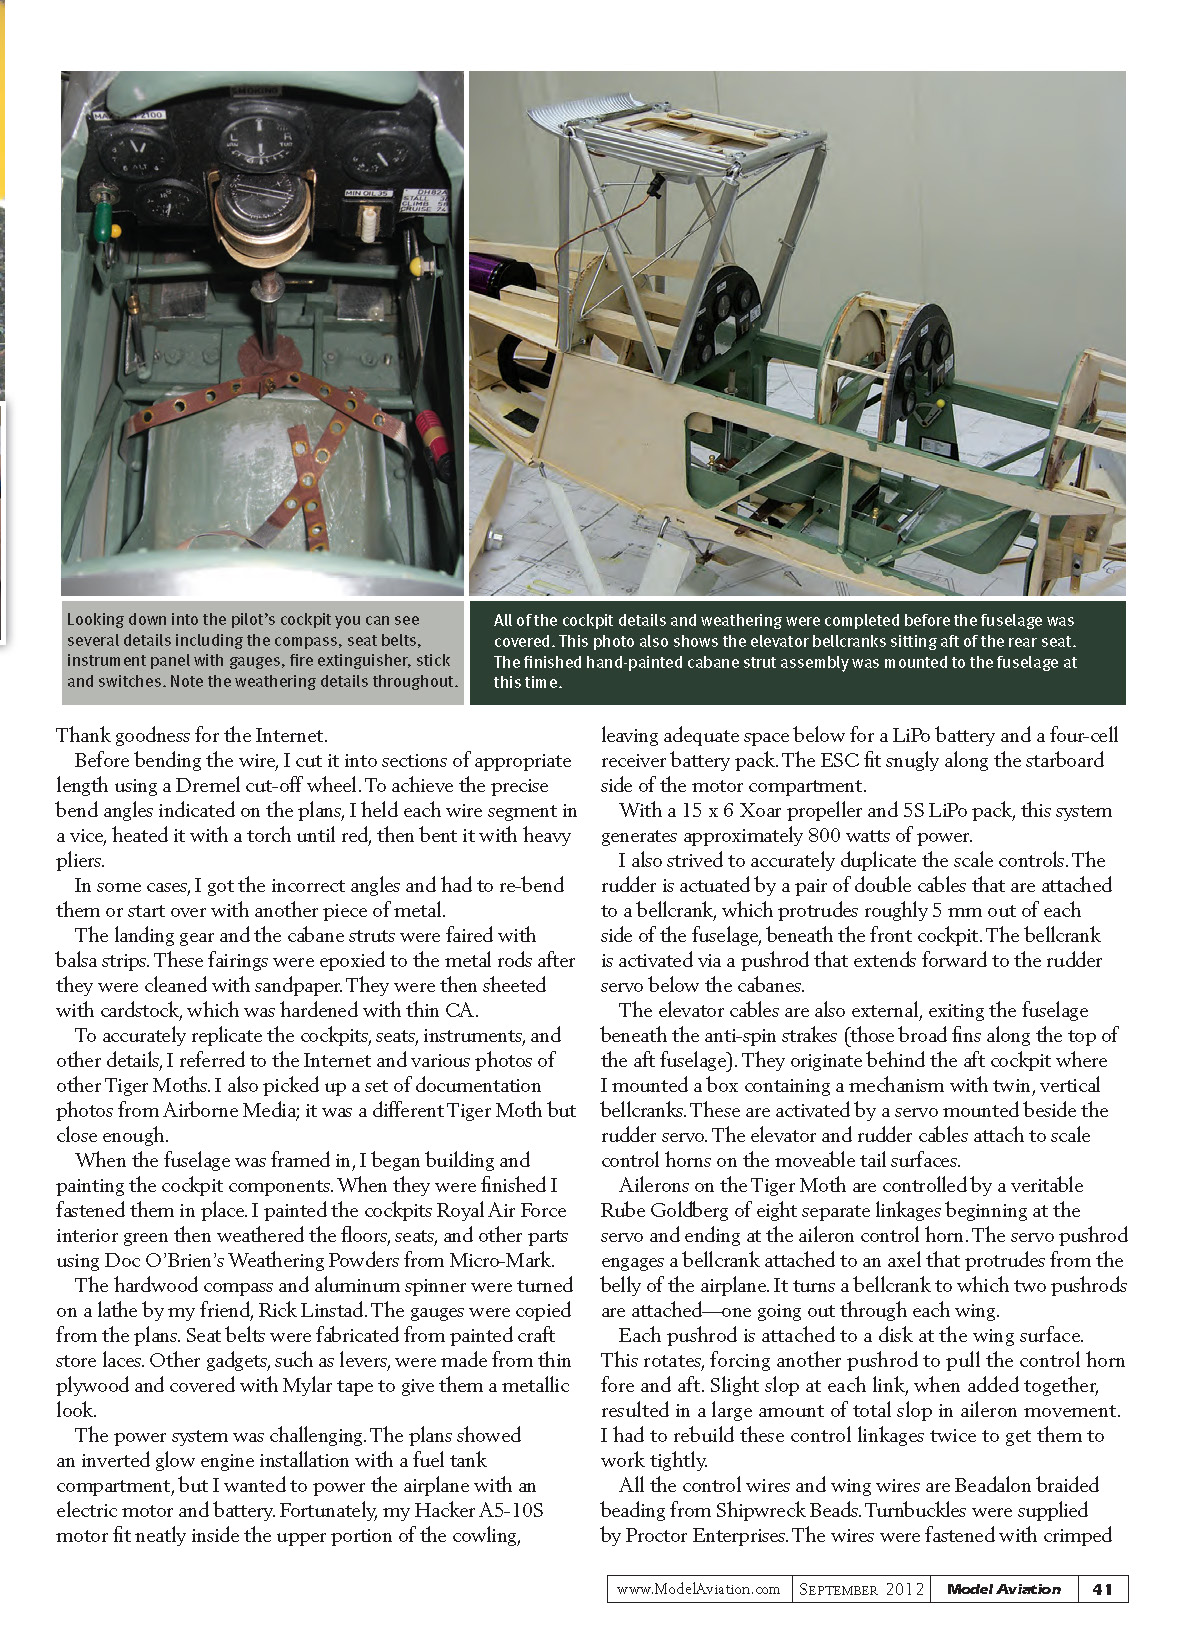
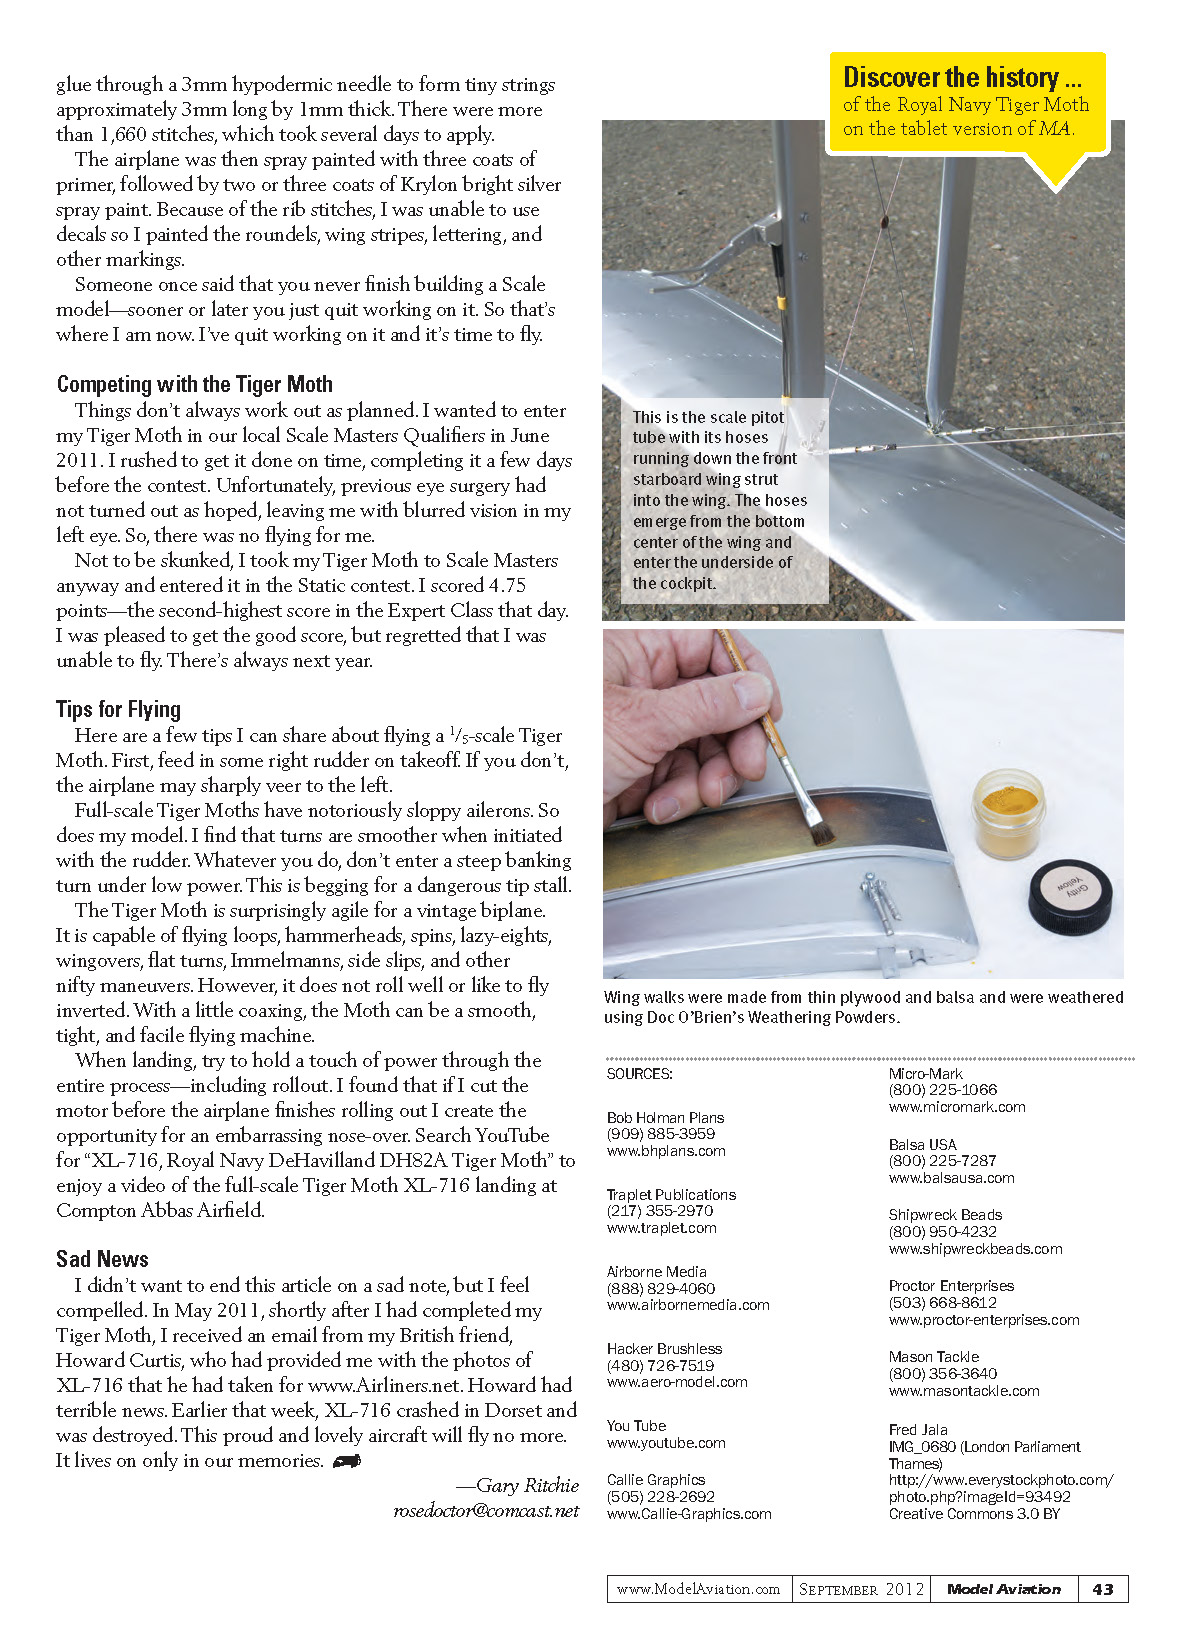
To accurately replicate the cockpits, seats, instruments, and other details, I referred to the Internet and various photos of other Tiger Moths. I also picked up a set of documentation photos from Airborne Media; it was a different Tiger Moth but close enough. When the fuselage was framed in, I began building and painting the cockpit components. When they were finished I fastened them in place. I painted the cockpits Royal Air Force interior green then weathered the floors, seats, and other parts using Doc O'Brien's Weathering Powders from Micro-Mark. The hardwood compass and aluminum spinner were turned on a lathe by my friend, Rick Linstad. The gauges were copied from the plans. Seat belts were fabricated from painted craft store laces. Other gadgets, such as levers, were made from thin plywood and covered with Mylar tape to give them a metallic look.
The power system was challenging. The plans showed an inverted glow engine installation with a fuel tank compartment, but I wanted to power the airplane with an electric motor and battery. Fortunately, my Hacker A5-10S motor fit neatly inside the upper portion of the cowling, leaving adequate space below for a LiPo battery and a four-cell receiver battery pack. The ESC fit snugly along the starboard side of the motor compartment. With a 15 x 6 Xoar propeller and 5S LiPo pack, this system generates approximately 800 watts of power.
I also strove to accurately duplicate the scale controls. The rudder is actuated by a pair of double cables attached to a bellcrank that protrudes roughly 5 mm out of each side of the fuselage, beneath the front cockpit. The bellcrank is activated via a pushrod that extends forward to the rudder servo below the cabanes.
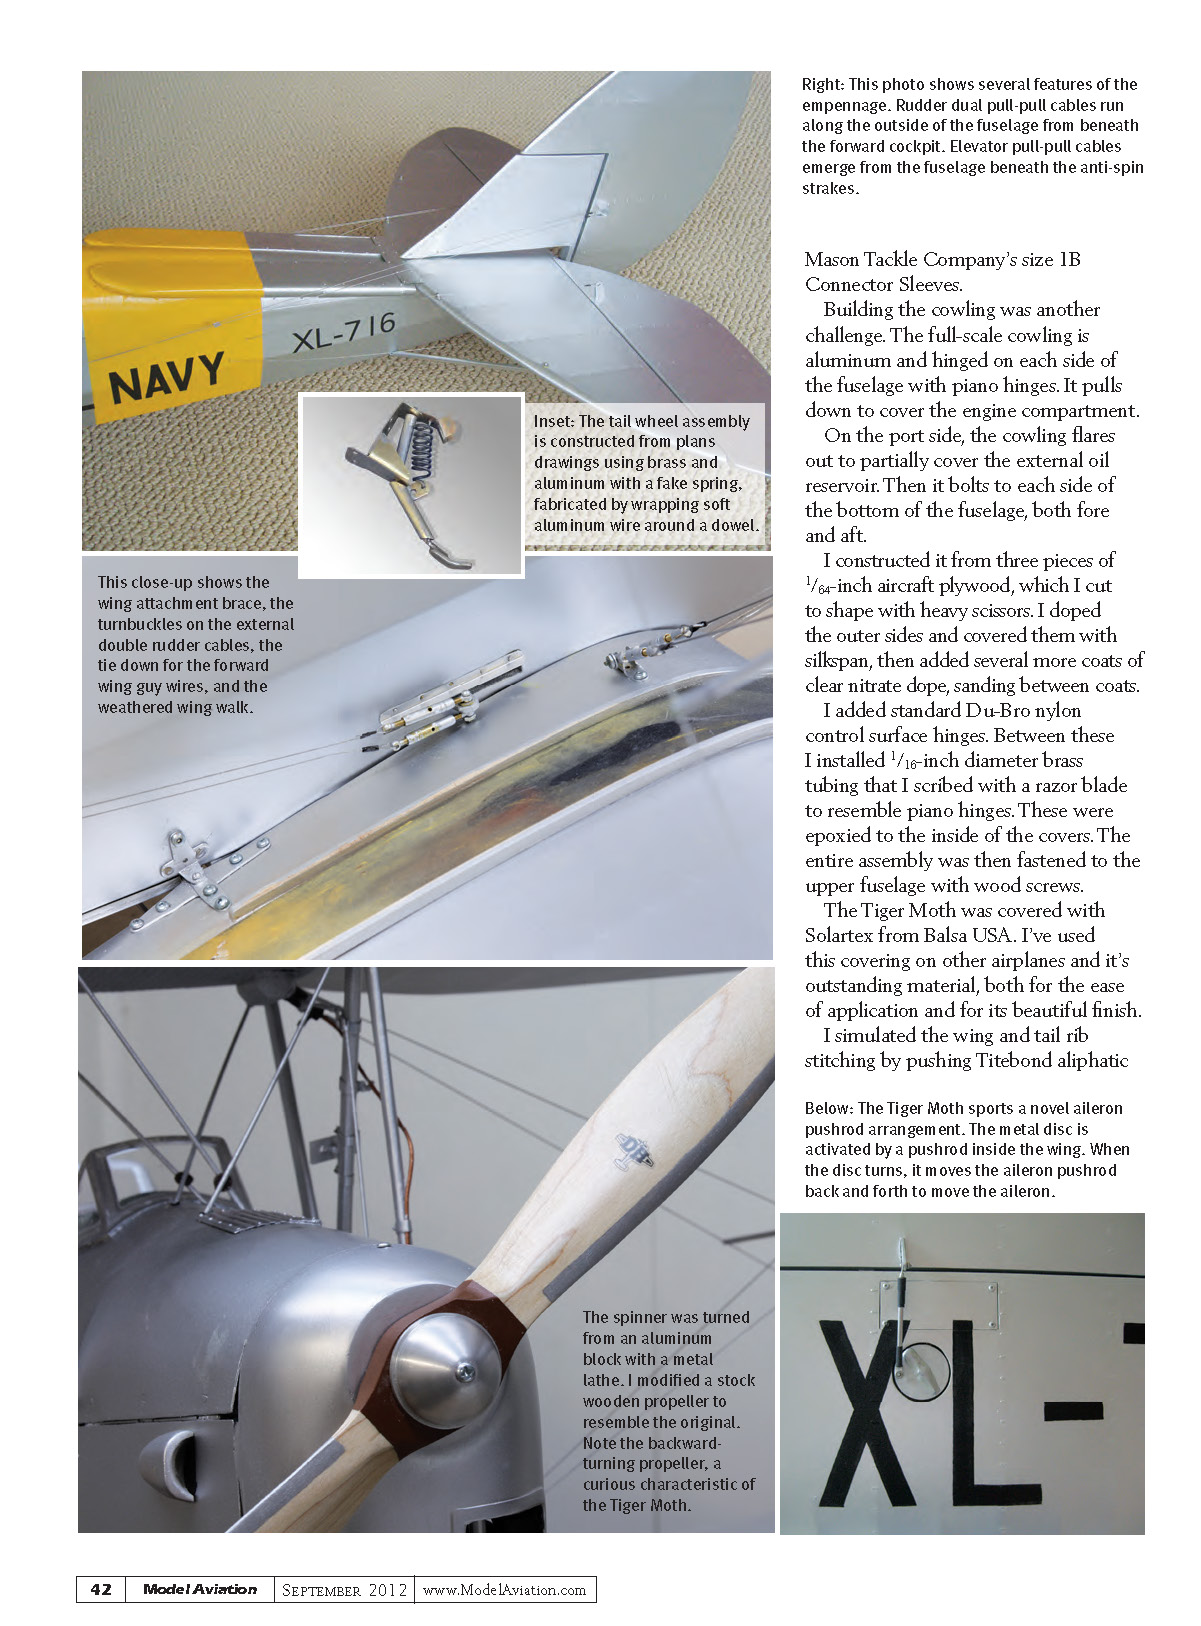
The elevator cables are also external, exiting the fuselage beneath the anti-spin strakes (those broad fins along the top of the aft fuselage). They originate behind the aft cockpit where I mounted a box containing a mechanism with twin, vertical bellcranks. These are activated by a servo mounted beside the rudder servo. The elevator and rudder cables attach to scale control horns on the moveable tail surfaces.
Ailerons on the Tiger Moth are controlled by a veritable Rube Goldberg of eight separate linkages beginning at the servo and ending at the aileron control horn. The servo pushrod engages a bellcrank attached to an axle that protrudes from the belly of the airplane. It turns a bellcrank to which two pushrods are attached—one going out through each wing. Each pushrod is attached to a disk at the wing surface. This rotates, forcing another pushrod to pull the control horn fore and aft. Slight slop at each link, when added together, resulted in a large amount of total slop in aileron movement. I had to rebuild these control linkages twice to get them to work tightly.
All the control wires and wing wires are Beadalon braided stainless fishing wire from Shipwreck Beads. Turnbuckles were supplied by Proctor Enterprises. The wires were fastened with crimped Mason Tackle Company size 1B connector sleeves.
Building the cowling was another challenge. The full-scale cowling is aluminum and hinged on each side of the fuselage with piano hinges. It pulls down to cover the engine compartment.
On the port side, the cowling flares out to partially cover the external oil reservoir, then it bolts to each side of the bottom of the fuselage, both fore and aft.
I constructed it from three pieces of 1/64-inch aircraft plywood, which I cut to shape with heavy scissors. I doped the outer sides and covered them with silkspan, then added several more coats of clear nitrate dope, sanding between coats.
I added standard Du-Bro nylon control surface hinges. Between these I installed 1/16-inch diameter brass tubing that I scribed with a razor blade to resemble piano hinges. These were epoxied to the inside of the covers. The entire assembly was then fastened to the upper fuselage with wood screws.
The Tiger Moth was covered with Solartex from Balsa USA. I've used this covering on other airplanes and it's outstanding material, both for the ease of application and for its beautiful finish.
I simulated the wing and tail rib stitching by pushing Titebond aliphatic glue through a 3 mm hypodermic needle to form tiny strings approximately 3 mm long by 1 mm thick. There were more than 1,660 stitches, which took several days to apply.
The airplane was then spray painted with three coats of primer, followed by two or three coats of Krylon bright silver spray paint. Because of the rib stitches, I was unable to use decals so I painted the roundels, wing stripes, lettering, and other markings.
Someone once said that you never finish building a scale model—sooner or later you just quit working on it. So that’s where I am now. I’ve quit working on it and it’s time to fly.
Competing with the Tiger Moth
Things don’t always work out as planned. I wanted to enter my Tiger Moth in our local Scale Masters Qualifiers in June 2011. I rushed to get it done on time, completing it a few days before the contest. Unfortunately, previous eye surgery had not turned out as hoped, leaving me with blurred vision in my left eye. So, there was no flying for me.
Not to be skunked, I took my Tiger Moth to Scale Masters anyway and entered it in the Static contest. I scored 4.75 points—the second-highest score in the Expert Class that day. I was pleased to get the good score, but regretted that I was unable to fly. There’s always next year.
Tips for Flying
Here are a few tips I can share about flying a 1/5-scale Tiger Moth. First, feed in some right rudder on takeoff. If you don’t, the airplane may sharply veer to the left.
Full-scale Tiger Moths have notoriously sloppy ailerons. So does my model. I find that turns are smoother when initiated with the rudder. Whatever you do, don’t enter a steep banking turn under low power. This is begging for a dangerous tip stall.
The Tiger Moth is surprisingly agile for a vintage biplane. It is capable of flying loops, hammerheads, spins, lazy-eights, wingovers, flat turns, Immelmanns, side slips, and other nifty maneuvers. However, it does not roll well or like to fly inverted. With a little coaxing, the Moth can be a smooth, tight, and facile flying machine.
When landing, try to hold a touch of power through the entire process—including rollout. I found that if I cut the motor before the airplane finishes rolling out I create the opportunity for an embarrassing nose-over. Search YouTube for "XL-716, Royal Navy DeHavilland DH82A Tiger Moth" to enjoy a video of the full-scale Tiger Moth XL-716 landing at Compton Abbas Airfield.
Sad News
I didn’t want to end this article on a sad note, but I feel compelled. In May 2011, shortly after I had completed my Tiger Moth, I received an email from my British friend, Howard Curtis, who had provided me with the photos of XL-716 that he had taken for www.Airliners.net. Howard had terrible news. Earlier that week, XL-716 crashed in Dorset and was destroyed. This proud and lovely aircraft will fly no more. It lives on only in our memories.
—Gary Ritchie rosedoctor@comcast.net
Transcribed from original scans by AI. Minor OCR errors may remain.

