
TIGER RAG
Peter Miller
Introduction
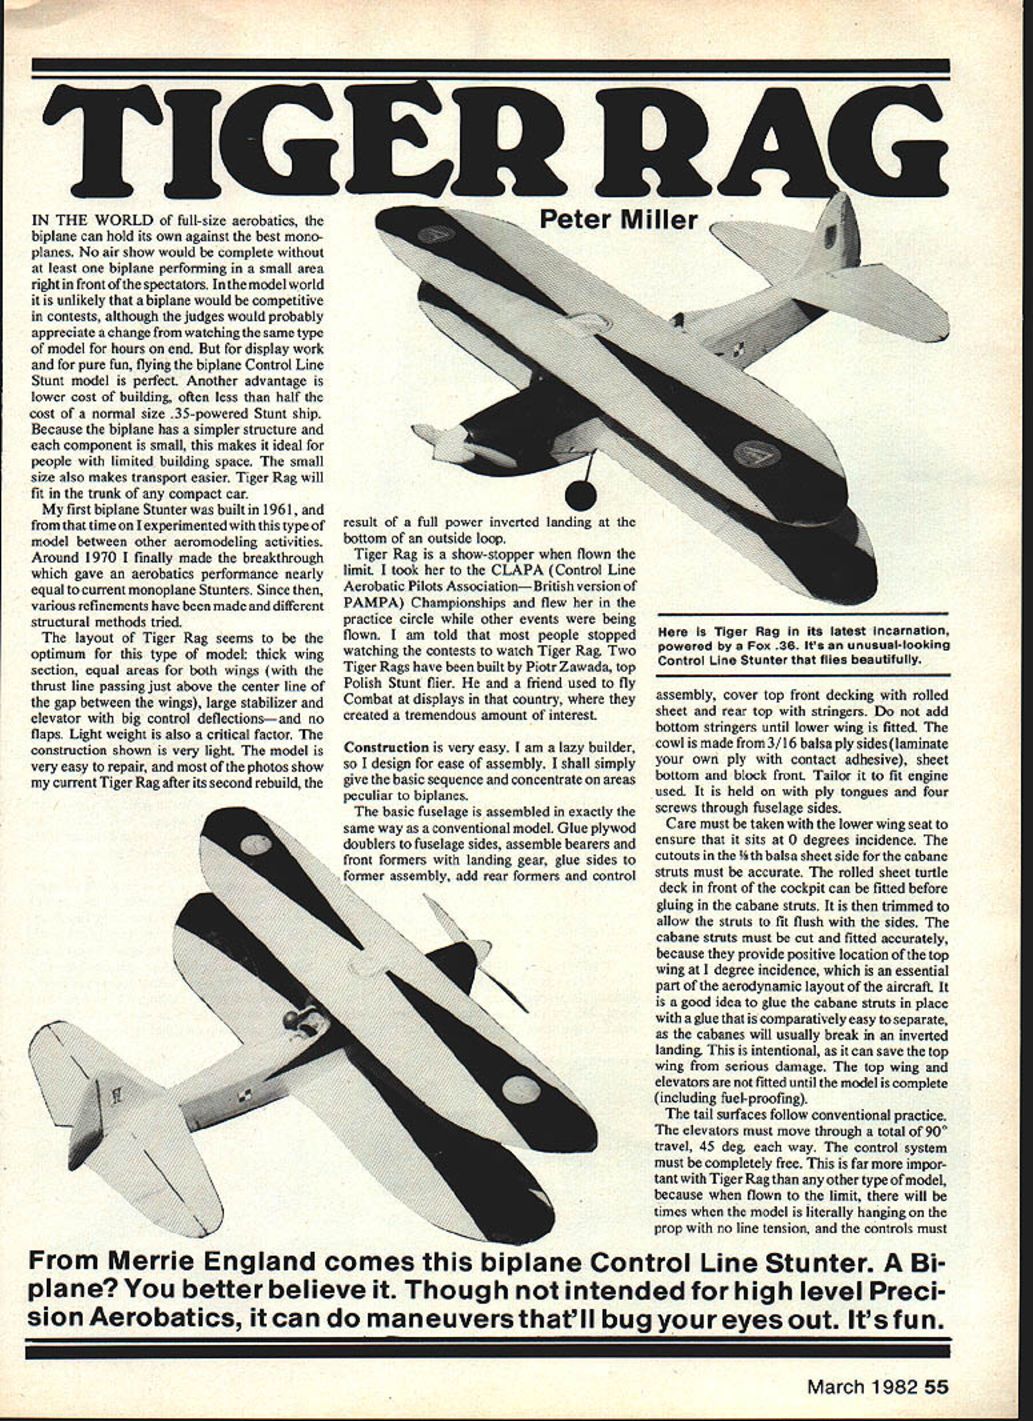
In the world of full-size aerobatics, the biplane can hold its own against the best monoplanes. No air show would be complete without at least one biplane performing in a small area right in front of the spectators. In the model world a biplane is unlikely to be competitive in contests, although judges may welcome a change from the same type of model for hours on end. For display work and pure fun, however, a biplane control-line stunt model is ideal. Another advantage is lower building cost—often less than half that of a typical .35-powered stunt ship. The simpler structure, small components and light weight make biplanes ideal for builders with limited workspace and for easy transport. Tiger Rag will fit in the trunk of any compact car.
My first biplane stunter was built in 1961. After years of experimentation, a breakthrough around 1970 produced aerobatic performance nearly equal to current monoplane stunters. Since then I have made refinements and tried different structural methods.
The layout of Tiger Rag appears optimum for this type of model: thick wing section, equal areas for both wings (with the thrust line passing just above the centre line of the gap between the wings), a large stabilizer and elevator with big control deflections — and no flaps. Light weight is critical. The construction shown is very light and easy to repair. Most photos show my current Tiger Rag after its second rebuild following a full-power inverted landing at the bottom of an outside loop.
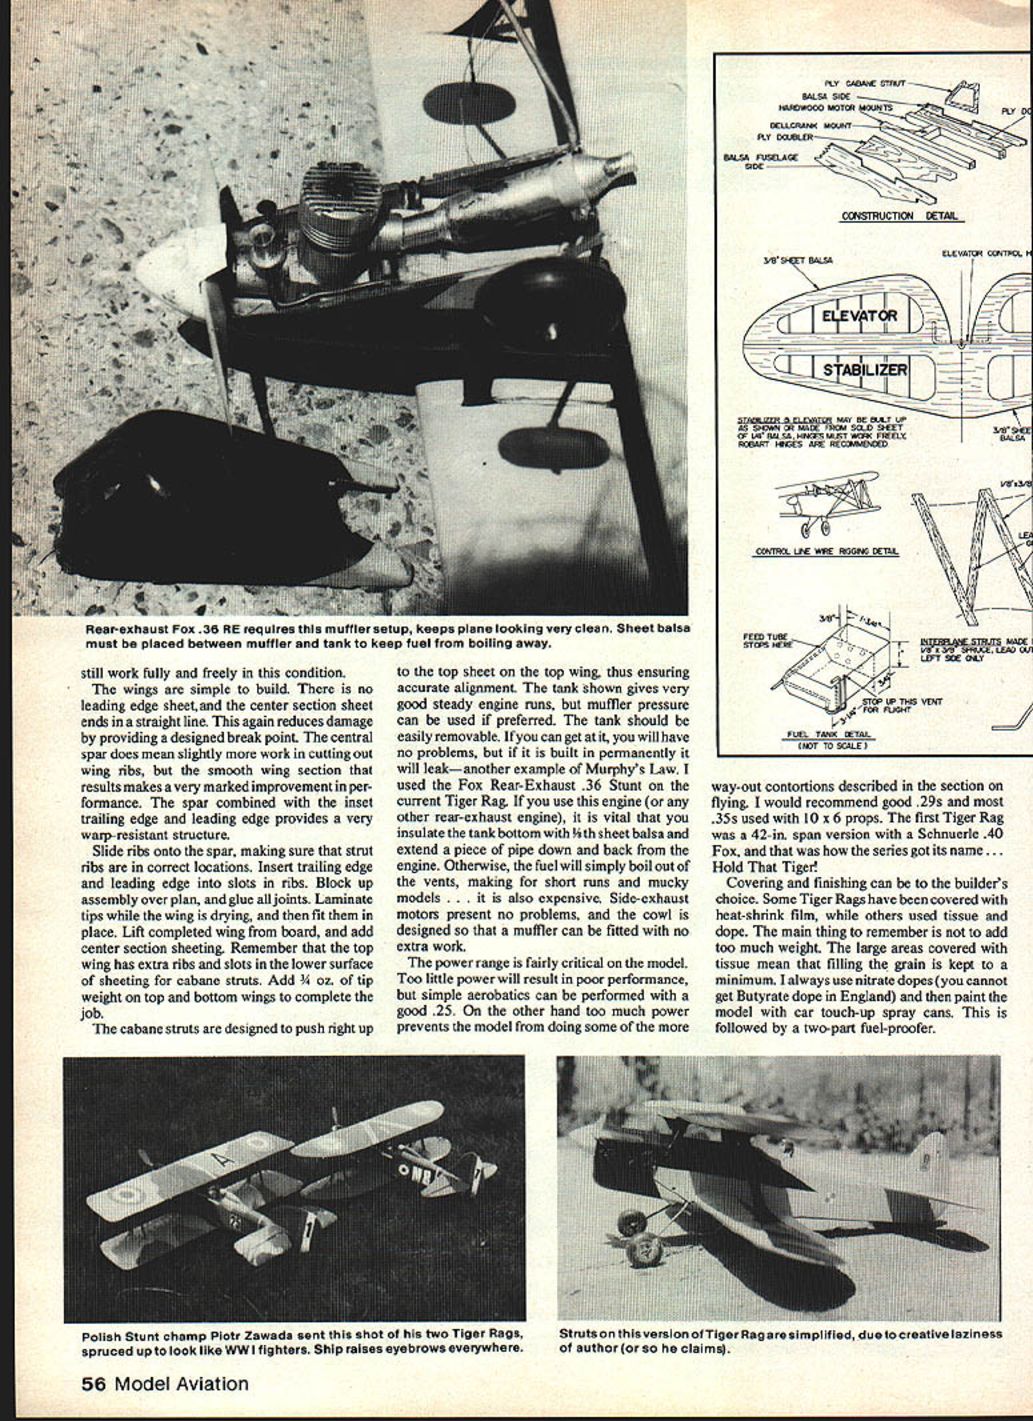
Tiger Rag is a show-stopper when flown to the limit. At the CLAPA (Control Line Aerobatic Pilots Association — British version of PAMPA) Championships I flew her in the practice circle while other events were on; many spectators stopped watching the contests to watch Tiger Rag. Two Tiger Rags were built by Piotr Zawada, a top Polish stunt flier. He and a friend used to fly combat at displays in Poland and created tremendous interest.
Construction
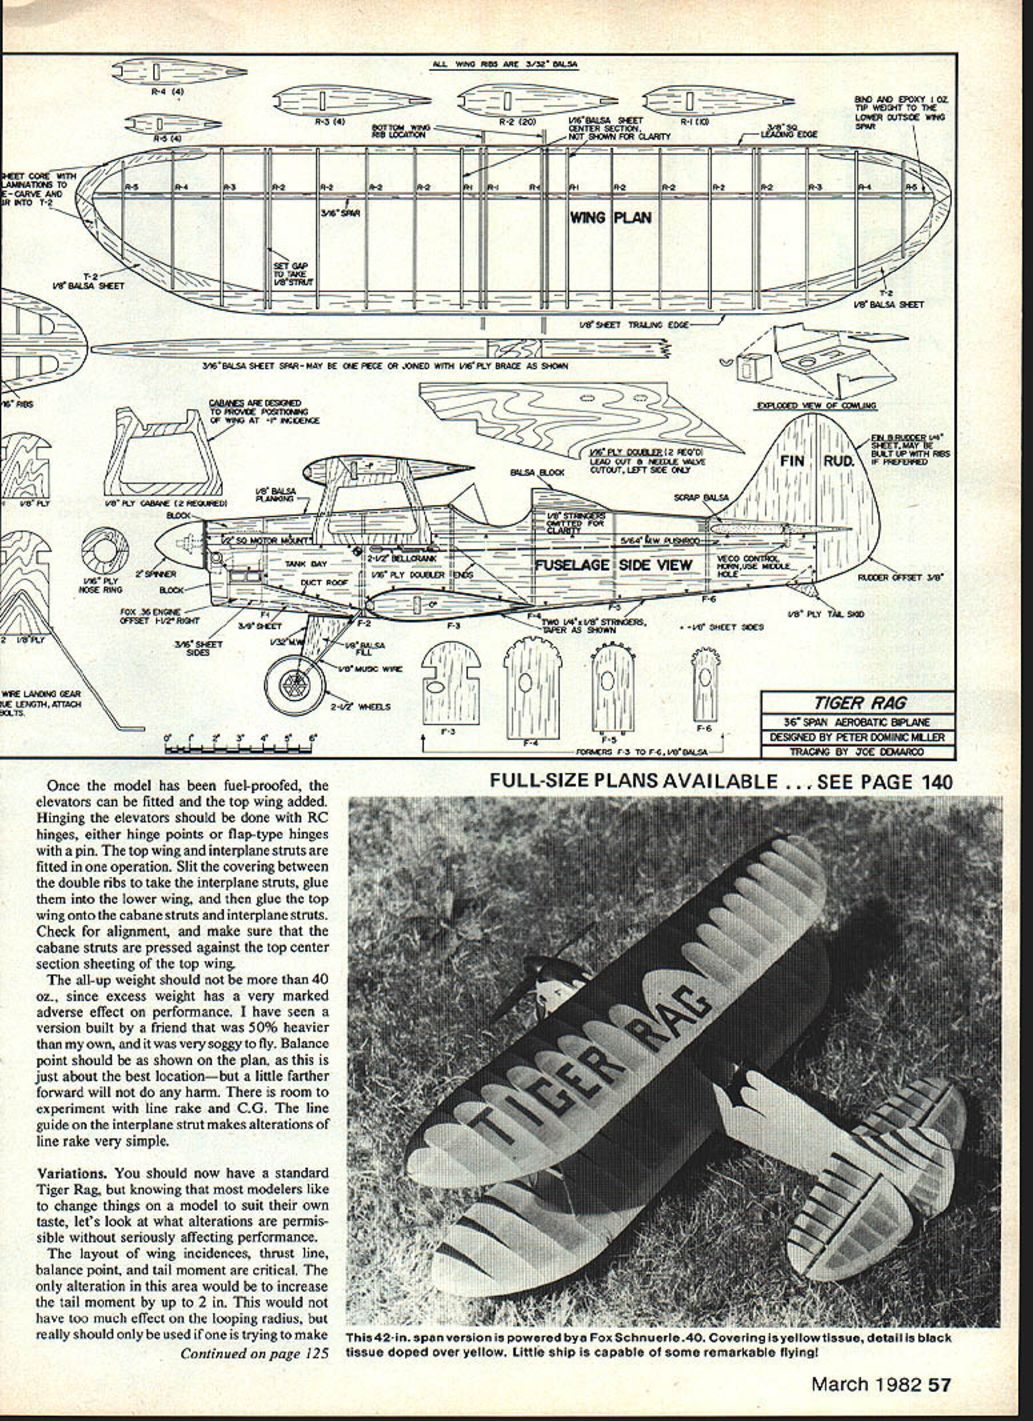
Construction is very easy — I design for ease of assembly. The basic fuselage is assembled the same way as a conventional model:
- Glue plywood doublers to fuselage sides.
- Assemble bearers and front formers with landing gear.
- Glue sides to former assembly.
- Add rear formers and control assembly.
- Cover top front decking with rolled sheet and rear top with stringers.
- Do not add bottom stringers until the lower wing is fitted.
The cowl is made from 3/16" balsa ply sides (laminate your own ply with contact adhesive), sheet bottom and block front. Tailor the cowl to fit the engine used. It is held on with ply tongues and four screws through the fuselage sides.
Care must be taken with the lower wing seat to ensure it sits at 0° incidence. Cutouts in the 1/8" balsa sheet side for the cabane struts must be accurate. The rolled-sheet turtle deck in front of the cockpit can be fitted before gluing in the cabane struts; trim it so the struts fit flush with the sides. The cabane struts must be cut and fitted accurately because they provide positive location of the top wing at 1° incidence — an essential part of the aerodynamic layout. It is a good idea to glue the cabane struts in place with a glue that is comparatively easy to separate, as the cabanes will usually break in an inverted landing. This is intentional and can save the top wing from serious damage. The top wing and elevators are not fitted until the model is complete (including fuel-proofing).
Controls and tail
Tail surfaces follow conventional practice. Elevators must move through a total of 90° travel, 45° each way. The control system must be completely free. This is especially important with Tiger Rag, because when flown to the limit there will be times when the model is literally hanging on the prop with no line tension; the controls must work fully and freely in this condition.
Wings
The wings are simple to build. There is no leading-edge sheeting; the centre-section sheeting ends in a straight line. This reduces damage by providing a designed break point. A central spar does mean slightly more work cutting out wing ribs, but the smooth wing section that results makes a marked improvement in performance. The spar combined with the inset trailing edge and leading edge provides a very warp-resistant structure.
Build sequence:
- Slide ribs onto the spar, making sure strut ribs are in correct locations.
- Insert trailing edge and leading edge into slots in the ribs.
- Block up assembly over the plan and glue all joints.
- Laminate tips while the wing is drying, then fit them in place.
- Lift completed wing from the board and add centre-section sheeting.
Remember that the top wing has extra ribs and slots in the lower surface of the sheeting for cabane struts. Add 1/2 oz. of tip weight on both top and bottom wings to finish.
The cabane struts are designed to push right up to the top sheet on the top wing, ensuring accurate alignment. Slit the covering between the double ribs to take the interplane struts, glue them into the lower wing, then glue the top wing onto the cabane and interplane struts. Check alignment and make sure the cabane struts are pressed against the top centre-section sheeting of the top wing. The top wing and interplane struts are fitted in one operation. The top wing and elevators are fitted only after fuel-proofing.
Engine, tank and power range
The tank shown gives very good steady engine runs, but muffler pressure systems can be used if preferred. The tank should be easily removable; permanent, hard-to-access tanks often leak. I used the Fox Rear-Exhaust .36 Stunt on the current Tiger Rag. If you use this or any rear-exhaust engine, insulate the tank bottom with 1/8" sheet balsa and extend a piece of pipe down and back from the engine. Otherwise fuel will boil out of the vents, causing short runs and messy, expensive problems. Side-exhaust motors present no problems, and the cowl is designed to accept a muffler with no extra work.
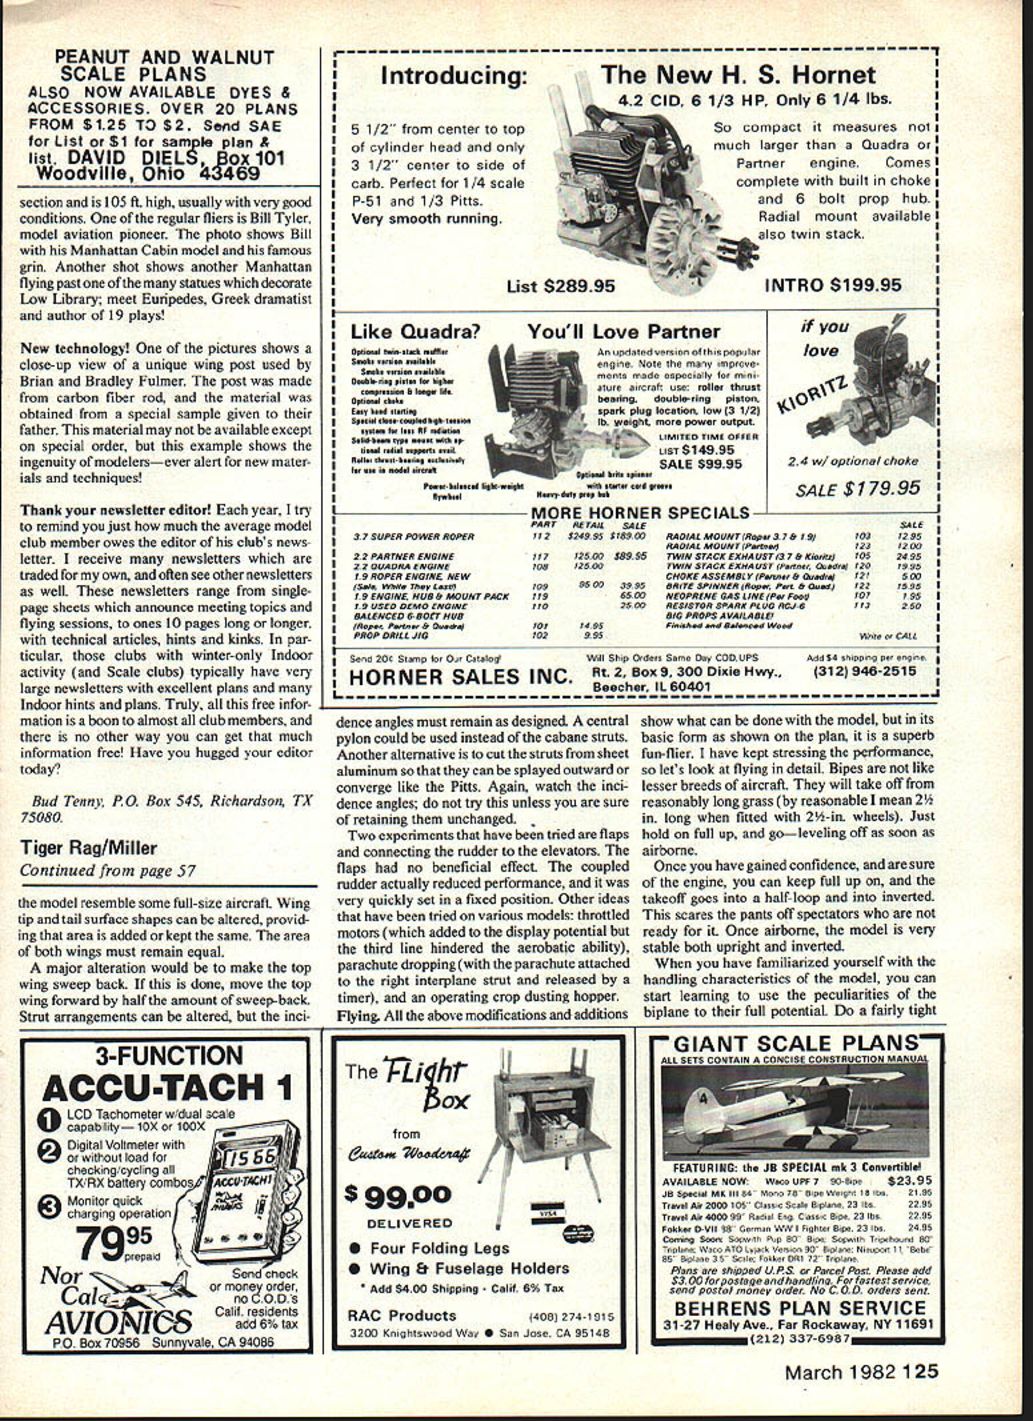
The power range is fairly critical. Too little power results in poor performance, though simple aerobatics can be done with a good .25. Too much power prevents some extreme maneuvers described in the flying section. I recommend good .29s and most .35s used with 10x6 props. The first Tiger Rag was a 42 in. span version with a .40 Fox — hence the series name: Hold That Tiger!
A spacer should be placed between the muffler and the tank to keep fuel from boiling away; the engine will still run freely.
Covering and finishing
Covering and finishing are up to the builder. Some Tiger Rags have been covered with heat-shrink film; others use tissue and dope. The main thing is not to add too much weight. Large tissue-covered areas mean minimal grain filling. I use nitrate dopes (butyrate dope is not available in England) and then paint with car touch-up spray cans. This is followed by a two-part fuel-proofer. Once fuel-proofed, fit the elevators and add the top wing.
Hinge the elevators with RC hinges — either hinge-point or flap-type hinges with a pin.
Weight, balance and line rake
The all-up weight should not exceed 40 oz.; excess weight markedly degrades performance. I have seen a version 50% heavier than mine, and it was very sluggish. Balance point should be as shown on the plan; this location is about optimal, though a little further forward is tolerable. There is room to experiment with line rake and C.G. The line guide on the interplane strut makes line rake alterations simple.
Variations
Most modelers like to modify designs. The following alterations are permissible without seriously affecting performance, provided you respect critical geometry:
- Keep wing incidences, thrust line, balance point and tail moment close to the design. The tail moment may be increased by up to 2 in. if desired (mainly for scale appearance).
- Wing tip and tail surface shapes may be altered if area is maintained or increased. The area of both wings must remain equal.
- Sweep the top wing back, but move the top wing forward by half the amount of sweep-back.
- Strut arrangements can be altered, but incidence angles must remain as designed. A central pylon may be used instead of cabane struts. Sheet-aluminium struts can be cut so they splay outward or converge (like the Pitts) — again, retain incidence angles.
Experiments tried include:
- Flaps: no beneficial effect.
- Coupling rudder to elevators: reduced performance; the rudder was soon fixed.
- Throttled motors: added display potential but the third line hindered aerobatic ability.
- Parachute drooping: parachute attached to right interplane strut and released by timer.
- Operating crop-dusting hopper.
Flying
In basic form, Tiger Rag is a superb fun-flier. Biplanes are robust in handling and will take off from reasonably long grass (I mean about 2½ ft. long when fitted with 2½-in. wheels). For basic takeoff, hold full up and go — level off as soon as airborne.
When confident and sure of the engine, one can keep full up on and the takeoff can go into a half-loop and into inverted flight — a crowd-pleaser. Once airborne, the model is very stable both upright and inverted.
As you become familiar with handling, learn to exploit biplane peculiarities. It is quite possible to fly every stunt in the book; do each one gradually until completely familiar with the model.
Flick loops and hovers
Try flick loops as follows:
- Start with a loop beginning and ending about 15 ft. up.
- Continue into a second loop, but as soon as the model reaches the vertical climb position, apply full up elevator. The model will loop in its own length.
- The first few times, neutralize the elevators as the model reaches normal upright flight and fly around.
- Progress to continuing the flick loop until the model points straight up, then neutralize elevators.
Three outcomes depend on power available:
- Insufficient power: model starts to sink slowly in a tail slide — apply full down immediately and fly away when nose drops.
- Just right power: model slowly climbs vertically; when lost height is recovered you can repeat the flick loop.
- Rare case: model hangs without gain or loss of height — spectacular and safe. Slight up or down elevator will tilt the model and it will start moving around the circle. Slowly increase elevator to transition back into level flight, upright or inverted. Slight up then slight down can make the model sway forward and backward — useful in slow climb situations.
Be cautious: do not overdo flick loops to the point where the lines lock up. Occasionally fly outside loops to unwind the lines. Consecutive flick loops can cause height loss between each one; the last may brush the ground with the tail or drop the model onto its wheels, which is usually followed by a normal takeoff. Most crashes at this stage occur at very low speed and rarely cause major damage.
Outside loops tend to be bigger than inside loops and have less line tension.
Landings and wind handling
Landings are easy but keep the nose down. Do not attempt to float the model around the circle — the biplane’s high drag bleeds off speed quickly.
Wind is not a problem. It helps in flick loops and hovers. In breezy conditions I take off at about 45° into the wind and go straight into inverted; this prevents the wind from getting under the tail and tipping the model nose-first and allows speed to build before coming into the wind. In very windy conditions, the entire flight can be made on the downwind half of the circle. I have also made complete flights while lying on my back on the ground.
Conclusion
I hope you will be tempted to build Tiger Rag. I can promise you will never regret it. If you are the first in your club to build one, you certainly won't be the last — the bug is infectious (and incurable).
Transcribed from original scans by AI. Minor OCR errors may remain.

