

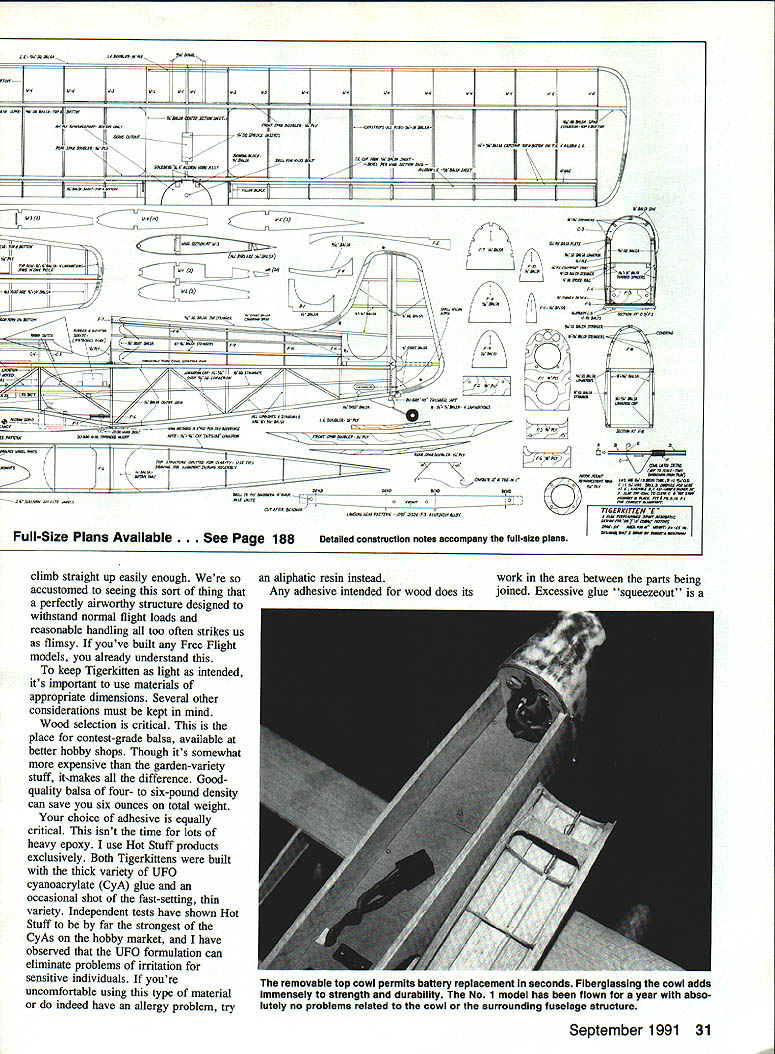
Tigerkitten "E"
Here's a sport-aerobatic electric that looks like a full-scale airplane and performs like a gas model. Tigerkitten "E" began to take shape in late 1988 after a year of building and flying electrics and watching many others fly. Tired of the backhanded compliment, "That flies pretty well for an electric," I set out to create an electric that required no excuses at the flying field.
After analyzing existing electric designs I took a proven layout — my Bobcat Mk.2 — reduced its size for .05-class motors, and completely re-engineered the structure to take advantage of the near lack of vibration from electric power. The aerodynamic layout was retained while the structure was lightened to offset battery/motor weight. The goal: maximize performance using readily available, off-the-shelf electric power systems and a state-of-the-art airframe. Build to fly, not to crash.
Development and contest results
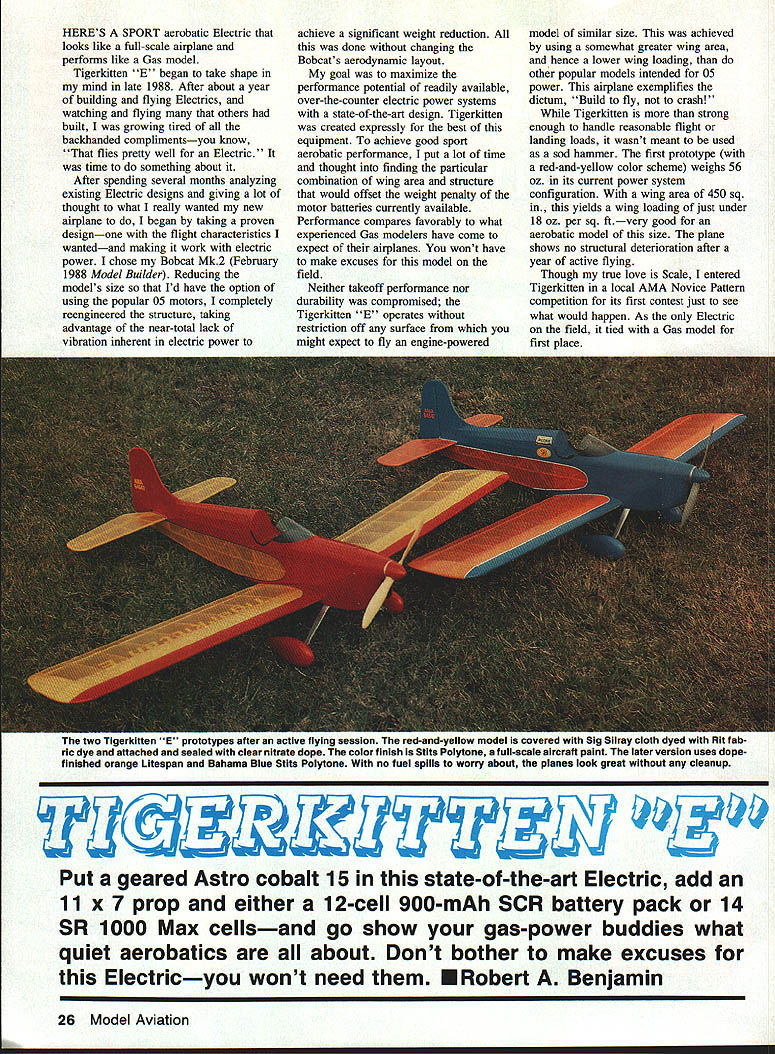
- Prototype 1 (red-and-yellow) — current weight 56 oz.; wing area 450 sq. in.; wing loading just under 18 oz./sq. ft. — has shown no structural deterioration after a year of active flying.
- The Tigerkitten tied with a gas model for first place in a local AMA Novice Pattern contest as the only electric on the field.
- At the 1990 U.S. Scalemasters (Dallas) I demonstrated the red-and-yellow prototype in windy conditions (20+ mph); it flew a clean, silent aerobatic routine and performed admirably.
Prototypes and recommended starting setup
- If you are not committed to specific equipment, start with a geared Astro Cobalt 15 and a 12-cell battery pack.
- If you already have a geared .05, expect similar handling on a nine-cell battery but about 5 oz. lighter and with several minutes less duration.
- The 12-cell / Cobalt-15 combination yields honest seven- to eight-minute flights with mixed aerobatics and cruising.
Power systems
One key to Tigerkitten's success is using high-quality cobalt motor systems. I recommend Astro Flight's cobalt line — they handle the high sustained current loads required for strong, prolonged aerobatic performance without deterioration. Pay for quality.
Prototype power examples:
- Prototype 1 (.05-class approach)
- Geared Astro Cobalt .05 (stock geared)
- Initially: 7 × 1200-mAh Sanyo SCR cells, cleaned-up Rev-Up 11 × 7 prop — acceptable but not outstanding.
- Current: 9 × 1200-mAh SCR cells, cleaned-up Super M 11 × 8-1/4 prop (no longer marketed). A cleaned-up Rev-Up 11-1/2 × 8 gives nearly the same performance.
- Reduced power loss by replacing stock connectors with Sermos connectors (Astro Flight expected to introduce a competitive low-loss connector).
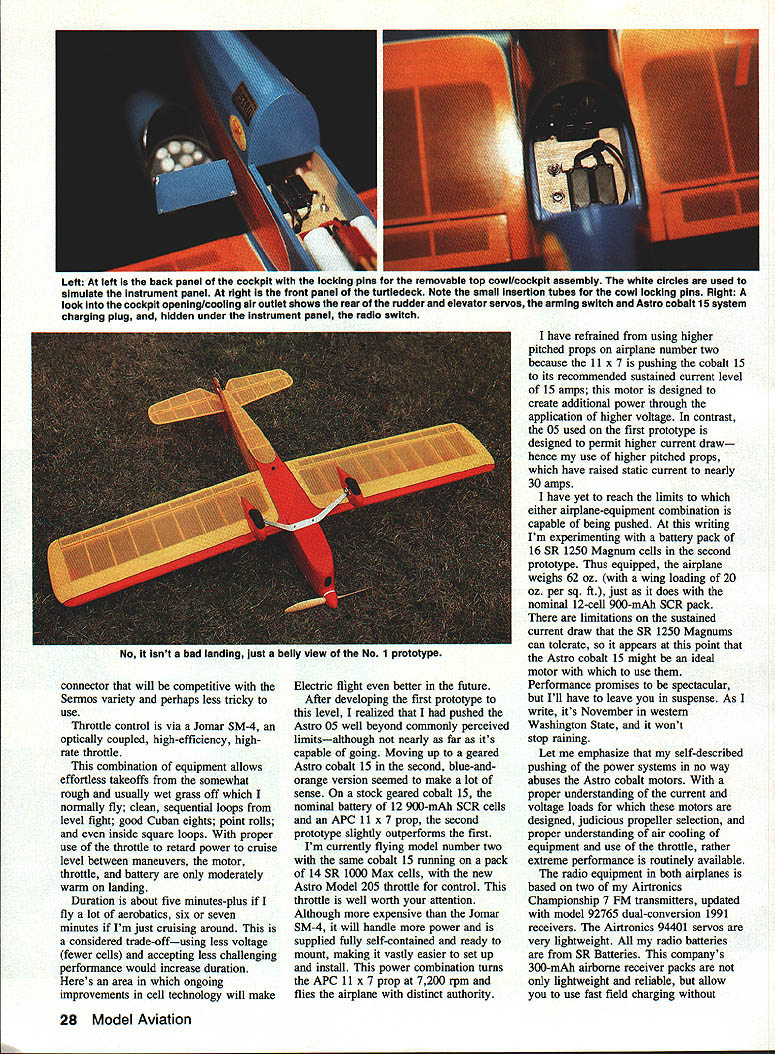
- Throttle: Jomar SM-4 (optically coupled, high-efficiency, high-rate).
- Performance: effortless rough-grass takeoffs, clean sequential loops, Cuban eights, point rolls, even inside square loops. Duration: ~5+ minutes when flying many aerobatics, 6–7 minutes cruising.
- Note: High-pitched props raised static current to nearly 30 amps on the .05 setup.
- Prototype 2 (recommended)
- Geared Astro Cobalt 15 (stock geared)
- Nominal battery: 12 × 900-mAh SCR cells with APC 11 × 7 prop — slightly outperforms prototype 1.
- Current flying: 14 × SR-1000 Max cells with Astro Model 205 throttle (self-contained, higher power handling). This combination turns an APC 11 × 7 at ~7,200 rpm and gives authoritative control.
- Experimenting with 16 × SR-1250 Magnum cells (airplane ~62 oz., wing loading ~20 oz./sq. ft.). There are sustained-current limits for the SR-1250s, suggesting the Cobalt 15 may be ideal for those cells.
- The Cobalt 15 is designed to develop additional power via higher voltage (more cells), whereas the .05 is designed to accept higher current.
General notes:
- With proper prop selection, cooling, and throttle use, cobalt motors can be pushed to yield extreme performance without abuse.
- Throttles mentioned: Jomar SM-4 and Astro Model 205 (latter is easier to install and handles more power).
Radio and onboard equipment
- Transmitters: Airtronics Championship 7 FM.
- Receivers: Airtronics model 92765 dual-conversion 1991 receivers.
- Servos: Airtronics 94401 (very lightweight).
- Receiver batteries: SR Batteries 300-mAh airborne packs (lightweight, reliable, tolerate fast field charging).
- Range-check with and without motor running; use an ESV (expanded scale voltmeter) on receiver and transmitter batteries before each session.
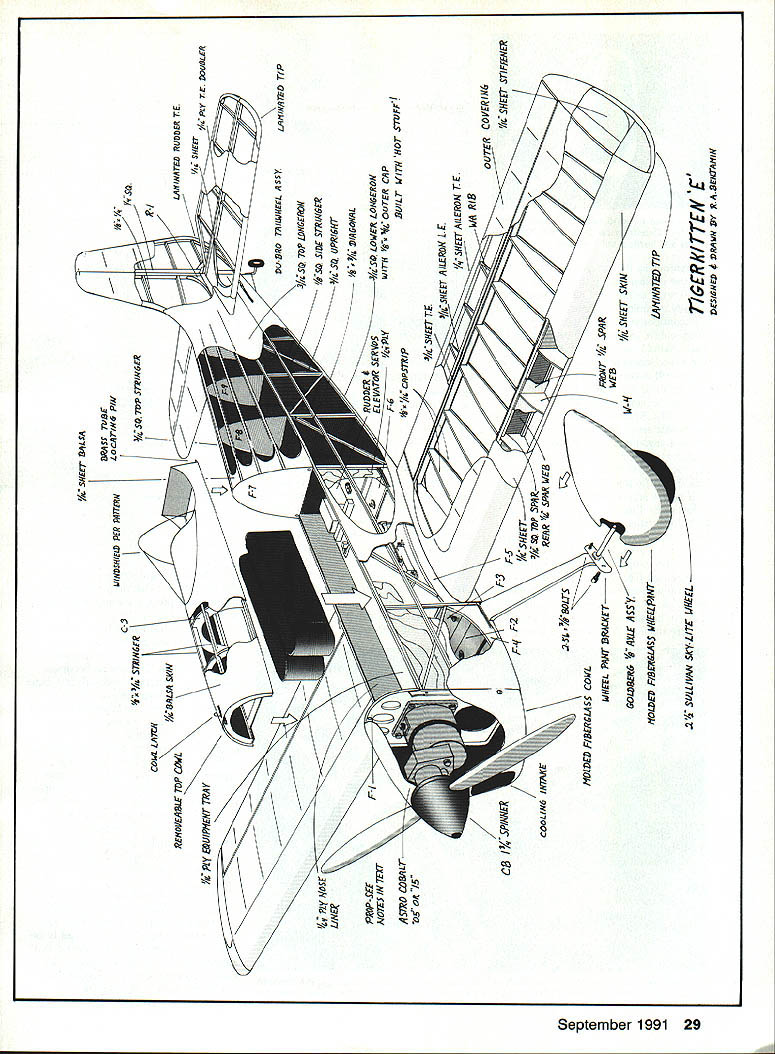
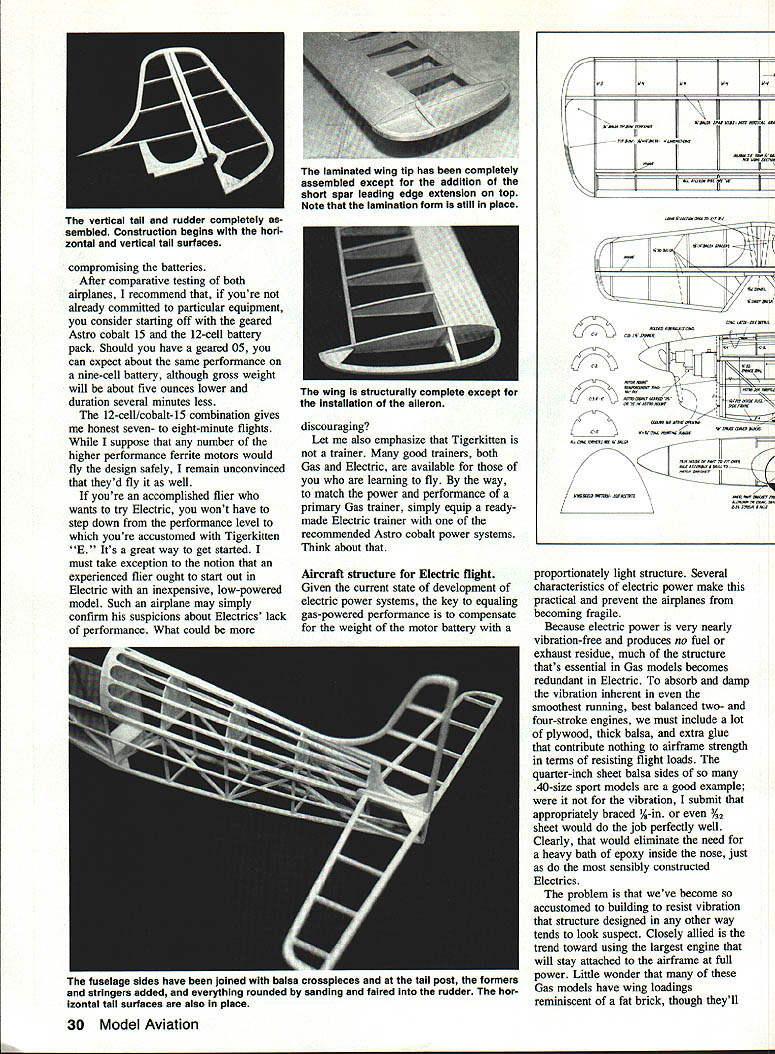
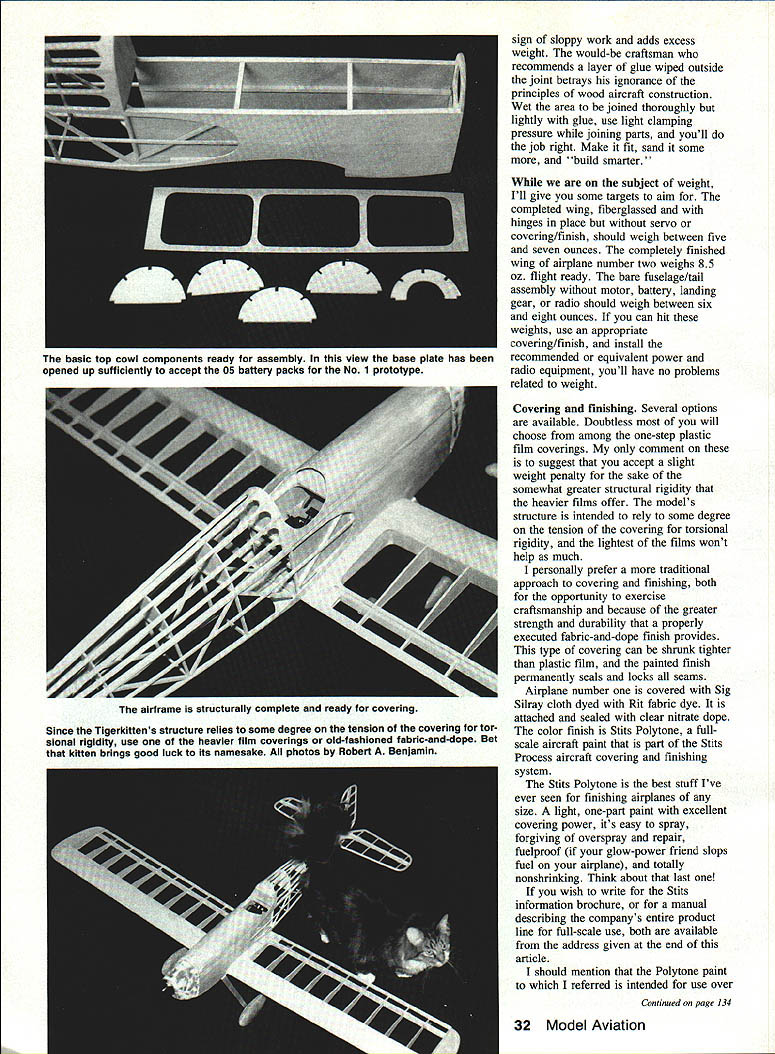
Aircraft structure for Electric flight
Electric power lets you significantly reduce unnecessary structure that exists primarily to resist engine vibration. Use lighter construction where appropriate; electric flight is nearly vibration-free and produces no fuel or exhaust residue.
Key construction recommendations:
- Use contest-grade balsa (good-quality 4–6 lb density) — it can save several ounces overall.
- Adhesives: avoid heavy epoxies where unnecessary. I use Hot Stuff UFO cyanoacrylate (thick variety, with occasional thin for capillary joints). If allergic or uncomfortable with CyA, use an aliphatic resin.
- Glue sparingly: wet the joint lightly but thoroughly, clamp with light pressure. Excess squeeze-out is wasted weight.
- Target weights (guidelines):
- Completed wing (fiberglassed, hinges in place, without servo or covering): 5–7 oz. The finished wing on prototype 2 weighs ~8.5 oz. flight-ready.
- Bare fuselage/tail assembly (without motor, battery, landing gear, or radio): 6–8 oz.
- Use materials of appropriate dimensions and build for loads expected in normal flight and handling. A structure that looks light is not necessarily weak if properly engineered and built.
Covering and finishing
Options:
- Plastic shrink films (one-step): convenient; consider accepting a slight weight penalty for heavier film that provides greater torsional rigidity since the structure depends somewhat on covering tension.
- Fabric-and-dope (preferred): stronger, more durable, can be shrunk tighter than film, and painted finishes permanently seal seams.
My coverings:
- Prototype 1: Sig Stitsray cloth dyed with Rit fabric dye, sealed with clear nitrate dope, finished with Stits Polytone (full-scale aircraft paint). Stits Polytone is light, easy to spray, forgiving of repairs, fuelproof, and nonshrinking.
- Prototype 2: Litespan (heat-shrink plastic from England; distributed by Idealair Models and Charlie's R/C Goodies). Litespan: 1/2 oz. per sq. ft., paintable, applied with an iron and brushed-on adhesive. I used transparent orange Litespan, two coats clear nitrate dope (tightens it further), Bahama Blue Stits Polytone, white striping tape, and two coats of clear Polytone. The paint adds tautness, gloss, and durability for a few ounces of weight.
- Markings: custom Tigerkitten "E" markings from Vinylwrite Custom Lettering.
Preparing for flight
Controls and throws:
- Aileron differential: about 2:1 (can be achieved by bending aileron horns forward and/or attaching pushrods behind servo output). Objective: avoid transmitter differential and prevent sluggish down-aileron response.
- Aileron throws for coordination with rudder to reduce adverse yaw: start with about 20° up and 10° down.
- Elevator: ~20° each way.
- Rudder: at least 35°.
- Install the battery pack and move it fore/aft to balance at the recommended CG: 25% of chord (shown on the plan). This balance point gives good responsiveness without being jumpy. For snappier stall maneuvers, move CG back to 30–33% chord.
Preflight checks:
- Range-check with and without motor running.
- Check transmitter and receiver batteries with an ESV.
- Verify the airplane is balanced, aligned, and warp-free.
- With the model on the ground and motor running in short bursts, rotate the model until prop wash is on the tail and note down-elevator trim required. Do a short-power hop to check CG and landing attitude; adjust battery position as needed.
Takeoff and landing technique:
- Takeoff: elevator neutral, full power; the Tigerkitten rotates and lifts in a short distance; use a slight up-elevator to hold the climb.
- Landing: use soft power and a normal glide approach; keep speed up in the flare to avoid stalling. The model handles crosswinds well due to generous fin and keel area. Many pilots prefer a wheel landing (mains first, tailwheel in the air) rather than three-point.
Flying tips
- Start sharp and anticipate control inputs. Build speed and fly fast and flat until you know what the airplane will do.
- Trim as indicated: Tigerkitten "E" will track where you point it with a touch of positive stability.
- Try different prop/battery combinations to tailor performance and duration.
- I welcome feedback from builders and flyers to broaden the shared experience; a 40-size version may be considered in the future depending on community input.
Good luck, and think Electric!
— Robert A. Benjamin
Bill of Materials
Balsa (all sheet stock contest grade; all strip stock light but firm):
- 1/16" × 3" × 36" — 1 piece
- 3/16" × 2" × 36" — 2 pieces
- 1/8" × 2" × 36" — 1 piece
- 1/4" × 2" × 36" — 1 piece
- 1/2" sq. × 36" — 10 pieces
- 1/4" sq. × 36" — 4 pieces
(Other materials, hardware, and specific plan items are detailed on the construction plans.)
Stits product information
Stits products and manuals are available through: Bob's Aircraft Supply & Avionics Attention: Karen Sandberg Pierce County Airport, 17017 Meridian E., Puyallup, WA 98373 Telephone: 800-331-4375 or 206-848-9349 (from Canada)
Karen Sandberg can supply Stits products by mail order in quantities modelers use, and a complete Stits manual is available (purchase information through the contact above).
Transcribed from original scans by AI. Minor OCR errors may remain.

