
Time for the Hobby
Luther Hux
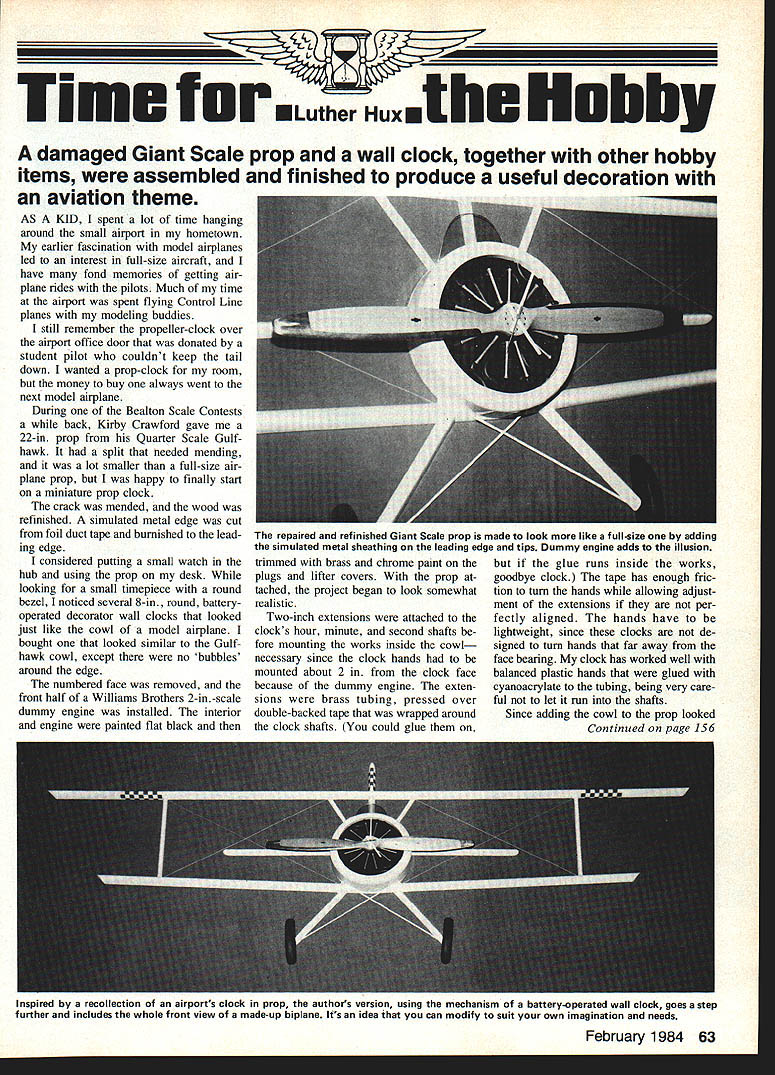
A damaged Giant Scale prop and a wall clock, together with other hobby items, were assembled and finished to produce a useful decoration with an aviation theme.
As a kid, I spent a lot of time hanging around the small airport in my hometown. My earlier fascination with model airplanes led to an interest in full-size aircraft, and I have many fond memories of getting airplane rides with the pilots. Much of my time at the airport was spent flying control-line planes with my modeling buddies.
I still remember the propeller clock over the airport office door that was donated by a student pilot who couldn't keep the tail down. I wanted a prop clock for my room, but the money to buy one always went to the next model airplane.
During one of the Bealeton Scale Contests a while back, Kirby Crawford gave me a 22-in. prop from his quarter-scale Gulfhawk. It had a split that needed mending, and it was a lot smaller than a full-size airplane prop, but I was happy to finally start on a miniature prop clock.
The crack was mended, and the wood was refinished. A simulated metal edge was cut from foil duct tape and burnished to the leading edge.
I considered putting a small watch in the hub and using the prop on my desk. While looking for a small timepiece with a round bezel, I noticed several 8-in. round battery-operated decorator wall clocks that looked just like the cowl of a model airplane. I bought one that looked similar to the Gulfhawk cowl, except there were no "bubbles" around the edge.
The numbered face was removed, and the front half of a Williams Brothers 2-in.-scale dummy engine was installed. The interior and engine were painted flat black and then trimmed with brass and chrome paint on the plugs and lifter covers. With the prop attached, the project began to look somewhat realistic.
Two-inch extensions were attached to the clock's hour, minute, and second shafts before mounting the works inside the cowl — necessary since the clock hands had to be mounted about 2 in. from the clock face because of the dummy engine. The extensions were brass tubing, pressed over double-backed tape that was wrapped around the clock shafts. (You could glue them on, but if the glue runs inside the works, goodbye clock.) The tape has enough friction to turn the hands while allowing adjustment of the extensions if they are not perfectly aligned. The hands have to be lightweight, since these clocks are not designed to turn hands that far away from the face bearing. My clock has worked well with balanced plastic hands that were glued with cyanoacrylate to the tubing, being very careful not to let it run into the shafts.
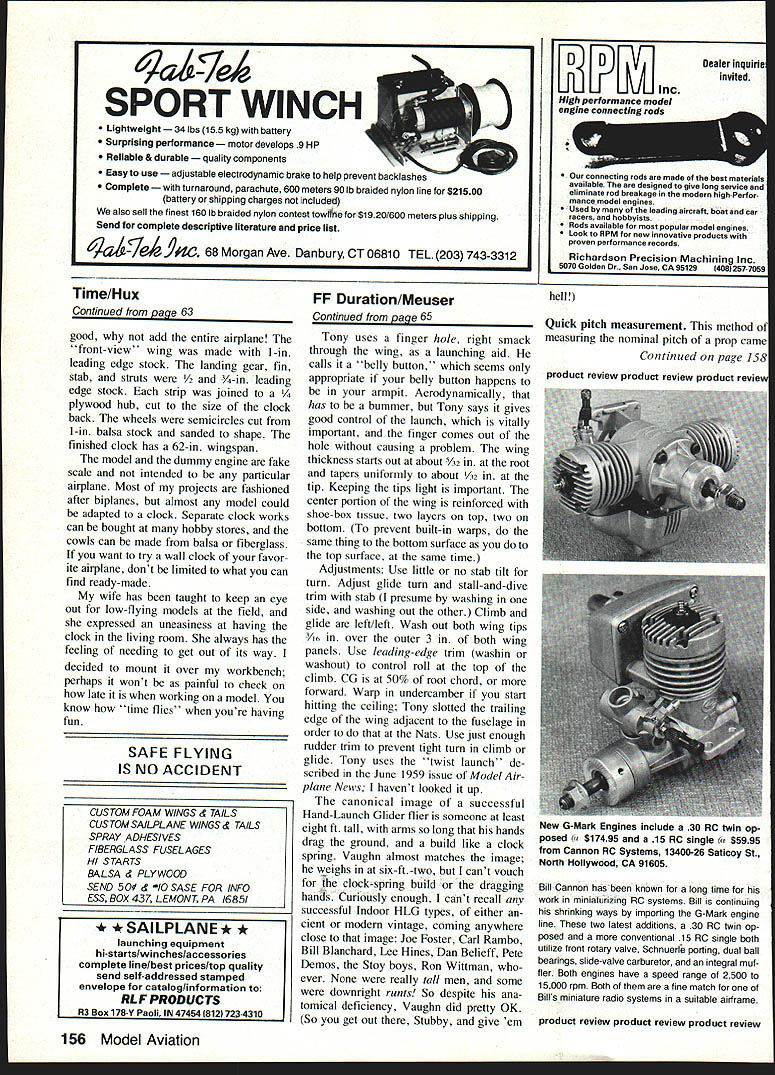
Since adding the cowl to the prop looked good, I decided to add the entire airplane. The "front-view" wing was made with 1-in. leading-edge stock. The landing gear, fin, stab, and struts were 1/2- and 3/4-in. leading-edge stock. Each strip was joined to a 1/4-in. plywood hub, cut to the size of the clock back. The wheels were semicircles cut from 1-in. balsa stock and sanded to shape. The finished clock has a 62-in. wingspan.
The model and the dummy engine are fake scale and not intended to be any particular airplane. Most of my projects are fashioned after biplanes, but almost any model could be adapted to a clock. Separate clock works can be bought at many hobby stores, and the cowls can be made from balsa or fiberglass. If you want to try a wall clock of your favorite airplane, don't be limited to what you can find ready-made.
My wife watches for low-flying models at the field, and she said she felt uneasy having the clock in the living room; she always feels she needs to get out of its way. I decided to mount it over my workbench; perhaps it won't be as painful to check how late it is when working on a model. You know how "time flies" when you're having fun.
Transcribed from original scans by AI. Minor OCR errors may remain.

