
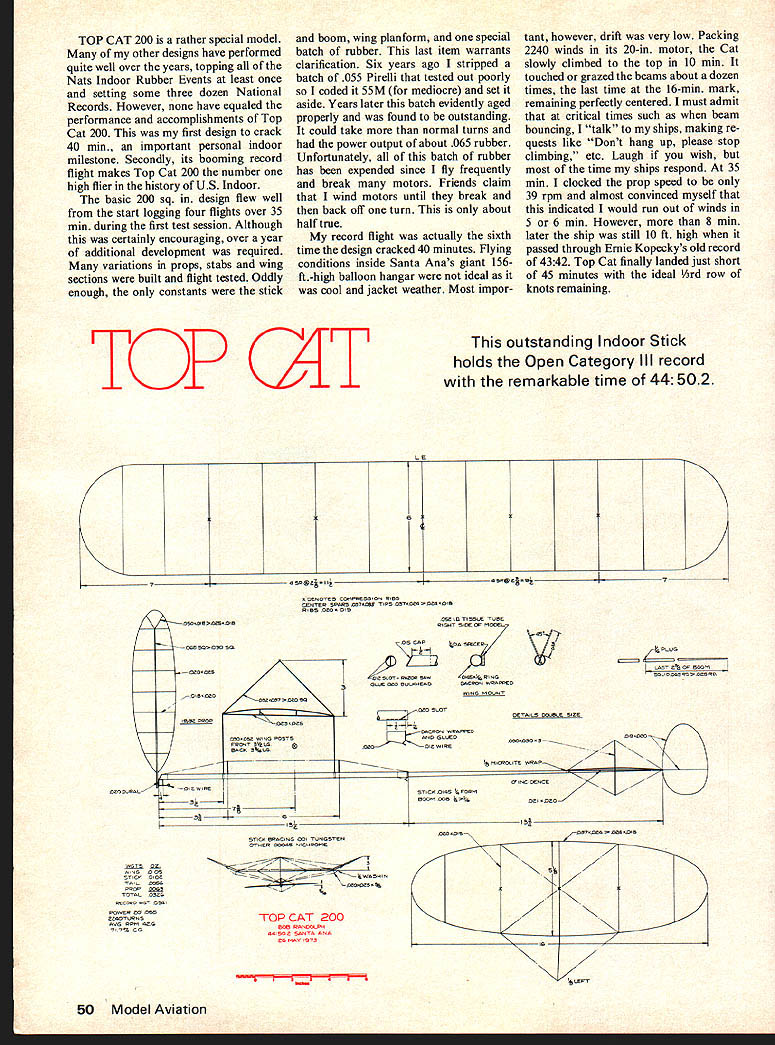
Top Cat
TOP CAT 200 is a rather special model. Many of my other designs have performed quite well over the years, topping all the Nats Indoor Rubber Events at least once and setting some three dozen National Records. However, none have equaled the performance and accomplishments of Top Cat 200. This was my first design to crack 40 min., an important personal indoor milestone. Secondly, its booming record flight makes Top Cat 200 the number one high flier in the history of U.S. Indoor.
The basic 200 sq. in. design flew well from the start, logging four flights over 35 min. during the first test session. Although this was certainly encouraging, over a year of additional development was required. Many variations in props, stabs and wing sections were built and flight tested. Oddly enough, the only constants were the stick and boom, wing planform, and one special batch of rubber. This last item warrants clarification.
Six years ago I stripped a batch of .055 Pirelli that tested out poorly so I coded it 55M (for mediocre) and set it aside. Years later this batch evidently aged properly and was found to be outstanding. It could take more than normal turns and had the power output of about .065 rubber. Unfortunately, all of this batch of rubber has been expended since I fly frequently and break many motors. Friends claim that I wind motors until they break and then back off one turn. This is only about half true.
My record flight was actually the sixth time the design cracked 40 minutes. Flying conditions inside Santa Ana's giant 156-ft.-high balloon hangar were not ideal as it was cool and jacket weather. Most important, however, drift was very low. Packing 2240 winds in its 20-in. motor, the Cat slowly climbed to the top in 10 min. It touched or grazed the beams about a dozen times, the last time at the 16-min. mark, remaining perfectly centered. I must admit that at critical times such as when beam bouncing, I "talk" to my ships, making requests like "Don't hang up, please stop climbing," etc. Laugh if you wish, but most of the time my ships respond. At 35 min. I clocked the prop speed to be only 39 rpm and almost convinced myself that this indicated I would run out of winds in 5 or 6 min. However, more than 8 min. later the ship was still 10 ft. high when it passed through Ernie Kopecky's old record of 43:42. Top Cat finally landed just short of 45 minutes with the ideal 1/3rd row of knots remaining.
Construction
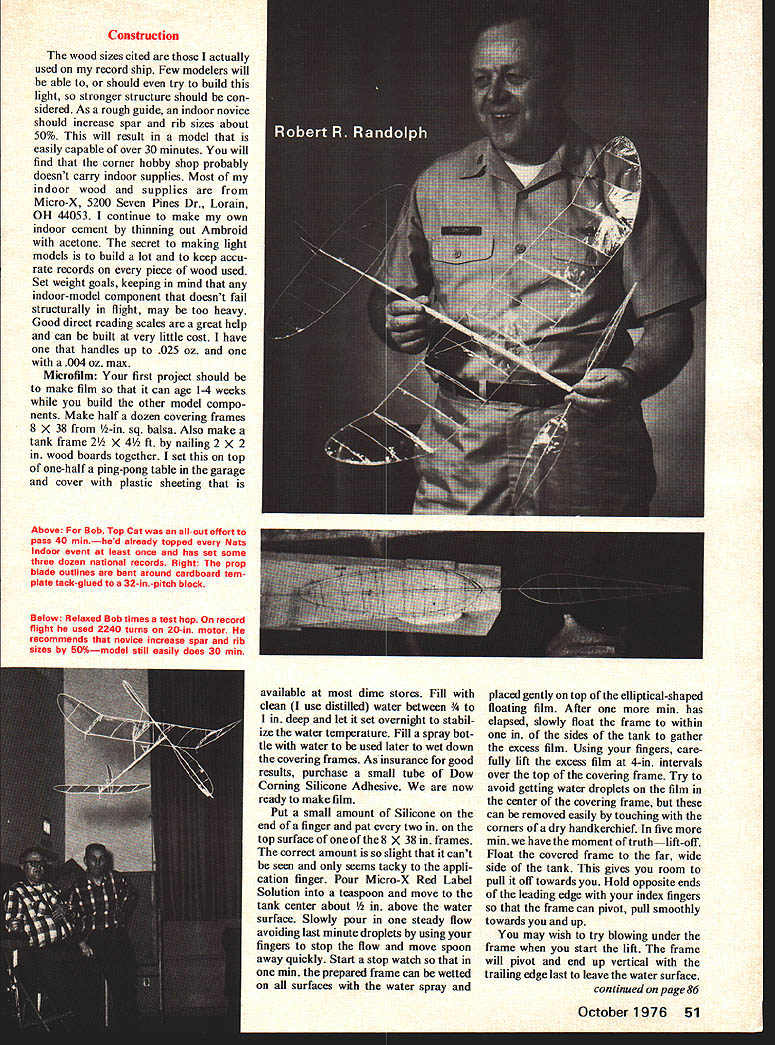
The wood sizes cited are those I actually used on my record ship. Few modelers will be able to, or should even try to build this light, so stronger structure should be considered. As a rough guide, an indoor novice should increase spar and rib sizes about 50%. This will result in a model that is easily capable of over 30 minutes. You will find that the corner hobby shop probably doesn't carry indoor supplies. Most of my indoor wood and supplies are from Micro-X, 5200 Seven Pines Dr., Lorain, OH 44053. I continue to make my own indoor cement by thinning out Ambroid with acetone. The secret to making light models is to build a lot and to keep accurate records on every piece of wood used. Set weight goals, keeping in mind that any indoor-model component that doesn't fail structurally in flight may be too heavy. Good direct reading scales are a great help and can be built at very little cost. I have one that handles up to .025 oz. and one with a .004 oz. max.
Microfilm
Your first project should be to make film so that it can age 1-4 weeks while you build the other model components. Make half a dozen covering frames 8 X 38 from 1/2-in. sq. balsa. Also make a tank frame 2 1/2 X 4 1/2 ft. by nailing 2 X 2 in. wood boards together. I set this on top of one-half of a ping-pong table in the garage and cover with plastic sheeting that is available at most dime stores. Fill with clean (I use distilled) water between 3/4 to 1 in. deep and let it set overnight to stabilize the water temperature. Fill a spray bottle with water to be used later to wet down the covering frames. As insurance for good results, purchase a small tube of Dow Corning Silicone Adhesive. We are now ready to make film.
Put a small amount of Silicone on the end of a finger and pat very two in. on the top surface of one of the 8 X 38 in. frames. The correct amount is so slight that it can't be seen and only seems tacky to the application finger. Pour Micro-X Red Label Solution into a teaspoon and move to the tank center about 1/2 in. above the water surface. Slowly pour in one steady flow avoiding last minute droplets by using your fingers to stop the flow and move spoon away quickly. Start a stop watch so that in one min. the prepared frame can be wetted on all surfaces with the water spray and placed gently on top of the elliptical-shaped floating film. After one more min. has elapsed, slowly float the frame to within one in. of the sides of the tank to gather the excess film. Using your fingers, carefully lift the excess film at 4-in. intervals over the top of the covering frame. Try to avoid getting water droplets on the film in the center of the covering frame, but these can be removed easily by touching with the corners of a dry handkerchief. In five more min. we have the moment of truth—lift-off. Float the covered frame to the far, wide side of the tank. This gives you room to pull it off towards you. Hold opposite ends of the leading edge with your index fingers so that the frame can pivot, pull smoothly towards you and up.
You may wish to try blowing under the frame when you start the lift. The frame will pivot and end up vertical with the trailing edge last to leave the water surface. Quickly set it down on the floor in a near vertical position. If this is not done at once, vibrations from your hands will shatter the film as it is very weak from the strain of the lift. In 10 min. the excess water will have run off and the film will be tough enough to be moved out of the way for aging. Don't try to pour microfilm on a rainy day as it seldom works due to the humidity.
Stick and Boom:
Tapered metal rods for rolling tail booms are standard items supplied by several major indoor model suppliers. I got mine from Micro-X. It's listed in their catalog as "Universal Steel Boom Form." I guess you could machine one on a lathe. They are 15 in. long and taper from 1/4 to 1/8 in. for 13/32 in. Some of the ones Microdyne used to sell were surplus aircraft antennas.
Cut the motor stick blank from light C-grained stock to fit around 1/4-in. tubing. Use a hypodermic needle to glue the seam. The rear hook design allows a fully wound motor to be easily removed. I don't understand why all indoor builders don't use this type. The end of the .012-wire hook should be rounded to keep from cutting motors. (Same for prop shaft.) After the rear hook is glued to the gusset, wrap 8-10 times with a Dacron monofilament and reglue. The nose structure is shown fully on the plan. The slot is cut using a .012 razor saw. This actually makes about a .018 slot. After the dual thrust bearing is glued to the stick, bind with Dacron and reglue. The motor stick braces go all the way through the stick for strength and are cut off at the bottom and glued. Apply the tungsten wire tight enough to bow the stick about 1/16 in. The boom blank is cut and rolled on a tapered metal form. The tail boom fits inside the stick and is glued on with zero stab incidence after installation of the stab, rudder and bracing.
Wing, Stab and Rudder:
All curved outlines are formed around cardboard templates. Build up the wing and stab center section ribs next. Note that the front of the wing ribs are cut on a diagonal as the leading edge spar is diamond shaped. Remember to glue on the wing tips prior to covering to make it easier to put on dihedral after covering. I cover wings and stabs using a modified Elgiloy procedure. Lay the structure flat on pressboard. Using a brush and water, wet around the outline about 4 in. and lower the slack film frame to the pressboard, blowing it down gently. Ribs are held in place with pins until the outline is trimmed. Next, put in the required tip dihedral and glue. If end bracing jigs unnecessary. Make the training edge straight by gluing the rear post, cabane and rear tip posts on while the wing is flat on the building board. Next, the rear secondary and rear primary bracing wire (.0045) is installed. While this size wire may be difficult to see, it is very easy to tension properly. With the main wing posts in a spare stick with sockets, glue the front post and front tip posts on and wire in the secondary, then primary bracing by eyeball. Bracing the wing tips flat and true completes the wing. I use a small microlite piece to protect the stab microfilm where the post goes through. The hole is made by using a hot needle. The stab is braced to be flat and true. Install the rudder to the end of the boom to have 1/8 in. left turn and brace.
Propeller:
An efficient prop is necessary to achieve high flight times. First carve a 32-in. pitch prop block. Form the prop outlines around a cardboard prop blade template. When dry, mark the leading edge and center of the prop with a felt pen before removing. Glue the hub end of the outline together to form a continuous flat outline. Next, make the tapered spar and install the hook. Tack glue the outline to the block starting at the tip, after the spar is on the block straight. After the spar and ribs are glued in, I moisten the prop outline with water to shape it better. When the one blade is dry, cut carefully from the block and build the other blade. Covering props with microfilm is easy and fun if you do it right. The trick is to wet both sides of the outline and ribs while keeping the spar dry. Lay the prop on the film so the tip is flat and trim progressively toward the hub using acetone. Too much acetone will jump the outline, while too little will cause the brush strokes to dry and stick to the film, ripping it. If the film isn't stuck to some of the prop ribs, blow on it while the ribs are still wet.
Flight Test:
Use an initial motor of 18 in. of .060 rubber and locate the movable wing post holders to obtain the correct CG. Stability with the rearward balance point is excellent. Put in about 35 turns using a 16-1 winder for a low cruise, incidence adjusting test flight. In my opinion, there is a common tendency to fly with less than optimum wing incidence. Keep increasing the incidence until a definite stall is obtained, then reduce just enough to avoid the stall. While doing this, check the circle size so the rudder can be adjusted to obtain a 30-in. diameter. Launch the model waist high on these preliminary incidence tests, and never let it climb higher than you can reach so you can keep adjusting and relaunching. When satisfied, work up to full turns very slowly.
When your model finally climbs close to the top, use the winds remaining as a guide for selecting the optimum rubber motor. Full winds cannot be used without backing some turns off when flying in Category 1 or 2 sites. You will find that unless you are pushing for record flights and therefore must get all the altitude possible for the site, indoor models will last for years and provide many, many hours of flight time.
Transcribed from original scans by AI. Minor OCR errors may remain.

