

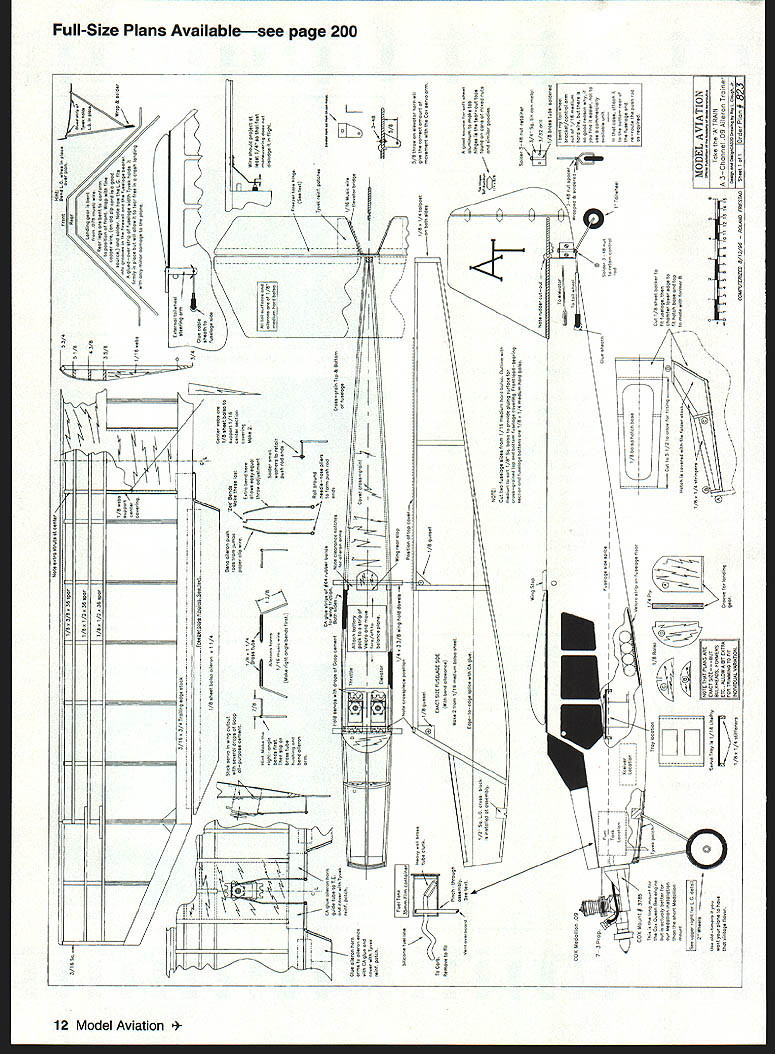

A Train
Roy L. Clough Jr.
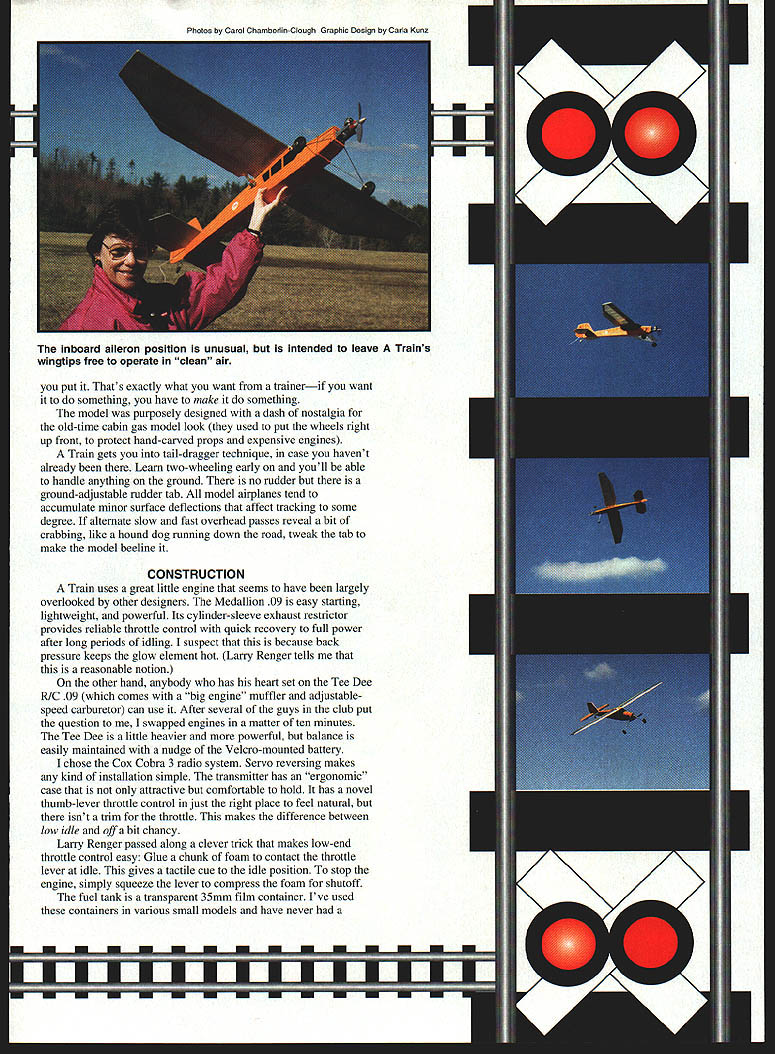
Learning to use ailerons? Bank on this model to keep you on track
If you are a rudder-and-elevator hotshot who is looking for new places to go, take the A Train!
A is for ailerons; Train is for trainer. You get elevators, ailerons and throttle. Coupling the ailerons to a steerable tailwheel gives you control on the ground. The throttle makes you the boss over takeoffs, power in the air, and landing where you want to.
A Train assumes a healthy modicum of rudder-elevator experience and familiarity with orientation—that is, knowing how a model looks in the air, coming and going. It is not intended to be a raw beginner's model; its design aim is to introduce aileron control. Ailerons must be used—there isn't a rudder.
Newcomers to aileron-and-elevator models sometimes get into trouble at low speed when the drag and disturbed airflow over a deflected aileron results in wingtip stalling. This can cause a snap roll on takeoff or wallowing into a spin from a slow landing approach.
A Train largely avoids this problem. The ailerons have been moved inboard, leaving the low-drag wingtips free of stall-inducing clutter. Despite this somewhat unusual aileron position, control is positive. Several of my fellow Winnipesaukee Radio Controllers who have wrung out the A Train agree that its turns seem very well coordinated, without appreciable yaw despite the lack of rudder input.
Design objectives have been pretty well met. Lean, rangy lines, with the engine out on the end of a long nose, spread inertial moments and smooth out control response. With no dihedral, this results in largely neutral stability—the airplane tends to stay where you put it. That's exactly what you want from a trainer: if you want it to do something, you have to make it do something.
The model was purposely designed with a dash of nostalgia for the old-time cabin gas-model look (they used to put the wheels right up front to protect hand-carved props and expensive engines).
A Train gets you into tail-dragger technique, in case you haven't already been there. Learn two-wheeling early on and you'll be able to handle anything on the ground. There is no rudder but there is a ground-adjustable rudder tab. All model airplanes tend to accumulate minor surface deflections that affect tracking to some degree. If alternate slow and fast overhead passes reveal a bit of crabbing—like a hound dog running down the road—tweak the tab to make the model beeline it.
CONSTRUCTION
A Train uses a great little engine that seems to have been largely overlooked by other designers: the Cox Medallion .09. It's easy-starting, lightweight, and powerful. Its cylinder-sleeve exhaust restrictor provides reliable throttle control with quick recovery to full power after long periods of idling. I suspect this is because back pressure keeps the glow element hot (Larry Renger tells me that this is a reasonable notion).
If you prefer, the Tee Dee R/C .09 (which comes with a "big engine" muffler and adjustable-speed carburetor) can be used. After several of the guys in the club asked, we swapped engines in about ten minutes. The Tee Dee is a little heavier and more powerful, but balance is easily maintained with a nudge of the Velcro-mounted battery.
I chose the Cox Cobra 3 radio system. Servo reversing makes any kind of installation simple. The transmitter has an ergonomic case that is attractive and comfortable to hold. It has a novel thumb-lever throttle control in just the right place to feel natural, but there isn't a trim for the throttle. This makes the difference between low idle and off a bit chancy.
Larry Renger passed along a clever trick that makes low-end throttle control easy: glue a chunk of foam to contact the throttle lever at idle. This gives a tactile cue to the idle position. To stop the engine, simply squeeze the lever to compress the foam for shutoff.
The fuel tank is a transparent 35mm film container. I've used these containers in various small models and have never had a leaker despite friction-fit covers. Polaroid color-negative film containers are preferred—there's no room for ordinary clunks and fittings. No problem: fittings aren't needed. Silicone fuel line squeezed through undersized drilled holes won't leak. Cut a long tapered end on the tubing, poke it through the hole and pull it into place. Use the same method to pull the fuel feed line through. One inch of thick-wall brass tubing serves as the clunk I wanted.
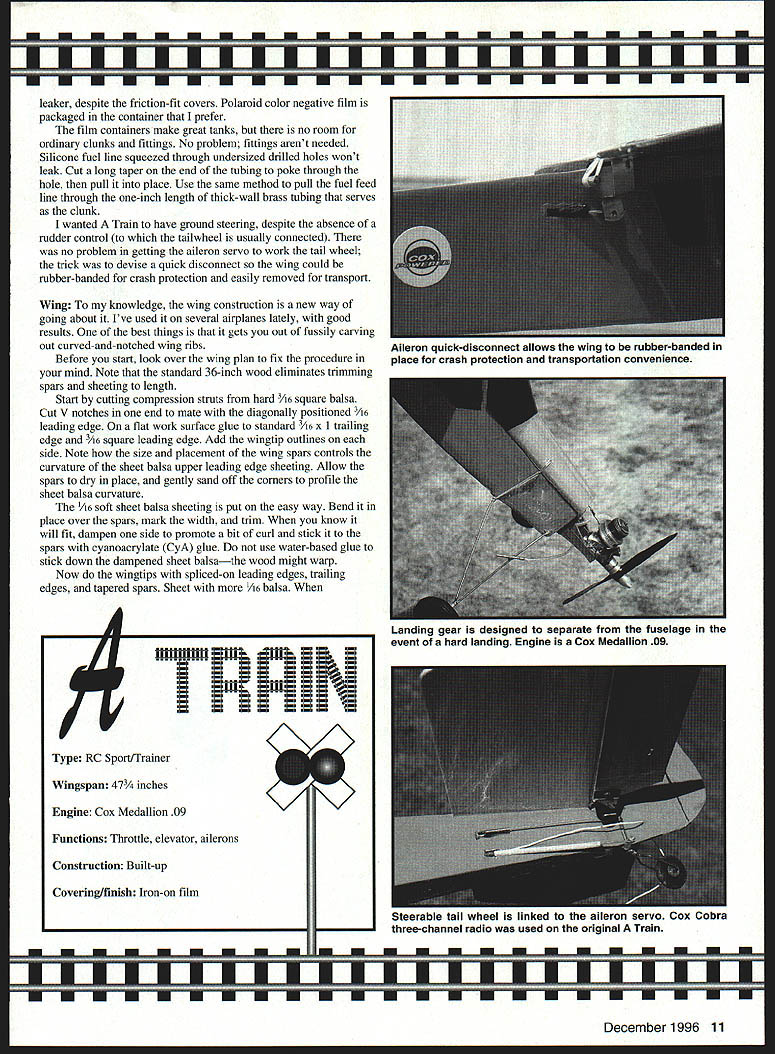
I wanted A Train to have ground steering despite the absence of rudder control. The tailwheel is usually connected; there's no problem getting an aileron servo to work the tailwheel. The tailwheel trick I devised is a quick disconnect so the wing can be rubber-banded for crash protection and easily removed for transport.
Specifications
- Type: RC Sport/Trainer
- Wingspan: 47¾ inches
- Engine: Cox Medallion .09
- Functions: Throttle, elevator, ailerons
- Construction: Built-up
- Covering/finish: Iron-on film
WING
To my knowledge, the wing construction shown on the plan is a new way of going about it. I've used this method on several airplanes lately with good results. One of the best things about it is that it avoids fussily carving out curved-and-notched wing ribs.
Before you start, study the wing plan to fix the procedure in your mind. Note that standard 36-inch wood eliminates trimming spars and sheeting to length.
Start by cutting compression struts from hard 3/16-inch square balsa. Cut V-notches in one end to mate with the diagonally positioned 3/16-inch leading edge. On a flat work surface, glue to standard 3/16 x 1 trailing edge and 3/16-inch square leading edge. Add the wingtip outlines on each side. Note how the size and placement of the wing spars controls the curvature of the sheet balsa upper leading-edge sheeting. Allow the spars to dry in place, and gently sand off the corners to profile the sheet-balsa curvature.
The 1/16-inch soft sheet-balsa sheeting is put on the easy way. Bend it in place over the spars, mark the width, and trim. When you know it will fit, dampen one side to promote a bit of curl and stick it to the spars with cyanoacrylate (CyA) glue. Do not use water-based glue to stick down the dampened sheet balsa—the wood might warp.
Now do the wingtips with spliced-on leading edges, trailing edges, and tapered spars. Sheet with more 1/16-inch balsa. When everything is solid, glue the triangular ribs or gussets to the main spar and compression struts and cover the center section, top and bottom, with 1/16-inch sheet back to the trailing edge.
The ailerons are hinged with ordinary freezer tape. Leave a 1/8-inch gap when taping the first side so that when you tape the second side you can squeeze the sticky faces together in the crack of the hinge. Tough and simple. If you doubt that these hinges will stay put, remember the last time you tried to remove masking tape after it had been left in place for a week or two.
The wing is covered with any lightweight iron-on material, up to but not over the hinge gap. Use separate pieces to cover the ailerons.
FUSELAGE AND TAIL SURFACES
These are utterly conventional and require little explanation except to note the swing-open foredeck. This provides easy access to aileron hookup (you won't need an aileron extension wire) and you get the satisfaction of filling the fuel tank by sight; it's less messy than waiting for it to signal "full" by spilling fuel out of the vent. A simple paper-clip wire hook and a thin rubber band to the rear landing-gear leg holds the hatch down in flight. Also note that the top fuselage has a wing stop and notches to make certain nothing can shift and lock up the ailerons in flight. (Guess how I learned that one!)
The landing-gear attachment is rather cute—and practical. Crossbars are glued with CyA in slots in the firewall and the landing-gear fuselage support crossbar. Cover with Tyvek before applying iron-on film. It's rugged, but it will tear off without ripping the fuselage.
The tailwheel is mounted in a simple swivel bearing of brass tubing soldered to a patch of tin-can metal. If you'd rather use a commercial assembly, do so.
Servos
Locating the servos as shown on the plan makes them accessible with the wing off and is good for balance. Hold the servos in place with "Goop." Get to know Goop—it's a better servo mount than any amount of hardware, transmits little vibration, and strips off fairly easily.
The wing-mounted aileron servo is set into a cutout in the lower-surface sheeting and held in place with a couple of gobs of Goop adhesive on its sides. Don't bother with the normal mounting lugs here.
The use of Cox servos is assumed. The radius of the servo arm to the radius of elevator and aileron horn shown on the plan produces approximately the right amount of deflection for smooth and positive handling.
Aileron hookup should be quite clear from the plan sheet. After the wing is complete, add the tailwheel steering arm. I used 1/32-inch sheet brass and left it unpainted to show up better in the picture.
The elevator push-pull rod can be just about anything (I used a 3/32-inch dowel with lashed-on paper-clip wire ends); the tailwheel control should be a sheathed plastic pushrod because both ends of the sheath must be glued in place for the semiflexible pushrod to operate properly. A simpler bend in the screw-in wire end engages a hole in the aileron bracket when the wing is put on.
FLYING
Be sure that the model balances 1-3/4 to 2 inches back from the leading edge when the airplane is supported on fingertips under the wing. This slight nose-heaviness is intentional and much easier to start with than a tail-heavy model. The balance point is easily altered by moving the battery back and forth along its Velcro hold-down strip. After you get some experience handling the A Train, move the battery pack back a little to liven up the maneuvers.
Universal advice to a flier with a "move-up" airplane is to have it test-hopped by an old salt. When he gets through fooling with the trims, you'll get at least a level start.
Takeoffs are made with the engine wide open. Just remember that with the tailwheel connected to aileron control, you should hold the stick back a little to keep the tailwheel on the runway. Let the airplane take off in three-point attitude.
The A Train has quite a wide speed range—from faster-than-you-might-expect to slower-than-you'd-think-it would stay up. Use the throttle to get comfortable while you practice turning in both directions until you have a feel for the reaction produced by stick motions. When you start to try advanced maneuvers, remember that altitude is the only friend you have. Begin with loops, then learn to roll out on top to make an Immelmann turn. Note that with a high-wing airplane you will also have to use elevator correction as the model goes over.
Learn the difference of inverted-flight "feel" with a flat-bottomed airfoil—a valuable insight if you build and fly high-wing scale models.
A Train is not intended to be an advanced aerobatic model, but it will perform most common maneuvers with power to spare. The main thing is, it will teach you to think ahead of your airplane.
Roy L. Clough Jr. 1070 Upper City Rd. Pittsfield, NH 03263
Transcribed from original scans by AI. Minor OCR errors may remain.

