
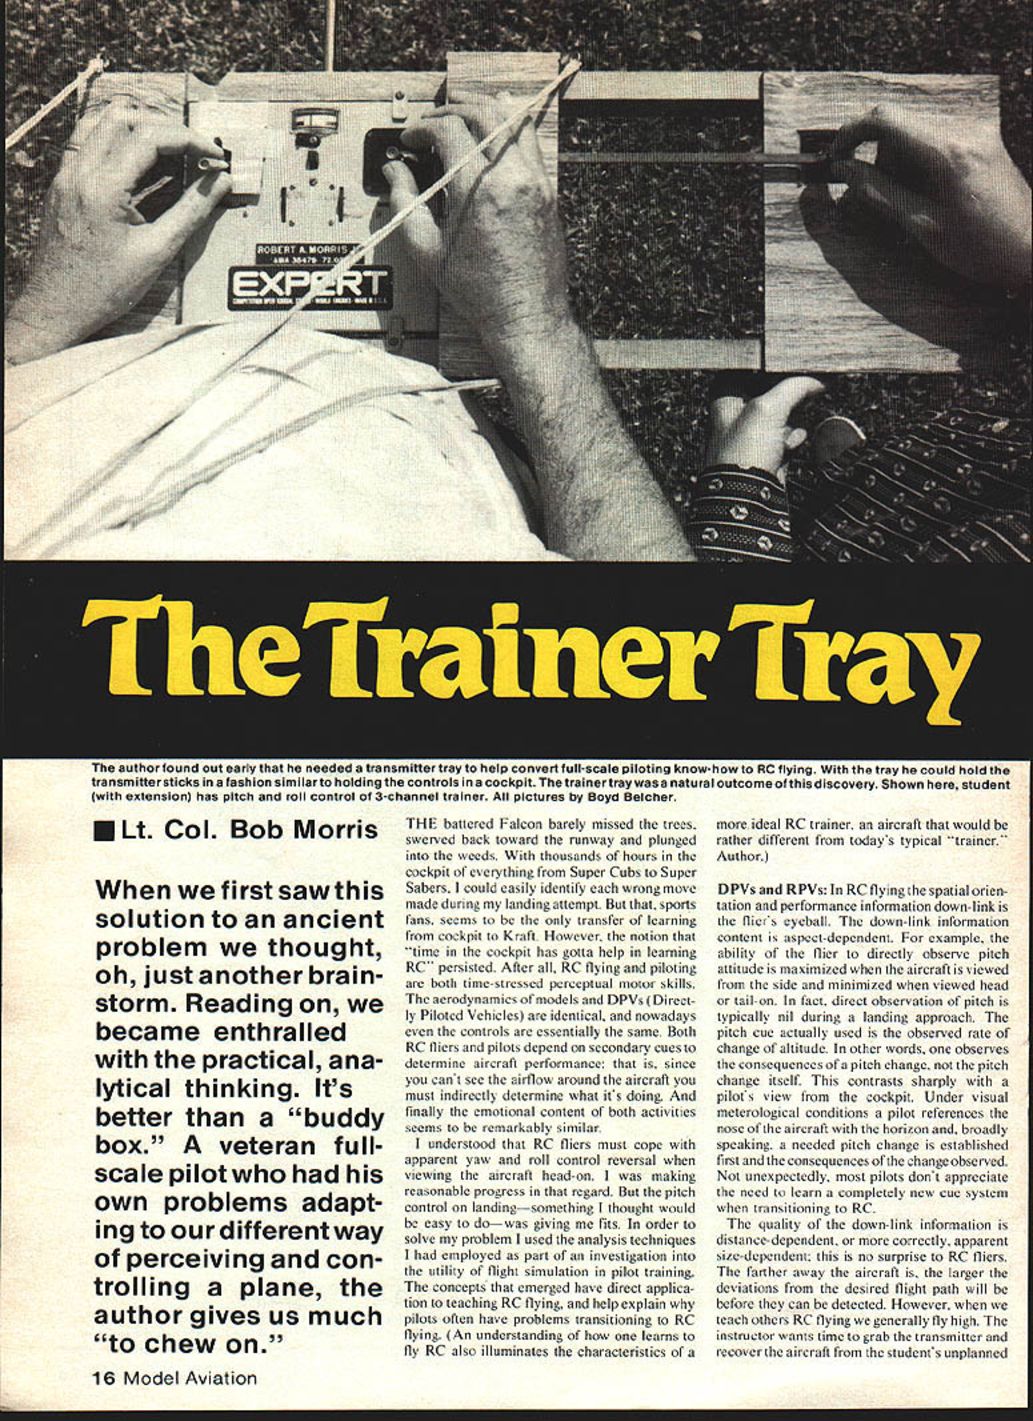
The Trainer Tray
Lt. Col. Bob Morris
When we first saw this solution to an ancient problem we thought, "oh, just another brainstorm." Reading on, we became enthralled with the practical, analytical thinking. It's better than a "buddy box." A veteran full-scale pilot who had his own problems adapting to our different way of perceiving and controlling a plane, the author gives us much to chew on.
THE battered Falcon barely missed the trees, swerved back toward the runway and plunged into the weeds. With thousands of hours in the cockpit of everything from Super Cubs to Super Sabers, I could easily identify each wrong move made during my landing attempt. But that, sports fans, seems to be the only transfer of learning from cockpit to RC. However, the notion that "time in the cockpit has gotta help in learning RC" persisted. After all, RC flying and piloting are both time-stressed perceptual-motor skills. The aerodynamics of models and DPVs (Directly Piloted Vehicles) are essentially identical, and nowadays even the controls are essentially the same. Both RC fliers and pilots depend on secondary cues to determine aircraft performance; that is, since you can't see the airflow around the aircraft you must indirectly determine what it's doing. Finally, the emotional content of both activities seems to be remarkably similar.
I understood that RC fliers must cope with apparent yaw and roll control reversal when viewing the aircraft head-on. I was making reasonable progress in that regard. But pitch control on landings—something I thought would be easy to do—was giving me fits. In order to solve my problem I used the analysis techniques I had employed as part of an investigation into the utility of flight simulation in pilot training. The concepts that emerged have direct application to teaching RC flying and help explain why pilots often have problems transitioning to RC flying. An understanding of how one learns to fly RC also illuminates the characteristics of a more ideal RC trainer—an aircraft that would be rather different from today's typical "trainer."
DPVs and RPVs
In RC flying the spatial orientation and performance information down-link is the flier's eyeball. The down-link information content is aspect-dependent. For example, the ability of the flier to directly observe pitch attitude is maximized when the aircraft is viewed from the side and minimized when viewed head- or tail-on. In fact, direct observation of pitch is typically nil during a landing approach. The pitch cue actually used is the observed rate of change of altitude. In other words, one observes the consequences of a pitch change, not the pitch change itself. This contrasts sharply with a pilot's view from the cockpit. Under visual meteorological conditions a pilot references the nose of the aircraft with the horizon and, broadly speaking, a needed pitch change is established first and the consequences observed. Not unexpectedly, most pilots don't appreciate the need to learn a completely new cue system when transitioning to RC.
The quality of the down-link information is distance-dependent, or more correctly, apparent-size-dependent; this is no surprise to RC fliers. The farther away the aircraft is, the larger the deviations from the desired flight path will be before they can be detected. However, when we teach others RC flying we generally fly high. The instructor wants time to grab the transmitter and recover the aircraft from the student's unplanned maneuver. The resulting degraded down-link produces an inefficient learning environment.
Back at the Gulf Coast LARCS flying field I started making real progress, but I was still having fine pitch-control problems on landing. One typical example: a sturdy bird sailed in low, a little kid looked up and reached for something, my thumb wasn't responding quickly enough, and the faithful Falcon ricocheted off the nosewheel. At that point it dawned on me that for the past 30 years when I flared to land I had used hand, wrist and arm muscles to produce the delicate pitch control needed for good landings. A smooth neurological groove between eyeball input and those muscle responses had been developed by practice in full-scale flying, but RC required a different set of cues and responses. The groove didn't connect to the thumb.
The solution was simple: a transmitter tray.
It only took a few hours to build a plywood Trainer Tray and the next time out my flying skills took a quantum jump. With the tray I was holding the stick in a manner similar to the way I would hold the controls in a cockpit. I felt comfortable with it, and was doing classy bump-and-jumps within an hour.
Why use a Trainer Tray?
If you are satisfied with your flying skills, you need not change over to a Trainer Tray. However, for anyone transitioning from DPVs to RPVs the tray provides a much more "natural" control feel. Three other reasons for using a Trainer Tray are:
- The fine finger control intrinsic in opposed thumb and forefinger is exploited. We use this anatomical feature for everything requiring precision control, and we need it in RC. (Some fliers support the transmitter in their hands so that thumb and forefinger are on the sticks — the so-called "single stick" grip. I have no personal experience with these grips, but they appear advantageous.)
- Hanno Prettner.
- You can use a true dual control system for instruction. Combined with a good three-control RC training aircraft, mechanically interconnected student and instructor sticks provide a training basis distinctly superior to the usual method.
Trainer Tray as a teaching aid
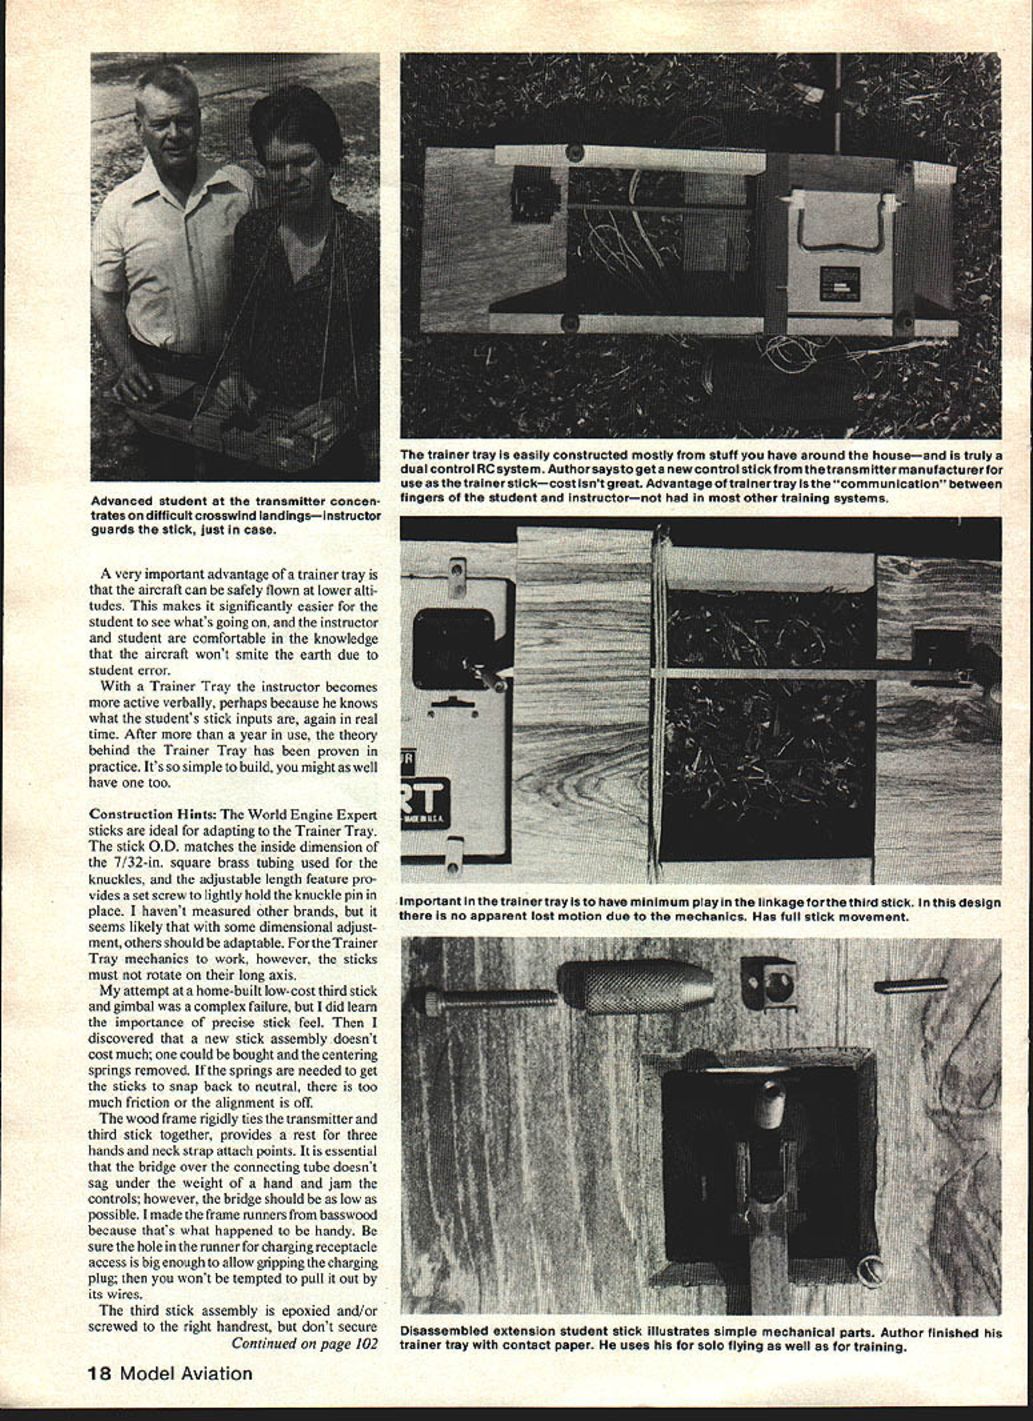
One can hardly imagine aviation as it exists today without dual-control training aircraft. You never could have become an instructor, or a student for that matter, if pilots had to fly around passing the stick back and forth. While the hazards to health and investment are less for RC fliers, they still exist. One can pass the stick back and forth electronically with a buddy box and reduce crashes considerably, and not crashing is a certified good thing. However, the buddy box is noncommunicative.
In learning to be a pilot, a great deal of critical instructor-to-student communication is nonverbal: it's done through the sticks. For example, an instructor may say "a little up" and the direction of stick movement is understood by the student but the magnitude of "a little..." is nebulous. With dual controls the instructor actually communicates the precise meaning in terms of both the rate and distance of stick movement by moving a stick connected to the student's fingers.
As an RC student (or perhaps an observer), have you ever tried to watch the model aircraft and the instructor's thumbs at the same time? It can't be done. The old-fashioned attempted demonstration makes clear the need for students to have real-time information that correlates stick movement with aircraft response.
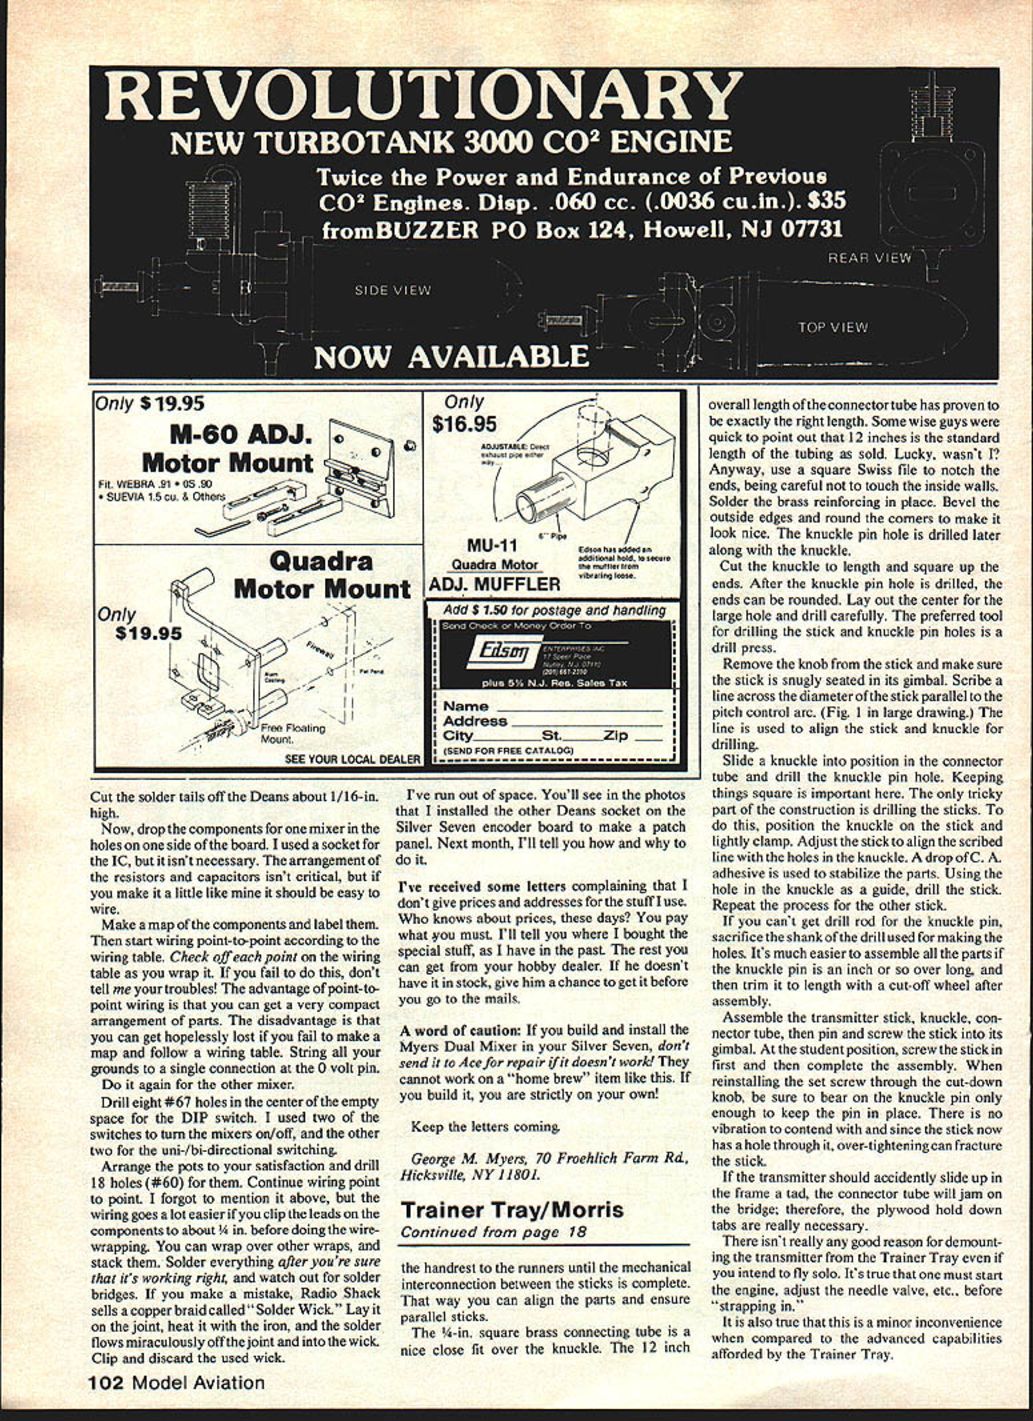
A very important advantage of a Trainer Tray is that the aircraft can be safely flown at lower altitudes. This makes it significantly easier for the student to see what's going on, and the instructor and student are more comfortable in the knowledge that the aircraft won't smite the earth due to student error.
With a Trainer Tray the instructor becomes more active verbally, perhaps because he knows what the student's stick inputs are in real time. After more than a year in use, the theory behind the Trainer Tray has been proven in practice. It's so simple to build, you might as well have one too.
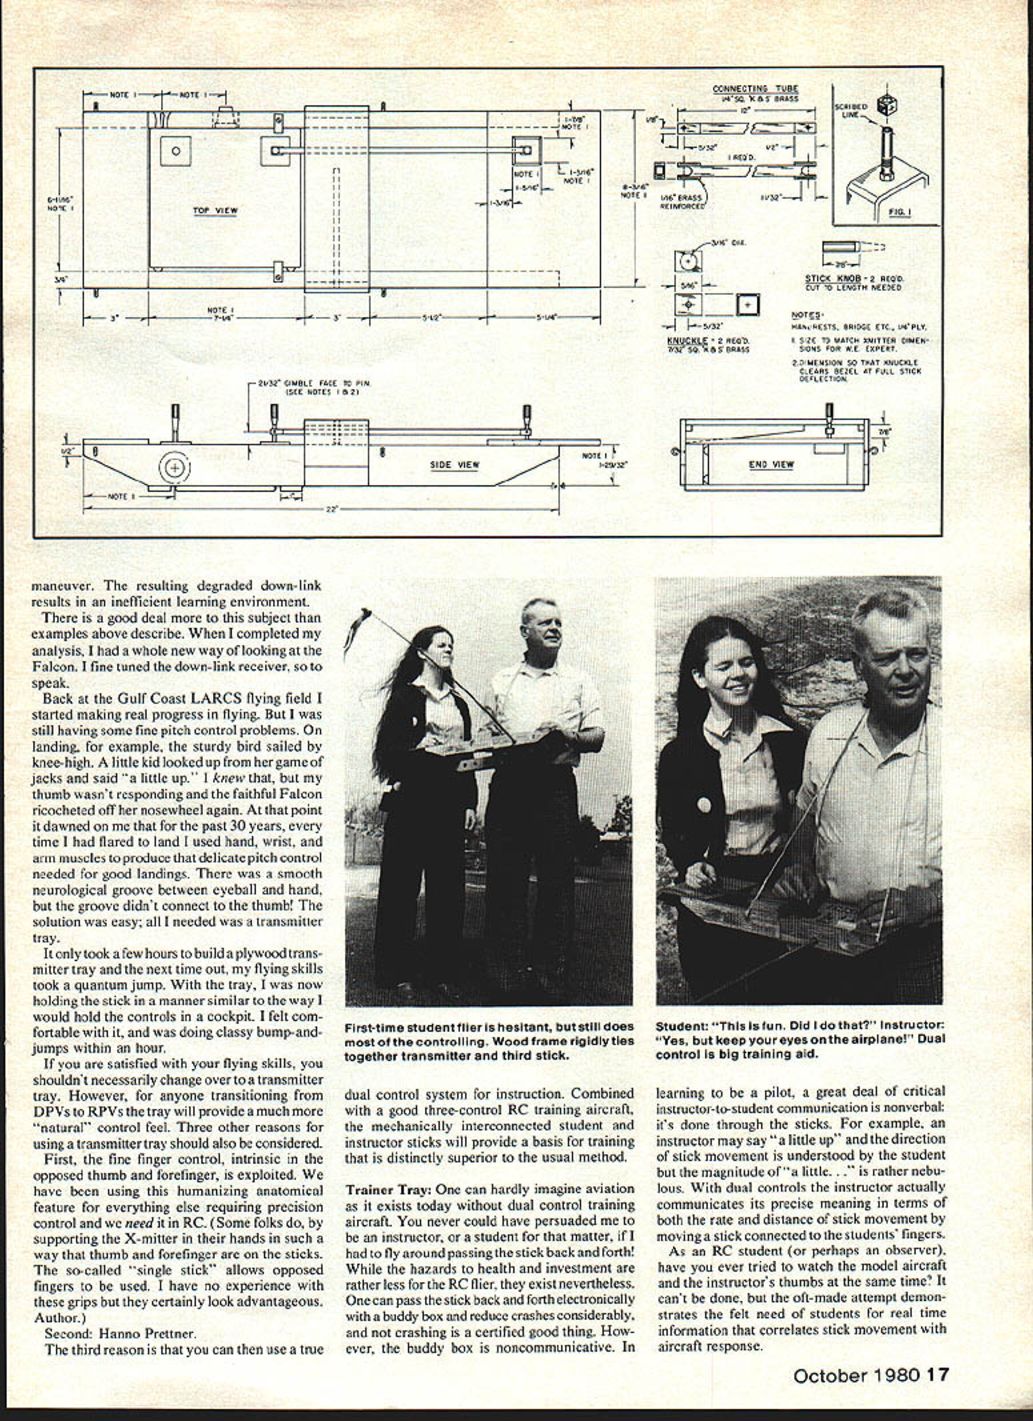
Construction Hints
The World Engine Expert sticks are ideal for adapting to the Trainer Tray. The stick outer diameter matches the inside dimension of the 7/32-in. square brass tubing used for the knuckles, and the adjustable-length feature provides a set screw to lightly hold the knuckle pin in place. I haven't measured other brands, but with dimensional adjustment others should be adaptable. For the Trainer Tray mechanics to work, however, the sticks must not rotate on their long axis.
My attempt at a home-built low-cost third stick and gimbal was a complex failure, but I learned the importance of precise stick feel. A new stick assembly doesn't cost much; one can be bought and the centering springs removed. If springs are needed to get the sticks to snap back to neutral, there is too much friction or the alignment is off.
The wood frame rigidly ties the transmitter and third stick together, provides a rest for three hands and neck-strap attach points. It is essential that the bridge over the connecting tube doesn't sag under the weight of a hand and jam the controls; however, the bridge should be as low as possible. I made the frame runners from basswood because that's what happened to be handy. Be sure the hole in the runner for charging-receptacle access is big enough to allow gripping the charging plug; then you won't be tempted to pull it out by its wires.
The third-stick assembly is epoxied and/or screwed to the right handrest, but don't secure the handrest to the runners until the mechanical interconnection between the sticks is complete. That way you can align the parts and ensure parallel sticks.
The 1/8-in. square brass connecting tube is a nice close fit over the knuckle. The 12-inch overall length of the connector tube has proven to be exactly the right length (coincidentally the standard length of the tubing as sold). Use a square Swiss file to notch the ends, being careful not to touch the inside walls. Solder brass reinforcing in place. Bevel the outside edges and round the corners to make it look nice. The knuckle pin hole is drilled later along with the knuckle.
Cut the knuckle to length and square up the ends. After the knuckle pin hole is drilled, the ends can be rounded. Lay out the center for the large hole and drill carefully. The preferred tool for drilling the stick and knuckle pin holes is a drill press.
Remove the knob from the stick and make sure the stick is snugly seated in its gimbal. Scribe a line across the diameter of the stick parallel to the pitch-control arc. The line is used to align the stick and knuckle for drilling.
Slide a knuckle into position in the connector tube and drill the knuckle-pin hole. Keeping things square is important here. The only tricky part of the construction is drilling the sticks. To do this, position the knuckle on the stick and lightly clamp. Adjust the stick to align the scribed line with the holes in the knuckle. A drop of cyanoacrylate adhesive (C.A.) stabilizes the parts. Using the hole in the knuckle as a guide, drill the stick. Repeat the process for the other stick.
If you can't get drill rod for the knuckle pin, sacrifice the shank of the drilled rod for making the holes. It's much easier to assemble all the parts if the knuckle pin is an inch or so overlong, then trim it to length with a cut-off wheel after assembly.
Assemble the transmitter stick, knuckle, connector tube, then pin and screw the stick into its gimbal. At the student position, screw the stick in first and then complete the assembly. When reinstalling the set screw through the cut-down knob, be sure to bear on the knuckle pin only enough to keep the pin in place. There is no vibration to contend with and since the stick now has a hole through it, over-tightening can fracture the stick.
If the transmitter should accidentally slide up in the frame a tad, the connector tube will jam on the bridge; therefore the plywood hold-down tabs are necessary.
There isn't any good reason to demount the transmitter from the Trainer Tray even if you intend to fly solo. It's true that once you must start the engine, adjust the needle valve, etc., you will need to "strap in." That is a minor inconvenience compared to the advanced capabilities afforded by the Trainer Tray.
Transcribed from original scans by AI. Minor OCR errors may remain.

