
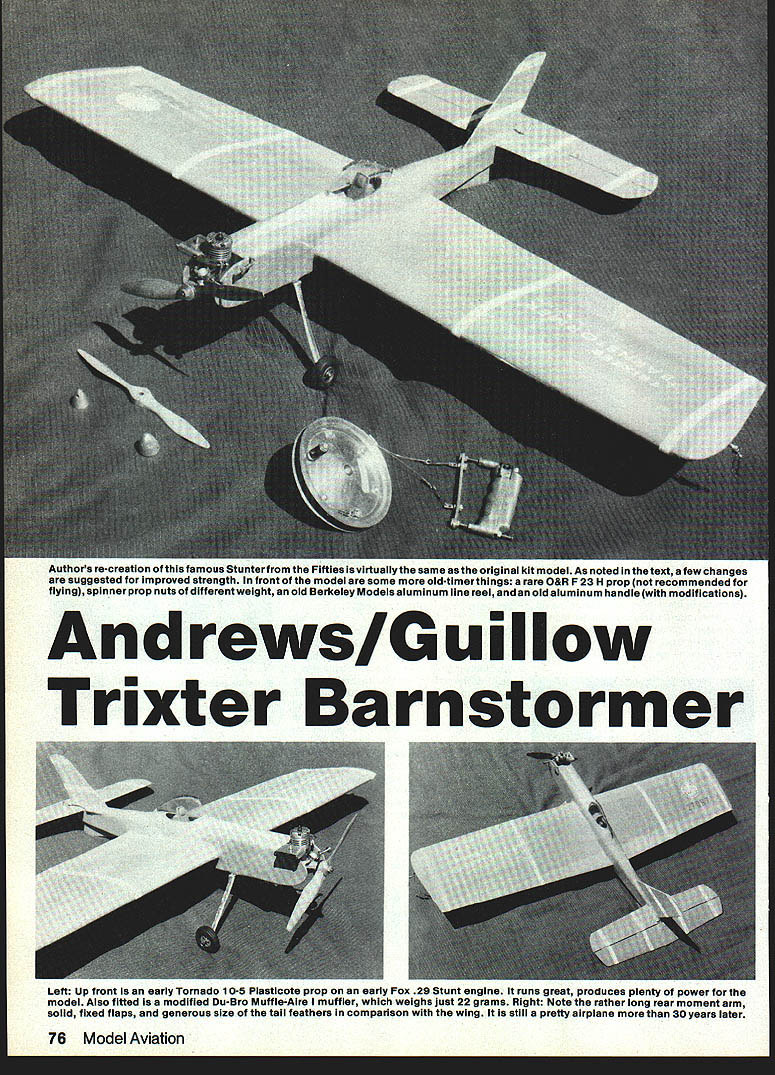

Trixter Barnstormer
Douglas A. Dahlke
This famous CL (control-line) Stunter, designed by Lou Andrews and kitted by Paul K. Guillow in 1950, is an American classic with many contest wins to its credit. It remains an excellent flier for .25 to .35 engines.
Although others have used the same name, Barnstormer still means Andrews/Guillow and 1950 to thousands of modelers. When I was a kid of 14 watching my first Barnstormer fly at the old Oshkosh Aeronuts field on one corner of Wittman Field, it was hard to believe that a model which looked so realistic could do the maneuvers so well and, at the same time, fly so slowly. Surely it would fall from the sky at that speed—I thought. Needless to say, it didn't.
At a time when some model magazines coyly suggested that super speeds might help cover flying errors (and Hal deBolt's Wagons rocketed about the Stunt circle at around 100 mph), the Barnstormer puttered its way into first place at the 1950 National Contest. To prove that this was no fluke, it won again in 1951. It also scored hundreds of first places at local meets all over the country, demonstrating convincingly that a longer aft moment arm could turn very sharply and that a realistic appearance was no hindrance.
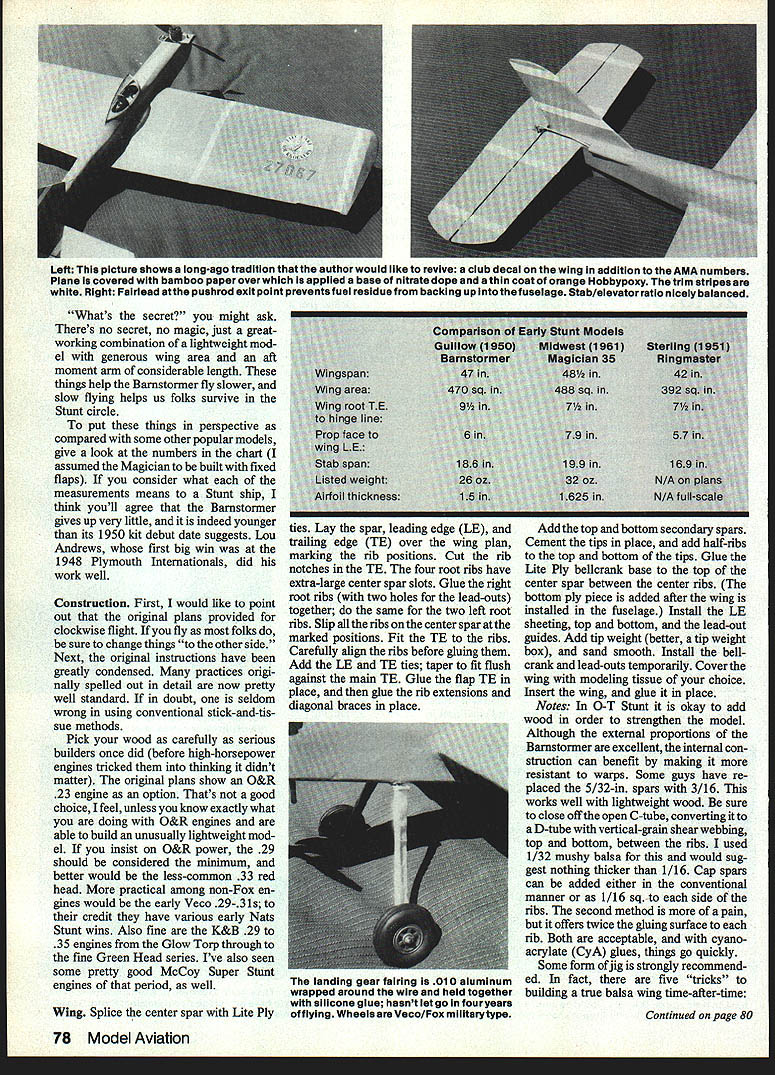
Fox engines filled the noses of countless Barnstormers. The Fox .35 was the most common, but Fox .29 fans grabbed their share of wins, including places at the Nats. These two engines remain popular among current builders of Old-Timer (O-T) Stunt models—for three good reasons:
- they run great,
- they are easy to obtain,
- they are inexpensive.
The Barnstormer was an attractive kit at the initial moderate price of $4.95. The average builder could assemble the kit and stand a reasonable chance of winning—much as one can with the Gieseke Nobler of today. It was the right plane at the right time—and for the right price. Introduced in 1950, the Barnstormer kit was still available from America's Hobby Center in New York during 1959. Unfortunately, no production records exist.
Today O-T Stunt is growing rapidly. As an unofficial Nats event, it outdrew all Stunt events except Open at the 1982 Nats. O-T is strong and growing in the Midwest and elsewhere. At Milwaukee in 1981, during a 40-mph wind, my Barnstormer not only took first place in the PAMPA (Precision Aerobatic Model Pilots Assn.) Intermediate event, it also took the high score of the entire meet—beating a Nobler in Advanced by 20 points (an Expert-class flier sadly crashed in the wind). At 32 oz., my Barnstormer mocks the supposed fact that lightweight models fly poorly in the wind. In 1983 it scored two firsts, two seconds, and two thirds, as well as first in "Best-Flying Glow (Stunt-a-thon '83)" and first in "Spirit of '52" judging (Peoria '83) for the most authentic O-T model.
What's the secret? There's no secret—no magic—just a great working combination: a lightweight model, generous wing area, and an aft moment arm. These things help the Barnstormer fly slower, and slow flying helps us survive in the Stunt circle.
Comparison of Early Stunt Models
Guillow (1950) Barnstormer
- Wingspan: 47 in.
- Wing area: 470 sq. in.
- Wing root T.E. to hinge line: 9½ in.
- Prop face to wing L.E.: 6 in.
- Stab span: 18.6 in.
- Listed weight: 26 oz.
- Airfoil thickness: 1.5 in.
Midwest (1961) Magician 35 (assumed with fixed flaps)
- Wingspan: 48½ in.
- Wing area: 488 sq. in.
- Wing root T.E. to hinge line: 7½ in.
- Prop face to wing L.E.: 7.9 in.
- Stab span: 19.9 in.
- Listed weight: 32 oz.
- Airfoil thickness: 1.625 in.
Sterling (1951) Ringmaster
- Wingspan: 42 in.
- Wing area: 392 sq. in.
- Wing root T.E. to hinge line: 7½ in.
- Prop face to wing L.E.: 5.7 in.
- Stab span: 16.9 in.
- Listed weight: N/A on plans
- Airfoil thickness: N/A full-scale
I think you'll agree the Barnstormer gives up very little compared with these popular models and remains surprisingly youthful despite its 1950 debut. Lou Andrews, whose first big win was at the 1948 Plymouth Internationals, did his work well.
Construction
First, note the original plans provided for clockwise flight. If you fly counterclockwise, be sure to mirror the parts "to the other side." The original instructions have been condensed—many practices once spelled out in detail are now standard. When in doubt, use conventional stick-and-tissue methods.
Pick your wood carefully. The original plans show an O&R .23 engine as an option—that's not a good choice unless you know exactly what you are doing and can build an unusually lightweight model. If you insist on O&R power, the .29 should be considered the minimum, and the less-common O&R .33 red head would be better. Practical non-Fox alternatives include early Veco .29–.31s and K&B .29 to .35 engines (Glow Torq to Green Head). McCoy Super Stunt engines of the period have also worked well.
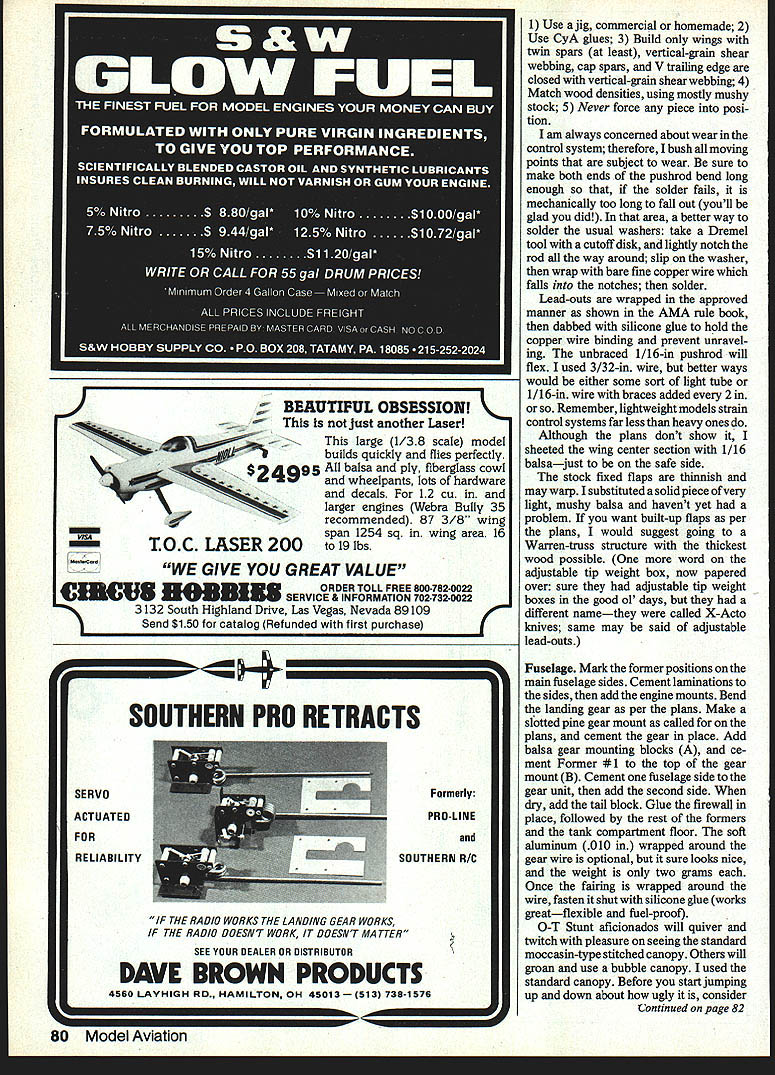
Wing
- Splice the center spar with lite-ply ties. Lay the spar, leading edge (LE), and trailing edge (TE) over the wing plan and mark rib positions.
- Cut rib notches in the TE. The four root ribs have extra-large center-spar slots.
- Glue the right root ribs (with two holes for the lead-outs) together; do the same for the left root ribs. Slip all ribs onto the center spar at the marked positions.
- Fit the TE to the ribs, carefully align before gluing. Add LE and TE ties; taper to fit flush against the main TE.
- Glue the flap TE in place, then glue rib extensions and diagonal braces.
- Add top and bottom secondary spars, cement the tips, and add half-ribs to the top and bottom of the tips.
- Glue the lite-ply bellcrank base to the top of the center spar between the center ribs (the bottom ply piece is added after the wing is installed in the fuselage).
- Install LE sheeting (top and bottom) and the lead-out guides. Add a tip weight or a tip weight box and sand smooth.
- Install the bellcrank and lead-outs temporarily, cover the wing with modeling tissue, insert the wing, and glue it in place.
Notes and strengthening suggestions:
- In O-T Stunt it is acceptable to add wood to strengthen the model and resist warps.
- Some builders replace the 5/32-in. spars with 3/16-in. with lightweight wood.
- Close the opening at the wing root, converting it to a D-tube with vertical-grain shear webbing top and bottom between the ribs. Use 1/32- to 1/16-in. balsa for this webbing.
- Cap spars can be conventional or 1/16 sq. to each side of the ribs—this doubles the gluing surface.
- Cyanoacrylate (CA) glues speed construction.
- Some form of jig is strongly recommended. Five "tricks" to building a true balsa wing time after time:
- Use a jig, commercial or homemade.
- Use CA glues.
- Build wings with twin spars (at least), vertical-grain shear webbing, cap spars, and a V trailing edge closed with vertical-grain shear webbing.
- Match wood densities, using mostly mushy stock.
- Never force any piece into position.
The stock fixed flaps are thin and may warp. I substituted a solid piece of very light, mushy balsa with no problems. If you want built-up flaps as per the plans, consider a Warren-truss structure using the thinnest wood possible.
Control system and lead-outs
- Bush all moving points subject to wear. Make both ends of the pushrod bends long enough so, if the solder fails, the rod is mechanically too long to fall out.
- A reliable washer-solder method: lightly notch the rod all the way around with a cutoff disk, slip on the washer, wrap with bare fine copper wire into the notches, then solder.
- Lead-outs should be wrapped per the AMA rule book, then dabbed with silicone glue to hold the copper-wire binding and prevent unraveling.
- The unbraced 1/16-in. pushrod will flex; 3/32-in. wire works better. Even better: a light tube or 1/16-in. wire with braces every ~2 in.
- For safety, sheet the wing center section with 1/16 balsa.
Stabilizer and Elevator
- Cut pieces from the lightest wood available. Sand and mark hinge spots.
- Traditional Z-hinges: use nylon reinforcing tape to make them—these look original, won't rot, and are strong. Regular nylon pinned hinges will work but the stab/elevator is thin.
- If using nylon Z-hinges, glue them on with the stab slightly set so they are flush with the surface. Do not use common cotton cloth hinges.
- When hinged, notch the stab LE at the center. Install the control horn temporarily (don't glue), then slide the stab into the fuselage.
Fuselage
- Mark former positions on the main fuselage sides. Cement laminations to the sides, then add engine mounts.
- Bend the landing gear per plans. Make a slotted pine gear mount as called for and cement the gear in place.
- Add balsa gear mounting blocks (A). Cement Former #1 to the top of the gear mount (B), then cement one fuselage side to the gear unit, followed by the second side. When dry, add the aft block.
- Glue the firewall in place, followed by the rest of the formers and the tank compartment floor.
- Soft aluminum (.010 in.) wrapped around the gear wire is optional but attractive; .005-in. brass also works. Once the fairing is wrapped, fasten it shut with silicone glue (flexible and fuel-proof).
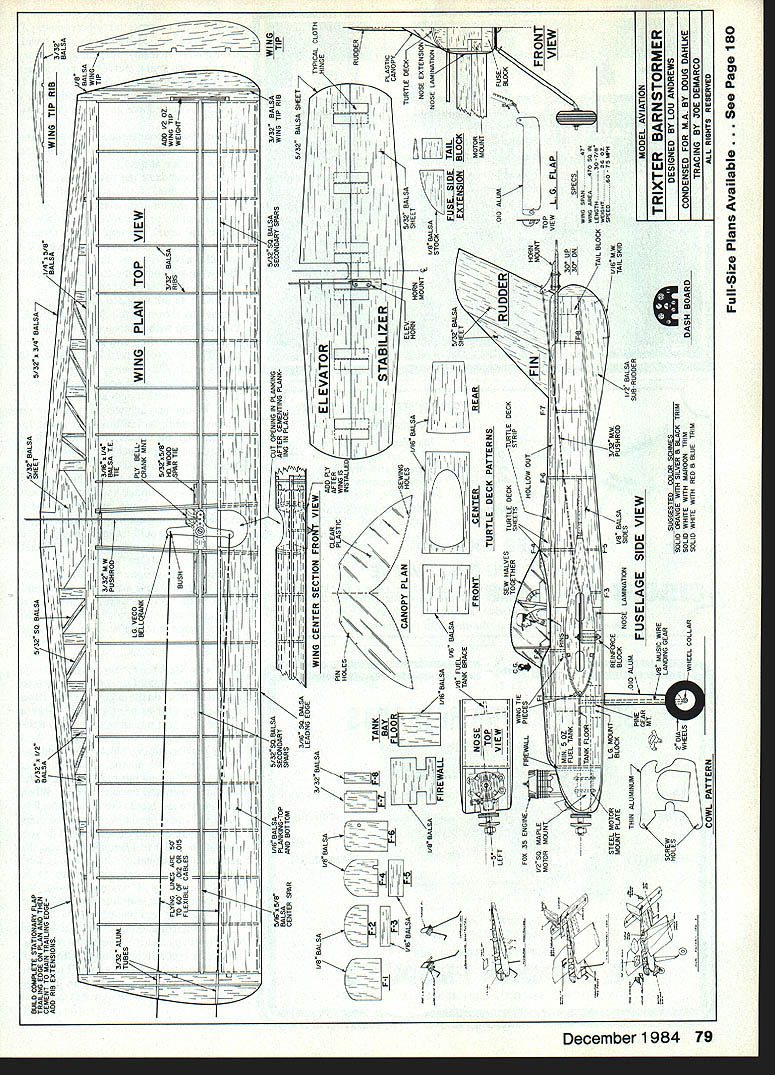
- The standard moccasin-type stitched canopy is rugged—my Barnstormer survived four inverted landings with zero damage. A bubble canopy looks sleek but is less forgiving.
- Add an extended fairlead where the pushrod exits the body to prevent fuel from creeping back inside.
- Plans show tin stock for the fuel tank (~.009 in.), but .005-in. brass works fine.
- The plans show 5° of engine offset, but 1°–2° often suffices.
- Resist using hard balsa in the fuselage "for strength"—heavier is not necessarily stronger.
- For a small weight penalty (~1½ oz.) I used vintage parts (Veco bellcrank, tank, wheels, horn). A spun-aluminum spinner is the lightest all-metal spinner I know of; an aluminum spinner nut is an alternative. Consider a muffler.
- With a good Fox .29 and a 10x5 prop you'll need ~2½ oz. tank capacity. Mount the engine far forward on the bearers, but not so far forward there is nothing to absorb vibration.
- I used a brass eyelet in the sub-rudder for a stooge release hole.
Final assembly
- Bend the pushrod as shown (but don't bend the horn end yet). Insert the pushrod through the bottom of the wing and hook it to the bellcrank.
- Glue the bottom ply piece to the bottom of the center spar between the center ribs.
- Bolt the bellcrank in place, center it and neutralize the elevator, then bend the horn end to the pushrod accordingly. When aligned, glue the horn in place.
- Glue the reinforcement block to the bottom of the ply piece and between the fuselage sides after cutting a hole in the block to clear the bellcrank bolt. Notch the rear fuselage block for pushrod clearance.
- Spot-glue the block in place atop the fuselage sides; carve and sand to match former #6; remove, hollow as per the plans, then glue in place.
- Sand and cement the rudder/fin in place.
- Glue in the three tie pieces between fuselage sides and around the wing LE. Cement in a slightly oversize fuselage bottom after notching for gear clearance, then trim and sand.
- Add the sub-rudder and tail fairing block; shape to blend in. Add the wire tail skid.
- Glue the tuckered strips to the top of the fuselage sides and formers. Spot-glue the front fuselage block in place, carve, remove and hollow out. Repeat for the bottom fuselage block.
- Install the fuel tank and glue its covering in place. Glue the canopy in place, and after finishing the model, add the wheels.
Finish
- Although some O-T Stunters use plastic film covering, I prefer Ply Span or bamboo paper with the shiny side out. These are lightweight and require less dope for sealing.
- Use clear nitrate dope as a base, then spray grossly-thinned Hobbypoxy orange or similar. Aero Gloss dope is a traditional O-T material (formulations may have changed).
- Keep trim minimal to save weight—my design is the second-lightest possible: a few chordwise stripes and minimal paneling taken from the plans. Dry transfers are nearly weightless for markings. Consider reviving the club decal tradition.
Flying
- The original center of gravity (CG) was about 1½ in. aft of the LE. For power, unless you have an unusually light model, a .25 with a 10x4 or 9x5 prop is the minimum recommended. For Fox .29 or .35, I suggest a 10x5 prop (Top Flite); old-style gumwood props are lighter than modern Super M units.
- With a Fox .29 I find 51–52 ft of .012-in. solid line works fine. Solid line is heavier but has less drag than stranded line; it need not be wiped down.
- I use fuel with ~5% nitro and 30% castor oil.
- Acceleration is brisk for a big model powered by a plain-bearing .29—take care at the throttle and watch during contests. I prefer mildly nose-heavy trim, achieved by building in a very light tail. If needed, move the tank or add nose weight.
- The Barnstormer handles rough fields well with a high angle of attack and low gross weight. It performs the full AMA Precision Aerobatics pattern well while also doing big, sweeping old-style maneuvers for demonstrations.
Plans & Credits
- Design: Lou Andrews
- Construction: Doug Drake (article)
- Condensed from: Paul K. Guillow
- Plans by: Don T. Grant
- Full-size plans available: See plan source
Plan sheet captions (included on the original plan sheet):
- Wing Tip Rib
- Wing Plan Top View
- Wing Center Section Front View
- Elevator
- Stabilizer
- Canopy Plan
- Tank Floor
- Firewall
- Nose Top View
- Rudder
- Fin
- Center Turtle Deck Patterns
- Turtle Deck Front
- Turtle Deck Side
- Fuselage Side View
- Front View
- Dash Board
- Wheel Collar
- Cowl Pattern
Final thoughts: how many of you are game to build one using only Ambroid or Testor's glue? That was how they were built in the good old days. The Barnstormer remains a classic example of how sensible design—lightweight construction, generous wing area, and aft moment arm—produces exceptional slow-speed handling and contest success.
Transcribed from original scans by AI. Minor OCR errors may remain.

