
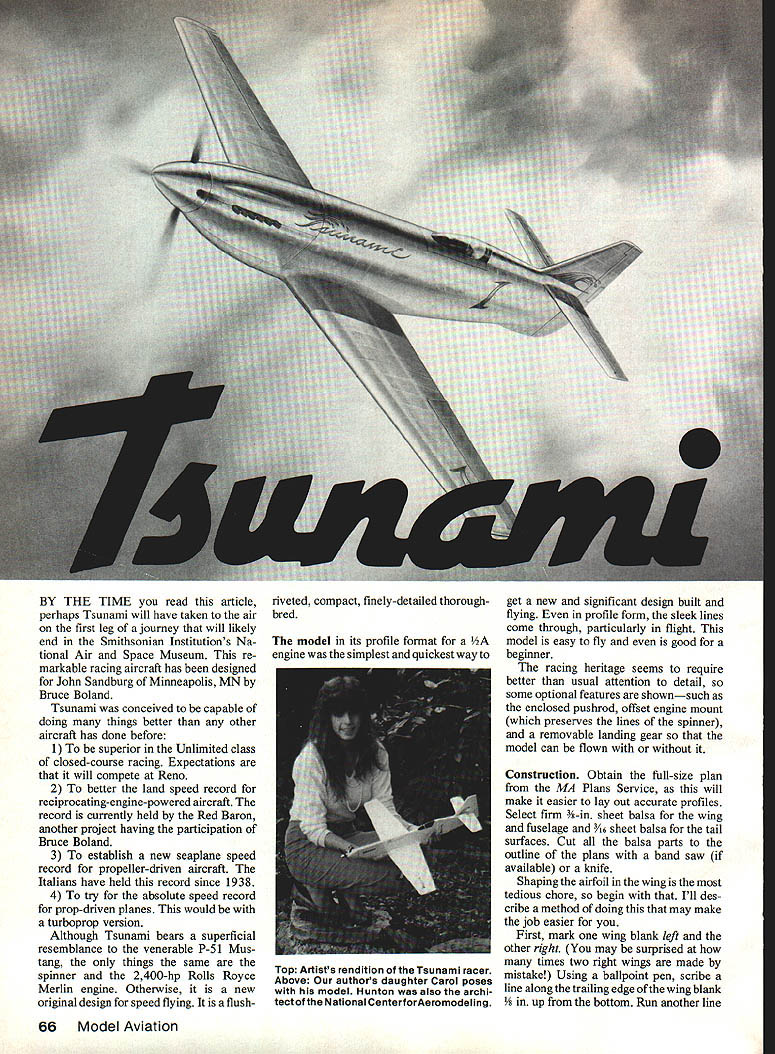
Tsunami
By the time you read this article, perhaps Tsunami will have taken to the air on the first leg of a journey that will likely end in the Smithsonian Institution's National Air and Space Museum. This remarkable racing aircraft was designed for John Sandburg of Minneapolis, MN by Bruce Boland.
Tsunami was conceived to be capable of doing many things better than any other aircraft has done before:
- To be superior in the Unlimited class of closed-course racing. Expectations are that it will compete at Reno.
- To better the land speed record for reciprocating-engine-powered aircraft. The record is currently held by the Red Baron, another project involving Bruce Boland.
- To establish a new seaplane speed record for propeller-driven aircraft. The Italians have held this record since 1938.
- To try for the absolute speed record for prop-driven planes, which would be with a turboprop version.
Although Tsunami bears a superficial resemblance to the venerable P-51 Mustang, the only things the same are the spinner and the 2,400-hp Rolls-Royce Merlin engine. Otherwise it is a new, original design for speed flying: a flush-riveted, compact, finely detailed thoroughbred.
The model, in its profile format for a 1/2A engine, was the simplest and quickest way to get a new and significant design built and flying. Even in profile form, the sleek lines come through, particularly in flight. This model is easy to fly and even is good for a beginner.
The racing heritage requires better-than-usual attention to detail, so some optional features are shown:
- Enclosed pushrod
- Offset engine mount (which preserves the spinner lines)
- Removable landing gear so the model can be flown with or without it
Construction
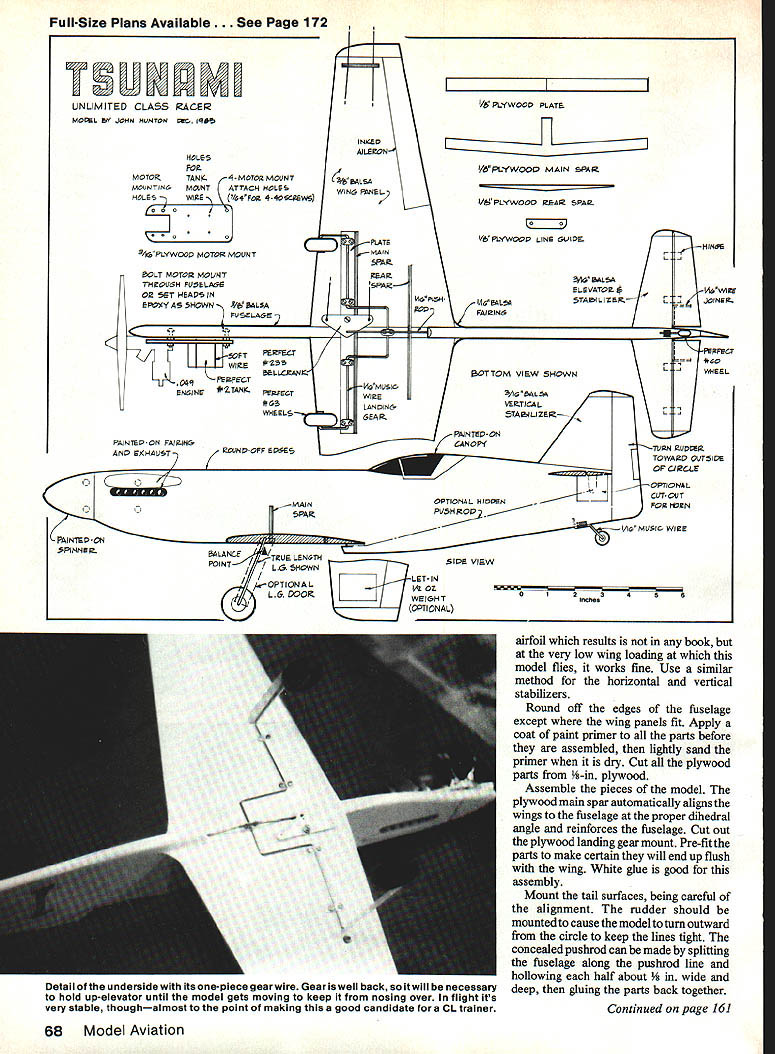
Obtain the full-size plans from the MA Plans Service, as this will make it easier to lay out accurate profiles. Select firm 3/16-in. sheet balsa for the wing and fuselage and 1/16-in. sheet balsa for the tail surfaces. Cut all balsa parts to the outline of the plans with a band saw (if available) or a sharp knife.
Shaping the airfoil in the wing is the most tedious chore. A suggested method:
- Mark one wing blank LEFT and the other RIGHT to avoid making two right wings by mistake.
- Using a ballpoint pen, scribe a line along the trailing edge of the wing blank 5/8 in. up from the bottom.
- Scribe another line 3/16 in. down from the top surface and a center line halfway between leading and trailing edges.
- Using a knife and a coarse sandpaper block, remove material flat between the trailing-edge line and the center line.
- Mark a line 7/16 in. along the leading edge, then mark another line midway between that line and the top leading edge. Remove material between these two lines with a sanding block and finer sandpaper.
- Round the airfoil, thin the trailing edge, and well-round the leading edge. Finish-sand to smooth shape.
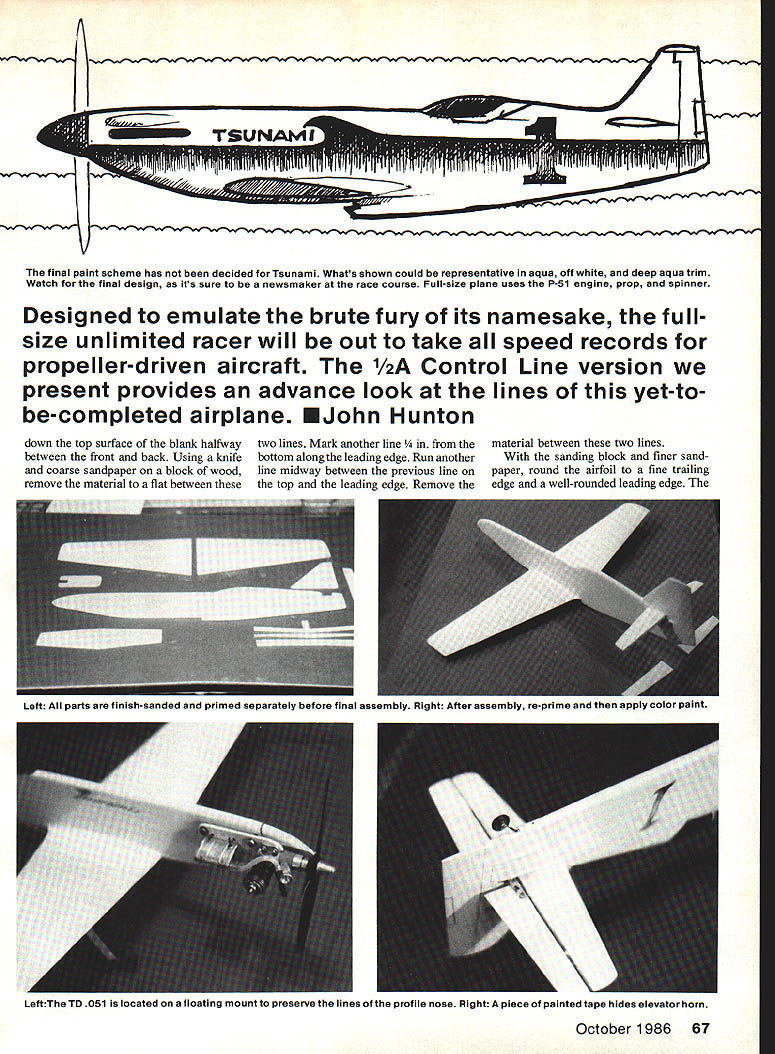
Finish-sand and prime parts separately before final assembly. After assembly, re-prime and apply color paint.
Full-size plans available. See Page 172.
Finish the horizontal and vertical stabilizers. Round off the edges of the fuselage except where the wing panels fit. Apply a coat of primer to parts before they are assembled and lightly sand the primer when dry. Cut plywood parts from 1/8-in. plywood. Assemble the pieces so the plywood main spar automatically aligns the wings and fuselage at the proper dihedral angle and reinforces the fuselage. Cut out the plywood landing gear mount. Pre-fit parts and make certain they end up flush when glued. White glue is good for this assembly.
Mount the tail surfaces, being careful of alignment. The rudder should be mounted so the model does not tend to yaw outward from the flying circle (this helps keep the lines tight). The concealed pushrod can be made by splitting the fuselage along the pushrod line, hollowing each half about 1/8 in. wide and deep, then gluing the parts back together.
Tsunami/Hunton
The model shown in the photographs was finished with the Black Baron epoxy system and primer. Two coats of primer with a light wet-sanding between coats will do well. Use flat paint for the basic finish coat. After this coat dries well, all trim can be applied with felt-tip markers; then apply a finish coat of gloss clear.
Install the elevators with the wire joiner and plastic hinges. Install the pushrod and elevator horn. Then install the bellcrank, which is bolted through the wing, and be certain that the controls are well-centered and move freely.
Cut pieces of plastic hinge material to serve as landing gear mounts. Bend the 1/16-in. gear wire to shape, attach the wheels, and mount the assembly to the model. Install the tail wheel so the model will track straight ahead.
Mount the tank to the plywood plate with soft wire, and bolt on the engine. Hook up the fuel line. It is best to run the needle valve to the top side to prevent its being damaged in the case of a nose-over on landing.
Drill blind holes in the fuselage and insert epoxy into the holes. Then, using the plywood plate as a guide, epoxy in the mounting bolts. After the epoxy has cured, run nuts onto the bolts, slip on the plywood engine plate, and install nuts to hold down the engine.
Balance the model at the point shown on the plans. Use modeling clay if necessary to achieve balance. For initial flights, add approximately 1 1/2 oz. of modeling clay to the outboard wing tip; this can be removed when you become a more experienced flier.
Flying
- Recommended prop: 6-3.
- Use Dacron lines approximately 25 to 30 ft. long.
- Wait for a reasonably calm day.
Use full power on the engine, set just slightly on the rich side. When the plane is released, hold full-up control initially to keep the nose up. After sufficient speed is built up, go to neutral control and let the model take off by itself.
Do not let the model climb too high and slow, as line tension will be reduced or lost and you may lose control. Pay particular attention to wind direction, and do not let the model climb into the wind until you are used to it.
Good luck with your model. Watch for the full-size Tsunami, for it will be in the news.
Transcribed from original scans by AI. Minor OCR errors may remain.

