

Tutor
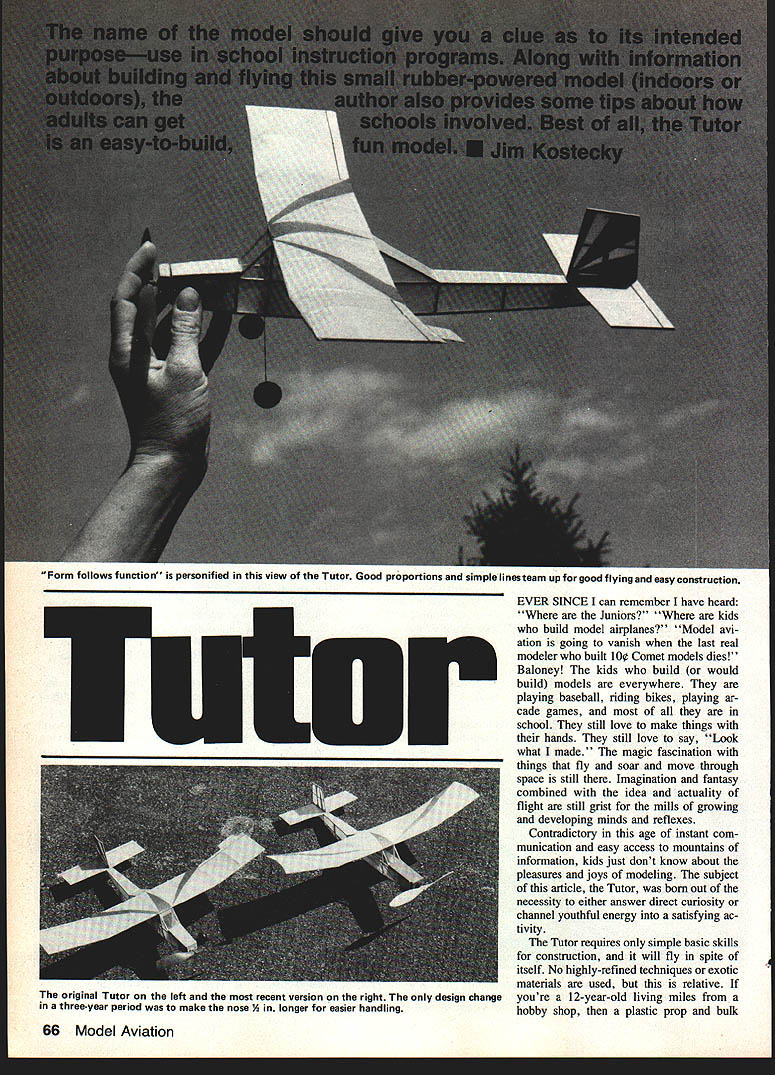
The name of the model should give you a clue as to its intended purpose—use in school instruction programs. Along with information about building and flying this small rubber-powered model (indoors or outdoors), the author also provides some tips about how adults can get schools involved. Best of all, the Tutor is an easy-to-build, fun model. — Jim Kostecky
Ever since I can remember I have heard: "Where are the Juniors?" "Where are kids who build model airplanes?" "Model aviation is going to vanish when the last real modeler who built 10¢ Comet models dies!" Baloney! The kids who build (or would build) models are everywhere. They are playing baseball, riding bikes, playing arcade games, and most of all they are in school. They still love to make things with their hands. They still love to say, "Look what I made." The magic fascination with things that fly and soar and move through space is still there. Imagination and fantasy combined with the idea and actuality of flight are still grist for the mills of growing and developing minds and reflexes.
Contradictory in this age of instant communication and easy access to mountains of information, kids just don't know about the pleasures and joys of modeling. The subject of this article, the Tutor, was born out of the necessity to either answer direct curiosity or channel youthful energy into a satisfying activity.
The Tutor requires only simple basic skills for construction, and it will fly in spite of itself. No highly refined techniques or exotic materials are used, but this is relative. If you're a 12-year-old living miles from a hobby shop, then a plastic prop and bulk materials are exotic. A first consideration is to make sure you know where you can get the materials easily and have them available when needed—but I get ahead of myself.
Where do you find the greatest concentrations of kids? In schools, of course. Health departments use schools to accomplish their ends, because the little rascals are there—easy access. Various agencies find schools a convenient way to disseminate important information that children and parents need to know. Principals, school boards, and teachers are in the business of providing the best and widest range of activities possible to their students and the community. A school building should be in use constantly. The more facilities are used, the more cost-efficient they become.
The schools need to be used by adults in the community, too. Watch the illuminated school building on a cold winter's night. Often you will see departing adults carrying sweaty socks and sneakers after aerobics or basketball. "Little old ladies" carry macramé or stained-glass ornaments from adult education activities. There is no reason the socks and sneakers can't be augmented with winders and rubberbands. The "little old ladies," fathers, sons, and daughters (or should I say adult persons and young persons) could be carrying balsawood, tissue, X-Acto knives, and model kits. If you are a teacher/modeler as I am, then you know how to implement modeling activities in school.
My background and philosophy in modeling began with rubber models. They didn't fly much at first, but I hung them all over my room. Man-carrying aircraft with character filled the skies whenever I looked up—Piper Cubs, Champs, DC-3s, Taylorcrafts, occasional Thunderbolts, P-80 Shooting Stars, Starfires, Sabrejets, and a host of other planes. The thrill of flight could be enjoyed vicariously because it was observable. Today, unless you live in an airport glide path, most aircraft are small specks and a Cessna driving overhead does not smack of adventure and excitement. Most of my models didn't fly, but the need for flight was satisfied by observing planes in flight—constantly and in rather close proximity.
I learned to fly control line. Flight manipulation by my reflexes caused an excitement that still lives today. I competed long and hard in control line, and the thrill of flight by my command was merged with the competition, one sustaining the enthusiasm for the other. Along the way, free flight got mixed in a little, and this form of flight appealed to a different, more passive part of me. It fit my personality. Radio control followed as a natural progression—mostly because noise ruined control line in every area for flying that was accessible to me. I miss it. I mention this because, from the wide range of activities I've enjoyed in modeling, and knowing children as I do, I feel my approach to showing modeling to others is positive and relevant.
Today, models must fly. We need that to satisfy our interest, curiosity, and fantasy about flight. Full-size aviation of a few decades ago fulfilled this need, but it just doesn't anymore. Instant gratification is the way of today's world. When a youngster has been brought up with it as an integral part of life, it's tough to get him to sit for an eternity holding two stick model fuselage sides together while the Ambroid or Testor's dries—and then maybe the plane won't fly.
I teach in a middle school with a super staff and administration. Kids travel from class to class for different periods, and this provides a great opportunity because there is a certain amount of flexibility. I've made days where I escape having to run a study hall or have a hall duty assignment. For that period I can teach a modeling course to kids that have a study hall and can get excused to my room.
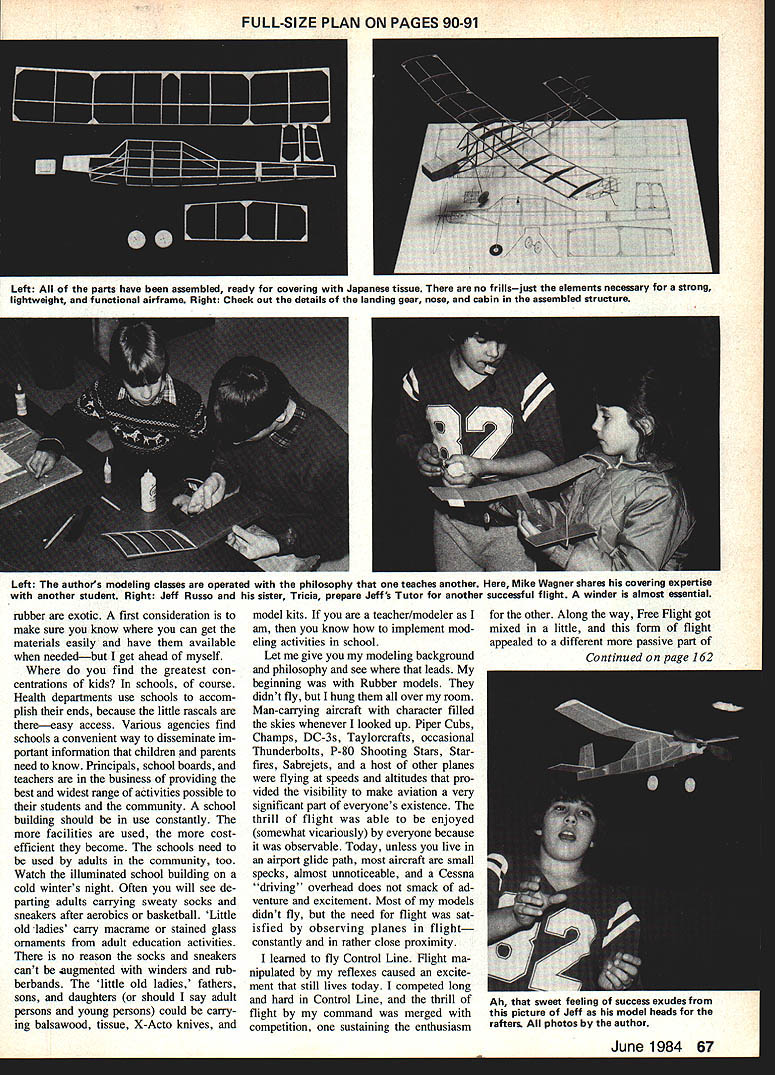
Also, a fellow teacher and I applied for a building-use permit through our principal. We were granted use of the gymnasium every Friday night from 7 to 10:30 p.m. in the winter. We spent a lot of time making airplanes that normally would fail due to a lack of simple flight-trimming knowledge. Other adult modelers from the area were invited, and we all learned and were motivated by each other. These kids sometimes spin off into radio control or get quite involved in free flight rubber. Many will pursue this activity through life as avidly as anyone.
Ed Herrscher, a co-teacher and budding model builder, and I also utilize models in a normal class setting. Metric weights, math, and research become meaningful by weighing components, computing wing loadings, and searching out data on specific aircraft. When the final test is a model that either flies or doesn't in front of a gym full of people (instead of an A or B on a paper), education has a greater impact.
Even if you are not a teacher, you can still utilize the school setting very effectively to promote modeling. Any member of a community can talk to a principal and apply for the use of a gym for flying sessions. Make sure you have your thoughts organized for your activity, and just be sincere. A good school administrator will recognize your idea's merit. A poor one will have to be convinced, but if you can explain the value of your activity (and get the School Board president's child interested) you'll be successful.
Try an exciting possibility: teach modeling in an Adult Education Program. For heaven's sake, don't try to teach advanced RC pattern or quarter-scale building to a group of neophytes in a six-to-eight-week period. Design a course that requires an adult to bring a youngster (father/child, mother/child, neighbor/child, etc.) to build and fly a model together. This is an excellent way to sell a model building course to a continuing education director, but the adult/child aspect isn't mandatory in this instance.
Along the way, basic construction techniques are taught (Model Aviation articles on gluing, bracing, etc., are a fabulous resource), a simple rubber-powered plane is constructed, and trimming and flying techniques are demonstrated. At various times it is useful to show a more complex model: an RC trainer, scale, control line, free flight, or anything you have or can borrow. An occasional movie from the AMA film library will stimulate your class like there's no tomorrow.
Keep the course simple! In just one session per week for six to eight weeks, an instructor cannot even come close to teaching all the skills he has acquired from, possibly, many years of experience. Oh yes, you usually get paid for teaching this. You probably will need to submit a written course outline. You'll be amazed how difficult it is to condense everything you need to teach and show in the available time. The outline will really help you organize your time and ideas efficiently.
What do you do with your old modeling magazines? If you aren't a saver, give them to your local school library. The more current the issues, the better. Schools are really cutting back monetarily, and magazine subscriptions are among the first things to go. I firmly believe that Model Aviation should be in every school library. It has the scope and range necessary to explain the basics of modeling as well as showcase the most sophisticated forms. It's a great motivator, and it also explains and answers a multitude of questions generated in young minds eager to explore modeling's possibilities.
If you're still reading, it probably means somewhere in your life you feel a need or responsibility to share the enjoyment of modeling with others. This model was designed for this purpose, so let's build it. The instructions are simple and detailed so that a complete novice should be successful. Those of you with more experience will be able to use the instructions as an aid in communications.
Construction
Collect everything you need. Nothing is more frustrating than not having some simple thing at a crucial time.
Tools you will need:
- Needle-nose pliers
- A sharp No. 11 X-Acto knife
- A small, inexpensive paint brush
- A razor blade
- A building board (a piece of Celotex ceiling tile, Homosote pressed board, or a piece of Styrofoam about 1-in. thick); it should be at least the size of the plan
- Straight pins
- Wax paper or Saran Wrap
Adhesives and finishing supplies:
- A small container of Testor's or Elmer's carpenter's glue
- A bottle of water-soluble cyanoacrylate (CyA) glue if you wish
- A bottle of Sig Low-Shrink or nitrocellulose dope
- A container of dope thinner
- Some 320-grit sandpaper and a sanding block
Materials list:
- 3 — 1/16 x 1/16 x 36-in. balsa strips
- 3 — 1/16 x 1/8 x 18-in. balsa strips
- 1 — 1/16 x 3/8 x 8-in. balsa
- 1 — 1/8 x 1/4 x 1-in. balsa (or laminate four 1/16-in. pieces)
- 6-1/2 in. of .025 music wire
- 2 in. of 1/16-in. O.D. aluminum tube
- 1 — 5-1/2-in. plastic prop
- 1 — plastic nose button
- 1 — 3/32-in. prop shaft and two brass washers
- 1 — 3 x 3-in. clear acetate
- 1 — 30-in. strip of 3/32-in. rubber
- 1 — sheet of Japanese tissue
Tape or pin the plan to the building board, and protect it with wax paper or Saran Wrap. Trace the rib shape from the plan onto a piece of tagboard or heavy paper. Use this as a template for cutting 10 ribs from 1/16-in. balsa. Bend the wire landing gear to the shape shown on the plan. If you curl very accurately and make tight-fitting joints, use CyA glue to build with. If you're getting better-fitting joints but not quite perfect, Titebond glue is a good choice. Coat each piece of the joint lightly, let it dry, add a little more glue, and press the pieces into place.
Tail surfaces Build the stabilizer by cutting and fitting the 1/16-in. sheet pieces over the plan. Hold the parts in place by pinning next to or over them, but never through them. The triangular gussets are very important; be sure the grain runs as shown on the plan.
Build the fin and rudder as two separate pieces. They will be held together with thin wire after being covered.
Wing Pin the 1/16 x 1/2-in. trailing edge to the plan. Fit the two end ribs and the spar so the ribs are snug against the trailing edge; pin them down. Add all the other ribs and spar, and finally the leading edge. If you use Titebond, pre-glue and then re-glue the joints as you go. Add the gussets to the tip and center joint.
Cut the wing at the dihedral breaks. The ribs at these joints should remain attached to the flat center section. Prop up the tips 7/16 in., with the joint end flush with the edge of your board; sand the dihedral area into the end grain with the sanding block. Now, prop up the tips, and glue them to the center section. Add the last set of gussets. Remove the wing from the board, and shape and sand the leading and trailing edges.
Fuselage Build two flat sides directly over the plan. Don't forget the 1/16-in. sheet nose fillers, the angled 1/16-in. nose top, and the sheet motor peg support. Place the two identical sides upside down on the board. Add the crosspieces in the center section and the front former. Add the 1/16-in. top nose sheeting. Pull the tail ends together and glue. Use the top view of the plan to make sure the fuselage doesn't curve to one side. Add the rest of the crosspieces.
Glue the previously-bent landing gear wire into the fuselage against the balsa uprights. This should be a snug fit. Add the gussets where the wire comes out. It's now beginning to look like an airplane.
Wheels and nose For the wheels, trace a nickel four times on 1/16-in. balsa. Roughly cut them out, then sand them round. Glue two discs together for each wheel with the grain at right angles. CyA works well here. Determine the center of the wheels and drill holes to accommodate bushings. Also drill the fuselage sides for the aluminum tube rear motor peg.
The 3/4-in. balsa nose piece is glued to the rectangular cutout from the nose former to make the nose block. When it is dry, drill to accept the plastic nose button. Insert the prop shaft, brass washers, and prop. Bend the shaft so it engages the prop. The nose should fit snugly into the former. Apply CyA glue to both parts to harden them and allow the fit to remain tight for a long period of time.
Covering Lightly sand everything first. Cut the Japanese tissue into enough pieces to cover all the surfaces. Mix some Titebond or Elmer's with water so it will brush onto the framework easily but still have enough body to hold the tissue—about 60% glue and 40% water is usually good. Brush the glue only on the border (outline) of the parts to be covered. Drape the tissue over the part, and gently stretch out the wrinkles. Press the tissue onto the glue so that it adheres (but don't allow your fingers to stay in one spot too long, or you'll stick to it and rip the tissue).
Cover the top of the wing last. It's a little tougher to do due to the curve of the airfoil. Pull the tissue tight at the center, glue the leading and trailing edges, and use small strips over the ribs. When the glue is dry, wet the tissue with dope thinner and apply coats of dope as required.
Cover the center section and outside panels of the wing separately. Shrink the tissue by misting it lightly with water from an atomizer or by dabbing it with alcohol and a cotton ball. Pin the parts, except the fuselage, to your building board until dry. Use wax paper or Saran Wrap between the surfaces and the building board, or they'll glue themselves to each other.
Then dope 50/50, and give everything two even coats. When dry, you can dope on some contrasting tissue trim or leave it alone. Glue on the acetate windshield and windows with a model airplane cement such as Ambroid or Duco. Attach the wheels by bending right angles in the ends of the axles or epoxying on a paper washer.
Using a pin, pierce the rudder and fin to accept the soft wire hinges. Wire from a "twist-tie" works well. Insert the wires, and give them a dab of glue.
Glue the rudder to the top of the stabilizer, making sure it is square. Use Duco, Ambroid, or CyA because the water-based glues won't hold the doped parts as well. Glue the tail surfaces and wing to the fuselage. A thin trim tab is attached to the trailing edge of the left wing in the same way the rudder was attached to the fin. Cut the trim tab from a piece of 1/16-in. balsa, and sand it down to about 1/32 in. Now, take a few minutes to admire your handiwork.
Flying
This is the best part. Finished Tutors have weighed as little as seven and as much as 15 grams; all have flown well. The plane is designed for a gym with a 25-ft. ceiling, but it also flies well outdoors. The heavier versions are less bothered by the wind outdoors, and they don't seem to be significantly handicapped indoors.
Trimming is simple. Follow these steps, and you'll be pleasantly surprised.
- Balance it by adding bits of clay to the tail or nose until the plane sits perfectly level when pivoted on the spar. Make sure you do this with the rubber motor installed—loosely wound so it doesn't bunch up in the front or back. Keep the prop from unwinding with a pin in the nose block.
- Tie the rubber motor loop with a square knot, putting a dab of CyA on the knot, then work some commercial rubber lube (or liquid soap) into the rubber.
- A rubber winder makes life much simpler. Bend about 1/16 in. of left rudder into the tail, and then put in about 20 turns with a 16:1 winder (about 300–350 hand winds). Launch with a level gentle shove after releasing the prop a split second earlier.
Carefully observe the flight. If the circle is too large, tighten it by shimming the nose to the left with balsa or thick paper about 1/32 in. at a time. If the plane climbs abruptly but then stalls, add downthrust in the same manner until the climb becomes even. If you have the circle size you want (or need) and the plane has a tendency to spiral in, depress the wing tab a little until you achieve a flat turn.
Flights will be around 20–25 seconds. One of our kids got a 15-gram model (with a motor tied from several worn-out, broken ones) to fly 48 seconds with 35 turns on the winder. So much for experience!
In retrospect there seems to have been an awful lot of instruction and philosophy for such a simple model. If you've never built a model before, you still might have questions. If you're an expert or experienced modeler, project yourself into a teaching situation, and it should make sense. If you want to test the validity of all this, walk into a roomful of inexperienced modelers with a $3.00 kit under your arm, and show them how to build and fly it.
Usually there is an undercurrent of tongue-in-cheek humor in what I write, but not so this time. This is serious, as you'll learn when you see the look on a child's face as his first model cruises magically near the beams in his school's gym.
Transcribed from original scans by AI. Minor OCR errors may remain.

