

Twiggy
Clarence Mather Photos by Fudo Takagi
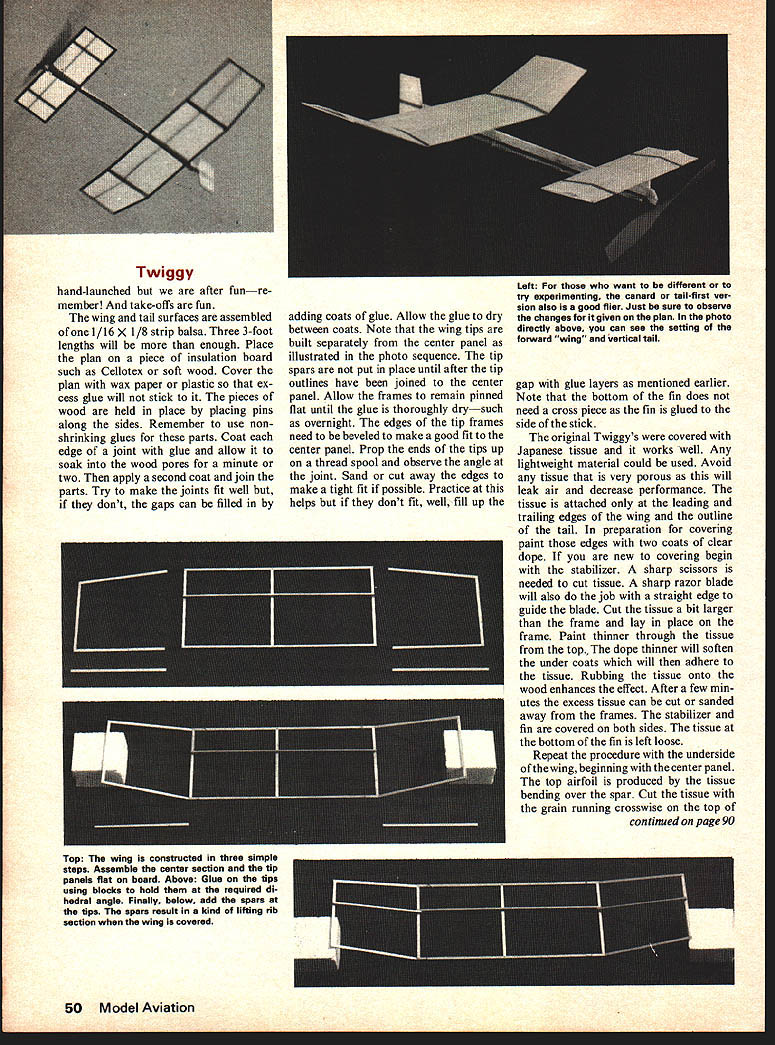
TWIGGY IS AN ultra-simple stick-and-tissue model that flies well. It is designed for the modeler trying his first built-up construction and the experienced modeler wanting some sport flying fun with a minimum of construction time. It is ideally suited for all classes of beginning modelers. The article is mainly about a conventional tractor model but details of a canard version are also included. It is recommended that the tractor be built first. The canard is for someone wishing to do some experimenting.
The propeller-nose bearing unit of rubber-powered models used to be a rather difficult construction task. Twiggy avoids the difficulty by utilizing the plastic unit from a #600 North Pacific Star Flyer. The canard version drawing shows how to build up a nose bearing if one prefers. The wing has no ribs yet has an airfoil which gives good lift. One may wonder why Twiggy should be built if he already has a Star Flyer. Twiggy is a much better performer because it is larger yet lighter.
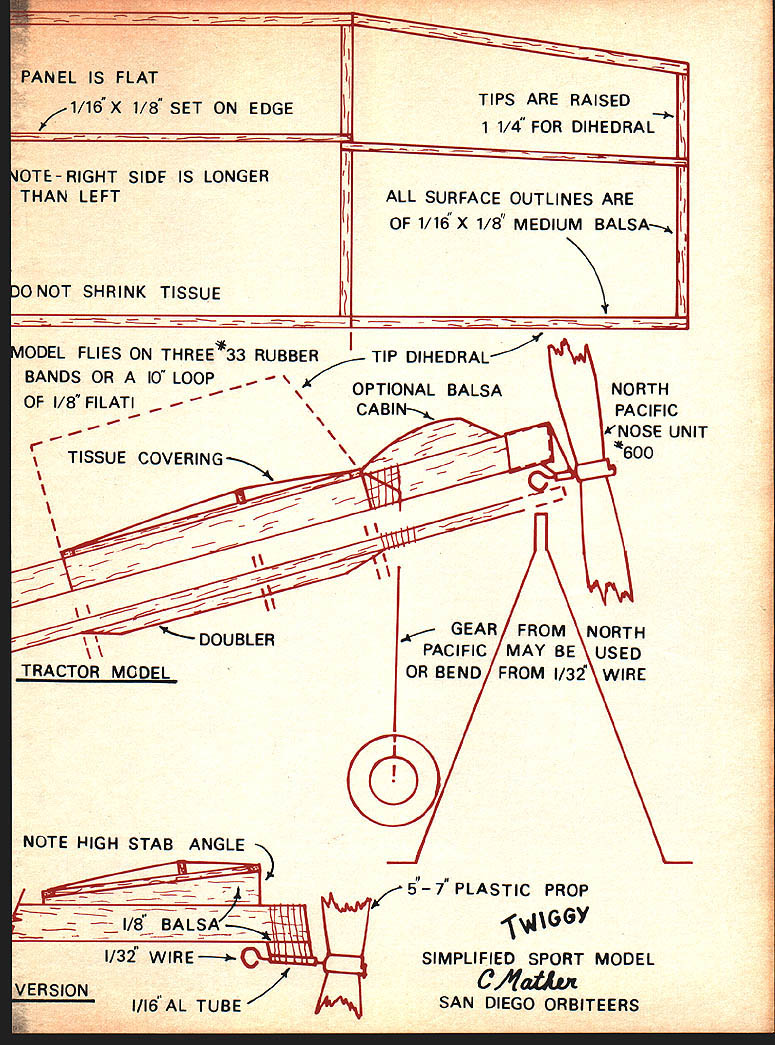
Medium-grade balsa should be used for this model. Lightweight balsa is often brittle and heavy balsa is unnecessary. Select a straight piece 1/8 x 3/8 x 13 for the stick. Note that the underside of the stick at the rear is cut to an upsweep. Measure and cut this carefully as this negative angle is necessary to produce good stability. The upsweep begins four inches forward of the end of the stick and removes all except the top 1/16 of the stick at the tail. That angle is often called decalage though I understand that the word is supposed to be used only for the angular difference between the wings of a biplane. Sometimes the stabilizer is set parallel to the fuselage and the wing is given a positive angle rather than the set up used here. Note that the stick has a double thickness under the wing. This is to resist the twisting forces of the wound rubber. A tightly wound rubber will twist the thin stick which in turn will twist the wing, causing erratic flight. So glue a second thickness of wood to the stick at the wing location. The piece can be tapered fore and aft to streamline the stick.
For this joint, and the wing and tail frames, white-type glues are recommended. Aliphatic ones such as Titebond are excellent. They soak in well, are very tough, and don't shrink upon drying. Thus they are not likely to warp surfaces. They are slower to dry than the plastic types such as Ambroid, Testors, or Duco, but are worth the extra bother.
Form the rear hook of steel piano wire and glue and lash it to the stick. The landing gear unit from the Star Flyer can also be glued and lashed to the stick as shown. It could be left off and the model flown R.O.G.
All wing and tail surfaces are assembled from 1/16 x 1/8 strip balsa. Three 3-foot lengths will be enough. Place the plan on a piece of insulation board such as Cellotex or soft wood. Cover the plan with wax paper or plastic so excess glue will not stick the pieces to the plan. Pieces of wood are held in place by placing pins along the sides. Remember to use nonshrinking glues for these parts. Coat edge joints with glue and allow the glue to soak into the wood pores for a minute or two before applying a second coat and joining the parts. Try to make joints fit well; don't leave gaps that can be filled by adding coats of glue. Allow glue to dry between coats.
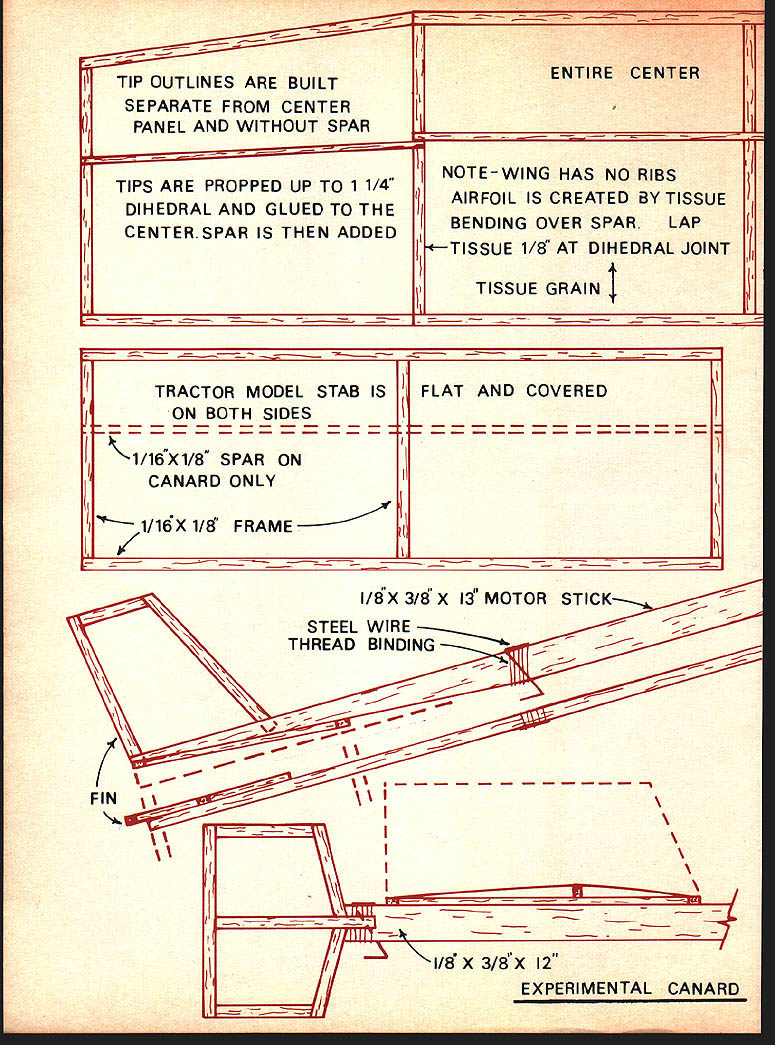
Note — wing tips are built separately from the center panel as illustrated in the photo sequence. Tip spars are not put in place until after tip outlines have been joined to the center panel. Allow frames to remain pinned flat until the glue is thoroughly dry, such as overnight. Edges of the tips... TIP OUTLINES ARE BUILT SEPARATE FROM CENTER PANEL AND WITHOUT SPAR
ENTIRE CENTER
TIPS ARE PROPPED UP TO 1 1/4" DIHEDRAL AND GLUED TO THE CENTER. SPAR IS THEN ADDED
NOTE — WING HAS NO RIBS. AIRFOIL IS CREATED BY TISSUE BENDING OVER SPAR. LAP TISSUE 1/8" AT DIHEDRAL JOINT
TISSUE GRAIN
TRACTOR MODEL STAB IS ON BOTH SIDES
FLAT AND COVERED
1/16" X 1/8" SPAR ON CANARD ONLY
1/16" X 1/8" FRAME
1/8" X 3/8" X 13" MOTOR STICK
STEEL WIRE THREAD BINDING
FIN
1/8" X 3/8" X 12"
EXPERIMENTAL CANARD PANEL IS FLAT
1/16" X 1/8" SET ON EDGE
TIPS ARE RAISED 1 1/4" FOR DIHEDRAL
NOTE - RIGHT SIDE IS LONGER THAN LEFT
ALL SURFACE OUTLINES ARE OF 1/16" X 1/8" MEDIUM BALSA
DO NOT SHRINK TISSUE
MODEL FLIES ON THREE #33 RUBBER BANDS OR A 10 LOOP OF 1/8" FILATI
TIP DIHEDRAL
OPTIONAL BALSA CABIN
NORTH PACIFIC NOSE UNIT #600
TISSUE COVERING
DOUBLER
TRACTOR MODEL
GEAR FROM NORTH PACIFIC MAY BE USED OR BEND FROM 1/32" WIRE
NOTE HIGH STAB ANGLE
1/8" BALSA
1/32" WIRE
1/16" AL TUBE
5"–7" PLASTIC PROP
SIMPLIFIED SPORT MODEL
C. Mather
SAN DIEGO ORBITEERS frames need to be beveled to make a good fit to the center panel. Prop the ends of the tips up on a thread spool and observe the angle at the joint. Sand or cut away the edges to make a tight fit if possible. Practice at this helps but if they don't fit, well, fill up the gap with glue layers as mentioned earlier. Note that the bottom of the fin does not need a cross piece as the fin is glued to the side of the stick.
The original Twiggy's were covered with Japanese tissue and it works well. Any lightweight material could be used. Avoid any tissue that is very porous as this will leak air and decrease performance. The tissue is attached only at the leading and trailing edges of the wing and the outline of the tail. In preparation for covering paint those edges with two coats of clear dope. If you are new to covering begin with the stabilizer. A sharp scissors is needed to cut tissue. A sharp razor blade will also do the job with a straight edge to guide the blade. Cut the tissue a bit larger than the frame and lay in place on the frame. Paint thinner through the tissue from the top. The dope thinner will soften the under coats which will then adhere to the tissue. Rubbing the tissue onto the wood enhances the effect. After a few minutes the excess tissue can be cut or sanded away from the frames. The stabilizer and fin are covered on both sides. The tissue at the bottom of the fin is left loose.
Repeat the procedure with the underside of the wing, beginning with the center panel. The top airfoil is produced by the tissue bending over the spar. Cut the tissue with the grain running crosswise on the top of the wing.
Twiggy
the wing as this will form a better looking airfoil. Allow the tissue to overlap 1/8 in. or so at the dihedral joint. Attach the tissue to the leading edges first, then pull fairly tight and attach to the trailing edge. The tissue is left free at the ends of the tips. The tissue on Twiggy is not water shrunk or doped.
Scrape or sand the tissue from the frames where the stick-frames joints will form. That will allow the glue to make stronger joints. Attach the wing first, then hold the stabilizer in place and observe whether or not it is parallel to the wing. If so, glue in place. If not, sand away a new angle in the underside of the stick until it is parallel. Go at this carefully as only a small amount will need to be removed. The fin is glued to the side of the stick.
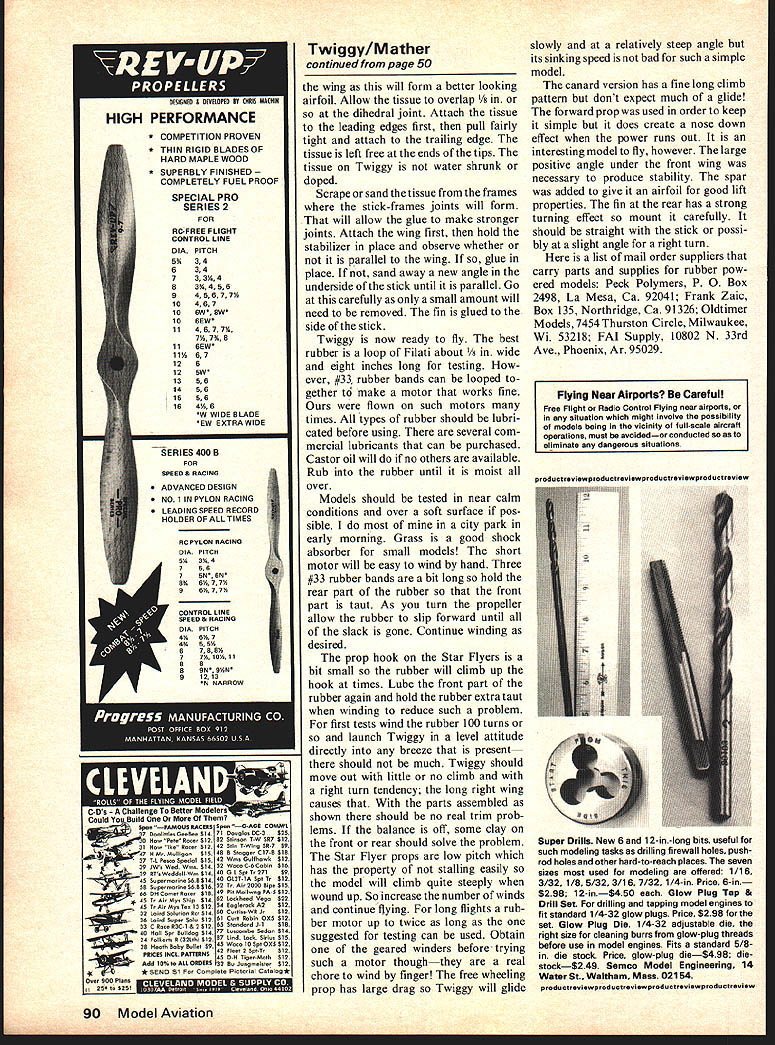
Twiggy is now ready to fly. The best rubber is a loop of Filati about 1/8 in. wide and eight inches long for testing. However, #33 rubber bands can be looped together to make a motor that works fine. Ours were flown on such motors many times. All types of rubber should be lubricated before using. There are several commercial lubricants that can be purchased. Castor oil will do if no others are available. Rub into the rubber until it is moist all over.
Models should be tested in near calm conditions and over a soft surface if possible. I do most of mine in a city park in early morning. Grass is a good shock absorber for small models! The short motor will be easy to wind by hand. Three #33 rubber bands are a bit long so hold the rear part of the rubber so that the front part is taut. As you turn the propeller allow the rubber to slip forward until all of the slack is gone. Continue winding as desired.
The prop hook on the Star Flyers is a bit small so the rubber will climb up the hook at times. Lube the front part of the rubber again and hold the rubber extra taut when winding to reduce such a problem. For first tests wind the rubber 100 turns or so and launch Twiggy in a level attitude directly into any breeze that is present; there should not be much. Twiggy should have about a foot or two of climb and with a right turn tendency; the long right wing causes that. With the parts assembled as shown there should be no real trim problems. If the balance is off, some clay on the front or rear should solve the problem. The Star Flyer props are low pitch which has the property of not stalling easily so the model will climb quite steeply when wound up. So increase the number of winds and continue flying. For long flights a rubber motor up to twice as long as the one suggested for testing can be used. Obtain one of the geared winders before trying such a motor though—they are a real chore to wind by finger! The free wheeling prop has large drag so Twiggy will glide slowly and at a relatively steep angle but its sinking speed is not bad for such a simple model.
The canard version has a fine long climb pattern but don't expect much of a glide! The forward prop was used in order to keep it simple but it does create a nose down effect when the power runs out. It is an interesting model to fly, however. The large positive angle under the front wing was necessary to produce stability. The spar was added to give it an airfoil for good lift properties. The fin at the rear has a strong turning effect so mount it carefully. It should be straight with the stick or possibly at a slight angle for a right turn.
Here is a list of mail order suppliers that carry parts and supplies for rubber powered models: Peck Polymers, P.O. Box 2498, La Mesa, CA, 92041; Frank Zaic, Box 135, Northridge, CA, 91326; Oldtimer Models, 7454 Thurston Circle, Milwaukee, WI, 53218; FAI Supply, 10802 N. 33rd Ave., Phoenix, AZ, 85029.
Transcribed from original scans by AI. Minor OCR errors may remain.

