
Two Trainers for Tenderfeet
Larry Kruse
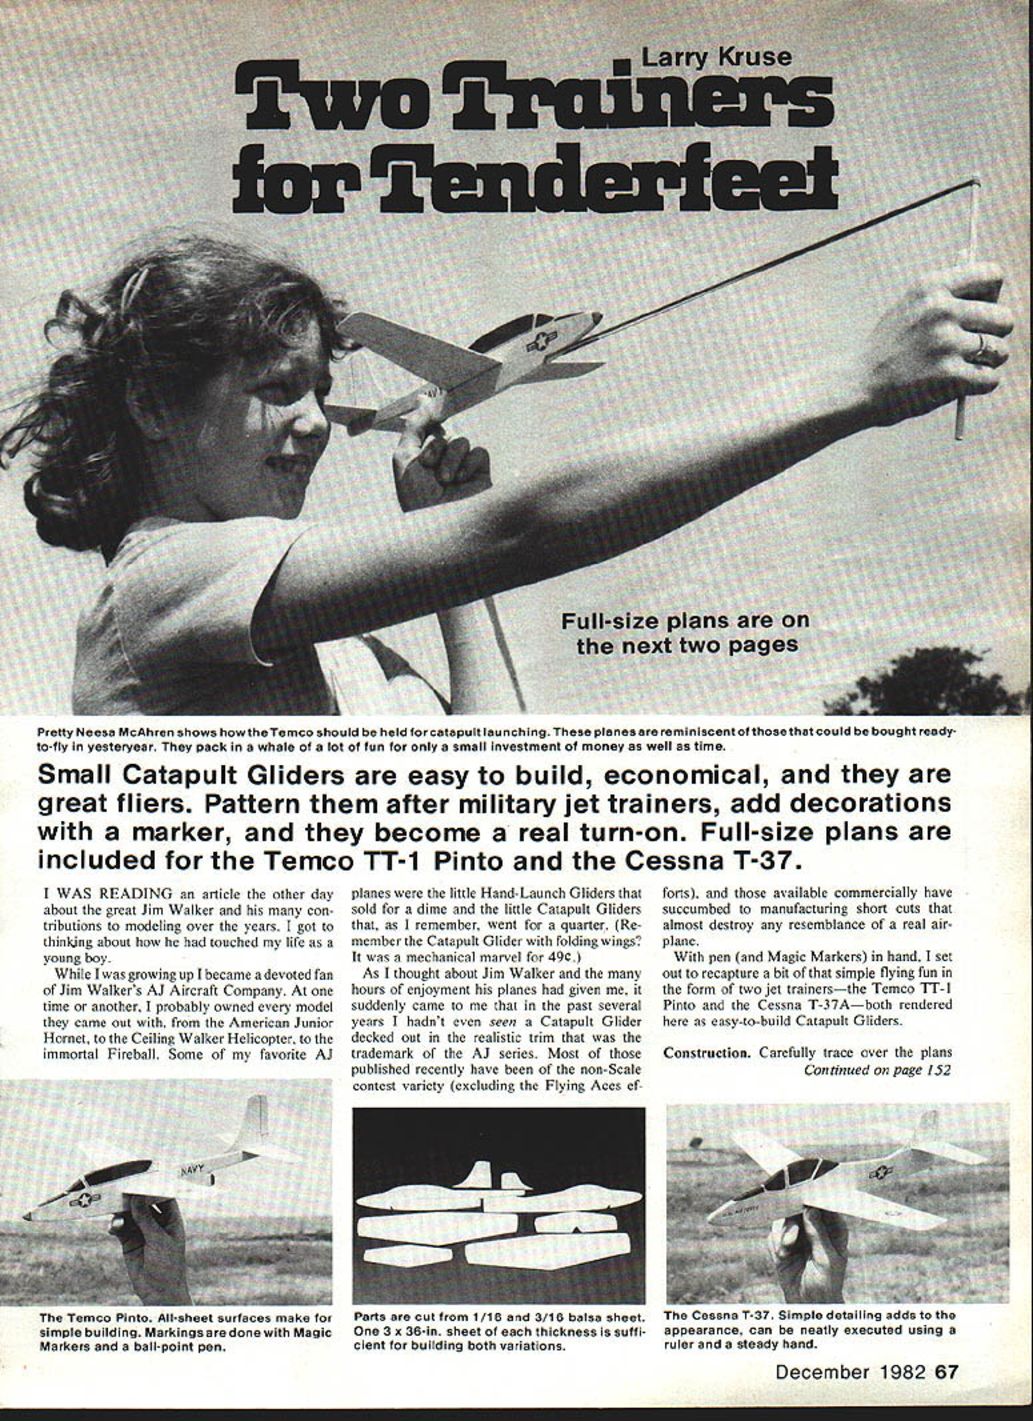
Small Catapult Gliders are easy to build, economical, and great fliers. Pattern them after military jet trainers, add decorations with a marker, and they become a real turn-on. Full-size plans are included for the Temco TT-1 Pinto and the Cessna T-37.
I was reading an article the other day about the great Jim Walker and his many contributions to modeling over the years. I got to thinking about how he had touched my life as a young boy.
While I was growing up I became a devoted fan of Jim Walker's AJ Aircraft Company. At one time or another I probably owned every model they came out with, from the American Junior Hornet to the Ceiling Walker Helicopter to the immortal Fireball. Some of my favorite AJ planes were the little Hand-Launch Gliders that sold for a dime and the little Catapult Gliders that, as I remember, went for a quarter. (Remember the Catapult Glider with folding wings?) It was a mechanical marvel for 49¢.
As I thought about Jim Walker and the many hours of enjoyment his planes had given me, it suddenly came to me that in the past several years I hadn't even seen a Catapult Glider decked out in the realistic trim that was the trademark of the AJ series. Most of those published recently have been of the non-scale contest variety (excluding the efforts of Flying Aces), and those available commercially have succumbed to manufacturing shortcuts that almost destroy any resemblance to a real airplane.
With pen (and Magic Markers) in hand, I set out to recapture a bit of that simple flying fun in the form of two jet trainers—the Temco TT-1 Pinto and the Cessna T-37A—both rendered here as easy-to-build Catapult Gliders.
Construction
Carefully trace over the plans using carbon paper with lightweight poster board underneath. After tracing, cut out the poster-board templates and transfer the shapes to 1/16" sheet balsa for the wings and tail surfaces and to 3/16" balsa for the fuselages.
- Cut the fuselages as square as possible (90°) so the stabilizer mounting areas are not slotted when you glue the stabilizers to the main bodies.
- Cut the wing slots at 90° to the flat sides of each fuselage.
- Sand all surfaces lightly and round off the leading and trailing edges of the wings and tail surfaces. Round off the edges of the fuselages except where the stabilizer is to be mounted.
All markings on the original plans were done by outlining first with a ball-point pen, then filling in colored areas with a felt-tip pen or fine-line Magic Marker. Paint neatly, and don't apply too much pressure to the felt-tip pens or they will bleed the boundaries of the markings through capillary action.
Assemble the planes with Jet, Hot Stuff, Zap, or an equivalent cyanoacrylate glue. Block each wing tip up 1" above the building board, and glue the wings together before inserting them into the wing slot on the fuselage. When the wings are square with the fuselage (equal dihedral on both sides), glue the stabilizers in place, then add the rudders.
Flying
Balance both planes as shown on the plans by adding clay to the nose area. Alternatively, drill a small hole in the bottom of the nose, press lead shot into the hole, and glue it in place when the proper balance point is reached.
Test-glide the planes outdoors in a grass field. Add or subtract clay until they show no tendency to stall or dive when tossed from about shoulder height. Test flights are best accomplished by holding the nose level or slightly down and aiming at a spot on the ground about 25 to 30 feet away. A moderately smooth toss from shoulder height should cause the plane to maintain a level attitude and gradually sink to the ground, coming to rest on its belly (not its nose or tail).
Power for the jets is one 9" loop of 1/8" rubber anchored to a 3/16" dowel cut about 6–7" long. Catapult launches should be gentle at first: pull the rubber back about twice its original length and let go of the plane at a slight bank either to the right or left. The plane should gain altitude in the bank, level off, and then glide downwind to a gentle landing.
As early catapult launches appear safe, you may pull the rubber further back for more power. The further you pull it back, the higher and longer the flight. Be careful not to launch the model when anyone is in or near the expected flight path.
I hope you enjoy these two little ships. They carry a heritage of many pleasurable hours spent many years ago in the company of Jim Walker's progeny.
Transcribed from original scans by AI. Minor OCR errors may remain.

