
Uncle Harry's Way
George M. Myers
Part of the pleasure in model aviation comes from sharing pictures of your models. The better the picture, the greater the pleasure. From a magazine's viewpoint, good photographs draw the reader's attention to the words.
Airplanes are difficult to photograph because they usually have slender shapes that stick out in all directions and many small details that the reader wants to see. Getting the details into the photograph is your job.
PERSPECTIVE AND COMPOSITION
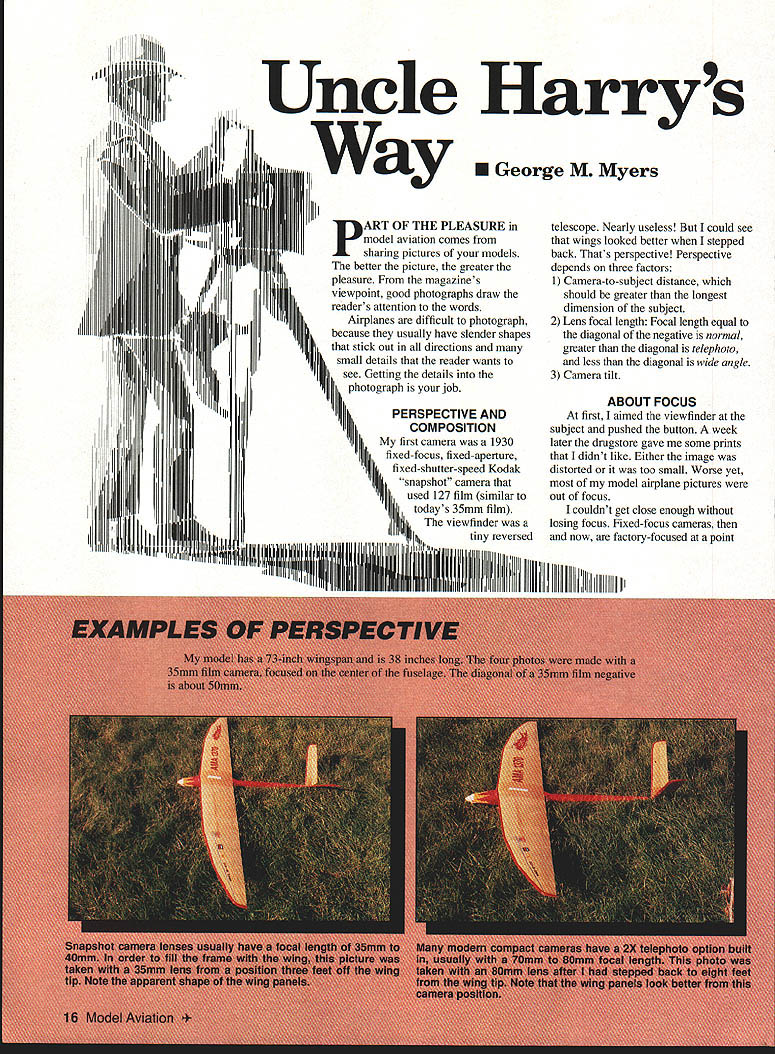
My first camera (a 1930 fixed‑focus, fixed‑aperture, fixed‑shutter‑speed Kodak snapshot using 127 film) had a tiny, nearly useless viewfinder. I learned that wings looked better when I stepped back. That's perspective.
Perspective depends on three factors:
- Camera‑to‑subject distance — this should be greater than the longest dimension of the subject.
- Lens focal length — a focal length equal to the diagonal of the negative is normal; greater than the diagonal is telephoto; less than the diagonal is wide angle.
- Camera tilt.
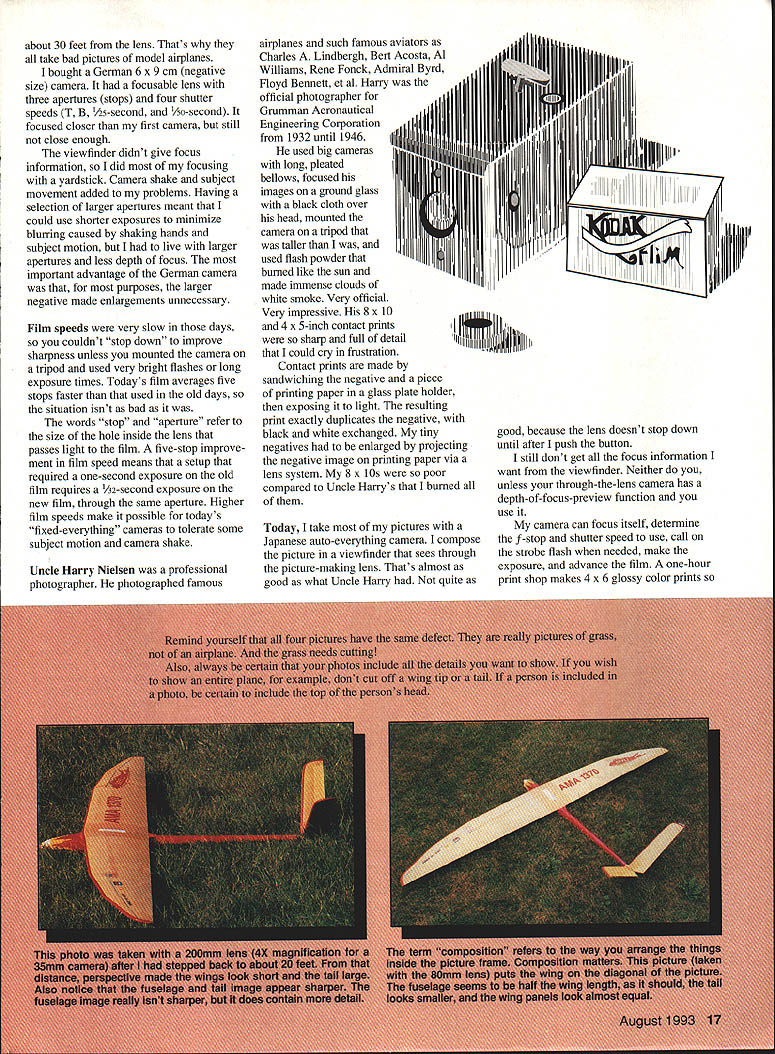
Move around to get a good perspective. Select or zoom the lens to frame the image, turn on the camera (and strobe flash if necessary), and then push the button. If you include a person, be certain to include the top of the head. If you show an entire plane, don't cut off a wing tip or tail. And check the background—grass that dominates the foreground will make the picture look like a picture of grass, not a plane.
ABOUT FOCUS
Fixed‑focus cameras are typically factory‑focused at about 30 feet, which is too far for close subjects like model airplanes. I bought a German 6 × 9 cm camera with a focusable lens, several apertures, and several shutter speeds. It focused closer and its larger negatives usually made enlargements unnecessary. But the viewfinder still offered no focus information, so I focused with a yardstick. Camera shake and subject motion required larger apertures (shorter exposures), but larger apertures reduce depth of focus.
Film speeds were very slow in those days; you couldn't stop down to improve sharpness unless you used a tripod and long exposures or very bright flash. Modern films are several stops faster, so today's fixed‑everything cameras tolerate some subject motion and camera shake.
Uncle Harry Nielsen, a professional photographer, photographed famous airplanes and aviators (Charles Lindbergh, Bert Acosta, Al Williams, René Fonck, Admiral Byrd, Floyd Bennett, etc.). He used large plate cameras, focused on ground glass under a dark cloth, mounted the camera on a tall tripod, and used flash powder that burned like the sun. His 8 × 10 and 4 × 5 contact prints were incredibly sharp and full of detail.
Contact prints are made by sandwiching the negative and printing paper in a glass plate holder and exposing them to light; the print exactly duplicates the negative. Small negatives must be enlarged optically, which loses detail compared with contact prints from large negatives.
Today I use a Japanese auto‑everything through‑the‑lens (TTL) camera. The viewfinder sees through the picture‑making lens, which helps with composition. But unless your camera has a depth‑of‑field preview, the viewfinder still won't show depth of focus. Automatic cameras can produce good average photos and are helpful when working fast, but they don't teach you how to make better‑than‑average photographs.
Current kit I use:
- Minolta 7000 camera with TTL viewfinder
- Minolta 28–80mm f/4 zoom/macro lens (general use)
- Minolta 70–210mm f/4 zoom/macro lens (special pictures)
- Sakar 28 automatic TTL‑sensing flash
- Kodak Gold 400 color print 35mm film (12‑exposure rolls)
This is the drill:
- Move around to get a good perspective.
- Select and/or zoom the lens to frame the image.
- Turn on the camera (and strobe flash, if necessary).
- Push the button.
EXAMPLES OF PERSPECTIVE AND DEPTH OF FIELD
A few practical points:
- The smallest object that you can photograph with a non‑macro lens is roughly the size of the lens aperture.
- Enlarging a negative does not add any detail.
If you want big, sharp pictures, start with a big film, a small aperture (Ansel Adams used f/64), an image that uses the entire negative area, and lots of light. Optical physics hasn't changed.
Example with a 50mm lens:
- A 50mm lens marked f/2 has a maximum aperture diameter of 50 ÷ 2 = 25 mm (≈ 1 inch). Wide open at f/2, nothing smaller than about 1 inch in diameter far from the plane of focus will be recorded as a dot on the film.
- If the same lens stops down to f/16, the aperture diameter is 50 ÷ 16 ≈ 3.125 mm (≈ 1/8 inch). At f/16 you can resolve much smaller details at infinity focus.
Most rivet heads are larger than 1/8 inch, so you will need about f/16 (on that particular lens) to render rivets as small points.
TWO THOUGHTS FOR GOOD PHOTOGRAPHS
- The smallest object you can see in the viewfinder and photograph with a non‑macro lens is about the size of the lens aperture.
- Enlarging a negative doesn't add any detail.
Keep those ideas in mind. If you want detail, start with a large negative (or sensor), use a small aperture, and ensure the subject uses as much of the negative area as possible.
DO IT UNCLE HARRY'S WAY!
Depth of focus (depth of field) can be estimated with this rule of thumb and mnemonic:
Focus on IDA
F = I × D / A
where
- F = depth of focus measured toward the camera from the point of focus (near side)
- I = smallest image dimension you want to see on the film/negative
- D = distance from camera to subject
- A = aperture diameter
All dimensions must use the same units.
Example: Stand at the wing tip, focus on the fuselage 30 feet (360 inches) away, and you want to see 1/8‑inch rivets (I = 1/8 inch = 0.125"). If the aperture diameter A = 1" (about f/2 on a 50mm lens), then F = 0.125 × 360 ÷ 1 = 45 inches. So rivets will appear as small points out to about 45 inches from the fuselage.
If you stop down to f/16 on the same lens, the aperture diameter becomes about 1/8 inch, and F ≈ 0.125 × 360 ÷ 0.125 ≈ 360 inches (30 feet), so you can see rivets across the whole wing tip to tip.
When you want the sharpest picture of a big airplane, focus at infinity, step back until you like the perspective, then stop down until you have enough depth of field to show the smallest details you care about, and calculate the exposure time needed (or let the camera choose it in aperture‑priority).
General practical advice:
- In many cases, focus on the near side of the fuselage because that's where most important details are.
- If you must work quickly, learn to visualize the finished photo and the lens/aperture needed before you press the shutter.
- If possible, step back until the camera is at least about 1.5 wingspans from the model to get sufficient depth of field; then use a zoom lens to fill the frame.
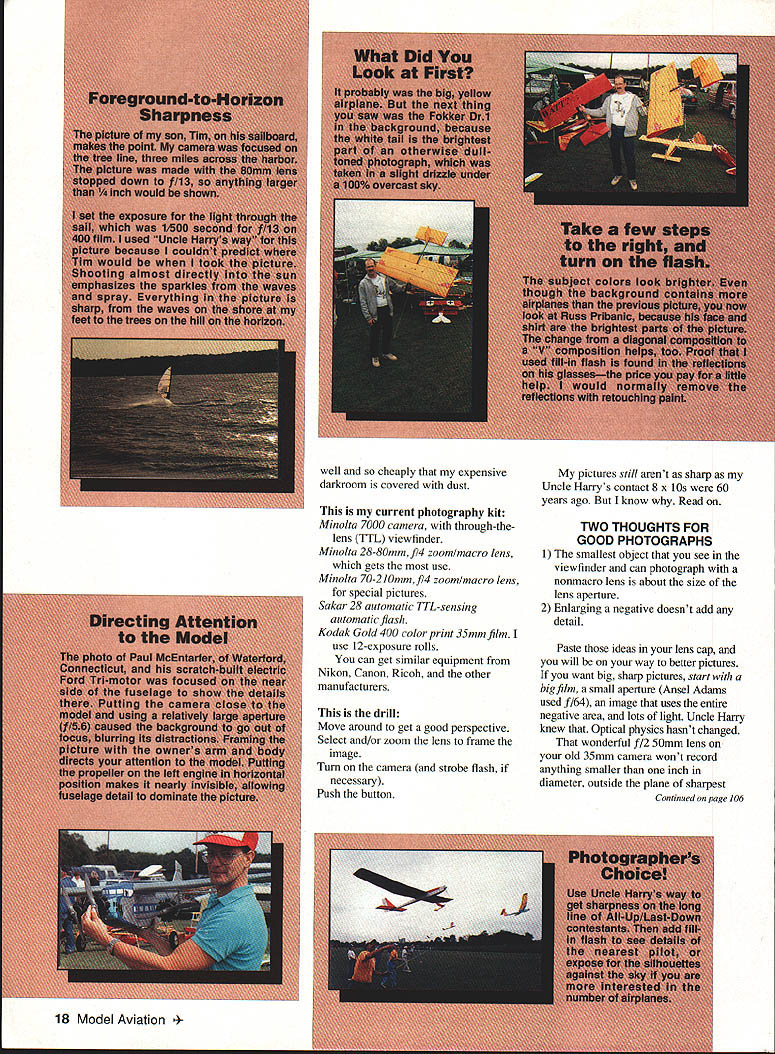
EXPOSURE AND FILL‑IN FLASH
Exposure makes or breaks the photograph. If a scene is half sky, you must decide what is important: expose for the clouds or the airplane, but you cannot expose correctly for both in many cases. The best compromise is when the sun lights the subject's face and you point the camera toward the part of the sky 90° to the shadows.
If you are close and have auxiliary flash, use fill‑in flash to light the subject to match the sky. Many automatic cameras have a "backlight" setting that is a simple alternative to fill‑in flash. Read your camera's manual and try the technique—then compare results: an Uncle Harry‑style picture will usually have a more pleasing background, foreground, and overall sharpness.
HOW ABOUT VIDEO?
Most of the above applies to video, but the principal limiting factor for video sharpness is the number of pixels (picture elements) in the TV screen, not just lens aperture. U.S. TV channels are bandwidth limited (six MHz per channel, only about 4.5 MHz usable for picture), which limits resolution.
- Old black‑and‑white TV could show about 330 vertical lines across the picture.
- Compatible color TV was squeezed into less bandwidth and typically shows about 220 vertical lines.
- Hi‑band 8mm camcorders can approach ~330 vertical lines on an S‑video TV.
- HDTV (when available) displays roughly 400 vertical lines.
An ordinary 35mm film image can show about 1,440 lines across the picture (horizontally), implying roughly 5.5 million colored dots. When enlarged to an 8 × 10 print from a 35mm negative, you discard part of the negative and end up with fewer dots—perhaps about 2.7 million. An 8 × 10 contact print from a large negative may contain on the order of hundreds of millions of dots, which is why large‑format contact prints show vastly more detail.
HOW ABOUT COMPUTER GRAPHICS?
Computer displays are limited by pixels, like TV screens.
- VGA (640 × 480 = 307,200 pixels) can theoretically show about 320 vertical lines and contains ~22% of the detail of a 35mm negative.
- SVGA (1,024 × 768 = 786,432 pixels) can theoretically show about 512 vertical lines and contains ~36% of a 35mm negative's detail.
Knowing the limitations of your display or reproduction system helps you make better choices about how large and how detailed your original should be.
Note: The average picture printed in this magazine measures about 2.5 × 4.5 inches and contains about 180,000 dots — roughly 3% of the detail in a 35mm negative. Printing uses a screened process that discards detail, so send big, high‑contrast, sharp images if you want good reproduction.
SUMMARY
Your negative (slide, print, videotape, or computer file) has finite ability to show detail. Define the limits and then put as many pixels or dots of meaningful detail into the subject as possible. Evaluation of photographs is subjective; don't be discouraged if people ignore your photos. Good captions help readers understand and appreciate the picture.
Nobody can tell you how to make a great picture, but you can learn the tools and techniques that produce the best possible results from the equipment you have. Keep the best pictures and scrap the rest.
Transcribed from original scans by AI. Minor OCR errors may remain.

